Tabla de contenido
Publicidad
Idiomas disponibles
Idiomas disponibles
Enlaces rápidos
Publicidad
Capítulos
Tabla de contenido

Manuales relacionados para Bresser Tuya Smart


Resumen de contenidos para Bresser Tuya Smart
- Página 1 Tuya Smart Thermo-/Hygrometer Art. No. 7006300 BEDIENUNGSANLEITUNG INSTRUCTION MANUAL MODE D'EMPLOI HANDLEIDING MANUAL DE INSTRUCCIONES *Smart phone not included/*Smartphone nicht enthalten/* Smartphone non inclus/* Smartphone niet inbegrepen/* Smartphone no incluido...
- Página 2 Web al seguente link (codice QR Code) per conoscere le versioni disponibili. Посетите наш сайт, отсканировав QR-код, или перейдите ссылке, чтобы больше узнать об этом товаре или скачать руководство по эксплуатации на другом языке. www.bresser.de/P7006300 GARANTIE · WARRANTY · GARANTÍA · GARANZIA · ГАРАНТИЯ www.bresser.de/warranty_terms...
- Página 3 DOWNLOAD: https://smartapp.tuya.com/smartlife Smart Life for Android /IPhone Apple and the Apple logo are trademarks of Apple Inc., registered in the U.S. and other countries. App Store is a service mark of Apple Inc., registered in the U.S. and other countries. Google Play and the Google Play logo are trademarks of Google Inc.
-
Página 4: Tabla De Contenido
INHALTSVERZEICHNIS ZU DIESER ANLEITUNG . . . . . . . . . . . . . . . . . . . . . . . . . . . . . . . . . . . . . . . . . 5 ALLGEMEINE SICHERHEITSHINWEISE . -
Página 5: Zu Dieser Anleitung
ße Handhabung können Kurzschlüsse, Brände und legter Batterien übernimmt der Hersteller keine sogar Explosionen ausgelöst werden! Haftung! EINLEITUNG Vielen Dank, dass Sie sich für den Tuya Smart Tuya-kompatible Geräte entsprechend der Thermo-/Hygrometer entschieden haben . Die spezifischen Bedingung(en) zu steuern. Basisstation hat ein eingebautes WIFI/W-... -
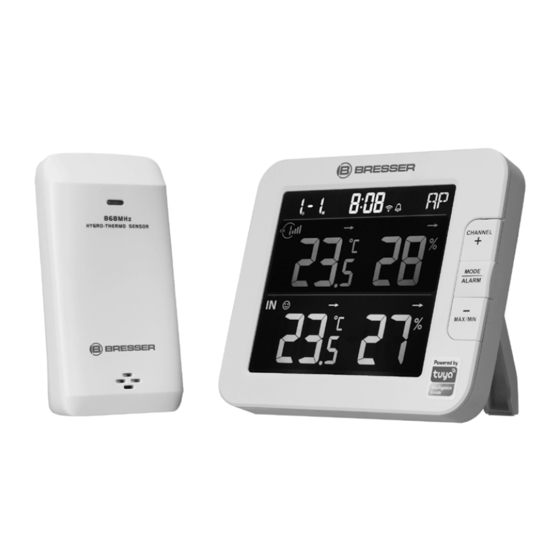
Página 6: Übersicht
ÜBERSICHT BASISSTATION 1 . [ ALARM / SNOOZE ]-Taste 9 . Standfuß 2 . LCD-DISPLAY 10 . Batteriefachabdeckung 3 . [ CHANNEL / + ]-Taste 11 . Wandhalterung 4 . [ MODE / ALARM ]-Taste 12 . [ °C / °F ]-Taste 5 . -
Página 7: Drahtloser Thermo-Hygro Sensor
DRAHTLOSER THERMO-HYGRO SENSOR 1 . LED-Anzeige 2 . Wandhalterung 3 . Kanalschiebeschalter 4 . [ RESET ]-Taste 5 . Batteriefach INSTALLATION UND EINRICHTUNG DRAHTLOSEN THERMO-HYGRO SENSOR INSTALLIEREN 1 . Entfernen Sie die Batteriefachabdeckung des Sensors . 2 . Stellen Sie mit dem Kanalschiebeschalter die Kanalnummer für den Sensor ein (z . -
Página 8: Einrichten Der Basisstation
PLATZIERUNG DES DRAHTLOSEN THERMO-HYGRO SENSORS Platzieren Sie eine Schraube an der Wand, an der Sie den Sensor aufhängen möchten . Hängen Sie den Sensor mit Hilfe des Wandhalters an die Schraube an . Sie können den Sensor auch alleine auf einen Tisch stellen . EINRICHTEN DER BASISSTATION BACKUP-BATTERIE EINSETZEN Die Backup-Batterie versorgt die Basisstation mit Strom, um Uhrzeit und Datum, Max/Min-... -
Página 9: Zusätzliche(R) Funksensor(En) (Optional)
HINWEIS: Wenn beim Einschalten der Basisstation keine Anzeige erscheint . Sie können die Taste [ RESET ] mit einem spitzen Gegenstand drücken . Wenn dieser Vorgang immer noch nicht funktioniert, können Sie die Backup-Batterie und das Netzteil entfernen und dann wieder einstecken, um die Basisstation erneut einzuschalten . -
Página 10: Smart Life App
SMART LIFE APP KONTO-REGISTRIERUNG Die Basisstation arbeitet mit der Smart Life App für Android- und iOS-Smartphones . 1 . Scannen Sie den QR-Code, um zur Smart Life Download-Seite zu gelangen, oder gehen Sie auf: https://smartapp .tuya .com/smartlife 2 . Alternativ können Sie Smart Life auch direkt aus dem Google Play oder Apple App Store herunter . - Página 11 Schritt 1: Schritt 2: Schritt 3 Tippen Sie auf dem Startbildschirm Wählen Sie auf dem Bildschirm "Manuell Stellen Sie sicher, dass Sie das dann auf in der oberen rechten Ecke, hinzufügen" in der linken Menüleiste 2 .4G-Netzwerk auswählen und geben Sie um Ihre Basisstation hinzuzufügen .
-
Página 12: Gerätebildschirm-Übersicht
3 . Die Basisstation verlässt automatisch den AP-Modus und kehrt zum normalen Betrieb zurück, sobald sie mit dem W-LAN-Router verbunden ist . HINWEIS: - Die intelligente Wetterstation kann sich nur mit 2 .4G WI-FI (W-LAN) Netzwerk verbinden - Aktivieren Sie die Standortinformationen in Ihrem Mobiltelefon, wenn Sie Ihre Basisstation zur App hinzufügen . -
Página 13: Alarmbenachrichtigung Einstellen
ALARMBENACHRICHTIGUNG EINSTELLEN Sie können den Hoch-/Niedrigalarm für Temperatur und Luftfeuchtigkeit einstellen . Schritt 1: Schritt 2: Schritt 3 Tippen Sie unten auf dem Tippen Sie auf den "Temperaturalarm" Tippen Sie auf "INDOOR(INNEN)" "Gerätebildschirm" auf "Einstellung" . oder "Luftfeuchtigkeitsalarm" . oder "CH 1 ~ 7 (KANAL 1-7) " . Schritt 4: Stellen Sie die Auslösewerte Hoch / Niedrig ein und schieben Sie den... -
Página 14: Iot-Anwendungen
IOT-ANWENDUNGEN Über die Smart Life App können Sie die Auslösebedingungen für Temperatur und Luftfeuchtigkeit erstellen, um andere Smart Life kompatible Geräte automatisch zu steuern . Schritt 1: Schritt 2: Schritt 3 Tippen Sie auf dem Startbildschirm auf Tippen Sie auf das Symbol " "... -
Página 15: Firmware-Aktualisierung
FIRMWARE-AKTUALISIERUNG Die Basisstation kann über Ihr W-LAN-Netzwerk aktualisiert werden . Wenn eine neue Firmware verfügbar ist, wird eine Benachrichtigung oder eine Pop-up-Meldung auf Ihrem Mobiltelefon angezeigt, wenn Sie die App öffnen. Folgen Sie den Anweisungen in der App, um das Update durchzuführen . -
Página 16: Weckzeiteinstellung
WECKZEITEINSTELLUNG 1 . Halten Sie im Normalmodus die Taste [ MODE / ALARM ] 2 Sekunden lang gedrückt, bis die Alarmstundenziffer blinkt, um in den Alarmzeiteinstellmodus zu gelangen. 2 . Drücken Sie die [ + ]-Taste oder [ - ]-Taste, um den Wert zu ändern . Für eine Schnellverstellung die Taste gedrückt halten . -
Página 17: Ansicht Der Anderen Kanäle (Optionale Funktion Mit Zusätzlichen Sensoren)
ANSICHT DER ANDEREN KANÄLE (OPTIONALE FUNKTION MIT ZUSÄTZLICHEN SENSOREN) Diese Basisstation ist in der Lage, sich mit 7 Funksensoren zu verbinden . Wenn Sie über 2 oder mehr Sensoren verfügen, können Sie die [ CHANNEL ] -Taste drücken, um zwischen verschiedenen drahtlosen Kanälen im Normalmodus zu wechseln, oder die [ CHANNEL ]-Taste 2 Sekunden gedrückt halten, um in den automatischen Zyklusmodus zu wechseln, um die angeschlossenen Kanäle im 4-Sekunden-Intervall abwechselnd anzuzeigen . -
Página 18: Kalibrierung
MAX/MIN-AUFZEICHNUNGEN LÖSCHEN Halten Sie die Taste [ MAX / MIN ] 2 Sekunden lang gedrückt, um die aktuell auf dem Bildschirm angezeigten MAX- oder MIN-Aufzeichnungen zurückzusetzen . HINWEIS: Das LCD zeigt auch das „ „ / „ „ Symbol an, wenn die Aufzeichnung(en) angezeigt werden . -
Página 19: Fehlerbehebung
FEHLERBEHEBUNG Problem Lösung Der Innenraum- 1 . Stellen Sie sicher, dass sich der Sensor innerhalb des Übertragungsbereichs befindet. Funksensor ist 2 . Stellen Sie sicher, dass der angezeigte Kanal mit der unterbrochen oder Kanalauswahl am Sensor übereinstimmt . hat keine Verbindung . 3 . -
Página 20: Drahtloser Thermo-Hygro Sensor
802 .11 b/g/n Betriebsfrequenz 2 .4GHz Unterstützter Router- WPA/WPA2, Offen, WEP (WEP unterstützt nur hexadezimales Sicherheitstyp Passwort) App Merkmale - Tuya smart App-Unterstützung - Smart Life Android Smartphone Unterstützte Plattform der App iPhone DRAHTLOSER THERMO-HYGRO SENSOR Maße (B x H x T) -
Página 21: Reingung Und Wartung
Schadstoffes bezeichnet, „Cd“ steht für Cadmium, „Hg“ steht für Quecksilber und „Pb“ steht für Blei . EG-KONFORMITÄTSERKLÄRUNG Hiermit erklärt Bresser GmbH, dass der Funkanlagentyp mit Artikelnummer: 7006300 der Richtlinie 2014/53/EU entspricht . Der vollständige Text der EU-Konformitätserklärung ist unter der folgenden Internetadresse verfügbar: www .bresser .de/download/7006300/CE/7006300_CE .pdf GARANTIE &... - Página 22 TABLE OF CONTENTS ABOUT THIS INSTRUCTION MANUAL . . . . . . . . . . . . . . . . . . . . . . . . . . . . . . . . 23 GENERAL WARNINGS .
-
Página 23: About This Instruction Manual
The manufacturer is not liable for damage relat- them into a fire. Excessive heat or improper ed to improperly installed batteries! INTRODUCTION Thank you for selecting the Tuya Smart compatible device(s) according to the specific Thermo-/Hygrometer . The console has a WIFI condition(s) . -
Página 24: Overview
OVERVIEW CONSOLE 1 . [ ALARM/SNOOZE ] key 7 . [ / CAL ] key 13 . [ Refresh ] key 2 . LCD display 8 . [ TIME SET ] key 14 . [ RESET ] key 3 . [ CHANNEL / + ] key 9 . -
Página 25: Wireless Thermo-Hygro Sensor
WIRELESS THERMO-HYGRO SENSOR 1 . LED indicator 2 . Wall mounting holder 3 . Channel slide switch 4 . [ RESET ] key 5 . Battery compartment INSTALLATION AND SETUP INSTALL WIRELESS THERMO-HYGRO SENSOR 1 . Remove the battery door of the sensor . 2 . -
Página 26: Setup The Console
SETUP THE CONSOLE INSTALL THE BACKUP BATTERY Backup battery provides power to the console to retain clock time and date, max/min records and calibration value . Step 1 Step 2 Step 3 Remove the console Insert a new CR2032 Replace the battery door . battery door with coin button cell battery NOTE:... -
Página 27: Additional Wireless Sensor(S) (Optional)
ADDITIONAL WIRELESS SENSOR(S) (OPTIONAL) The console can support up to 7 wireless sensors . 1 . In the new wireless sensor, slide the Channel switch to a new CH number 2 . Press the [ RESET ] key on the new sensor . 3 . - Página 28 Step 2: On "Add Manually" screen, choose Step 3: "Sensors" in the left menu bar and Step 1: Make sure you select the 2 .4G network then select "Temperature and Humidity At the home screen , tap the on the and enter your Wi-Fi password then tap Sensor(Wi-Fi)"...
-
Página 29: Device Screen Overview
3 . The console will automatically exit AP mode and return to normal operation once it's connected to Wi-Fi router . NOTE : - Smart weather station can only connect to 2 .4G WI-FI network - Enable the location information in your mobile when you add your console to App . [ SENSOR / WI-FI ] - User may press and hold for 6 seconds to exit AP mode any time . -
Página 30: Automation With Other Device Using Smart Life
TO SET ALERT NOTIFICATION You can set the temperature and humidity high / low alarm . Step 1: Step 2: Step 3: Tap the "Setting" on the bottom of the Tap the "Temperature Alarm" or Tap the "INDOOR" or "CH 1 ~ 7 " . "device Screen"... -
Página 31: Iot Applications
IOT APPLICATIONS Through the Smart life App, you can create the temperature and humidity trigger conditions to control other Smart Life compatible device(s) automatically . Step 1: Step 2: Step 3: Tap the " Smart" icon on Home Tap the " "... -
Página 32: Firmware Update
FIRMWARE UPDATE The console can be updated through your WI-FI network. If new firmware is available, a notification or pop up message will be shown on your mobile when you open the App. Follow the instruction in the App to do the update . During the update process, the console will show the progress status percentage at the bottom of the screen . -
Página 33: Activating Alarm Function
ACTIVATING ALARM FUNCTION 1 . In normal mode, press [ MODE / ALARM ] key to show the alarm time for 5 seconds . 2 . When the alarm time displays, press [ MODE / ALARM ] key Alarm off Alarm on again to activate the alarm function . -
Página 34: To View Max / Min
TREND INDICATOR The trend indicator shows the temperature or humidity trends of changes based on later 15 minutes . Rising Steady Falling MAX / MIN DATA RECORD The console can record MAX / MIN readings both daily and since last reset . -
Página 35: Set Lcd Display Contrast
SET LCD DISPLAY CONTRAST In normal mode, press [ / CAL ] key to adjust LCD contrast for best viewing on table stand or wall mounted . MAINTENANCE BATTERY REPLACEMENT When low battery indicator “ ” is displayed in CH section of the LCD display, it indicates that the current channel sensor battery power give wireless sensor shown is low respectively . -
Página 36: Wireless Thermo-Hygro Sensor
Operating frequency : 2 .4GHz Supported router security WPA/WPA2, OPEN, WEP (WEP only support Hexadecimal type password) APP Specification - Tuya smart Support App - Smart Life Android smart phone Supported platform of App iPhone WIRELESS THERMO-HYGRO SENSOR Dimensions (W x H x D) 60 x 113 x 39 .5mm (2 .4 x 4 .4 x 1 .6in) -
Página 37: Cleaning And Maintenance
.bresser .de/download/7006300/UKCA/7006300_ UKCA .pdf Bresser UK Ltd. • Suite 3G, Eden House, Enterprise Way, Edenbridge, Kent TN8 6Hf, UK WARRANTY & SERVICE The regular guarantee period is 5 years and begins on the day of purchase . You can consult the... - Página 38 TABLE DES MATIÈRES A PROPOS DE CE MODE D’EMPLOI . . . . . . . . . . . . . . . . . . . . . . . . . . . . . . . . . 39 AVERTISSEMENTS GÉNÉRAUX .
-
Página 39: A Propos De Ce Mode D'emploi
A PROPOS DE CE MODE D’EMPLOI Ce mode d’emploi fait partie intégrante de propriétaire/utilisateur du produit . l’appareil . Veuillez lire les consignes de sécurité et le mode Ce produit est destiné uniquement à un usage privé . Il d’emploi attentivement avant utilisation . a été... -
Página 40: Vue D'ensemble
VUE D'ENSEMBLE BASE 1 . Touche [ ALARM/SNOOZE ] (alarme/répétition 8 . Touche [ TIME SET ] de l’alarme) 9 . Support de table 2 . Ecran LCD 10 . Couvercle du compartiment à piles 3 . Touche [ CHANNEL / + ] (canal / +) 11 . -
Página 41: Capteur Thermo-Hygro Sans Fil
CAPTEUR THERMO-HYGRO SANS FIL 1 . Indicateur LED 2 . Support mural 3 . Interrupteur coulissant de changement de canal 4 . Touche [ RESET ] 5 . Compartiment des piles INSTALLATION ET CONFIGURATION INSTALLATION DU CAPTEUR THERMO-HYGRO SANS FIL 1 . -
Página 42: Installation De La Console
INSTALLATION DE LA CONSOLE INSTALLER LA BATTERIE DE SECOURS La pile de secours permet d’alimenter la console afin de conserver l’heure et la date de l’horloge, les mesures max ./min . et la valeur de calibration . Étape 1 : Étape 2 : Étape 3 : Retirez le couvercle du... -
Página 43: Capteur(S) Sans Fil Supplementaire(S) (Optionnel)
CAPTEUR(S) SANS FIL SUPPLEMENTAIRE(S) (OPTIONNEL) La console peut prendre en charge jusqu’à 7 capteurs sans fil. 1 . Sur le nouveau capteur sans fil, coulissez l’interrupteur de sélection de canal sur un nouveau numéro de canal (CH) . 2 . Appuyez sur la touche [ RESET ] du nouveau capteur . 3 . - Página 44 Étape 1 : Étape 2 : Sur l’écran « Add Manually » (Ajout Étape 3 : Sur l’écran d’accueil , appuyez sur manuel), sélectionnez « Sensors » (Capteurs) Vérifiez que vous avez bien sélectionné le dans le coin supérieur droit pour ajouter dans la barre de menu gauche, puis choisissez réseau 2,4 G, entrez votre mot de passe votre console .
-
Página 45: Présentation De L'écran De L'appareil
3 . La console quittera automatiquement le mode AP et reprendra un fonctionnement normal une fois connectée à un routeur Wi-Fi . REMARQUE : - La station météo intelligente ne peut se connecter qu’à un réseau Wi-Fi 2,4 G . - Activez les informations de localisation sur votre téléphone portable lorsque que vous ajoutez votre console sur l’application . -
Página 46: Pour Régler Une Notification D'alerte
POUR RÉGLER UNE NOTIFICATION D’ALERTE Vous pouvez régler une alerte de température et d’humidité élevées/basses . Étape 1 : Étape 2 : Étape 3 : Appuyez sur « Setting » (Réglage) en Appuyez sur « Temperature Alarm » Appuyez sur « INDOOR » ou « CH 1 bas de l’écran Appareil . -
Página 47: Applications Ido
APPLICATIONS IDO Via l’application Smart Life, vous pouvez définir les conditions de déclenchement selon la température et l’humidité afin de contrôler automatiquement un ou des autres appareils compatibles avec Smart Life . Étape 1 : Étape 2 : Étape 3 : Appuyez sur l’icône «... -
Página 48: Mises À Jour Du Firmware
MISES À JOUR DU FIRMWARE La console peut être mise à jour via votre réseau Wi-Fi. Si un nouveau firmware est disponible, une notification ou un message apparaîtra sur votre téléphone portable lorsque vous ouvrirez l’application . Suivez les consignes dans l’application pour procéder à la mise à jour . Pendant le processus de mise à... -
Página 49: Activation De La Fonction D'alarme
2 . Appuyez sur la touche [ + ] ou [ - ] pour changer la valeur . Maintenez la touche enfoncée pour le réglage rapide . 3 . Réappuyez sur la touche [ MODE / ALARM ] pour passer au réglage des minutes en faisant clignoter le chiffre des minutes. -
Página 50: Fonction Température / Humidité
FONCTION TEMPÉRATURE / HUMIDITÉ - Les relevés de température et d’humidité sont affichés sur la section Channel (canal) et intérieure . - Utilisez la touche [ °C / °F ] pour sélectionner l’unité d’affichage de la température. - Si la température / l’humidité est inférieure à la plage de mesure, l’affichage indique « LO ». Si la température / l’humidité... -
Página 51: Rétro-Éclairage
2 . Appuyez sur la touche [ + ] ou [ - ] pour sélectionner IN ou l’un des canaux . 3 . Appuyez sur la touche [ MODE / ALARM ] pour choisir entre : Température Humidité . 4 . Lorsque la température ou l’humidité clignotent, appuyez sur la touche [ + ] ou [ - ] pour régler la valeur de compensation . -
Página 52: Spécifications
Type de sécurité de routeur WPA/WPA2, OPEN, WEP (WEP ne fonctionne qu’avec un mot pris en charge de passe hexadécimal) Caractéristiques des applications - Tuya smart Applications prises en charge - Smart Life Plateformes prises en charge Smartphone Android pour l’application... -
Página 53: Recyclage
« Cd » = cadmium, « Hg » = mercure, « Pb » = plomb. DÉCLARATION DE CONFORMITÉ CE Le soussigné, Bresser GmbH, déclare que l’équipement radioélectrique du type : 7006300 satisfait à la directive : 2014/53/UE . L’intégralité de la déclaration de conformité UE est disponible à... - Página 54 INHOUDSTAFEL OVER DEZE HANDLEIDING . . . . . . . . . . . . . . . . . . . . . . . . . . . . . . . . . . . . . . 55 ALGEMENE WAARSCHUWINGEN .
-
Página 55: Over Deze Handleiding
. Overmatige hitte of onjuist gebruik kan kortsluiting, verkeerd geplaatste batterijen! INLEIDING Dank u voor het kiezen van de Tuya Smart Dit systeem wordt geleverd met een draadloze Thermo-/Hygrometer . De console heeft een thermo-hygrosensor en kan tot 7 extra sensors ingebouwde wifimodule en is dankzij het ondersteunen (optioneel) . -
Página 56: Overzicht
OVERZICHT CONSOLE 1 . [ ALARM/SNOOZE ] knop 9 . Tafelstandaard 2 . LED-DISPLAY 10 . Batterijklep 3 . [ CHANNEL / + ] knop 11 . Muurbevestigingsgat 4 . [ MODE / ALARM ] knop 12 . [ °C / °F ] knop 5 . -
Página 57: Draadloze Thermo-Hygro-Sensor
DRAADLOZE THERMO-HYGRO-SENSOR 1 . Rode LED indicator 2 . Wandmontagehouder 3 . Kanaal schuifschakelaar 4 . [ RESET ] toets 5 . Batterijcompartiment INSTALLATIE EN OPSTELLING INSTALLEER DE DRAADLOZE THERMO-HYGRO-SENSOR 1 . Verwijder het batterijklepje van de sensor . 2 . Gebruik de kanaalschuifschakelaar om het kanaalnummer voor de sensor in te stellen (bijv . -
Página 58: De Console Instellen
DE CONSOLE INSTELLEN INSTALLEER DE BACK-UPBATTERIJ De back-upbatterij voorziet de console van stroom om de kloktijd en datum, max/min-registraties en kalibratiewaarde te behouden . Stap 1 Stap 2 Stap 3 Verwijder het Plaats een nieuwe Plaats het batterijklepje batterijklepje van de CR2032-knoopcelbatterij terug . -
Página 59: Aanvullende Draadloze Sensor(S) (Optioneel)
3 . De console zal de sensor opnieuw registreren nadat de batterijen zijn vervangen (ongeveer 1 minuut) . AANVULLENDE DRAADLOZE SENSOR(S) (OPTIONEEL) De console kan tot 7 draadloze sensors ondersteunen . 1 . In de nieuwe draadloze sensor, schuif de kanaalschakelaar naar een nieuw kanaalnummer 2 . - Página 60 Stap 1: Stap 2: Stap 3: Op het beginscherm , tik op Op het scherm "Handmatig toevoegen" Zorg ervoor dat u het 2,4G-netwerk rechtsboven om uw console toe te kiest u "Sensors" in de linker menubalk selecteert en voer uw Wi-Fi wachtwoord voegen .
-
Página 61: Apparaat-Schermen Overzicht
3 . De console zal automatisch de AP-modus verlaten en terugkeren naar de normale werking zodra hij verbonden is met de wifirouter. OPMERKING}:<1 - Het weerstation kan alleen verbinding maken met een 2,4G-wifinetwerk - Schakel de locatie-informatie in op uw mobiel wanneer u uw console toevoegt aan app . - Druk op enig moment 6 seconden op [ SENSOR / WI-FI ] om de AP-modus te verlaten . -
Página 62: Waarschuwingsmelding Instellen
WAARSCHUWINGSMELDING INSTELLEN U kunt het temperatuur en vochtigheid hoog/laag alarm instellen . Stap 1: Stap 2: Stap 3: Tik op "Instelling" onderin het Tik op "Temperatuuralarm" of Raak "INDOOR" of "CH 1 ~ 7" aan . "Apparaatscherm" . "Vochtigheidsalarm" . Stap 4: Stel de hoge / lage triggerwaarden in en schuif de schakelaar om het alarm... -
Página 63: Iot-Toepassingen
IOT-TOEPASSINGEN Via de Smart Life-app kunt u de temperatuur en vochtigheid triggervoorwaarden creëren om andere Smart Life compatibele apparaten automatisch te bedienen . Stap 1: Stap 2: Stap 3: Tik op het " Slimme" icoon op het Tik op het " "... -
Página 64: Firmware-Update
FIRMWARE-UPDATE De console kan worden bijgewerkt via uw wifinetwerk. Als er nieuwe firmware beschikbaar is, verschijnt er een melding of pop-upbericht op uw mobiele telefoon wanneer u de app opent . Volg de instructies in de app om de update uit te voeren . Tijdens het updateproces toont de console het voortgangsstatuspercentage onderaan het scherm . -
Página 65: Activeren Van De Alarmfunctie
3 . Druk nogmaals op de knop [ MODE / ALARM ] om de instelwaarde te verhogen naar minuut waarbij het minuut-cijfer knippert . 4 . Druk op de knop [ + ] of [ - ] om de waarde te veranderen . 5 . -
Página 66: Comfortaanduiding
COMFORTAANDUIDING De comfortaanduiding is een picturale aanduiding op basis van de temperatuur en de vochtigheid van de binnenlucht in een poging om het Te koud Comfortabel Te warm comfortniveau te bepalen . OPMERKING: - De comfortaanduiding kan variëren bij dezelfde temperatuur, afhankelijk van de luchtvochtigheid . - Er is geen comfortaanduiding wanneer de temperatuur lager is dan 0°C (32°F) of hoger dan 60°C (140°F) . -
Página 67: Achtergrondverlichting
2 . Druk op de knop [ + ] of [ - ] om IN of een kanaal te kiezen . 3 . Druk op [ MODE / ALARM ] om te kiezen tussen: Temperatuur vochtigheid . 4 . Terwijl de temperatuur of de vochtigheid knippert, drukt u op [ + ] of [ - ] om de offsetwaarde in te stellen . -
Página 68: Draadloze Thermo-Hygro-Sensor
802 .11 b/g/g/n Werkingsfrequentie : 2,4GHz Ondersteund router WPA/WPA2, OPEN, WEP (WEP ondersteunt alleen beveiligingstype hexadecimaal wachtwoord) App-specificatie - Tuya smart Ondersteuning app - Smart Life Ondersteund platform van Android-smartphone iPhone DRAADLOZE THERMO-HYGRO-SENSOR Afmetingen (B x H x D) 60 x 113 x 39,5 mm... -
Página 69: Verwijdering
.bresser .de/ download/7006300/CE/7006300_CE .pdf GARANTIE & SERVICE De reguliere garantieperiode is 5 jaar en gaat in op de dag van aankoop . U kunt de volledige garantievoorwaarden en details van onze diensten raadplegen op www .bresser .de/warranty_ terms . - Página 70 ÍNDICE DE CONTENIDOS SOBRE ESTE MANUAL DE INSTRUCCIONES . . . . . . . . . . . . . . . . . . . . . . . . . . . . 71 ADVERTENCIAS GENERALES .
-
Página 71: Sobre Este Manual De Instrucciones
INTRODUCCIÓN dispositivo(s) compatible(s) con Tuya según Le agradecemos que haya escogido el termohigrómetro Tuya Smart . La consola lleva la(s) condición(es) específica(s). incorporado un módulo WIFI, y a través de La colorida pantalla LCD muestra las lecturas... -
Página 72: Panorama General
PANORAMA GENERAL CONSOLA 1 . [ ALARM/SNOOZE ] tecla 9 . Soporte de mesa 2 . Pantalla LCD 10 . Tapa del compartimento para pilas 3 . Botón [ CHANNEL / + ] (canal) 11 . Orificio para montaje en la pared 4 . -
Página 73: Sensor Termohigrométrico Inalámbrico
SENSOR TERMOHIGROMÉTRICO INALÁMBRICO 1 . Indicador LED 2 . Soporte para montaje en pared 3 . Interruptor deslizante de canal 4 . Tecla[ RESET ] 5 . Compartimento para las pilas INSTALACIÓN Y CONFIGURACIÓN INSTALACIÓN DEL SENSOR TERMOHIGROMÉTRICO INALÁMBRICO 1 . Retire la tapa de la batería del sensor . 2 . -
Página 74: Configuración De La Consola
CONFIGURACIÓN DE LA CONSOLA INSTALACIÓN DE LA PILA DE RESPALDO La pila de respaldo proporciona energía a la consola para conservar la hora y la fecha del reloj, los registros de máximos y mínimos y el valor de calibración . Paso 1: Paso 2: Paso 3:... -
Página 75: Sensor(Es) Inalámbirco(S) Adicional(Es) (Opcional)
3 . La consola volverá a registrar el sensor después de cambiar las pilas (aproximadamente 1 minuto) . SENSOR(ES) INALÁMBIRCO(S) ADICIONAL(ES) (OPCIONAL) La consola soporta hasta 7 sensores inalámbricos . 1 . En el nuevo sensor inalámbrico, deslice el interruptor de canal a un nuevo número de canal . 2 . - Página 76 Paso 1: Paso 2: Paso 3: En la pantalla de inicio , pulse el En la pantalla "Añadir manualmente", elija Asegúrese de seleccionar la red 2 .4G, la esquina superior derecha para añadir "Sensores" en la barra de menú de la introduzca su contraseña de Wi-Fi y luego su consola .
-
Página 77: Descripción General De La Pantalla Del Dispositivo
3 . La consola saldrá automáticamente del modo AP y volverá al funcionamiento normal una vez que esté conectada al router Wi-Fi . NOTA: - La estación meteorológica Smart solo puede conectarse a la red WI-FI 2 .4G . - Active la información de localización en el móvil cuando añada su consola a la aplicación . - El usuario puede mantener pulsado el botón [ SENSOR / WI-FI ] durante 6 segundos para salir del modo AP en cualquier momento . -
Página 78: Configuración De La Notificación De Alerta
CONFIGURACIÓN DE LA NOTIFICACIÓN DE ALERTA Puede ajustar la alarma de temperatura y humedad alta/baja . Paso 1: Paso 2: Paso 3: Pulse la "Configuración" en la parte Pulse la "Alarma de temperatura" o la Pulse "INDOOR" o "CH 1 ~ 7 " . inferior de la "Pantalla del dispositivo"... -
Página 79: Aplicaciones Iot
APLICACIONES IOT A través de la aplicación Smart Life, puede crear las condiciones de activación de la temperatura y la humedad para controlar automáticamente otro(s) dispositivo(s) compatible(s) con Smart Life . Paso 1: Paso 2: Paso 3: Pulse el icono « Smart»... -
Página 80: Actualización De Firmware
ACTUALIZACIÓN DE FIRMWARE La consola se puede actualizar a través de su red WI-FI. Si hay un nuevo firmware disponible, aparecerá una notificación o un mensaje emergente en su móvil cuando abra la aplicación. Siga las instrucciones en la aplicación para actualizarla . Durante el proceso de actualización, la consola mostrará... -
Página 81: Configuración De La Hora De Alarma
CONFIGURACIÓN DE LA HORA DE ALARMA 1 . En el modo de la hora normal, mantenga pulsado el botón [ MODE / ALARM ] durante 2 segundos hasta que el dígito de las horas de la alarma parpadee, para entra en el modo de ajuste de la alarma . -
Página 82: Función Temperatura / Humedad
pantalla de la consola . Pulse el botón [ CHANNEL ] para detener el ciclo automático y mostrar el canal actual . FUNCIÓN TEMPERATURA / HUMEDAD - Se muestra la lectura de la temperatura y la humedad en la sección del canal y del interior . - Use el botón [ °C / °F ] para seleccionar la unidad de indicación de la temperatura . -
Página 83: Luz De Fondo
2 . Pulse el botón [ + ] o [ - ] para seleccionar IN o cualquier otro canal . 3 . Pulse el botón [ MODE / ALARM ] para seleccionar entre: Temperatura humedad . 4 . Mientras la temperatura o la humedad parpadean, pulse los botones [ + ] o [ - ] para ajustar el valor offset. -
Página 84: Especificaciones
Estándar 802 .11 b/g/n Frecuencia de 2 .4GHz funcionamiento: Tipo de seguridad del router WPA/WPA2, OPEN, WEP (WEP sólo admite contraseña soportado hexadecimal) Especificaciones APP - Tuya Smart Soporte APP - Smart Life Plataforma soportada de la Smartphone Android iPhone... -
Página 85: Sensor Termohigrométrico Inalámbrico
«Cd» = cadmio, «Hg» = mercurio, «Pb» = plomo. DECLARACIÓN DE CONFORMIDAD CE Bresser Iberia declara que el artículo con número: 7006300 cumple la directiva: 2014/53/UE . El texto completo de la declaración de conformidad UE está disponible en la siguiente dirección de internet: http://www .bresser .de/download/7006300/CE/7006300_CE .pdf... - Página 87 (de preferencia por e-mail: service@bresseruk.com e-mail). Telephone*: +44 1342 837 098 BRESSER UK Ltd e-mail: servicio.iberia@bresser-iberia. Bresser UK Ltd. Suite G3, Eden House Teléfono*: +34 91 67972 69...
- Página 88 Contact Bresser GmbH Bresser UK Ltd. Gutenbergstraße 2 Suite 3G, Eden House 46414 Rhede · Germany Enterprise Way, Edenbridge, Kent TN8 6Hf, UK www.bresser.de @BresserEurope �� ...