Publicidad
Enlaces rápidos
http://waterheatertimer.org/How-to-wire-switches.html
http://waterheatertimer.org/How-to-wire-Cooper-277-pilot-light-switch.html
PK-92623-10-02-0B
C O L L E C T I O N B Y L E V I T O N
English
TO BE INSTALLED AND/OR USED IN ACCORDANCE WITH
APPROPRIATE ELECTRICAL CODES AND REGULATIONS
TO INSTALL:
WARNING: To avoid fire, shock, or death, turn off power at
circuit breaker or fuse and test that power is off before
wiring!
CAUTION: Use these devices only with copper or copper clad
wire. With aluminum wire, use only devices marked CO/ALR.
CAUTION: When installing these devices, a Neutral wire is
required for the outlet portion. When only one black and one
white wire are present in the wall box, the white wire is not
necessarily a Neutral wire. If you are unsure or unable to
determine the polarity of the two wires, consult a qualified
electrician.
Do not use to replace a switch that had been controlling
a light with only two wires present.
CAUTION: Break-off fin should be removed only when
installing for separate feed (2 circuit) operation.
1. Remove approximately 5/8" (1.6 cm) insulation from wire.
2. Connect wires per corresponding diagram as follows: Loop
wires clockwise 3/4 turn around terminal screws. Tighten
screws over wire loops with a force of 12-14 in.-lbs. of
torque. Terminal screws accept up to #10AWG copper or
copper clad wire.
3. Attach wallplate and restore power. INSTALLATION IS
COMPLETE.
Español
PARA INSTALARSE Y/O USARSE DE ACUERDO CON LOS
CODIGOS ELECTRICOS Y NORMAS APROPIADOS
PARA INSTALAR:
ADVERTENCIA: Para evitar descarga electrica, fuego, o
muerte, interrumpa el paso de energia mediante el
interruptor de circuito fusible. ¡Asegurese que el circuito
no este energizado antes de iniciar la instalacion!
PRECAUCION: Use este producto sólo con cable de cobre
o revestido de cobre. Para cable de aluminio use sólo
productos marcados con el símbolo CO/ALR.
PRECAUCION: Para instalar estos productos se necesita un
cable Neutro para el contacto. Cuando sólo hay un cable
Blanco y uno Negro en la caja de pared, el cable Blanco no
es necesariamente el cable Neutro. Si no está seguro o no
es capaz de determinar la polaridad de los dos alambres,
consulte con un electricista calificado.
No lo use para reemplazar un interruptor que ha estado
controlando una luz con solo dos alambres presentes.
PRECAUCION: La aleta rompible se debe remover sólo para
instalaciones de alimentación separada (2 circuitos).
1. Pele aproximadamente 1.6 cm. (5/8") de aislante del alambre.
2. Conecte los alambres según el diagrama correspondiente:
enrosque los alambres hacia la derecha alrededor del
tornillo de las terminales. Apriete los tornillos sobre los
alambres enroscados con una fuerza de 12-14 in.-lbs. libras
por pulgada de torque. Los tornillos terminales aceptan
alambres de cobre o revestidos de cobre hasta #10AWG.
3. Monte la placa de pared y restablezca la corriente. LA
INSTALACIÓN ESTÁ COMPLETA.
Français
INSTALLER OU UTILISER CONFORMÉMENT AUX CODES DE
L'ÉLECTRICITÉ EN VIGUEUR
INSTALLATION :
MISE EN GARDE : pour éviter les risques d'incendie, de
choc électrique ou d'électrocution, couper le courant au
fusible ou au disjoncteur et s'assurer que le circuit soit bien
coupé avant de procéder à l'installation.
AVERTISSEMENT : n'utiliser ce dispositif qu'avec du fil de
cuivre.
AVERTISSEMENT : la présente installation requiert un
raccord au fil de Neutre au niveau de la prise. Si la boîte
murale ne présente qu'un fil noir et un fil blanc, ce dernier
n'est pas nécessairement le Neutre. À défaut de pouvoir
déterminer la polarité des fils existants, faire appel à un
électricien qualifié.
Ne pas utiliser ce dispositif pour remplacer un
interrupteur commandant un luminaire au moyen de deux
fils seulement.
AVERTISSEMENT : les ailettes détachables ne doivent être
retirées que dans les applications à alimentation distincte
(deux circuits).
1. Dénuder les fils sur environ 1,6 cm. (5/8 po).
2. Raccorder les fils conformément au schéma correspondant
et de la façon suivante : enrouler les fils autour des bornes
à vis (3/4 de tour); serrer les bornes à vis sur les fils en
appliquant un couple de 12 à 14 po-lb. Ces dernières
acceptent les fils de cuivre de calibre maximal de 10 AWG.
3. Fixer la plaque murale et rétablir le courant; L'INSTALLATION
EST TERMINÉE.
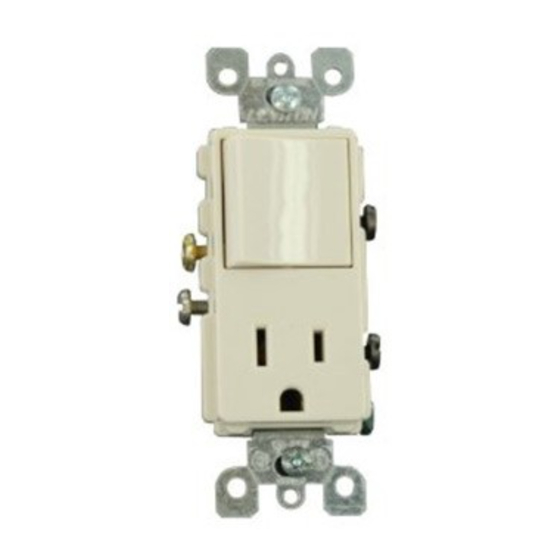
NO TE: The following wiring diagrams apply to both Decora Style and Standard Style combination devices.
NOTA: Los siguientes diagramas de cableado se aplican para productos de combinación Estilo Decora y
Estilo Estándar.
REMARQUE : Les schémas de câblage ci-contre conviennent tant aux dispositifs combinés standard que
ceux de la gamme Decora.
E N GL I S H E S PA Ñ OL
K E Y
H O T
G U I A
N EU T R AL
L É G E N D
L I G H T
DECORA
Switch / Receptacle
Combination
Combinación de
Interruptor / Receptáculo
Combinaison
interrupteur / prise
SINGLE POLE SWITCH WITH GROUNDING OUTLET
Decora Style Cat. No. 5636 / Standard Style Cat. No. 5335
INTERRUPTOR UNIPOLAR Y CONTACTO CON CONEXION A TIERRA
Estilo Decora No. Cat. 5636 / Estilo Estándar No. Cat. 5335
INTERRUPTEUR UNIPOLAIRE ET PRISE AVEC MISE À LA TERRE
Nos de cat. 5636 (Decora) et 5335 (standard)
Ground
Ground
Tierra
Tierra
Malt
Malt
COMMON FEED
COMMON FEED
Single-pole switch controls
Single-pole switch controls
light only. Power outlet for
grounded power outlet.
grounded appliances.
ALIMENTACION COMUN
ALIMENTACION COMUN
Interruptor unipolar controla
Interruptor unipolar controla
el contacto de poder con
sólo la luz. Contacto de
conexión a tierra.
poder para artefactos con
conexión a tierra.
ALIMENTATION COMMUNE
Interrupteur unipolaire
ALIMENTATION COMMUNE
commandant la prise avec
Interrupteur unipolaire ne
mise à la terre.
commandant que le
luminaire et prise pour
appareils avec mise à la
terre.
3-WAY SWITCH WITH GROUNDING OUTLET
Decora Style Cat. No. 5650 / Standard Style Cat. No. 5345
INTERRUPTOR DE 3 VIAS Y CONTACTO CON CONEXION A TIERRA
Estilo Decora No. Cat. 5650 / Estilo Estándar No. Cat. 5345
INTERRUPTEUR À 3 VOIES ET PRISE AVEC MISE À LA TERRE
Nos de cat. 5650 (Decora) et 5345 (standard)
3-way switch
3-way switch
Interruptor de 3-vías
Interruptor de 3-vías
Interrupteur á 3 voies
Interrupteur á 3 voies
Ground
Ground
Tierra
Tierra
Malt
Malt
COMMON FEED
COMMON FEED
3-way switch controls light
Grounded power outlet
only. Power outlet for
controlled by 3-way switch
grounded appliances.
and 3-way switch at another
location.
ALIMENTACION COMUN
ALIMENTACION COMUN
Interruptor de 3-vías
controla sólo la luz.
Contacto de poder con
Contacto de poder para
conexión a tierra controlado
artefactos con conexión a
por el interruptor de 3-vías
tierra.
y un interruptor de 3-vías
ubicado en otro lugar.
ALIMENTATION COMMUNE
ALIMENTATION COMMUNE
Interrupteur à 3 voies ne
commandant que le
Prise avec mise à la terre
luminaire et prise pour
commandée par
appareils avec mise à la
l'interrupteur à 3 voies et
terre.
par un second interrupteur à
3 voies installé à un autre
emplacement.
®
F R AN Ç A I S
FA S E
A CT I F
N E UTR O
NE U TRE
L U Z
LU MI NA I RE
STANDARD/ESTANDER
Switch / Receptacle
Combination
Combinación de
Interrupto / Receptáculo
Combinaison
interrupteur / prise
Ground
Ground
Tierra
Tierra
Malt
Malt
COMMON FEED
SEPARATE FEED
Single-pole switch controls
Single-pole switch and
light and grounded power
grounded power outlet on
outlet.
separate circuits.
(Break-off fin removed)
ALIMENTACION COMUN
ALIMENTACION SEPARADA
Interruptor unipolar
controla la luz y el contacto
Interruptor unipolar y
de poder con conexión a
contacto de poder con
tierra.
conexión a tierra en
circuitos separados.
ALIMENTATION COMMUNE
(La aleta rompible Quitada)
Interrupteur unipolaire
commandant le luminaire et
ALIMENTATION DISTINCTE
la prise avec mise à la
terre.
Interrupteur unipolaire et
prise avec mise à la terre
sur circuits distincts (ailette
détachée).
3-way switch
3-way switch
Interruptor de 3-vías
Interruptor de 3-vías
Interrupteur á 3 voies
Interrupteur á 3 voies
Ground
Tierra
Ground
Malt
Tierra
Malt
COMMON FEED
SEPARATE FEED
Grounded power outlet and
3-way switch and grounded
light controlled by
power outlet on separate
3-way switch and 3-way
circuits.
switch at another location.
(Break-off fin removed)
ALIMENTACION COMUN
ALIMENTACION SEPARADA
Contacto de poder con
Interruptor de 3-vías y
conexión a tierra y luz
contacto de poder con
controlados por el
conexión a tierra en circuitos
interruptor de 3-vías y un
separados.
interruptor de 3-vías
(La aleta rompible Quitada)
ubicado en otro lugar.
ALIMENTATION DISTINCTE
ALIMENTATION COMMUNE
Interrupteur à 3 voies et
Prise avec mise à la terre
prise avec mise à la terre sur
et luminaire commandés
circuits distincts (ailette
par l'interrupteur à 3 voies
détachée).
et par un second
interrupteur à 3 voies
installé à un autre
emplacement.
Publicidad

Manuales relacionados para Leviton Decora 5650


Resumen de contenidos para Leviton Decora 5650
- Página 1 http://waterheatertimer.org/How-to-wire-switches.html http://waterheatertimer.org/How-to-wire-Cooper-277-pilot-light-switch.html NO TE: The following wiring diagrams apply to both Decora Style and Standard Style combination devices. PK-92623-10-02-0B NOTA: Los siguientes diagramas de cableado se aplican para productos de combinación Estilo Decora y C O L L E C T I O N B Y L E V I T O N Estilo Estándar.
- Página 2 NOTE: The following wiring diagrams apply to both Decora Style and Standard Style combination devices. NOTA: Los siguientes diagramas de cableado se aplican para productos de combinación Estilo Decora y Estilo Estándar. REMARQUE : Les schémas de câblage ci-contre conviennent tant aux dispositifs combinés standard que ceux de la gamme Decora.