Publicidad
Idiomas disponibles
Idiomas disponibles
Enlaces rápidos
WPS2040M
ENGLISH
ITEMS REQUIRED
(Purchase separately)
• Phillips screwdriver
• 3/16" drill bit (for anchors)
• Hammer (for anchors)
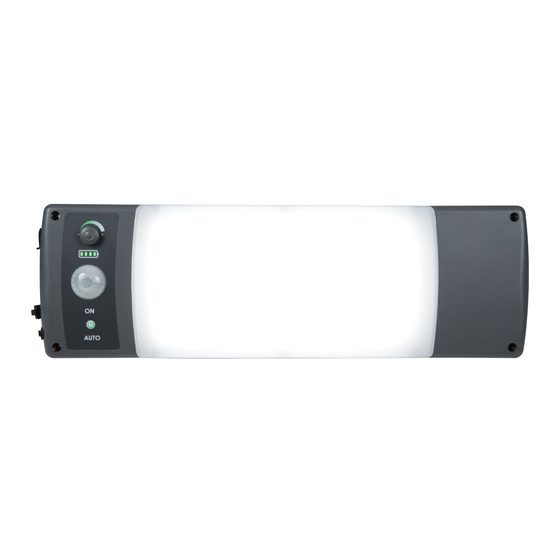
PRODUCT OVERVIEW
This lighting system is designed for off-grid operation, utilizing an integrated rechargeable li-
ion battery pack and dimmer control for longer periods of use between charging. The battery
pack can be charged either with the included solar panel, which converts sunlight into energy,
or with an external USB power supply (purchased separately). This system features an
integrated 360° motion sensor that turns the light on automatically when motion is detected
at night or in the dark, and can also be used without the motion sensor, allowing the light to
remain on regardless of motion events or ambient light levels.
WARNINGS AND CAUTIONS
INSTRUCTIONS PERTAINING TO A RISK OF FIRE OR INJURY TO PERSONS.
To reduce the risk of fire or injury to persons, read and follow these instructions:
• DO NOT disassemble the lighting system, housing or components
• DO NOT dispose of this product in fire. Batteries inside this product may explode or leak.
• DO NOT puncture, tamper with, or attempt to modify the battery pack.
• DO NOT install or use this system near sources of excessive heat
• Lithium-Ion batteries must be disposed of in accordance with local waste ordinances and
regulations.
• DO NOT operate a luminaire with a missing or damaged lens.
• DO NOT cut, tamper with, or attempt to modify the solar panel wire or USB cable.
• For indoor or outdoor use.
SAVE THESE INSTRUCTIONS.
FOR BEST RESULTS
• Allow fixture to receive three full days of sunlight
before use.
• Locate solar panel in an area that will receive the
maximum amount of sunlight during the daylight
hours. The solar panel mustreceive at least 3-4 hours
of direct sunlight daily.
Questions?/Des questions?/ ¿Preguntas? 1-800-334-6871 ConsumerProducts@eaton.com
PACKAGING CONTENTS/ CONTENIDO DEL PAQUETE
A. Light fixture
Luminaire
Luminaria
F. Mounting pin
G. Mounting pin cap
Goupille de montage
Capuchon de goupille
de montage
Clavija de montaje
Tapa para clavija de
montaje
K. (4) Drywall anchors
(4) dispositifs d'ancrage
pour cloison sèche
(4) Anclajes para panel de yeso
Fig. 1
Instruction Manual/Manuel d'instructions/ Instrucciones
B. Solar panel with 3ft. cord
Panneau solaire avec
cordon de 0,9 m (3 pi)
Panel solar con cable de
3 pies (0,91 m)
H. Mounting friction gasket
Joint de frottement de montage
Arandela de fricción de montaje
L. 6ft.USB Cable
De 1,8 m (6 pi) Câble USB
Cable USB de 6 pies (1,8 m)
• Once charged, test the system before permanently installing.
• Position the motion sensor so motion moves across the
detection zone (Fig. 1).
• Keep solar panel clear of any objects that will block
the sunlight. It will be necessary to periodically clean
the solar panel with soft wet cloth.
INSTALLATION
Solar Panel
1. Assemble the solar panel mounting bracket (Fig 2):
- Identify the frictional gasket(H) and place on the
mounting stand(E)
- Place the mounting base(D) on a hard flat surface.
Insert mounting stand(E) into the mounting
base(D) until a click is felt and heard.
- Align the arrow on the mounting stand(E) with
the arrow on the mounting plate(I), inserting the
mounting pin(F) through both to lock them together
(Fig 3).
- Push the mounting pin cap(G) into the open end
of the mounting pin(F). The inside edge of the pin
cap(G) should be flush with the mounting plate(I).
2. Choose a location to mount the solar panel(B),
ensuring the solar panel extension cord(M) will reach
the lighting system. For best results the solar panel
should face south, and be clear of any obstructions
that may impede exposure to sunlight. The bracket
provides nearly 360° of rotation, and 120° of tilt.
3. Mount the assembled bracket onto a solid surface,
using four of the mounting screws(J) (Fig 4).
4. Slide the solar panel(B) onto the solar panel
mounting plate(I) until an audible click is felt and
heard (Fig. 5). Make any final adjustments to the
panel to optimize exposure to sunlight.
Lighting System
1. Before installing, check to ensure the included solar
panel extension cord(M) will reach the solar panel
input on the endcap (Fig. 6 ).
2. Mount your lighting system choosing one of three
methods: Direct Mount, D-Ring, or Bracket Mount.
1
D. Mounting base
C. (2) Mounting brackets
Base de montage
(2) Supports de montage
(2) Soportes de montaje
Base de montaje
I. Mounting plate
Plaque de montage
Placa de montaje
M. 17ft. Solar panel extension cord
De 5 m (17 pi) Rallonge électrique pour le panneau d'alimentation
Cable de extensión para paneles solares de 17 pies (5,18 m)
E. Mounting stand
Socle de montage
Plataforma de
montaje
J. (8) Mounting screws
(8) vis de montage
(8) Tornillos de montaje
Fig. 2
E ---
H ---
CLICK
D ---
Fig. 3
E
I
I
G
F
D ---
Fig. 4
J
Fig. 5
B--
--I
Publicidad

Manuales relacionados para Eaton ALL-PRO WPS2040M


Resumen de contenidos para Eaton ALL-PRO WPS2040M
- Página 1 Instruction Manual/Manuel d’instructions/ Instrucciones Questions?/Des questions?/ ¿Preguntas? 1-800-334-6871 ConsumerProducts@eaton.com PACKAGING CONTENTS/ CONTENIDO DEL PAQUETE E. Mounting stand A. Light fixture B. Solar panel with 3ft. cord D. Mounting base C. (2) Mounting brackets Luminaire Panneau solaire avec Base de montage...
- Página 2 CHARGING Direct Mount: Fig. 6 Using the 4 of the mounting screws provided(J), attach This system is capable of being charged with the included solar panel, or via micro USB. the lighting system directly to a wall or ceiling using See Table 2 below for approximate charge times based on power source and input power.
- Página 3 être exposé directement au soleil pendant 3 à 4 heures E --- Eaton warrants to customers that, for a period of one year from the date of purchase, pendant la journée. Eaton products will be free from defects in materials and workmanship. The obligation of Eaton •...
- Página 4 PARTICULIER. Branchez le cordon du panneau solaire directement dans Eaton garantit à ses clients, pendant une période de une ans à compter de la date d’achat, le port d’entrée du panneau solaire situé sur le luminaire que ses produits Eaton sont exempts de tout défaut de matériaux et de fabrication. En vertu Entrée USB...
- Página 5 D --- (E) en la base (D) hasta que escuche y sienta Pour faire une réclamation au titre de la garantie, veuillez appeler Eaton, au 1 800 334 6871, un clic. en choisissant l’option 2 pour le Service à la clientèle, ou envoyer un courriel à Consumer- - Alinee la flecha en el soporte de montaje (E) con Products@eaton.com et fournir les renseignements ci-après :...
-
Página 6: Funciones
RESOLUCIÓN DE PROBLEMAS siempre deben estar control en una orientación horizontal) del sistema siempre deben estar orientados hacia abajo para proteger contra el ingreso de agua. La luz no se • Presione el botón de encendido para cambiar entre los modos •... - Página 7 TOUTEFOIS S’Y LIMITER, TOUTE GARANTIE DE QUALITÉ MARCHANDE ET POUR UN USAGE PARTICULIER. Eaton garantit à ses clients, pendant une période de une ans à compter de la date d’achat, que ses produits Eaton sont exempts de tout défaut de matériaux et de fabrication. En vertu de la présente garantie, l’obligation de Eaton se limite expressément à...