Tabla de contenido
Publicidad
Idiomas disponibles
Idiomas disponibles
Enlaces rápidos
Publicidad
Capítulos
Tabla de contenido

Manuales relacionados para auna Verticalo SE DAB


Resumen de contenidos para auna Verticalo SE DAB
-
Página 3: Tabla De Contenido
Sehr geehrter Kunde, wir gratulieren Ihnen zum Erwerb Ihres Gerätes. Lesen Sie die folgenden Hinweise sorgfältig durch und befolgen Sie diese, um möglichen Schäden vorzubeugen. Für Schäden, die durch Missachtung der Hinweise und unsachgemäßen Gebrauch entstehen, übernehmen wir keine Haftung. Scannen Sie den folgenden QR-Code, um Zugriff auf die aktuellste Bedienungsanleitung und weitere Informationen rund um das Produkt zu erhalten:... -
Página 4: Technische Daten
TECHNISCHE DATEN Artikelnummer 10034590 Stromversorgung 230 V ~ 50 Hz Maximaler Stromverbrauch 12 W Abspielgeschwindigkeiten ⁄ , 45, 78 U/min UKW-Radio 88 – 108 MHz Anschlüsse USB (zur MP3-Wiedergabe); AUX-Eingang; Kopfhöreranschluss KONFORMITÄTSERKLÄRUNG Hersteller: Chal-Tec GmbH, Wallstraße 16, 10179 Berlin, Deutschland. Dieses Produkt entspricht den folgenden Europäischen Richtlinien: 2011/65/EU (RoHS) -
Página 5: Sicherheitshinweise
SICHERHEITSHINWEISE • Beachten Sie alle in der Bedienungsanleitung aufgeführten Hinweise. • Das Gerät darf nicht in der Nähe von Wasser oder in feuchter Umgebung verwendet werden. • Achten Sie darauf, dass keine Flüssigkeit über dem Gerät und den Geräteöffnungen verschüttet wird. •... -
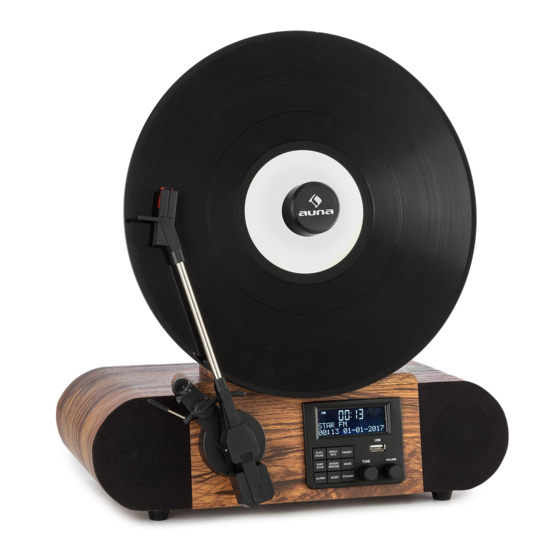
Página 6: Geräteübersicht
GERÄTEÜBERSICHT Vorderseite Rückseite... -
Página 7: Inbetriebnahme Und Bedienung
Tonabnehmer und Nadel USB-Anschluss Plattenteller Magnetischer Adapter Tonarm LCD-Bildschirm Lautsprecher Menü/Info Taste Cue-Level Eingabe/Schlummertaste Wiedergabe/ Pause-Taste Einstellungen Kopplungs-/Suchtaste Modus (PAIR/SCAN) Abspielgeschwindigkeit Wecker AUX-Eingang Schlaf Kopfhöreranschluss Standby Stromversorgung Sendersuche Netzschalter Lautstärkeregler INBETRIEBNAHME UND BEDIENUNG Vor der Inbetriebnahme • Entnehmen Sie das Gerät vorsichtig aus der Verpackung und entfernen Sie das Verpackungsmaterial vollständig. -
Página 8: Phono-Modus
HINWEIS: Das Gerät ist mit einem Standardnetzstecker ausgestattet. Wenn Dieser Netzstecker nicht in Ihre Steckdose passt, versuchen Sie bitte nicht, diesen durch Feilen passend zu machen. Wenn dieser Stecker nicht in Ihre Steckdose passt, ist Ihre Steckdose vermutlich veraltet und nicht gepolt. Sie sollten Ihre Steckdose in diesem Fall von einem qualifizierten Elektriker austauschen lassen. -
Página 9: Radio
RADIO Schalten Sie das Gerät ein. 2. Drücken Sie die MODE-Taste, um den UKW-Modus auszuwählen. Der Bildschirm zeigt „UKW“ an. 3. Drücken Sie die Taste „Koppelung/Suche“, um die automatische Sendersuche zu starten. Sie können auch den TUNE-Knopf drehen, um den gewünschten Sender auszuwählen. Wenn Sie einen Sender einstellen, zeigt der Bildschirm „St“... -
Página 10: Bt-Modus
4. Wiederholen Sie die Schritte 1-3 für alle Radiosender, die Sie speichern möchten. Im DAB- oder UKW-Modus können jeweils maximal 20 Sender gespeichert werden. 5. Zur Wiedergabe eines gespeicherten Senders, drücken Sie die PRESET- Taste und drehen Sie den TUNE-Knopf so lange, bis Sie bei dem von Ihnen gewünschten gespeicherten Sender angelangt sind. -
Página 11: Aux-Eingang
AUX-EINGANG Schalten Sie das Gerät ein. 2. Verbinden Sie Ihr externes Gerät über ein 3,5-mm-Audiokabel mit dem AUX-Anschluss an der Rückseite Ihres Geräts. 3. Drücken Sie die MODE-Taste und wählen Sie den AUX-IN-Modus aus. „AUX IN“ wird auf Ihrem Bildschirm angezeigt. 4. -
Página 12: Wecker
WECKER • Drücken Sie die ALARM-Taste, um in das Menü zur Weckereinstellung zu gelangen. Drehen Sie am TUNE-Knopf, um eine der unten aufgelisteten Funktionen auszuwählen und drücken Sie die ENTER/ SNOOZE-Taste, um die gewünschte Alarmeinstellung zu bestätigen. A. Alarm1/Alarm2: Drehen Sie zur Auswahl am TUNE-Knopf und drücken Sie die ENTER/SNOOZE-Taste zum Bestätigen. -
Página 13: Reinigung Und Pflege
• Nachdem der Alarm aktiviert wurde wird er, wenn die aktuelle Uhrzeit mit der von Ihnen eingestellten Weckzeit übereinstimmt, ertönen. • Wenn der Alarm ertönt, drücken Sie die ENTER/SNOOZE-Taste zum Aktivieren der Schlummerfunktion. 5 Minuten später, wird der Alarm erneut ertönen. •... -
Página 14: Hinweise Zur Entsorgung
Möbelschutz • Dieses Gerät ist mit Anti-Rutsch-Gummifüßen ausgestattet, um zu verhindern, dass das Gerät sich während der Bedienung bewegt. Diese Füße wurden aus nicht rutschendem Gummi hergestellt, welches so entwickelt wurde, dass es keine Kratzer und Flecken auf den Möbeln hinterlässt. Es ist jedoch möglich, dass einige ölbasierte Möbelpolituren, Holzschutzmittel und Reinigungssprays die Gummifüße aufweichen lassen und das diese dadurch Flecken oder Gummireste auf den Möbeln hinterlassen. - Página 15 Dear Customer, Congratulations on purchasing this device. Please read the following instructions carefully and follow them to prevent possible damages. We assume no liability for damage caused by disregard of the instructions and improper use. Scan the QR code to get access to the latest user manual and more product information.
-
Página 16: Technical Data
TECHNICAL DATA Item number 10034590 Power supply 230 V ~ 50 Hz Max. power consumption (Watt) 12 W Turntable speed ⁄ , 45, 78 rpm FM radio 88 – 108 MHz Connections USB (for MP3 playback); AUX; Headphone jack DECLARATION OF CONFORMITY Producer: Chal-Tec GmbH, Wallstraße 16, 10179 Berlin, Germany. -
Página 17: Safety Instructions
SAFETY INSTRUCTIONS • Observe all notes listed in the operating instructions. • Do not use the unit near water or in a humid environment. • Make sure that no liquid is spilled over the unit and the unit openings. • Move the unit carefully to avoid damaging it. -
Página 18: Device Overview
DEVICE OVERVIEW Front view Rear... -
Página 19: Commissioning And Operation
Cartridge and Stylus USB socket Turntable Magnetic Adapter Tone Arm LCD Screen Speakers MENU/INFO Button Cue Level ENTER/SNOOZE Button PLAY/PAUSE Button PRESET Button PAIR/SCAN Button MODE Button ALARM Button Speed Control Knob SLEEP Button AUX IN Jack STANDBY Button EARPHONE Jack TUNE Knob Power Jack VOLUME Knob... -
Página 20: Phono Mode
Switch on the device • Turn on the unit: press the POWER button (on the back of the unit) to position ”I”, and then press the STANDBY button at the front panel. “Power On” will be shown on the screen. •... -
Página 21: Radio
RADIO Turn on the unit 2. Press the MODE button to select the FM mode. “FM” will be shown on the screen. 3. Press the PAIR/SCAN to start auto-search the FM stations. Or rotate the TUNE knob to select the desired FM stations. If you tune to a FM stereo station, the “St”... -
Página 22: Bt Mode
2. Press the MODE button to select the BT mode. “BT Connecting” will be shown on the screen. 3. Turn on your BT device and search for “Verticalo SE DAB+” and pair. 4. Once your BT device is successfully paired with the unit, you will hear a short confirmation sound from the unit. -
Página 23: Setting The Time And Date
SETTING THE TIME AND DATE In DAB playing mode, press the MENU/INFO button to choose SYSTEM by rotating the TUNE knob, “Main menu” will be shown on the screen. 2. Press the ENTER/SNOOZE button, “Time setup”will be shown on the screen. - Página 24 D. Repeat alarm (Days): Turn the TUNE button to select between „Daily/ Once“ and confirm your selection with the ENTER/SNOOZE button. If „Daily“ is selected, the alarm icon will remain permanently on the screen unless the alarm is disabled. E. Alarm type (Mode): Turn the TUNE knob to select between DAB/FM/ BUZZER and press the ENTER/SNOOZE button to confirm.
-
Página 25: Cleaning And Care
CLEANING AND CARE Case cleaning • You should treat the case as carefully as any of your furniture. • When the cabinet is dusty, rub it with a soft, abrasion-resistant cloth. If the case is contaminated with fingerprints, you can remove them with a high-quality commercial dust remover and polishing spray. -
Página 26: Hints On Disposal
HINTS ON DISPOSAL According to the European waste regulation 2012/19/ EU this symbol on the product or on its packaging indicates that this product may not be treated as household waste. Instead it should be taken to the appropriate collection point for the recycling of electrical and electronic equipment. - Página 27 Chère cliente, cher client, Toutes nos félicitations pour l’acquisition de ce nouvel appareil. Veuillez lire attentivement et respecter les instructions de ce mode d’emploi afin d’éviter d’éventuels dommages. Nous ne saurions être tenus pour responsables des dommages dus au non-respect des consignes et à...
-
Página 28: Fiche Technique
FICHE TECHNIQUE Numéro d'article 10034590 Alimentation 230 V ~ 50 Hz Consommation maximale 12 W Vitesses de lecture ⁄ , 45, 78 U/min Radio FM 88 – 108 MHz Connexions USB (pour la lecture des MP3 ; Entrée AUX; Prise casque DÉCLARATION DE CONFORMITÉ... -
Página 29: Consignes De Sécurité
CONSIGNES DE SÉCURITÉ • Respectez toutes les consignes du mode d‘emploi. • L‘appareil ne doit pas être utilisé à proximité de l‘eau ou dans un environnement humide. • Assurez-vous qu‘aucun liquide n‘est renversé sur l‘appareil ou dans ses ouvertures. • Déplacez l‘appareil avec précaution afin de ne pas l‘endommager. -
Página 30: Aperçu De L'appareil
APERÇU DE L‘APPAREIL Face avant Dos de l‘appareil... -
Página 31: Mise En Marche Et Utilisation
Tête de lecture et aiguille Port USB Platine Centreur magnétique Bras de lecture Ecran LCD Enceinte Touche menu/info Cue-Level Touche de saisie / veille Touche de lecture/ pause Paramètres Touche de recherche / Mode d‘appairage (PAIR/SCAN) Vitesse de lecture Réveil Entrée AUX Nuit Prise casque... -
Página 32: Mode Phono
REMARQUE : L‘appareil est équipé d‘une prise d‘alimentation standard. Si cette fiche d‘alimentation ne rentre pas dans votre prise, veuillez ne pas essayer de la faire rentrer en la limant. Si cette fiche ne correspond pas à votre prise, celle-ci est probablement obsolète et non polarisée. Dans ce cas, vous devez faire remplacer votre prise par un électricien qualifié. -
Página 33: Radio
RADIO Allumez l‘appareil. 2. Appuyez sur la touche MODE pour sélectionner le mode FM. L‘écran affiche „FM“. 3. Appuyez sur la touche „Pairing / Search“ pour lancer la recherche automatique des stations. Vous pouvez également tourner la touche TUNE pour sélectionner la station souhaitée. Lorsque vous réglez une station, l‘écran affiche „St“. -
Página 34: Mode Bt
2. Appuyez sur la touche MODE pour sélectionner le mode BT. „Connect BT“ s‘affiche à l‘écran. 3. Allumez votre appareil BT externe, recherchez „Verticalo SE DAB +“ et associez votre appareil. 4. Lorsque votre appareil BT externe a été correctement couplé avec la platine, vous entendrez un bref son de confirmation de la platine. -
Página 35: Entrée Aux
ENTRÉE AUX Allumez l‘appareil. 2. Branchez votre appareil externe au connecteur AUX à l‘arrière de votre appareil à l‘aide d‘un câble audio 3,5 mm. 3. Appuyez sur la touche MODE et sélectionnez le mode AUX-IN. „AUX IN“ s‘affiche sur votre écran. 4. -
Página 36: Réveil
RÉVEIL • Appuyez sur la touche ALARM pour accéder au menu de réglage de l‘alarme. Tournez le bouton TUNE pour sélectionner l‘une des fonctions répertoriées ci-dessous et appuyez sur la touche ENTER / SNOOZE pour confirmer le réglage d‘alarme souhaité. A. -
Página 37: Nettoyage Et Entretien
• Pour désactiver définitivement l‘alarme, suivez l‘étape H. „Alarme désactivée / enregistrée“ dans la section ci-dessus. L‘alarme est alors désactivée et le symbole d‘alarme ne s‘affiche plus à l‘écran. • Si vous avez réglé un réveil quotidien, le symbole de l‘alarme reste à l‘écran et le réveil sonnera à... -
Página 38: Informations Sur Le Recyclage
Protection des meubles • Cet appareil est équipé de pieds en caoutchouc antidérapants pour empêcher l‘appareil de bouger pendant le fonctionnement. Ces pieds en caoutchouc antidérapant ont été développés pour ne pas laisser de rayures et de taches sur les meubles. Cependant, il est possible que certains produits de polissage à... - Página 39 Estimado cliente, Le felicitamos por la adquisición de este producto. atentamente siguiente manual siga cuidadosamente las instrucciones de uso con el fin de evitar daños posibles. La empresa no se responsabiliza de los daños ocasionados por un uso indebido del producto o por haber desatendido las indicaciones de seguridad.
-
Página 40: Datos Técnicos
DATOS TÉCNICOS Número del artículo 10034590 Potencia 230 V ~ 50 Hz Consumo máximo 12 W Velocidad de giro ⁄ , 45, 78 U/min Frecuencia de Radio 88 – 108 MHz Entradas USB (para reproductor MP3; entrada AUX; para auriculares) DECLARACIÓN DE CONFORMIDAD Fabricante : Chal-Tec GmbH, Wallstraße 16, 10179 Berlin,... -
Página 41: Instrucciones De Seguridad
INSTRUCCIONES DE SEGURIDAD • Observe todas las instrucciones del manual de instrucciones. • El dispositivo no debe utilizarse cerca del agua o en un ambiente húmedo. • Tenga cuidado de no derramar ningún líquido sobre la unidad o las aberturas de la misma. •... -
Página 42: Descripción Del Producto
DESCRIPCIÓN DEL PRODUCTO Parte frontal Parte posterior... -
Página 43: Puesta En Marcha Y Funcionamiento
Fonocaptor y aguja Entrada USB Plato de tocadiscos Adaptador magnético Brazo del fonocaptor Pantalla LCD Altavoz Botón Menu/Info Palanca Botón Enter/Snooze Tecla de reproducción/pausa Tecla de configuración Tecla para conexión/búsqueda Modo (PAIR/SCAN) Velocidad de lectura Despertador Entrada AUX Función nocturna Entrada auriculares Standby Suministro eléctrico... -
Página 44: Modo Fono
NOTA: el aparato está equipado con un enchufe estándar. Si este enchufe no encaja en su toma de corriente, por favor no lo fuerce. Si este enchufe no encaja en su toma de corriente, su toma de corriente probablemente esté anticuada y no polarizada. -
Página 45: Radio
RADIO Encienda el aparato 2. Pulse la tecla MODE para seleccionar el modo FM. En la pantalla aparecerá “FM”. 3. Pulse la tecla PAIR/SCAN para buscar estaciones FM o gire el mando de TUNE. Si sintoniza una emisora FM estéreo en la pantalla aparecerá “st”. -
Página 46: Modo Bt
2. Presione el botón MODE para seleccionar el modo BT. En la pantalla aparece “Connect BT”. 3. Encienda su dispositivo BT externo, busque “Verticalo SE DAB+” y empareje su dispositivo. 4. Cuando su dispositivo BT externo se empareje con éxito con el tocadiscos, se oirá... -
Página 47: Aux In
AUX IN Encienda el aparato 2. Conecte un cable de audio de 3.5 mm en el conector AUX en la parte posterior del aparato. 3. Pulse MODE para seleccionar AUX IN. “AUX IN” aparecerá en la pantalla. 4. Reproduzca la música desde el dispositivo externo. CONFIGURACIÓN DE HORA Y FECHA En el modo de reproducción DAB, presione el botón MENU/INFO. -
Página 48: Alarma
ALARMA • Presione el botón ALARM para entrar en el menú de ajuste de la alarma. Gire la perilla TUNE para seleccionar una de las funciones enumeradas a continuación y presione el botón ENTER/SNOOZE para confirmar el ajuste de alarma deseado. A. -
Página 49: Limpieza Y Cuidado
• Para apagar la alarma permanentemente siga lo indicado en el punto G de la sección anterior “Off/save” (apagar/guardar). Si lo pone en la posición OFF la alarma se apaga y el icono desaparece de la pantalla. • Si hay configurada una alarma diaria, el icono de la alarma permanece en la pantalla y la alarma suena al día siguiente excepto si se desactiva. -
Página 50: Retirada Del Aparato
Protección de muebles • Este dispositivo está equipado con patas de goma antideslizantes para evitar que el dispositivo se mueva durante su funcionamiento. Estos pies están hechos de goma antideslizante, que ha sido desarrollada para que no deje arañazos y manchas en los muebles. Sin embargo, es posible que algunos pulidores de muebles a base de aceite, conservantes de madera y aerosoles de limpieza puedan ablandar las patas de goma, dejando manchas o residuos de goma en los... - Página 51 Gentile cliente, La ringraziamo per aver acquistato il nostro prodotto. La preghiamo di leggere attentamente le seguenti istruzioni e di seguirle per evitare eventuali danni. Si declina ogni responsabilità per danni derivati da una mancata osservazione delle istruzioni e da un uso improprio del dispositivo.
-
Página 52: Dati Tecnici
DATI TECNICI Numero articolo 10034590 Alimentazione 230 V ~ 50 Hz Consumo massimo 12 W Velocità di riproduzione ⁄ , 45, 78 U/min Radio FM 88 – 108 MHz Connessioni USB (per riprodurre MP3; ingresso AUX; connessione cuffie) DICHIARAZIONE DI CONFORMITÀ Produttore: Chal-Tec GmbH, Wallstraße 16, 10179 Berlino, Germania... -
Página 53: Avvertenze Di Sicurezza
AVVERTENZE DI SICUREZZA • Rispettare tutte le avvertenze elencate nel manuale di istruzioni. • Non usare il dispositivo vicino all’acqua o in ambienti umidi. • Assicurarsi che non vengano versati liquidi sul dispositivo o sulle aperture. • Spostare il dispositivo con cura per non danneggiarlo. •... -
Página 54: Descrizione Del Prodotto
DESCRIZIONE DEL PRODOTTO Parte frontale Parte posteriore... -
Página 55: Messa In Funzione E Utilizzo
Pick-up e puntina Connessione USB Piatto Adattatore magnetico Braccio Display LCD Altoparlante Tasto menù/informazioni Livello cue Invio/tasto snooze Tasto riproduzione/pausa Impostazioni Tasto di accoppiamento/ricerca Modalità (PAIR/SCAN) Velocità di riproduzione Sveglia Ingresso AUX Funzione notturna Connessione cuffie Standby Alimentazione Ricerca stazioni Interruttore Regolatore volume MESSA IN FUNZIONE E UTILIZZO... -
Página 56: Modalità Phono
NOTA: Il dispositivo dispone di una spina standard. Se la spina non entra nella presa non provare a inserirla ugualmente limandola. Significa presumibilmente che la presa è obsoleta o non polarizzata. In questo caso va sostituita da un elettricista qualificato. Accendere il dispositivo •... -
Página 57: Radio
RADIO Accendere il dispositivo. 2. Premere il tasto MODE per selezionare la modalità FM. Sul display appare “FM”. 3. Premere il tasto “Accoppiamento/Ricerca” per iniziare la ricerca automatica delle stazioni. E’ possibile anche ruotare la manopola TUNE per selezionare l’emittente desiderata. Quando viene impostata una stazione, sul display appare “St”. -
Página 58: Modalità Bt
2. Premere il tasto MODE e selezionare la modalità BT. Sul display appare “Collegare BT”. 3. Accendere il dispositivo BT esterno, cercare “Verticalo SE DAB+” e accoppiare il dispositivo. 4. Quando l’accoppiamento tra il dispositivo BT e il giradischi è avvenuto con successo, il giradischi emette un breve suono di conferma. -
Página 59: Aux In
AUX IN Accendere il dispositivo. 2. Collegare il dispositivo esterno tramite un cavo audio da 3,5 mm con il collegamento AUX sul retro del dispositivo. 3. Premere il tasto MODE e selezionare la modalità AUX-IN. Sul display appare “AUX IN”. 4. -
Página 60: Sveglia
SVEGLIA • Premere il tasto ALARM per accedere al menù impostazioni della sveglia. Ruotare la manopola TUNE per selezionare una delle funzioni sottoelencate. Premere il tasto ENTER/SNOOZE per confermare l’impostazione sveglia desiderata. A. Sveglia1/Sveglia2: Ruotare la manopola TUNE confermando con il tasto ENTER/SNOOZE. -
Página 61: Pulizia E Manutenzione
• Per cancellare definitivamente la funzione sveglia seguire il punto H “Sveglia off/salvare” nel precedente capitolo. La sveglia è spenta e il simbolo della sveglia non viene più visualizzato sul display. • Se si imposta la funzione di sveglia giornaliera, sul display appare il simbolo permanentemente e la sveglia suona di nuovo il giorno seguente, a meno che non venga disattivata. -
Página 62: Smaltimento
Protezione per i mobili • Questo dispositivo dispone di piedini di gomma antiscivolo per evitare che si sposti durante il funzionamento. I piedini sono fatti di gomma antiscivolo creata in modo tale da non lasciare graffi e macchie sui mobili. È però possibile che alcune cere per mobili a base di olio, prodotti protettivi per il legno e spray detergenti ammorbidiscano i piedini, che quindi lasciano macchie o residui di gomma sui mobili.