
Manuales relacionados para KTM 90612968144


Resumen de contenidos para KTM 90612968144
- Página 1 INFORMATION CRASH BARS 90612968144 03.2017 3.213.692 KTM Sportmotorcycle GmbH *3213692* 5230 Mattighofen, Austria www.ktm.com...
- Página 2 3 DEUTSCH Wir freuen uns, dass Sie sich für dieses Produkt entschieden haben. Unser hochwertiges Qualitätsprodukt ist rennerprobt und wurde speziell für sportliche Herausforderungen entwickelt. Eine korrekte Montage des Produktes ist unerlässlich, um ein Maximum an Sicherheit und Funktionalität gewährleisten zu können. Bitte befolgen Sie daher die Montageanleitung oder wenden Sie sich an Ihren autorisierten Fachhändler.
-
Página 3: Lieferumfang
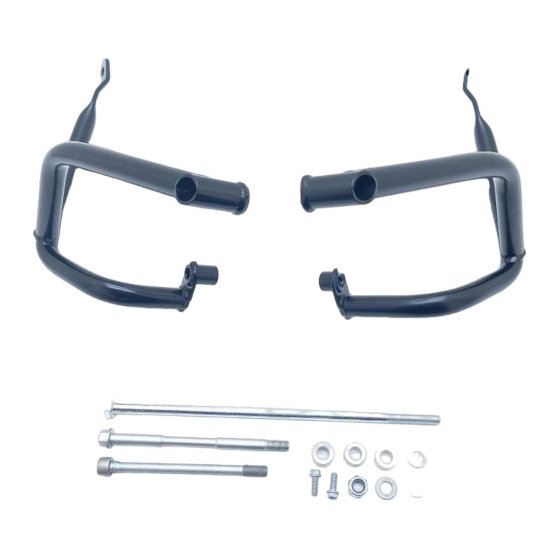
Lieferumfang 1x Sturzbügel rechts 1x Sturzbügel links 1x Distanzbuchse breit (für Modelle vor 2017) 2x Distanzbuchse 1x Schraube M10x160 1x Schraube M10x300 2x Bundschraube M6x16 2x Scheibe 1x Sechskantmutter M10 Vorarbeit - Motorrad mit Hebevorrichtung hinten aufheben (s. Bedienungsan- leitung). HINWEIS Ein Helfer ist für diese Arbeit sinnvoll. - Página 4 - Sturzbügel rechts und links positionieren. - Schraube montieren, aber noch nicht festziehen. HINWEIS Für Modelle vor Modelljahr 2017 muss zusätzlich die Distanzbuchse (Lieferumfang) mit der Schraube montiert werden. - Schrauben montieren, aber noch nicht festziehen. - Beide Sturzbügel ausrichten und Schraube mit 49 Nm festziehen.
- Página 5 Scope of supply 1x right crash bar 1x left crash bar 1x spacer, wide (for models before 2017) 2x spacer 1x screw M10x160 1x screw M10x300 2x collar screw M6x16 2x washer 1x hexagon nut M10 Preliminary work - Raise the rear of the motorcycle using lifting gear (see Owner’s Manual).
- Página 6 - Position right crash bar and left crash bar - Mount screw but do not tighten yet. NOTE For models before 2017, spacer (included) must also be mounted with screw - Mount screws , but do not tighten them yet. - Align both crash bars and tighten screw to 49 Nm.
- Página 7 Materiale fornito 1 barra di protezione destra 1 barra di protezione sinistra 1 bussola distanziale larga (per i modelli prima del 2017) 2 bussole distanziali 1 vite M10x160 1 vite M10x300 2 viti fl angiate M6x16 2 rondelle 1 dado esagonale M10 Operazione preliminare - Sollevare la motocicletta tramite il dispositivo di sollevamento posteriore (v.
- Página 8 - Posizionare la barra di protezione destra e sinistra - Montare la vite senza serrarla. AVVERTENZA Per i modelli prima del model year 2017 montare in aggiunta la bus- sola distanziale (in dotazione) con la vite - Montare le viti , senza serrarle.
- Página 9 Contenu de la livraison 1x arceau de sécurité de droite 1x arceau de sécurité de gauche 1x douille-entretoise large (pour les modèles antérieurs à 2017) 2x douilles-entretoises 1x vis M10x160 1x vis M10x300 2x vis à épaulement M6x16 2x rondelles 1x écrou six pans M10 Travaux préalables - Relever la moto avec le dispositif de levage arrière (voir le manuel...
- Página 10 - Mettre en place l’arceau de sécurité de droite et de gauche - Mettre la vis en place sans la serrer. REMARQUE Pour les modèles antérieurs à l’année-modèle 2017, la douille-entre- toise (fournie) doit également être montée avec la vis - Mettre les vis en place sans les serrer.
-
Página 11: Montaje
Volumen de suministro 1x arco de protección derecho 1x arco de protección izquierdo 1x casquillo distanciador ancho (para modelos anteriores a 2017) 2x casquillos distanciadores 1x tornillo M10x160 1x tornillo M10x300 2x tornillos de collarín M6x16 2x arandelas 1x tuerca hexagonal M10 Trabajos previos - Levantar la parte trasera de la motocicleta con el soporte de eleva- ción (véase el manual de instrucciones). - Página 12 - Posicionar el arco de protección derecho e izquierdo - Montar el tornillo , pero no apretarlo todavía. ADVERTENCIA Para los modelos anteriores al año de modelo 2017 se debe montar además el casquillo distanciador (volumen de suministro) con el tornillo - Montar los tornillos , pero no apretarlos todavía.