
Manuales relacionados para Klarstein GrandChef


Resumen de contenidos para Klarstein GrandChef
- Página 1 GrandChef Elektrischer Einbaubackofen Built-in Electric Oven Horno eléctrico empotrable Four électrique encastrable Forno a incasso 10035473...
-
Página 3: Tabla De Contenido
Sehr geehrter Kunde, wir gratulieren Ihnen zum Erwerb Ihres Gerätes. Lesen Sie die folgenden Hinweise sorgfältig durch und befolgen Sie diese, um möglichen Schäden vorzubeugen. Für Schäden, die durch Missachtung der Hinweise und unsachgemäßen Gebrauch entstehen, übernehmen wir keine Haftung. Scannen Sie den folgenden QR-Code, um Zugriff auf die aktuellste Bedienungsanleitung und weitere Informationen rund um das Produkt zu erhalten. -
Página 4: Sicherheitshinweise
SICHERHEITSHINWEISE VORSICHT Verbrennungsgefahr! Dieses Gerät und die zugänglichen Geräteteile werden während der Verwendung sehr heiß. Lassen Sie Vorsicht walten und berühren Sie keinesfalls die Heizelemente. • Halten Sie Kinder unter 8 Jahren vom Gerät fern. • Kinder ab 8 Jahren, psychisch, sensorisch und körperlich eingeschränkte Menschen dürfen das Gerät nur benutzen, wenn sie vorher von einer für sie verantwortlichen Aufsichtsperson ausführlich mit den Funktionen und den Sicherheitsvorkehrungen vertraut gemacht wurden und die damit verbundenen Risiken verstehen. - Página 5 • Bewegen Sie Backbleche und Backgitter niemals, während diese heiß sind, sondern lassen Sie diese zunächst abkühlen. • Schalten Sie das Gerät vor Reinigung und Wartung immer aus und ziehen Sie den Stecker aus er Steckdose. • Dieses Gerät ist für die Verwendung in Haushalten ausgelegt und kann in Standardküchen oder Wohneinheiten eingebaut werden.
- Página 6 VORSICHT Stromschlaggefahr! Versuchen Sie keinesfalls, ein beschädigtes Gerät selbst zu reparieren und hören Sie auf, dieses zu verwenden. Schalten Sie das Gerät aus, ziehen Sie den Netzstecker aus der Steckdose und kontaktieren Sie den Kundendienst. • Lassen Sie das Netzkabel nicht über scharfe Kanten verlaufen und knicken oder verbiegen Sie dieses nicht, damit es nicht beschädigt wird.
-
Página 7: Installation
INSTALLATION VORSICHT Verletzungsgefahr! Lassen Sie die Installation immer von geschultem Fachpersonal durchführen, um Stromschläge, Personenschäden und Schäden am Gerät zu vermeiden. Hinweise zum Einbau in die Küchenzeile Passen Sie den Ofen in die dafür vorgesehene Öffnung in der Küchenzeile ein. Er kann unter einer Arbeitsfl äche oder in einen stehenden Schrank eingefügt werden. - Página 8 Hinweise zum elektrischen Anschluss • Das Gerät ist für die feste Installation mit einem dreipoligen Netzkabel ausgelegt und darf nur von einem zugelassenen Fachmann gemäß Anschlussplan angeschlossen werden. • Nur eine Elektrofachkraft, welche die einschlägigen Vorschriften berücksichtigt, darf das Netzkabel austauschen. •...
- Página 9 Installation • Damit dieses Gerät sicher betrieben werden kann, vergewissern Sie sich, dass es fachgerecht und unter Beachtung der Bedienungsanleitung installiert wurde. Schäden, die durch fehlerhafte Installation entstehen, fallen nicht unter die Garantie. • Tragen Sie während der Installation Schutzhandschuhe, um sich vor Schnittverletzungen durch scharfe Kanten zu schützen.
- Página 10 • Der Netzstecker muss entweder leicht zugänglich sein oder es muss ein Trennschutzschalter in die feste Verkabelung eingebaut werden, um das Gerät nach der Installation gegebenenfalls vom Netz trennen zu können. • Das Gerät darf nicht hinter einer Ziertür installiert werden, um eine Überhitzung zu vermeiden.
- Página 11 Sobald der Ofen sich an seinem Verwendungsort befindet, fixieren Sie diesen mit dem unten dargestellten Zubehör (1), (2) und (3). Hinweis: Ziehen Sie die Schrauben (1) nicht zu fest an, um Schäden am Ofen oder dem Ofengehäuse zu vermeiden. Verwenden Sie zum Anziehen der Schrauben ausschließlich einen Schraubenzieher.
- Página 12 Zubehör Im Lieferumfang des Geräts ist eine Auswahl an Zubehör im Lieferumfang enthalten. Nachfolgend finden Sie einen Überblick über das Zubehör und Informationen zur korrekten Verwendung. Im Lieferumfang enthaltenes Zubehör Backgitter Backblech Zum Abstellen von Ofengeschirr, Zur Zubereitung von Blechkuchen und Kuchenformen und Auflaufformen.
-
Página 13: Zubehör Anbringen
Zubehör anbringen Im Garraum gibt es fünf Einschübe für das Zubehör. Die Einschübe werden von unten nach oben gezählt. Das Zubehör kann ungefähr bis zur Hälfte herausgezogen werden, ohne dass es kippt. • Stellen Sie sicher, dass Sie das Zubehör richtig herum in den entsprechenden Einschub im Garraum platzieren (siehe Abbildung unten). - Página 14 Sicherungsfunktion Das Zubehör kann ungefähr bis zur Hälfte herausgezogen werden, bevor es einrastet. Die Sicherungsfunktion verhindert, dass das Zubehör und die darauf/ darin befindlichen Lebensmittel durch die Schwerkraft beim Herausziehen herunterkippen. Zubehör sollte daher richtig in die Einschübe im Garraum eingesetzt werden, damit die Sicherungsfunktion greifen kann.
-
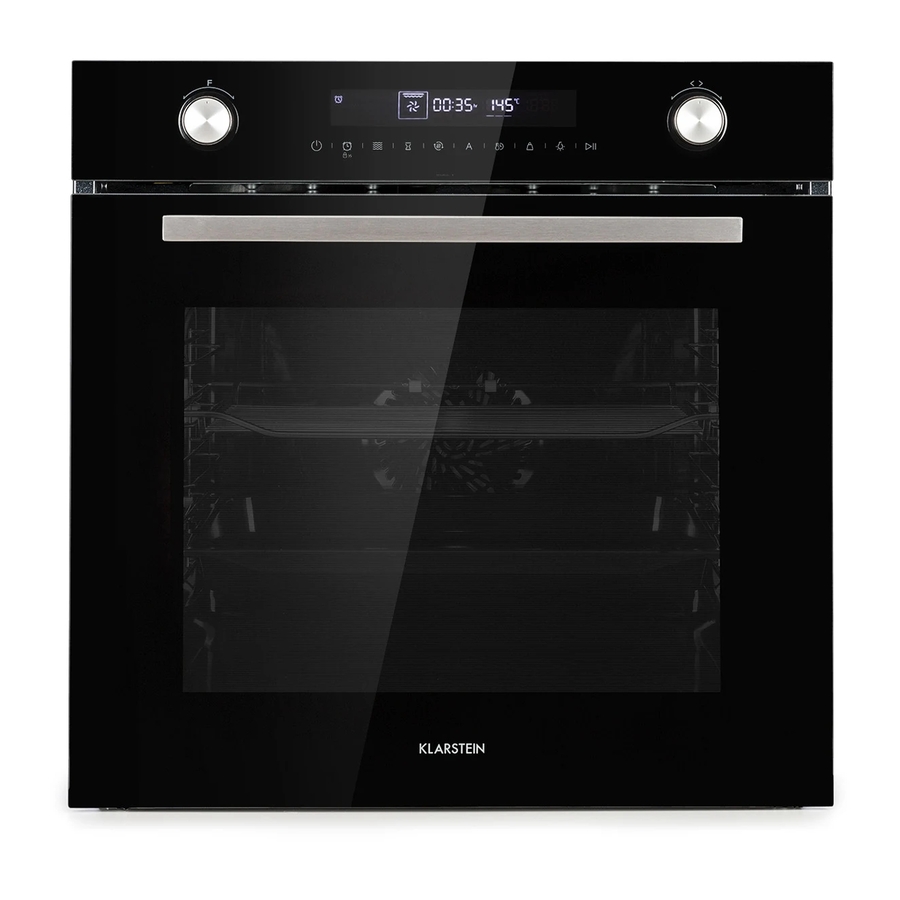
Página 15: Geräteübersicht Und Tasten
GERÄTEÜBERSICHT UND TASTEN 10 11 Taste Beschreibung 1. Funktionseinstellung Ändern des Heizmodus 2. Ein/Aus Ofen ein- und ausschalten 3. Timer/ Timerfunktion/Kindersicherung durch 3s drücken Kindersicherung 4. Mikrowelle Verwendung der Mikrowellen- und Mikrowellenkombinationsfunktion 5. Endzeit Endzeit einstellen 6. Schnelles Vorheizen Verwenden Sie diese Funktion zum schnellen Vorheizen Automatische Rezepte Automatische Rezeptfunktion... -
Página 16: Inbetriebnahme
INBETRIEBNAHME Vor der ersten Verwendung Vor der ersten Verwendung des Geräts, müssen das Geräteinnere und das Zubehör gereinigt werden. • Entfernen Sie alle Aufkleber, Schutzfolien und den Transportschutz. • Entnehmen Sie das gesamte Zubehör und die Seitengitter aus dem Geräteinneren. •... -
Página 17: Bedienung
Zeiteinstellung Stellen Sie vor der Verwendung des Geräts die Uhrzeit ein. 1. Drücken Sie, nachdem der Netzstecker des Ofens eingesteckt wurde, die UHRZEIT- Taste. Durch Drehen des rechten Drehreglers kann die aktuelle Stunde eingestellt werden. 2. Berühren Sie erneut die UHRZEIT-Taste und stellen Sie mit dem rechten Drehregler die aktuelle Minute ein. - Página 18 Heizmodus Temperatur Verwendung Grill 150 ~250 °C Grillen und Rösten kleiner Mengen. Legen Sie die Lebensmittel mittig unter das Grillelement. Doppelgrill + Umluft 50 ~250 °C Grillen flacher Lebensmittel und Rösten. Durch den Ventilator wird die Hitze gleichmäßig in der Ofenhöhle verteilt.
- Página 19 Verwendung des Geräts 1. Drehen Sie den Funktionsregler, nach dem Anschluss des Geräts an die Steckdose, um die gewünschte Funktion einzustellen. Drehen Sie am Anpassungsregler, um die Betriebstemperatur einzustellen. 2. Wenn Sie die Taste START/PAUSE berühren, startet der Betrieb des Geräts. Wenn Sie dieses Symbol nicht berühren, wechselt das Gerät nach 5 Minuten wieder in den Standbymodus und auf dem Bildschirm wird die Uhrzeit angezeigt.
- Página 20 Anpassung während der Zubereitung Es besteht die Möglichkeit, während des Betriebs den Heizmodus und die Temperatureinstellung anzupassen, indem Sie am Funktionsregler oder dem Anpassungsregler drehen. Wenn innerhalb von 6 Sekunden nach der Anpassung keine weitere Taste gedrückt wird, dann wird diese Einstellung gespeichert. Wenn Sie die Zubereitungsdauer anpassen möchten, drücken Sie auf die Taste ZEITEINSTELLUNG und passen Sie die Zubereitungszeit mit dem rechten Anpassungsregler an.
- Página 21 • Drücken Sie im Standbymodus die Taste MIKROWELLE, um die Mikrowellenfunktion zu nutzen. Drehen Sie am linken Drehregler, um die Mikrowellenkombinationsfunktion einzustellen. Es gibt drei verfügbare Kombinationsmodi. Stellen Sie die Temperatur mit dem rechten Drehregler ein. Berühren Sie die Taste ZEITEINSTELLUNG und stellen Sie die Zeit mit dem rechten Drehregler ein.
-
Página 22: Automatische Rezepte
AUTOMATISCHE REZEPTE Ihr Gerät verfügt über eine Vielzahl an Automatikprogrammen, welche Ihnen die Zubereitung erleichtern soll. Wählen Sie das für die von Ihnen verwendeten Lebensmittel geeignete Programm aus und befolgen Sie die Anweisungen auf dem Bildschirm. Rezept Mikro Vorheizen Voreingestellte Zeit Gewicht (min) Auftauen... -
Página 23: Energiespartipps
ENERGIESPARTIPPS • Entfernen Sie das gesamte Zubehör, das während des Koch- und Backvorgangs nicht erforderlich ist. • Öffnen Sie während des Koch- und Backvorgangs, wenn möglich, nicht die Ofentür. • Wenn Sie die Ofentür während des Kochens und Backens öffnen, schalten Sie den Modus auf „Lampe“... -
Página 24: Back-Tipps
BACK-TIPPS Sie möchten Ihr eigenes Rezept Versuchen Sie zunächst, ähnliche zubereiten. Rezepte zu finden und optimieren Sie den Zubereitungsprozess abhängig vom Ergebnis. Ist der Kuchen fertig gebacken? Stecken Sie circa 10 Minuten, bevor die im Rezept angegebene Backzeit erreicht wurde, einen Holzstab in den Kuchen hinein. - Página 25 Kondenswasser während des Backens. Dampf ist Teil des Backens und Kochens und bewegt sich normalerweise zusammen mit dem Kaltluftstrom aus dem Ofen. Dieser Dampf kann an verschiedenen Oberflächen am Ofen oder in der Nähe des Ofens kondensieren und Wassertropfen bilden. Dies ist ein physikalischer Prozess und kann nicht vollständig vermieden werden.
- Página 26 Wie kann man die Ofeneinstellungen Wählen Sie die Einstellungen neben dem abschätzen, wenn das Gewicht eines Bratengewicht und ändern Sie die Zeit Bratens nicht im Rezept angegeben ist? geringfügig. Verwenden Sie wenn möglich eine Fleischsonde, um die Temperatur im Fleisch zu erfassen. Stecken Sie den Kopf der Fleischsonde vorsichtig in das Fleisch, entsprechend den Anweisungen des Herstellers.
-
Página 27: Reinigung Und Pflege
REINIGUNG UND PFLEGE Durch eine regelmäßige Reinigung behält Ihr Gerät sein Erscheinungsbild und wird für lange Zeit vollständig funktionieren. Im Folgenden wird erklärt, wie Sie Ihr Gerät reinigen können. Abhängig von dem von Ihnen erworbenen Modell kann es sein, dass nicht alle der genannten Bereiche bei Ihrem Modell enthalten sind. - Página 28 Bereich Reinigung Bedienfeld Heißes Seifenwasser Reinigen Sie das Bedienfeld mit einem feuchten Tuch und reiben Sie dieses anschließend mit einem trockenen Tuch trocken. Verwenden Sie keinen Glasreiniger oder Glasschaber. Türpaneel Heißes Seifenwasser Reinigen Sie das Türpaneel mit einem feuchten Tuch und reiben Sie dieses anschließend mit einem trockenen Tuch trocken.
- Página 29 Bereich Reinigung Führungsschienen Heißes Seifenwasser Weichen Sie die Führungsschienen in heißem Seifenwasser ein und reinigen Sie dieses mit einem weichen Tuch oder einer Bürste. Ausziehbare Einschübe Heißes Seifenwasser Reinigen Sie die ausziehbaren Einschübe mit heißem Seifenwasser ein und reinigen Sie dieses mit einem weichen Tuch oder einer Bürste.
- Página 30 FEHLERBEHEBUNG Problem Lösungsansatz Das Gerät funktioniert Die Sicherung könnte fehlerhaft sein. Überprüfen Sie nicht den Sicherungsschalter im Sicherungskasten. Stellen Sie sicher, dass der Netzstecker in der Steckdose steckt. Überprüfen Sie durch andere Geräte, ob es einen Stromausfall gibt. Die Drehknöpfe sind Die Drehknöpfe wurden versehentlich gelöst.
- Página 31 Problem Lösungsansatz Ungleichmäßige Die Temperatureinstellung ist zu hoch oder es könnte Bräunung der Lebensmittel eine andere Ebene verwendet werden. Überprüfen Sie, ob Ihre Einstellungen mit den Angaben im Rezept übereinstimmen. Die Oberflächenbeschaffenheit oder die Farbe oder das Material des verwendeten Backgeschirrs war für die gewählte Ofenfunktion nicht die beste Wahl.
-
Página 32: Hinweise Zur Entsorgung
HINWEISE ZUR ENTSORGUNG Befindet sich die linke Abbildung (durchgestrichene Mülltonne auf Rädern) auf dem Produkt, gilt die Europäische Richtlinie 2012/19/EU. Diese Produkte dürfen nicht mit dem normalen Hausmüll entsorgt werden. Informieren Sie sich über die örtlichen Regelungen zur getrennten Sammlung elektrischer und elektronischer Gerätschaften. - Página 33 Dear Customer, Congratulations on purchasing this device. Please read the following instructions carefully and follow them to prevent possible damages. We assume no liability for damage caused by disregard of the instructions and improper use. Scan the QR code to get access to the latest user manual and more product information.
-
Página 34: Safety Instructions
SAFETY INSTRUCTIONS CAUTION Risk of burns. This device and the accessible parts of the device become very hot during use. Use extreme care and caution and never touch the heating elements. • Keep children under 8 years away from the device. •... - Página 35 • Never move the baking trays or baking grates while they are hot, but rather allow them to cool down first. • Before cleaning and maintenance, always switch off the appliance and unplug the appliance from the mains socket. • This appliance is designed for household use and can be installed in standard kitchens or residential units.
- Página 36 CAUTION Risk of electric shock! Do not attempt to repair a damaged device yourself and stop using it. Turn off the power, unplug the appliance and contact your service representative. • To prevent damage, do not allow the power cord to run over sharp edges and do not bend or fold it.
-
Página 37: Installation
INSTALLATION CAUTION Risk of injury! Always have the installation carried out by trained specialist personnel to avoid electric shocks, personal injury and damage to the device. Note on Fitting the Oven into the Kitchen Unit Fit the oven into the space provided in the kitchen unit; it may be fi tted underneath a work top or into an upright cupboard. - Página 38 Notes on electrical connection • The device is designed for fixed installation with a three-pole mains cable and may only be connected by an authorised specialist in accordance with the wiring diagram. • Only a qualified electrician who complies with the relevant regulations may replace the mains cable.
- Página 39 Installation • To ensure safe operation of this unit, make sure that it has been installed properly and in accordance with the operating instructions. Damage caused by incorrect installation is not covered under the warranty. • Wear protective gloves during installation to prevent cuts from sharp edges. •...
- Página 40 • The mains plug must either be easily accessible or an isolating switch must be installed in the fixed wiring so that the unit can be disconnected from the mains if necessary after installation. • The unit must not be installed behind a decorative door to avoid overheating.
- Página 41 Once the oven is in place, secure it with the accessories (1), (2) and (3) shown below. Note: Do not overtighten the screws (1) to prevent damage to the furnace or the furnace housing. Only use a screwdriver to tighten the screws.
- Página 42 Accessories A selection of accessories is included in the scope of delivery of the device. Below you will find an overview of the accessories and information on their correct use. Accessories included in the scope of delivery Baking grid Baking tray For storing ovenware, cake tins and For the preparation of sheet cakes and casserole dishes.
- Página 43 Attaching accessories There are five slots in the cooking chamber for accessories. The slots are counted from bottom to top. The accessories can be pulled out about halfway without tilting. • Make sure that you place the accessories the right way round in the corresponding slot in the oven compartment (see illustration below).
- Página 44 Backup function The accessory can be pulled out about halfway before it snaps into place. The safety function prevents the accessories and the food on/inside them from falling down due to gravity when pulled out. Accessories should therefore be inserted correctly into the slots in the cooking chamber so that the safety function can engage.
-
Página 45: Device Overview And Keys
DEVICE OVERVIEW AND KEYS 10 11 Description 1. Function setting Changing the heating mode 2. On/Off Switching the oven on and off 3. Timer/ Parental lock Press the timer function/child lock for 3s 4. Microwave Use of the microwave and microwave combination function 5. -
Página 46: Commissioning
COMMISSIONING Before the first use Before using the device for the first time, the interior of the device and the accessories must be cleaned. • Remove all stickers, protective foils and transport protection. • Remove all accessories and side rails from the interior of the appliance. •... -
Página 47: Operation
Time setting Set the time before using the machine. 1. Press the TIME button after plugging in the oven power plug. Turn the right-hand dial to set the current hour. 2. Touch the TIME button again and turn the right-hand dial to set the current minute. 3. - Página 48 Heating mode Temperature Usage Grill 150 ~250 °C Grilling and roasting small quantities. Place the food centrally under the grill element. Double grill + 50 ~250 °C Grilling flat foods and roasting. circulating air The fan distributes the heat evenly in the oven cavity.
- Página 49 Using the device 1. After connecting the appliance to the power outlet, turn the function dial to set the desired function. Turn the adjustment knob to set the operating temperature. 2. When you touch the START/PAUSE button, the unit starts operating. If you do not touch this icon, the unit will return to standby mode after 5 minutes and the time will be displayed on the screen.
- Página 50 Adaptation during preparation It is possible to adjust the heating mode and temperature setting during operation by turning the function control or the adjustment control. If no other button is pressed within 6 seconds of the adjustment, this setting is saved. If you want to adjust the preparation time, press the TIME SETTING button and adjust the preparation time with the right adjustment knob.
- Página 51 • In standby mode, press the MICROWAVE button to use the microwave function. Turn the left-hand dial to set the microwave combination function. There are three available combination modes. Turn the right-hand dial to set the temperature. Touch the Time Setting button and adjust the time with the right-hand dial. Touch the MICROWAVE button to set the microwave power.
-
Página 52: Automatic Recipes
AUTOMATIC RECIPES Your appliance has a large number of automatic programmes to make your preparation easier. Select the appropriate program for the food you are using and follow the instructions on the screen. Recipe Micro Preheat Preset time Weight (min) Defrosting 08:00 min 0.2 kg... -
Página 53: Energy Saving Tips
ENERGY SAVING TIPS • Remove all accessories that are not required during the cooking and baking process. • If possible, do not open the oven door during cooking and baking. • If you open the oven door during cooking and baking, switch the mode to „Lamp“ (without changing the temperature setting). -
Página 54: Baking Tips
BAKING TIPS You want to prepare your own recipe. First try to find similar recipes and optimize the preparation process depending on the result. Is the cake ready baked? Insert a wooden stick into the cake about 10 minutes before the baking time indicated in the recipe is reached. - Página 55 Condensation water during baking. Steam is part of the baking and cooking process and normally moves along with the cold air flow from the oven. This steam can condense on various surfaces on or near the oven and form water droplets.
- Página 56 How can you estimate the oven settings Select the settings next to the roast weight if the weight of a roast is not specified in and change the time slightly. the recipe? If possible, use a meat probe to measure the temperature in the meat.
-
Página 57: Cleaning And Care
CLEANING AND CARE Regular cleaning will ensure that your device retains its appearance and will function fully for a long time. The following explains how to clean your machine. Depending on the model you have purchased, not all of the above areas may be included in your model. - Página 58 Area Cleaning Control panel Hot soapy water Clean the control panel with a damp cloth and then wipe it dry with a dry cloth. Do not use a glass cleaner or glass scraper. Door panel Hot soapy water Clean door panel with a damp cloth and then wipe it dry with a dry cloth.
- Página 59 Area Cleaning Guide rails Hot soapy water Soak the guide rails in hot soapy water and clean them with a soft cloth or brush. Extendable slide-in modules Hot soapy water Clean the pull-out shelves with hot soapy water and wipe them with a soft cloth or brush. Never remove the lubricant when the trays are pulled out.
- Página 60 TROUBLESHOOTING Problem Solution approach The device does not work The fuse may be faulty. Check the fuse switch in the fuse box. Make sure that the power plug is plugged into the power outlet. Check through other equipment to see if there is a power failure.
- Página 61 Problem Solution approach Uneven browning of food The temperature setting is too high or another level could be used. Check whether your settings match the specifications in the recipe. The surface finish or the color or material of the baking utensils used was not the best choice for the oven function you selected.
-
Página 62: Hints On Disposal
HINTS ON DISPOSAL According to the European waste regulation 2012/19/EU this symbol on the product or on its packaging indicates that this product may not be treated as household waste. Instead it should be taken to the appropriate collection point for the recycling of electrical and electronic equipment. -
Página 63: Datos Técnicos
Estimado cliente: Le felicitamos por la adquisición de este producto. Lea atentamente el siguiente manual y siga cuidadosamente las instrucciones de uso con el fin de evitar posibles daños. La empresa no se responsabiliza de los daños ocasionados por un uso indebido del producto o por haber desatendido las indicaciones de seguridad. -
Página 64: Indicaciones De Seguridad
INDICACIONES DE SEGURIDAD ATENCIÓN ¡Riesgo de quemaduras! Tanto este aparato como sus partes accesibles alcanzan temperaturas muy elevadas durante el funcionamiento. Tenga cuidado de no tocar el elemento calefactor. • Mantenga a los niños menores de 8 años lejos del aparato. •... - Página 65 • No mueva las bandejas o rejillas cuando están calientes. Deje que se enfrían primero. • Apague el aparato y desconecte el enchufe de la toma de corriente antes de limpiarlo o realizar trabajos de mantenimiento. • Este aparato está diseñado para uso doméstico y puede instalarse en cocinas estándares o viviendas.
- Página 66 ATENCIÓN ¡Riesgo de descarga eléctrica! No intente reparar el aparato usted mismo. Si el aparato está dañado, no lo utilice. Apague el aparato, desconecte el enchufe de la toma de corriente y póngase en contacto con el servicio técnico. • No doble el cable de alimentación ni deje quede colgando de cantos afi lados. Mantenga el cable lejos de las superfi cies calientes y llamas abiertas.
-
Página 67: Instalación
INSTALACIÓN ATENCIÓN ¡Peligro de lesiones! Haga que la instalación sea realizada siempre por personal capacitado y cualifi cado para evitar descargas eléctricas, lesiones y daños en el aparato. Indicaciones para el montaje en la unidad de cocina Coloque el horno en la abertura prevista en la unidad de cocina. Se puede insertar debajo de una encimera o en un armario de pie. - Página 68 Indicaciones sobre la conexión eléctrica • El aparato debe proveerse de un enchufe de tres clavijas para una instalación permanente y solo podrá ser instalado por un especialista autorizado siguiendo el diagrama de conexiones. • Solo personal electricista que respete las disposiciones correspondientes podrá sustituir el cable de alimentación.
- Página 69 Instalación • Para que este aparato se pueda poner en funcionamiento de un modo seguro, cerciórese de que sea instalado correctamente y siga las instrucciones de uso. Los daños que surjan de una instalación deficiente no estarán cubiertos por la garantía.
- Página 70 • El enchufe debe estar fácilmente accesible o bien contar con un conmutador de aislamiento en el cableado fijo para poder desconectar el aparato de la red eléctrica tras la instalación. • El aparato no debe colocarse tras una puerta empotrada para evitar sobrecalentamientos.
- Página 71 En cuanto el horno se sitúe en el lugar de utilización, fíjelo con los accesorios ilustrados a continuación (1), (2) y (3). Nota: no apriete demasiado los tornillos (1) para evitar daños en el horno o en su carcasa. Para apretar los tornillos, utilice exclusivamente un destornillador.
- Página 72 Accesorios En las piezas suministradas del aparato se encuentra una selección de accesorios. A continuación, verá un resumen de los accesorios e información relativa a un uso correcto. Accesorios incluidos en las piezas suministradas Rejilla de horneado Bandeja de horneado Para colocar recipientes de horneado, Para preparar galletas y repostería de moldes de bizcochos y moldes para...
- Página 73 Instalar los accesorios En el compartimento de horneado hay cinco inserciones para los accesorios. Las inserciones se cuentan de abajo arriba. El accesorio se puede extraer hasta la mitad sin peligro de que vuelque. • Asegúrese de que el accesorio esté bien colocado en la inserción correspondiente del compartimento de cocción (consulte la siguiente ilustración).
- Página 74 Función de seguridad El accesorio se puede extraer hasta la mitad antes de que encaje en su posición. La función de seguridad evita que el accesorio y los alimentos que se encuentran dentro o encima de él se vuelquen a causa de la fuerza de gravedad al tirar del accesorio. Por tanto, es necesario encajar correctamente el accesorio en las inserciones del compartimento de cocción para que pueda activarse la función de seguridad.
-
Página 75: Vista General Del Aparato Y Teclas
VISTA GENERAL DEL APARATO Y TECLAS 10 11 Tecla Descripción 1. Ajustes de Modificar el modo de calentamiento funcionamiento 2. On/off Apagar y encender el horno 3. Temporizador / Función del temporizador / protección infantil Protección infantil pulsando durante 3 s 4. -
Página 76: Puesta En Funcionamiento
PUESTA EN FUNCIONAMIENTO Antes del primer uso Antes de utilizar por primera vez el aparato, es necesario limpiar el interior del aparato y los accesorios. • Retire todos los adhesivos, plásticos de protección y protecciones de transporte. • Extraiga todos los accesorios y la rejilla lateral del interior del aparato. •... -
Página 77: Manejo
Configuración de la hora Antes de utilizar el aparato, introduzca la hora actual. 1. Pulse la tecla HORA cuando haya enchufado el horno. Girando el regulador derecho puede configurar la hora actual. Toque de nuevo la tecla HORA y configure los minutos actuales con el regulador derecho. - Página 78 Modo de calentamiento Temperatura Utilización Grill 150 ~250 °C Para preparar a la parrilla y tostar pequeñas cantidades. Coloque los alimentos en el centro, bajo el grill. Grill doble + circulación 50 ~250 °C Preparar a la parrilla alimentos de aire planos y tostar.
-
Página 79: Precalentamiento Rápido
Uso del aparato 1. Gire el regulador de funcionamiento tras conectar el aparato a la toma de corriente y seleccione la función que desee. Gire el regulador para seleccionar la temperatura. 2. Si toca la tecla START/PAUSE, el aparato se pone en marcha. Si no toca este símbolo, el aparato pasa al modo de espera a los 5 minutos y en pantalla se muestra la hora. - Página 80 Ajustar durante la preparación Existe la posibilidad de que durante el funcionamiento se ajuste el modo de calentamiento y el ajuste de temperatura girando el regulador de función o de ajustes. Si en 6 segundos tras el ajuste no toca ninguna tecla, se guardará esta configuración. Si desea ajustar la duración de la preparación, pulse la tecla CONFIGURACIÓN DEL TIEMPO y ajuste el tiempo de preparación con el regulador derecho de ajuste.
-
Página 81: Temporizador
• En modo de espera, pulse la tecla MICROONDAS para utilizar la función de microondas. Gire el regulador izquierdo para seleccionar la función de combinación de microondas. Existen tres modos disponibles de combinación. Seleccione la temperatura con el regulador derecho. Toque la tecla CONFIGURACIÓN DEL TIEMPO y seleccione el tiempo con el regulador derecho. -
Página 82: Receta Automática
RECETA AUTOMÁTICA El aparato dispone de una variedad de programas automáticos que tienen como propósito facilitarle la preparación. Para el alimento que desee utilizar, seleccione el programa adecuado y siga las instrucciones que aparecen en pantalla. Receta Micro Precalentar Tiempo predeterminado Peso (min) Descongelar... -
Página 83: Consejos De Ahorro De Energía
CONSEJOS DE AHORRO DE ENERGÍA • Desmonte todos los accesorios que no sean necesarios durante el proceso de cocción y horneado. • No abra la puerta del horno durante el proceso de cocción u horneado siempre que sea posible. • Si abre la puerta del horno durante la cocción y el horneado, se cambia el modo a „lámpara“... -
Página 84: Consejos De Horneado
CONSEJOS DE HORNEADO Desea preparar su propia receta. Primero intente encontrar recetas similares y optimizar el proceso de preparación en función del resultado. ¿Está listo el bizcocho? Introduzca un palillo de madera en el bizcocho 10 min antes de que se haya alcanzado el tiempo indicado en la receta. - Página 85 Agua condensada durante el horneado. El vapor es parte del horneado y la cocción y normalmente se desplaza junto con la corriente de aire frío del horno. Este vapor puede condensarse en distintas superficies del horno y formar gotas de agua. Se trata de un proceso físico inevitable.
- Página 86 ¿Cómo se puede estimar el ajuste del Seleccione los ajustes junto con el horno si el peso de un asado no está peso del asado y modifique el tiempo indicado en la receta? progresivamente. Cuando sea posible, utilice una sonda de temperatura para carne para registrar la temperatura de la carne.
-
Página 87: Limpieza Y Cuidado
LIMPIEZA Y CUIDADO Con una limpieza frecuente, su aparato conservará su apariencia y funcionará durante mucho tiempo. A continuación, se explica cómo puede limpiar el aparato. En función del modelo que haya adquirido, puede ocurrir que no todas las áreas mencionadas estén presentes en su modelo. - Página 88 Zona Limpieza Panel de control Agua caliente con jabón Limpie el panel de control con un paño húmedo y séquelo a continuación con un paño seco. No utilice limpiacristales o rascadores de cristal. Panel de la puerta Agua caliente con jabón Limpie el panel de la puerta con un paño húmedo y séquelo a continuación con un paño seco.
- Página 89 Zona Limpieza Rieles Agua caliente con jabón Ponga a remojo los rieles en agua caliente con jabón y límpielos con un paño suave o un cepillo. Inserciones extraíbles Agua caliente con jabón Limpie las inserciones extraíbles en agua caliente con jabón y límpielas con un paño suave o un cepillo.
-
Página 90: Resolución De Problemas
RESOLUCIÓN DE PROBLEMAS Problema Solución propuesta El aparato no funciona El fusible puede estar dañado. Compruebe el interruptor del fusible en la caja de fusibles. Asegúrese de que el enchufe encaje en la toma de corriente. Compruebe con otros aparatos si se ha producido un corte de luz. - Página 91 Problema Solución propuesta Tueste irregular de los La temperatura configurada es demasiado alta o se alimentos. debería utilizar otro nivel. Compruebe que los ajustes coinciden con los indicados en la receta. La composición de la superficie o el color del material de la bandeja de horneado empleada no era la mejor elección para la función seleccionada del horno.
-
Página 92: Retirada Del Aparato
RETIRADA DEL APARATO Si el aparato lleva adherida la ilustración de la izquierda (el contenedor de basura tachado) entonces rige la normativa europea, directiva 2012/19/UE. Este producto no debe arrojarse a un contenedor de basura común. Infórmese sobre las leyes territoriales que regulan la recogida separada de aparatos eléctricos y electrónicos. -
Página 93: Fiche Technique
Chère cliente, cher client, Toutes nos félicitations pour l’acquisition de ce nouvel appareil. Veuillez lire attentivement et respecter les instructions de ce mode d’emploi afin d’éviter d’éventuels dommages. Le fabricant ne saurait être tenu pour responsable des dommages dus au non- respect des consignes de sécurité... -
Página 94: Consignes De Sécurité
CONSIGNES DE SÉCURITÉ ATTENTION Risque de brûlures ! Cet appareil et ses parties accessibles deviennent très chauds pendant l‘utilisation. Soyez prudent et ne touchez jamais les éléments chauffants. • Gardez les enfants de moins de 8 ans à l ‚écart de l‘appareil. •... - Página 95 • Ne déplacez jamais les plaques ou les grilles de cuisson pendant qu‘elles sont chaudes, mais laissez-les d‘abord refroidir. • Éteignez toujours l‘appareil avant le nettoyage et la maintenance et débranchez la fiche de la prise. • Cet appareil est conçu pour un usage domestique et peut être encastré dans une cuisine standard ou dans un appartement.
- Página 96 ATTENTION Risque de choc électrique ! N‘essayez pas de réparer vous-même un appareil endommagé et cessez de l‘utiliser. Éteignez l‘appareil, débranchez le cordon d‘alimentation de la prise et contactez le service clientèle. • Ne laissez pas le cordon d‘alimentation passer sur des arêtes vives, ne le pliez pas ou ne le tordez pas pour éviter de l‘endommager.
-
Página 97: Installation
INSTALLATION ATTENTION Risque de blessure ! Faites toujours effectuer l‘installation par du personnel formé et qualifi é afi n d‘éviter les chocs électriques, les blessures et les dommages à l‘appareil. Conseils pour l‘encastrement dans une cuisine intégrée Montez le four dans l‘ouverture prévue dans la cuisine intégrée. Vous pouvez l‘insérer sous un plan de travail ou dans un caisson posé. - Página 98 Consignes pour les branchements électriques • L‘appareil est conçu pour une installation permanente avec un câble secteur à trois broches et ne peut être banché que par un spécialiste agréé et conformément au schéma de connexion. • Seul un électricien qualifié qui suit les réglementations applicables peut remplacer le cordon d‘alimentation.
- Página 99 Installation • Pour utiliser cet appareil en toute sécurité, assurez-vous qu‘il a été installé correctement et conformément au mode d‘emploi. Les dommages causés par une installation incorrecte ne sont pas couverts par la garantie. • Portez des gants de protection lors de l‘installation pour vous protéger des coupures dues aux arêtes vives.
- Página 100 • La fiche secteur doit être facilement accessible, ou bien un disjoncteur doit être intégré au câblage fixe afin que l‘appareil puisse être déconnecté du secteur après l‘installation. • Pour éviter la surchauffe, l‘appareil ne doit pas être installé derrière une porte décorative.
- Página 101 Dès que le four est dans son lieu d‘utilisation, fixez-le avec les accessoires (1), (2) et (3) illustrés ci-dessous. Remarque : Ne serrez pas excessivement les vis (1) pour éviter d‘endommager le four ou son châssis. Utilisez uniquement un tournevis pour serrer les vis.
- Página 102 Accessoires Une sélection d‘accessoires est fournie avec l‘appareil. Vous trouverez ci-dessous un aperçu des accessoires et des informations sur leur utilisation correcte. Accessoires fournis dans la livraison Grille de cuisson Plaque de cuisson Pour ranger les plats au four, les moules Pour la préparation de galettes et de à...
- Página 103 Installation d‘accessoires Il y a cinq emplacements pour les accessoires dans l‘espace de cuisson. Les emplacements sont comptés de bas en haut. L‘accessoire peut se retirer à peu près à mi-course sans basculer. • Veillez à placer les accessoires dans le bon sens dans la glissière correspondante de l‘espace de cuisson (voir figure ci-dessous).
- Página 104 Fonction de sécurité L‘accessoire peut être retiré à peu près à mi-course avant de s‘enclencher. La fonction de sécurité empêche les accessoires et les aliments qu‘ils contiennent de basculer sous l‘effet de leur poids lorsque vous les retirez. Les accessoires doivent donc être correctement insérés dans les glissières du volume de cuisson pour que la fonction de sécurité...
-
Página 105: Aperçu De L'appareil Et Touches
APERÇU DE L‘APPAREIL ET TOUCHES 10 11 Touche Description 1. Réglage de la fonction Pour changer le mode de chauffage 2. Marche / arrêt Pour allumer et éteindre le four 3. Minuterie/ Fonction minuterie /verrouillage parental verrouillage parental appuyez 3 s 4. -
Página 106: Mise En Marche
MISE EN MARCHE Avant la première utilisation Avant d‘utiliser l‘appareil pour la première fois, nettoyez l‘intérieur de l‘appareil et les accessoires. • Retirez tous les autocollants, films de protection et protections de transport. • Retirez tous les accessoires et les rails latéraux de l‘intérieur de l‘appareil. •... -
Página 107: Utilisation
Réglage de la durée Avant d‘utiliser l‘appareil, réglez l‘horloge. 1. Après avoir branché le four, appuyez sur HEURE. Vous pouvez régler l‘horloge en tournant le bouton rotatif droit. 2. Appuyez à nouveau sur HEURE et réglez les minutes avec le bouton rotatif droit. 3. - Página 108 Mode de chauffage Température Utilisation Grill 150 ~250 °C Pour faire griller et rôtir de petites quantités. Placez les aliments au milieu sous la résistance du gril. Gril double + 50 ~250 °C Pour faire griller et rôtir des convection aliments plats.
-
Página 109: Préchauffage Rapide
Utilisation de l‘appareil 1. Après avoir branché l‘appareil à la prise, tournez le sélecteur de fonction pour régler la fonction souhaitée. Tournez la molette pour régler la température. 2. Lorsque vous appuyez sur DÉMARRER / PAUSE, l‘appareil commence à fonctionner. Si vous ne touchez pas à ce symbole, l‘appareil repasse en mode veille après 5 minutes et affiche l‘heure à... - Página 110 Ajustement en cours de cuisson Vous pouvez régler le mode de chauffage et la température pendant le fonctionnement en tournant le sélecteur de fonction ou le bouton de réglage. Si aucune autre touche n‘est utilisée dans les 6 secondes suivant le réglage, ce paramètre est enregistré. Si vous souhaitez régler le temps de cuisson, appuyez sur DURÉE et ajustez la durée avec la commande de réglage droite.
-
Página 111: Verrouillage Parental
• En mode veille, appuyez sur MICRO-ONDES pour utiliser la fonction micro-ondes. Tournez le bouton rotatif gauche pour régler la fonction combinée micro-ondes. Il existe trois modes de combinaison disponibles. Réglez la température avec le bouton rotatif droit. • Appuyez sur DURÉE et réglez la durée avec le bouton rotatif droit. Appuyez sur MICRO-ONDES pour régler la puissance du micro-ondes. -
Página 112: Recettes Automatiques
RECETTES AUTOMATIQUES Votre appareil dispose d‘un grand nombre de programmes automatiques conçus pour vous faciliter la préparation. Sélectionnez le programme approprié pour les aliments que vous utilisez et suivez les instructions à l‘écran. Recette Micro Préchauffage Durée par défaut Poids (mn) décongélation 08:00 min... -
Página 113: Conseils Pour Économiser De L'énergie
CONSEILS POUR ÉCONOMISER DE L‘ÉNERGIE • Retirez tous les accessoires qui ne sont pas nécessaires pendant la cuisson. • Si possible, n‘ouvrez pas la porte du four pendant la cuisson. • Si vous ouvrez la porte du four pendant la cuisson, basculez le mode sur „Lampe“ (sans modifier le réglage de la température). -
Página 114: Conseils De Cuisson
CONSEILS DE CUISSON Vous souhaitez préparer votre propre Tout d'abord, essayez de trouver des recette. recettes similaires et d'optimiser le processus de cuisson en fonction du résultat. Votre gâteau est-il cuit ? Insérez un bâton en bois dans le gâteau environ 10 minutes avant que la fin du temps de cuisson spécifié... - Página 115 Eau de condensation pendant la cuisson. La vapeur fait partie de la cuisson et se déplace généralement avec le flux d'air froid du four. Cette vapeur peut se condenser sur diverses surfaces sur ou près du four et former des gouttelettes d'eau.
- Página 116 Comment estimer les réglages du four si Sélectionnez les paramètres à côté du le poids d'un rôti n'est pas spécifié dans poids du rôti et modifiez légèrement la la recette ? durée. Si possible, utilisez une sonde à viande pour mesurer la température de la viande.
-
Página 117: Nettoyage Et Entretien
NETTOYAGE ET ENTRETIEN Un nettoyage régulier permettra à votre appareil de garder son apparence et son bon fonctionnement pendant longtemps. Suivent des explications pour un bon nettoyage de votre appareil. Selon le modèle que vous avez acheté, le vôtre peut ne pas inclure toutes les zones citées. - Página 118 Zone Nettoyage Panneau de commande Eau chaude savonneuse Nettoyez le panneau de commande avec un chiffon humide, puis essuyez-le avec un chiffon sec. N'utilisez pas de produit ou de grattoir pour vitres. Panneau de porte Eau chaude savonneuse Nettoyez le panneau de porte avec un chiffon humide, puis essuyez-le avec un chiffon sec.
- Página 119 Zone Nettoyage Rails de guidage Eau chaude savonneuse Faites tremper les rails de guidage dans de l'eau chaude savonneuse et nettoyez-les avec un chiffon doux ou une brosse. Glissières télescopiques Eau chaude savonneuse Nettoyez les glissières télescopiques à l'eau savonneuse chaude et essuyez-les avec un chiffon doux ou une brosse.
-
Página 120: Résolution Des Problèmes
RÉSOLUTION DES PROBLÈMES Problème Solution L'appareil ne fonctionne Le fusible est peut-être défectueux. Vérifiez le disjoncteur dans la boîte à fusibles. Vérifiez que la fiche d'alimentation est branchée dans la prise. Vérifiez avec d'autres appareils s'il y a une panne de courant. - Página 121 Problème Solution Les aliments sont Le réglage de la température est trop élevé ou bien inégalement dorés vous devriez utilisez un autre niveau. Vérifiez que vos paramètres correspondent aux informations de la recette. La texture de surface ou la couleur ou le matériau des ustensiles de cuisson utilisés n'était pas le meilleur choix pour la fonction sélectionnée.
-
Página 122: Informations Sur Le Recyclage
INFORMATIONS SUR LE RECYCLAGE Vous trouverez sur le produit l’image ci-contre (une poubelle sur roues, barrée d‘une croix), ce qui indique que le produit se trouve soumis à la directive européenne 2012/19/UE. Renseignez- vous sur les dispositions en vigueur dans votre région concernant la collecte séparée des appareils électriques et électroniques. - Página 123 Gentile cliente, La ringraziamo per aver acquistato il dispositivo. La preghiamo di leggere attentamente le seguenti istruzioni per l’uso e di seguirle per evitare possibili danni tecnici. Non ci assumiamo alcuna responsabilità per danni scaturiti da una mancata osservazione delle avvertenze di sicurezza e da un uso improprio del dispositivo.
-
Página 124: Avvertenze Di Sicurezza
AVVERTENZE DI SICUREZZA ATTENZIONE Pericolo di ustione! Questo dispositivo e i componenti accessibili diventano estremamente caldi durante l’utilizzo. Prestare attenzione e non toccare assolutamente gli elementi riscaldanti. • Tenere i bambini sotto a 8 anni lontano dal dispositivo. • Questo dispositivo può essere utilizzato da bambini a partire da 8 anni e da persone con limitate capacità... - Página 125 • Non spostare teglie e griglie mentre sono bollenti, ma aspettare che si raffreddino. • Spegnere sempre il dispositivo e staccare la spina prima di pulizia e manutenzione. • Questo dispositivo è progettato per utilizzo casalingo e può essere incassato in cucine standard e unità...
- Página 126 ATTENZIONE Pericolo di folgorazione! Non cercare assolutamente di riparare autonomamente un dispositivo danneggiato e smettere di utilizzarlo. Spegnere il dispositivo, staccare la spina e contattare il servizio di assistenza ai clienti. • Non far passare il cavo di alimentazione lungo bordi taglienti e non piegarlo, in modo da non danneggiarlo.
-
Página 127: Installazione
INSTALLAZIONE ATTENZIONE Pericolo di lesione! Lasciare eseguire l’installazione sempre da personale tecnico preparato, in modo da evitare folgorazioni, danni a persone e danni al dispositivo. Avvertenze per l’incasso nella cucina Mettere il forno nell’apposito vano della vostra cucina. Può essere posizionato sotto un piano di lavoro o in un mobile verticale. - Página 128 Avvertenze sul collegamento elettrico • Il dispositivo è progettato per installazione fissa con cavo a tre poli e può essere collegato solo da un tecnico autorizzato, nel rispetto del piano di allacciamento. • Il cavo di alimentazione può essere sostituito solo da un elettricista, nel rispetto delle normative vigenti.
- Página 129 Installazione • Per poter utilizzare in sicurezza questo dispositivo, assicurarsi che venga installato in modo corretto e nel rispetto del manuale d’uso. Danni dovuti a un’installazione errata non sono coperti dalla garanzia. • Indossare guanti protettivi durante l’installazione, in modo da evitare di tagliarsi con i bordi affilati.
- Página 130 • La spina deve essere facilmente accessibile, altrimenti è necessario integrare nel cablaggio fisso un disgiuntore, per poter scollegare il dispositivo dalla rete elettrica dopo l’installazione in caso di necessità. • Il dispositivo non può essere installato dietro a uno sportello decorativo, in modo da evitare il surriscaldamento.
- Página 131 Quando il dispositivo si trova nel luogo di utilizzo, fissarlo con gli accessori indicati (1), (2) e (3). Nota: non stringere troppo le viti (1) per evitare di danneggiare il forno o il suo alloggiamento. Utilizzare solo un cacciavite per stringere le viti.
- Página 132 Accessori Nel volume di consegna del dispositivo si trovano diversi accessori. Vi presentiamo ora una panoramica sugli accessori, con informazioni relative al corretto utilizzo. Accessori inclusi in consegna Griglia di cottura Teglia di cottura Per poggiare stoviglie per la cottura in Per preparare torte in teglia e piccoli forno, forme per torte e sformati.
- Página 133 Installare gli accessori Nel vano di cottura ci sono 5 livelli per posizionare gli accessori. I livelli vengono contati dal basso verso l’alto. Gli accessori possono essere tirati fuori fino a circa la metà senza che si ribaltino. • Assicurarsi che gli accessori siano inseriti nel verso giusto sul livello corretto (v. immagine).
- Página 134 Funzione di fissaggio Gli accessori possono essere tirati fuori fino a circa la metà senza che si agganci. La funzione di fissaggio garantisce che gli accessori e gli alimenti sopra o all’interno non si ribaltino a causa della forza di gravità quando vengono tirati fuori. Per questo motivo, è...
-
Página 135: Descrizione Del Dispositivo E Tasti
DESCRIZIONE DEL DISPOSITIVO E TASTI 10 11 Tasto Descrizione 1. Impostazione funzioni Cambiare la modalità riscaldante. 2. On/Off Accendere e spegnere il forno. 3. Timer/Sicura per Funzione timer/Sicura per bambini premendo bambini 3 secondi. 4. Microonde Utilizzare la funzione a microonde e quella a microonde combinata. -
Página 136: Messa In Funzione
MESSA IN FUNZIONE Prima di procedere all’utilizzo Prima di utilizzare il dispositivo, è necessario pulire il vano interno e gli accessori. • Rimuovere tutti gli adesivi, le pellicole protettive e le protezioni di trasporto. • Togliere tutti gli accessori e le griglie laterali dall’interno del dispositivo. •... -
Página 137: Utilizzo
Impostare l’ora Impostare l’ora prima di utilizzare il dispositivo. 1. Dopo aver inserito la spina, premere il tasto ORA. Girare la manopola destra per impostare l’ora attuale. 2. Toccare di nuovo il tasto ORA e impostare i minuti con la manopola destra. 3. - Página 138 Modalità riscaldante Temperatura Utilizzo Grill 150-250 °C Grigliare e arrostire piccole quantità. Poggiare gli alimenti al centro, sotto all’elemento riscaldante del grill. Grill doppio + ventola 50-250 °C Grigliare alimenti piatti e arrostire. La ventola distribuisce omogeneamente il calore nel vano interno.
-
Página 139: Preriscaldare Rapidamente
Utilizzare il dispositivo 1. Girare l’apposita manopola per impostare la funzione desiderata dopo aver inserito la spina del dispositivo in una presa elettrica adatta. Girare la manopola di regolazione per impostare la temperatura di funzionamento. 2. Quando si tocca START/PAUSA inizia il funzionamento. Se non si tocca questo simbolo, il dispositivo torna in standby dopo 5 minuti e lo schermo mostra l’ora. - Página 140 Regolare le impostazioni durante la preparazione È possibile regolare modalità riscaldante e impostazione della temperatura durante la preparazione utilizzando le manopole per le funzioni e per le regolazioni. Se non si premono altri tasti entro 6 secondi dopo l’impostazione, questa viene salvata automaticamente.
- Página 141 • Premere MICROONDE in standby per utilizzare la funzione a microonde. Girare la manopola sinistra per impostare la funzione combinata con microonde. Ci sono tre modalità combinate. Impostare la temperatura con la manopola destra. Premere MICROONDE per impostare la potenza. •...
-
Página 142: Ricetta Automatica
RICETTA AUTOMATICA Il dispositivo è dotato di diversi programmi automatici per facilitare la preparazione. Selezionare il programma adatto alla pietanza da preparare e seguire le indicazioni sullo schermo. Ricetta Microonde Preriscaldamento Tempo predefinito Peso Scongelare Sì Sì 08:00 min. 0,2 kg 0,1 kg –... -
Página 143: Consigli Per Il Risparmio Energetico
CONSIGLI PER IL RISPARMIO ENERGETICO • Togliere tutti gli accessori che non sono necessari durante la cottura. • Se possibile, non aprire lo sportello durante la cottura. • Se si apre lo sportello durante la cottura, attivare la modalità “Lampada” (senza modificare la temperatura). -
Página 144: Consigli Per La Cottura
CONSIGLI PER LA COTTURA Desiderate preparare una vostra ricetta. Cercate ricette simili e ottimizzate il processo di preparazione in base al risultato. La torta è cotta per bene? Circa 10 minuti prima della fine della cottura, inserire un bastoncino di legno nella torta. - Página 145 Condensa durante la cottura. Il vapore fa parte della cottura al forno e fuoriesce normalmente dal forno con il flusso di aria fredda. Questo vapore può condensarsi su diverse superfici del forno o nelle sue vicinanze e formare goccioline d’acqua. Questo è un processo fisico che non può...
- Página 146 Come è possibile calcolare le Selezionare le impostazioni valide per impostazioni per il forno se nella ricetta un arrosto di peso simile e modificare non è indicato il peso di un arrosto? leggermente il tempo. Se possibile, utilizzare un termometro a sonda per misurare la temperatura della carne.
-
Página 147: Pulizia E Manutenzione
PULIZIA E MANUTENZIONE Una pulizia regolare permette di mantenere immutati l’aspetto del dispositivo e le sue funzionalità. Di seguito viene indicato come pulire il dispositivo. In base al modello acquistato, può essere che non tutte le aree indicate siano rilevanti: Non utilizzare: •... - Página 148 Area Pulizia Pannello di controllo. Acqua calda e sapone Pulire il pannello di controllo con un panno umido e asciugarlo con un panno asciutto. Non utilizzare detergenti o raschietti per vetro. Pannello dello sportello. Acqua calda e sapone Pulire il pannello con un panno umido e asciugarlo con un panno asciutto.
- Página 149 Area Pulizia Guide di scorrimento. Acqua calda e sapone Ammorbidire le guide in acqua calda e sapone e pulirle poi con un panno o una spazzola. Ripiani estraibili. Acqua calda e sapone Ammorbidire i ripiani in acqua calda e sapone e pulirli poi con un panno o una spazzola.
-
Página 150: Correzione Degli Errori
CORREZIONE DEGLI ERRORI Problema Soluzioni Il dispositivo non funziona. Il fusibile potrebbe essere guasto. Controllare i fusibili nel quadro elettrico. Assicurarsi che la spina sia collegata alla presa elettrica. Controllare se è in corso un blackout attraverso altri dispositivi. Le manopole si sono Le manopole sono state staccate inavvertitamente. - Página 151 Problema Soluzioni Doratura non omogenea. La temperatura è troppo alta o bisogna utilizzare un altro livello. Controllare che le impostazioni corrispondano a quelle della ricetta. La superficie, il colore o il materiale delle stoviglie utilizzate non erano ideali per la funzione selezionata. Utilizzare, ad es., stoviglie opache, scure e leggere per la funzione “Calore dall’alto e dal basso”.
-
Página 152: Smaltimento
SMALTIMENTO Se sul prodotto è presente la figura a sinistra (il cassonetto mobile sbarrato), si applica la direttiva europea 2012/19/UE. Questi prodotti non possono essere smaltiti con i rifiuti normali. Informarsi sulle disposizioni vigenti sulla raccolta separata di dispositivi elettrici ed elettronici. Non smaltire i vecchi dispositivi con i rifiuti domestici.