Tabla de contenido
Publicidad
Idiomas disponibles
Idiomas disponibles
Enlaces rápidos
Installation and Assembly:
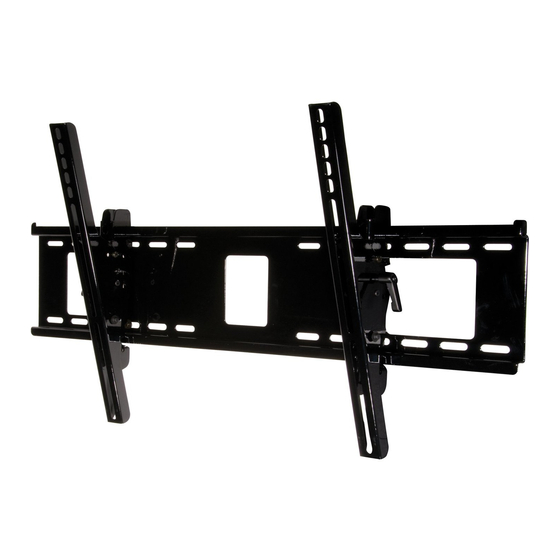
Universal Tilt Wall Mounts
for 37" - 60" (94 - 152 cm) Flat Panel Screens
Model: PT660, PWS421/BK
U L
C
US
©
Max Load Capacity:
200 lb (90.7kg)
Features:
• Universal mount fi ts screens with mounting hole patterns up to 29.06" W x 17.67" H (738 mm W x 449 mm H)
• Screen held only 2.5" (64 mm) from wall for a discreet installation
• Open wall plate design allows for greater wall and an array of cable management options
• Universal tilt brackets easily hook onto the wall plate for fast installation
• Adjustable up to 15° of forward tilt and up to -5° backward tilt for optimal viewing angle
• One-touch tilt for effortless adjustment
• Pre-tensioned universal tilt bracket allows for tilt angle adjustment in one easy motion.
• Easy locking handle locks the screen position into place without the use of tools
• Optional IncreLok feature offers fi xed tilts at -5°, 0°, 5°, 10°, 15° increments
• Includes Sorted-For-You™ fastener packs for installation to wood studs, concrete and cinder block
• Optional horizontal adjustment of up to 8" (203 mm) (depending on screen model) for perfect screen placement
ISSUED: 02-05-09 SHEET #: 202-9272-4 04-12-10
Publicidad
Capítulos
Tabla de contenido

Manuales relacionados para PEERLESS Paramount PT660


Resumen de contenidos para PEERLESS Paramount PT660
- Página 1 Installation and Assembly: Universal Tilt Wall Mounts for 37" - 60" (94 - 152 cm) Flat Panel Screens Model: PT660, PWS421/BK © Max Load Capacity: 200 lb (90.7kg) Features: • Universal mount fi ts screens with mounting hole patterns up to 29.06" W x 17.67" H (738 mm W x 449 mm H) •...
-
Página 2: Tabla De Contenido
NOTE: Read entire instruction sheet before you start installation and assembly. WARNING • Do not begin to install your Peerless product until you have read and understood the instructions and warnings contained in this Installation Sheet. If you have any questions regarding any of the instructions or warnings, for US customers please call Peerless customer care at 1-800-865-2112, for all international customers, please contact your local distributor. -
Página 3: Parts List
Before you begin, make sure all parts shown are included with your product. Parts List Description Part # AA wall plate 201-P1018 BB left tilt bracket 201-P1471 CC right tilt bracket 201-P1469 DD #14 x 2.5" wood screw 5S1-015-C03 EE concrete anchor 590-0320 Parts may appear slightly different than illustrated. -
Página 4: Installation To Double Wood Stud Wall
Installation to Double Wood Stud Wall WARNING • Installer must verify that the supporting surface will safely support the combined load of the equipment and all attached hardware and components. • Tighten wood screws so that wall plate is fi rmly attached, but do not overtighten. Overtightening can damage the screws, greatly reducing their holding power. -
Página 5: Installation To Solid Concrete Or Cinder Block
WARNING • When installing Peerless wall mounts on cinder block, verify that you have a minimum of 1-3/8" (35 mm) of actual concrete thickness in the hole to be used for the concrete anchors. Do not drill into mortar joints! Be sure to mount in a solid part of the block, generally 1"... -
Página 6: Installing Tilt Brackets
Attaching Tilt Brackets to Screen using Baffl ed Fastener Pack WARNING • Tighten screws so adapter brackets are fi rmly attached. Do not tighten with excessive force. Overtightening can cause stress damage to screws, greatly reducing their holding power and possibly causing screw heads to become detached. - Página 7 For Flat Back Screen Begin with the shortest length screw, hand thread through multi-washer and tilt bracket into screen as shown below. Screw must make at least three full turns into the mounting hole and fi t snug into place. Do not over tighten. If screw cannot make three full turns into the screen, select a longer length screw from the baffl...
-
Página 8: Mounting And Removing Flat Panel Screen
15° forward or 5° backward. 8 of 34 ISSUED: 02-05-09 SHEET #: 202-9272-4 04-12-10 © 2009, Peerless Industries, Inc. All rights reserved. All other brand and product names are trademarks or registered trademarks of their respective owners. Peerless Industries, Inc. -
Página 9: Instalación Y Montaje
Instalación y montaje: Soporte universal de pared Paramount™ con capacidad de in- clinación para pantallas LCD y pantallas planas de plasma de 37" a 60" (94 - 152 cm) Modelos: PT660, PWS421/BK © Máxima capacidad de carga: 200 lb (90.7 kg) Características: •... -
Página 10: Construcción De La Pared
Hoja de Instalación. Si tiene alguna pregunta acerca de cualquiera de las instrucciones o las ad- vertencias, por favor, llame a Servicio al Cliente de Peerless al 1-800-865-2112 si está en EE. UU. Si es un cliente internacional, por favor, comuníquese con su distribuidor local. -
Página 11: Lista De Piezas
Español Antes de comenzar, asegúrese de que su producto incluye todas las piezas ilustradas. Lista de piezas Descripción Cantidad N.o de pieza 201-P1018 placa de pared 201-P1471 soporte inclinable izquierdo 201-P1469 soporte inclinable derecho 5S1-015-C03 tornillo para madera de 14 x 2.5" 590-0320 anclaje para concreto Algunas partes pueden diferir un poco de las ilustradas. -
Página 12: Instalación En Una Pared Con Montantes De Madera Dobles
Español Instalación en una pared con montantes de madera dobles ADVERTENCIA • El instalador debe verifi car que la superfi cie de apoyo sea capaz de soportar fi rmemente la carga combinada del equipo y todos los herrajes y componentes. •... -
Página 13: Instalación En Una Pared De Concreto Macizo O De Bloques De Hormigón De Escorias
ADVERTENCIA • Cuando instale soportes de pared Peerless en bloques de hormigón de escorias, verifi que que tengan un mínimo de 1-3/8" (35 mm) de superfi cie efectiva de concreto en el agujero que va a utilizar para los anclajes de concreto. ¡No perfore en las juntas de mortero! Asegúrese de instalar el soporte en una parte sólida del bloque, generalmente a un... -
Página 14: Instalación De Los Soportes Inclinables
Español Instalación de los soportes inclinables ADVERTENCIA • Apriete los tornillos de tal modo que los soportes adaptadores queden fi rmemente sujetos. No apriete aplicando demasiada fuerza. El apriete excesivo puede causar daño por esfuerzo a los tornillos, reduciendo enormemente su fuerza de fi... - Página 15 INCLINABLE (BB o CC) Si tiene alguna pregunta, por favor, llame a Servicio al Cliente de Peerless al 1-800-865-2112. Instalación de un televisor que tiene la parte posterior abultada o empotrada Comience con uno de los tornillos más largos, enrósquelo, con la mano, a través de la arandela múltiple, el soporte adaptador y el espaciador, en ese orden, a la parte posterior de la pantalla, como se muestra abajo.
-
Página 16: Instalación Y Desinstalación De La Pantalla Plana
fi g 4.1 16 de 34 PUBLICADO: 02-05-09 HOJA #: 202-9272-4 04-12-10 © 2009, Peerless Industries, Inc. Todos los derechos reservados. Cualesquiera otras marcas y nombres de productos son marcas comerciales o registradas de sus respectivos dueños. Peerless Industries, Inc. -
Página 17: Installation Et Assemblage
Installation et assemblage: Supports muraux inclinables universels Paramount™ pour écrans plats ACL et plasma de 37 à 60 po (94 - 152 cm) Modèles: PT660, PWS421/BK © Capacité de charge maximale préconisée: 200lb (90.7 kg) Caractéristiques: • Le support universel est adapté aux écrans avec confi guration de trous de montage de 29,06 po de large x 17,67 po de hauteur (738 mm L x 449 mm H) •... -
Página 18: Outils Nécessaires Au Montage
REMARQUE: lisez entièrement la fi che d’instructions avant de commencer l’installation et l’assemblage. AVERTISSEMENT • Ne commencez pas à installer votre produit Peerless avant d’avoir lu et assimilé les instructions et les avertisse- ments contenus dans cette fi che d’installation. Pour toute question concernant les instructions ou les avertissements, veuillez appeler le service à... -
Página 19: Liste Des Pièces
Français Avant de commencer, veillez à ce que toutes les pièces énumérées soient incluses.. Liste des pièces Référence Description Qté des pièces 201-P1018 plaque murale 201-P1471 support inclinable gauche 201-P1469 support inclinable droit 5S1-015-C03 vis à bois no 14 x 2,5 po 590-0320 chevilles d'ancrage pur béton Il est possible que les pièces semblent légèrement... -
Página 20: Installation Sur Un Mur À Doubles Montants En Bois
Français Installation sur un mur à doubles montants en bois AVERTISSEMENT • L’installateur doit s’assurer que la surface de support pourra soutenir sans danger la charge combinée de l’équipement, de toute sa visserie et de tous ses composants. • Serrez les vis à bois de manière que la plaque murale soit fermement fi xée, mais sans excès. Un serrage excessif peut endommager les vis et en réduire considérablement le pouvoir de maintien. -
Página 21: Installation Sur Du Béton Plein Ou Un Bloc De Béton De Mâchefer
AVERTISSEMENT • Si vous installez des montures murales Peerless sur un bloc de béton de mâchefer, vérifi ez que vous disposez d’une épaisseur de béton d’au moins 3,4 cm (1 3/8 po) dans le trou destiné aux ancrages de béton. Ne percez pas dans les joints de mortier ! Veillez à... -
Página 22: Installation De Support Inclinables
Français Installation des support inclinables AVERTISSEMENT • Serrez les vis de manière à ce que les support adaptateurs tiennent solidement en place. N’exercez pas une force excessive pour serrer. Un serrage excessif peut endommager les vis, réduire considérablement leur capacité de support et, éventuellement, faire tomber les têtes de vis. - Página 23 INCLINABLE (BB ou CC) Pour toute question, veuillez appeler le service à la clientèle de Peerless au 1-800-729-0307. Pour un écran à dos convexe ou concave Commencez par la vis la plus longue et vissez-la manuellement à l’écran en la faisant passer à travers la...
-
Página 24: Installation De L'écran Plat Sur La Plaque Murale
24 sur 34 PUBLIÉ LE: 02-05-09 FEUILLE n : 202-9272-4 04-12-10 © 2009, Peerless Industries, Inc. Tous droits réservés. Tous les autres noms de marques et de produits sont des marques de commerce ou déposées de leurs propriétaires respectifs. Peerless Industries, Inc. - Página 25 Anbringung und Zusammenbau: Universal-Wandkipphalter für Flachbildschirme von 37-60 Zoll (94 - 152 cm) Modelle: PT660, PWS421/BK © Max. Tragfähigkeit: 200 lb (90.7kg) Merkmale: • Universaler Halter passend für Bildschirme mit Montagebohrungsmustern bis zu 738 mm B x 449 mm H (29,06 Zoll B x 17,67 Zoll H) •...
- Página 26 HINWEIS: Lesen Sie die gesamte Anleitung, bevor Sie mit der Anbringung und dem Zusammenbau beginnen. ACHTUNG • Beginnen Sie mit der Anbringung Ihres Peerless-Produkts erst, nachdem Sie die in dieser Montageanleitung enthaltenen Anleitungen und Achtungshinweise gelesen und sich gründlich mit ihnen vertraut gemacht haben. Falls Sie Fragen hinsichtlich irgendeiner der Anleitungen oder Achtungshinweise haben, wenden Sie sich in den USA bitte an den Peerless-Kundendienst unter der Rufnummer 1-800-865-2112.
-
Página 27: Teileliste
Deutsch Vergewissern Sie sich vor Beginn der Arbeiten, dass alle dargestellten Teile mit Ihrem Produkt mitgeliefert wurden. Teileliste Beschreibung Anz. Teilenr. AA Wandplatte 201-P1018 BB Linke Kipphalterung 201-P1471 CC Rechte Kipphalterung 201-P1469 DD Nr. 14 x 2,5 Zoll Holzschrauben 5S1-015-C03 EE Betondübel 590-0320 Die Teile können etwas anders als in der Abbildung aussehen. -
Página 28: Anbringung An Wand Mit Zwei Holzständerreihen
Deutsch Installation zu verdoppeln Holzständerreihe ACHTUNG • Bei der Anbringung muss darauf geachtet werden, dass die Wand die kombinierte Last von Bildschirm und allen Befestigungsteilen und -komponenten tragen kann. • Ziehen Sie die Schrauben fest genug an, dass die Wandplatte sicher befestigt ist, doch ohne sie zu überdrehen. Durch Überdrehen können die Schrauben beschädigt werden, wodurch ihr Haltevermögen stark reduziert wird. -
Página 29: Anbringung An Massivbeton Oder Porenbetonstein
Deutsch ACHTUNG • Bei der Anbringung von Peerless-Wandhaltern an Porenbetonstein muss sichergestellt werden, dass die tatsächliche Stärke des Betons, in den das Loch für die Betondübel gebohrt wird, mindestens 35 mm (1 3/8 Zoll) beträgt. Bohren Sie nicht in Mörtelfugen! Achten Sie darauf, dass die Anbringung an einem massiven Teil des Blocks erfolgt, im Allgemeinen mindestens 25 mm (1 Zoll) von der Blockseite entfernt. -
Página 30: Anbringung Von Kipphalterungen
Deutsch Befestigung von Kipphalterungen am Bildschirm mit Hilfe des Befestigungsteilesortiments ACHTUNG • Ziehen Sie die Schrauben so an, dass die Kipphalterungen sicher befestigt sind. Ziehen Sie die Schrauben nicht zu fest an. Durch die beim Überdrehen entstehende Spannung können die Schrauben beschädigt werden, was ihr Haltevermögen stark reduziert und möglicherweise dazu führen kann, dass die Schraubenköpfe sich lösen. - Página 31 KIPPHALTERUNG (BB oder CC) Wenden Sie sich mit Fragen an den Peerless-Kundendienst unter der Telefonnummer +1-800-865-2112 (innerhalb der USA). Bildschirme mit Wölbung oder Vertiefung an der Rückseite Beginnen Sie mit der längeren Schraube und schrauben Sie diese in der unten abgebildeten Reihenfolge von Hand durch die Mehrlochscheibe, die Adapterhalterung und den Abstandhalter in den Bildschirm.
-
Página 32: Anbringung Des Flachbildschirms An Der Wandplatte
Abbildund.4.1 bzw. 5° nach hinten. 32 von 34 AUSGEGEBEN: 02-05-09 BLATT NR.: 202-9272-4 04-12-10 © 2009, Peerless Industries, Inc. Alle Rechte vorbehalten. Alle anderen Marken- und Produktnamen sind eingetragene Marken der jeweiligen Eigentümer. Peerless Industries, Inc. 3215 W. North Ave. -
Página 33: Garantía Limitada De Cinco Años
Limited Five-Year Warranty. This warranty does not cover damage caused by (a) service or repairs by the customer or a person who is not authorized for such service or repairs by Peerless Industries, Inc., (b) the failure to utilize proper packing when returning the product, (c) incorrect installation or the failure to follow Peerless’ instructions or warnings when installing, using or storing the product, or (d) misuse or accident, in transit or otherwise, including in cases of third party actions and force majeure. -
Página 34: Garantie De Cinq Ans
Peerless ne saura en aucun cas être tenue pour responsable de tout préjudice accidentel ou induit, ou de tout préjudice dû au vol d’un produit, qu’il soit ou non protégé...