Tabla de contenido
Publicidad
Idiomas disponibles
Idiomas disponibles
Enlaces rápidos
π
H-4595, H-4596
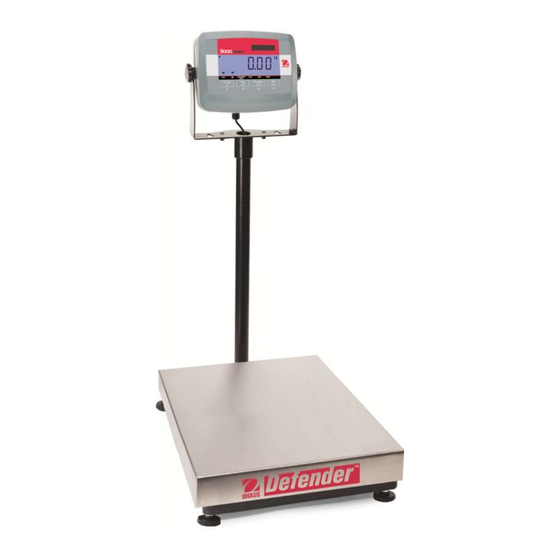
OHAUS DEFENDER™ 5000
XTREME PLATFORM SCALE
CONTROL PANEL
CONTROL FUNCTIONS
BUTTON
Turns the indicator ON
PRIMARY FUNCTION
If indicator is ON, sets
(Short Press)
zero.
Turns the indicator off.
SECONDARY FUNCTION
(Long Press)
Accepts the current
setting on the display.
MENU FUNCTION
(Short Press)
PAGE 1 OF 30
1-800-295-5510
uline.com
OVERVIEW OF CONTROLS
4
3
2
1
7
8
On/Zero
Off
Yes
ON/ZERO
Sends the current value to
the COM port if AUTOPRINT
is set to Off.
OFF
UNITS
Changes the weighing
unit.
YES
Advances to the next
menu or menu item.
Rejects the current setting
on the display and
advances to the next
available setting.
Increments the value.
5
6
Print
Units
No
PRINT
Initiates an application mode.
Temporarily displays the active
mode's reference data.
In Weigh mode, temporarily
displays 10x expanded resolution
Allows changing the application
mode.
Press and hold allows scrolling
through modes.
NO
Moves back to previous menu
item.
Decrements the value.
Para Español, vea páginas 11-20.
Pour le français, consulter les pages 21-30.
CONTROL PANEL PARTS
#
DESCRIPTION
1
Under LED
2
Accept LED
3
Over LED
4
Capacity Label Window
5
TARE Menu Button
6
FUNCTION Mode Button
7
PRINT Units Button
8
ON/ZERO Off Button
Function
Mode
Back
FUNCTION
Performs a tare
operation.
MODE
Enter the User Menu.
BACK
Exits the User Menu.
Aborts the calibration
in progress.
Tare
Menu
Exit
TARE
MENU
EXIT
0615 IH-4595
Publicidad
Tabla de contenido

Manuales relacionados para Uline OHAUS DEFENDER 5000 XTREME


Resumen de contenidos para Uline OHAUS DEFENDER 5000 XTREME
- Página 1 Para Español, vea páginas 11-20. Pour le français, consulter les pages 21-30. π H-4595, H-4596 1-800-295-5510 uline.com OHAUS DEFENDER™ 5000 XTREME PLATFORM SCALE OVERVIEW OF CONTROLS CONTROL PANEL CONTROL PANEL PARTS DESCRIPTION Under LED Accept LED Over LED Capacity Label Window...
-
Página 2: Menu Navigation
SET UP Remove red shipping tags located under metal pan. Figure 1 (See Figure 1) OPERATION TURNING INDICATOR ON/OFF 6. Press the YES button when the last 100000 digit has been set. 1. To turn the Indicator on, press the 7. - Página 3 OPERATION CONTINUED ENABLE UNITS OF MEASURE OUNCE UNIT Set the status: Units of measure must be enabled in the Unit menu to select from the PRINT UNITS button. OFF = Disabled ON = Enabled Once in the Unit Menu, you may turn UNIt units of measure on and off.
-
Página 4: Calibration Menu
OPERATION CONTINUED EXPONENT CALIBRATION VALUES SPAN CALIBRATION LINEARITY CALIBRATION Set the factor multiplier: MODEL # POINTS (kg.) POINTS (kg.) = 10 (Factor x 1) H-4595 25, 50 = 10 (Factor x 10) H-4596 50, 100 • = 10 (Factor x 100) •... -
Página 5: Linearity Calibration
OPERATION CONTINUED SPAN ADJUST 5. The display flashes 0. 6. With no weight on the scale, press the Span adjust uses one calibration point. The span adjust YES button to establish the zero point. point is established with a calibration mass placed on the scale. - Página 6 OPERATION CONTINUED AUTO-TARE 7. The display flashes the actual difference between the calibration data and the test weight. Auto-Tare automatically tares the initial weight (such as a container) placed on the empty scale, without having 8. The example shows a 0.010 to press the TARE button.
-
Página 7: Check Weighing
OPERATION CONTINUED AVERAGE PIECE WEIGHT (APW) REFERENCE WEIGHT When the FUNCTION MODE button is When the FUNCTION MODE button is CLr.rEF released, CLr.rEF% is displayed. released, CLr.PW Pcs is displayed. CLEARING A STORED APW CLEARING A STORED REFERENCE WEIGHT Press the YES button to clear the stored APW. Press the YES button to clear the stored reference weight. -
Página 8: Dynamic Weighing
OPERATION CONTINUED EDITING THE UNDER SETTING NOTE: When using manual 5 SEC mode, it is not necessary 1. The display shows SEt.LO. Press the for the display to be at zero SEt.LO YES button to edit setting. • gross or net. When using Settings: semi-automatic or automatic mode, the display must be... - Página 9 OPERATION CONTINUED LOAD CELL SEALING COLLAR NOTE: When Legal for Trade is set to ON and the security switch is set to ON, the following menu When the scale base is attached to the indicator using settings cannot be changed: Zero Calibration, a connector, it is necessary to seal the load cell cable Span Calibration, Linearity Calibration, GEO, to the indicator in some jurisdictions.
- Página 10 If the troubleshooting section does not resolve your problem, contact ULINE Customer Service at 1-800-295-5510. π CHICAGO • ATLANTA • DALLAS • LOS ANGELES • MINNEAPOLIS • NYC/PHILA • SEATTLE • MEXICO • CANADA 1-800-295-5510 uline.com...
- Página 11 π H-4595, H-4596 800-295-5510 uline.mx OHAUS DEFENDER™ 5000 XTREME BÁSCULA DE PLATAFORMA REVISIÓN DE LOS CONTROLES PANEL DE CONTROL PARTES DEL PANEL DE CONTROL DESCRIPCIÓN LED Under (Inferior) LED Accept (Aceptar) LED Over (Excedente) Ventana de etiqueta de capacidad Botón TARE Menu (Menú TARA) Botón FUNCTION Mode (Modo...
-
Página 12: Configuración
CONFIGURACIÓN Remueva las etiquetas de envío rojas que se Diagrama 1 encuentran debajo de la bandeja de metal. (Vea Diagrama 1) FUNCIONAMIENTO ENCENDER/APAGAR EL INDICADOR 6. Una vez que haya fijado el último 100000 dígito, presione el botón YES. Para encender el indicador, La nueva configuración se muestra oprima el botón ON/ZERO OFF ... -
Página 13: Habilite Unidades De Medida
CONTINUACIÓN DE FUNCIONAMIENTO HABILITE UNIDADES DE MEDIDA UNIDAD OUNCE (ONZA) Configure el estado: Las unidades de medida pueden habilitarse en el menú Unit (Unidad) al seleccionar el botón PRINT UNITS (Imprimir OFF = Inhabilitado Unidades). ON = Habilitado Una vez en el Unit Menu (Menú de UNIt NOTA: Unidad Onza no está... -
Página 14: Menú De Calibración
CONTINUACIÓN DE FUNCIONAMIENTO EXPONENTE 5. Para anular la calibración, presione el botón EXIT (salir) en cualquier momento durante el proceso de Configure el factor multiplicador: calibración. = 10 (Factor x 1) 6. Cuando está habilitada cualquier selección = 10 (Factor x 10) del menú... -
Página 15: Calibración De Linealidad
CONTINUACIÓN DE FUNCIONAMIENTO 3. Para elegir un punto de intervalo La pantalla mostrará --C-- mientras --C-- o una unidad de calibración determina el punto medio. diferentes, edite la configuración tal 8. En la pantalla parpadeará un 0. y como se explica en Navegación 9. -
Página 16: Funcionamiento Del Cero
CONTINUACIÓN DE FUNCIONAMIENTO 1. Cuando se muestre tESt, presione 2. Para eliminar el valor de tara, vacíe O.000 tESt el botón YES para iniciar la prueba la báscula y presione el botón TARE. de calibración. La pantalla mostrará el peso bruto. 2. -
Página 17: Modos De Aplicación
CONTINUACIÓN DE FUNCIONAMIENTO MODOS DE APLICACIÓN DETERMINAR UN NUEVO APW Presione el botón NO para Mantenga presionado el botón FUNCTION MODE aumentar la cantidad de la hasta que aparezca el modo de aplicación muestra. Las opciones son 5, 10, deseado. Solo se mostrarán los modos habilitados 20, 50 y 100. -
Página 18: Pesaje Dinámico
CONTINUACIÓN DE FUNCIONAMIENTO ESTABLECER UN NUEVO PESO DE REFERENCIA EDITAR LA CONFIGURACIÓN OVER (EXCEDENTE) La pantalla muestra Put.rEF %. La pantalla muestra SEt.HI. Presione Put.rEF SEt.HI el botón YES para editar la configuración. Configuraciones: Para determinar el peso de rEF. t referencia, coloque el ejemplar -999950 hasta 999950 en la báscula y presione el botón... -
Página 19: Legal Para Uso Comercial
CONTINUACIÓN DE FUNCIONAMIENTO VERIFICACIÓN NOTA: Si se seleccionó SEt 0 en el elemento de menú Dinámico, no se muestra el cronómetro de El director local de pesos y medidas o un agente cuenta regresiva. de servicio autorizado debe llevar a cabo un procedimiento de verificación. -
Página 20: Mantenimiento
Si la sección de solución de problemas no soluciona su problema, llame a la línea de Servicio a Clientes de Uline al 800-295-5510. π CHICAGO • ATLANTA • DALLAS • LOS ANGELES • MINNEAPOLIS • NYC/PHILA • SEATTLE • MEXICO • CANADA 800-295-5510 uline.mx... -
Página 21: Aperçu Des Commandes
π H-4595, H-4596 1-800-295-5510 uline.ca OHAUS DEFENDER 5000 XTREME – BALANCE À PLATEFORME APERÇU DES COMMANDES PANNEAU DE ÉLÉMENTS DU PANNEAU COMMANDE DE COMMANDE DESCRIPTION Voyant « Under » Voyant « Accept » Voyant « Over » Fenêtre affichant la capacité... - Página 22 INSTALLATION Enlevez les étiquettes d'expédition rouges situées en Figure 1 dessous du plateau en métal. (Voir Figure 1) FONCTIONNEMENT ALLUMER OU ÉTEINDRE L'INDICATEUR 6. Appuyez sur la touche YES après 100000 avoir entré le dernier chiffre. Pour allumer l'indicateur, appuyez sur Le nouveau paramètre s'affiche et la touche ON/ZERO OFF.
- Página 23 FONCTIONNEMENT SUITE ACTIVER LES UNITÉS DE MESURE UNITÉ DE ONCE Définir le staut : Les unités de mesure doivent être activées dans le menu d'unités pour pouvoir les sélectionner en appuyant sur la OFF = Désactivé touche PRINT UNITS . ON = Activé...
-
Página 24: Menu D'étalonnage
FONCTIONNEMENT SUITE EXPOSANT 5. Pour annuler l'étalonnage, appuyez sur la touche EXIT à tout moment pendant le processus d'étalonnage. Programmez le facteur multiplicateur : 6. Lorsqu'une sélection du menu GMP est activée, = 10 (Facteur x 1) les résultats d'étalonnage sont automatiquement = 10 (Facteur x 10) imprimés. - Página 25 FONCTIONNEMENT SUITE 3. Pour sélectionner un point L'écran indique --C-- lorsque le --C-- d'intervalle de mesure ou une unité point milieu est déterminé. d'étalonnage différent, modifiez le 8. Le chiffre 0 clignote à l'écran. paramètre comme expliqué dans 9. Lorsqu'il n'y a pas de poids sur la le menu de navigation.
-
Página 26: Mise À Zéro
FONCTIONNEMENT SUITE Lorsque tESt est affiché, appuyez 2. Pour effacer la valeur de tare, O.000 tESt sur la touche YES pour lancer l'essai déchargez la balance et appuyez d'étalonnage. sur la touche TARE. Le poids brut s'affichera à l'écran. 2. Le chiffre 0 clignote à l'écran. Lorsqu'il n'y a pas de poids sur la TARE PRÉDÉFINIE balance, appuyez sur la touche YES... - Página 27 FONCTIONNEMENT SUITE MODES D'APPLICATION ÉTABLIR UN NOUVEAU APW 1. Appuyez sur la touche NO Maintenez la touche FUNCTION MODE enfoncée jusqu'à pour augmenter la quantité ce que le mode d'application désiré soit affiché. Seuls d'échantillons. Les options sont 5, les modes activés dans le menu Mode seront affichés. 10, 20, 50 et 100 pièces.
-
Página 28: Pesage De Vérification
FONCTIONNEMENT SUITE DÉTERMINER UN NOUVEAU POIDS DE RÉFÉRENCE REMARQUE : Le signe « moins » est utilisé conjointement avec le premier chiffre pour L'écran affiche « Put.rEF % ». indiquer une valeur négative. Put.rEF MODIFIER LE PARAMÈTRE « OVER » (LIMITE SUPÉRIEURE) Pour déterminer le nouveau poids de référence, placez l'échantillon sur la rEF. - Página 29 FONCTIONNEMENT SUITE REMARQUE : En mode manuel, il REMARQUE : Lorsque l'option Legal for Trade 5 SEC n'est pas nécessaire que l'écran (Autoriser à des fins commerciales) est en soit à zéro (poids brut ou net). position ON et que le commutateur de sécurité •...
-
Página 30: Dépannage
Si la section Dépannage ne résout pas votre problème, communiquez avec le service à la clientèle d'ULINE au 1 800 295-5510. π CHICAGO • ATLANTA • DALLAS • LOS ANGELES • MINNEAPOLIS • NYC/PHILA • SEATTLE • MEXICO • CANADA 1-800-295-5510 uline.ca...