Tabla de contenido
Publicidad
Idiomas disponibles
Idiomas disponibles
Enlaces rápidos
H-4737, H-4738
H-4739
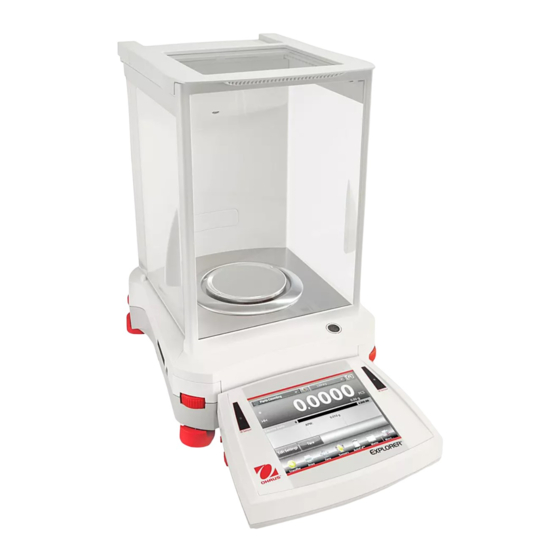
OHAUS EXPLORER
BALANCE SCALE
CONTROLS
This balance utilizes a touch-sensitive display. Touch areas and buttons to control the functions.
Instructional Messages
Stability (*), Net (NET),
Gross (G) and/or center
of zero (>0<) indicators
Result fields:
Information varies
by application
Touch icons to perform
specific functions or
access other functions
PAGE 1 OF 96
1-800-295-5510
uline.com
®
OVERVIEW OF CONTROLS
Touch to access
application setup menu
Touch to change
applications
Para Español, vea páginas 33-64.
Pour le français, consulter les pages 65-96.
Touch to access
available libraries
Touch for information menu
Touch unit indicator to
change weighing unit
capacity or status guides:
vary by application
Application buttons:
Functions vary by
application.
0721 IH-4737
Publicidad
Tabla de contenido

Manuales relacionados para Uline OHAUS EXPLORER H-4737


Resumen de contenidos para Uline OHAUS EXPLORER H-4737
- Página 1 Para Español, vea páginas 33-64. Pour le français, consulter les pages 65-96. H-4737, H-4738 1-800-295-5510 H-4739 uline.com OHAUS EXPLORER ® BALANCE SCALE OVERVIEW OF CONTROLS CONTROLS This balance utilizes a touch-sensitive display. Touch areas and buttons to control the functions.
-
Página 2: Overview Of Controls
OVERVIEW OF CONTROLS FUNCTIONS AND THEIR ICONS Menu: Touch MENU to enter the balance's menu list. Seven icons are initially available to operate the balance More...: Touch MORE to access Level Assist, Zero, and access the menu. For setup information, see User Tare, Units, Pretare, Cal Test, Calculator and Settings. -
Página 3: Menu Navigation
OVERVIEW OF CONTROLS CONTINUED Stopwatch: To use the built-in stopwatch Logout: Used for user logout and return to User application, touch STOPWATCH. A countdown Login screen. This feature is only active if a timer with interval (lap) timer is available. user profile has been created and a user has logged in. - Página 4 OPERATION CONTINUED ENABLING UNITS OF MEASURE CUSTOM UNITS Use each custom unit to display weight in an alternative In the balance setup menu, enter the weighing units sub unit of measure. The custom unit is defined using a menu to activate the desired units of measure. conversion factor, where the conversion factor is the NOTE: Due to national laws, the indicator may number of custom units per kilogram expressed in...
- Página 5 Application home screen to initiate an Internal Calibration. NOTE: Factory default settings are shown in bold. The display shows the status, then returns to the current application. To cancel at any time, press CANCEL. CALIBRATION WEIGHTS ULINE OHAUS MODEL NO. MODEL NO. SPAN CAL POINTS (G)
-
Página 6: User Calibration
OPERATION CONTINUED USER CALIBRATION 4. Once an application is enabled (turned on) it may be chosen from the Applications shortcut (top-left of Use this calibration method to calibrate the balance using all home screens). a defined mass. 5. The current menu item status is shown: With no load on the scale, press USER CALIBRATION OFF = disabled from the calibration sub-menu. -
Página 7: Parts Counting
OPERATION CONTINUED WEIGHING PARTS COUNTING Use this application to count samples of uniform weight. Use this application to determine the weight of items in the Three different modes can be selected: Standard, selected unit of measure. Check, or Fill Counting. In the upper left portion of the home screen, select STANDARD PARTS COUNTING (DEFAULT) WEIGHING (this application is the default). - Página 8 OPERATION CONTINUED ESTABLISH AN AVERAGE PIECE WEIGHT (APW) 2. Follow the screen instructions to establish a new APW. Actions available: Tare, Cancel, or Accept. Each time a new type of part is counted, the nominal 3. Press ACCEPT to capture the value and return to the weight of one piece (average piece weight or APW) settings screen.
- Página 9 OPERATION CONTINUED 2. Key in the desired sample size, then press √. 2. Change counting mode to check counting. 3. The next screen appears, with the message to place the number of pieces entered in the numeric input window. 4. Place the indicated number of pieces on the platform.
- Página 10 OPERATION CONTINUED 3. A new screen appears with the message: Place 30 EDIT SETTINGS pieces. Press ACCEPT. Touch the EDIT SETTINGS button. The settings screen appears. NOTE: Default is 10 pieces, but message matches number of pieces in SAMPLES button. The buttons for APW, SAMPLES and TARGET show default (or previously set) values.
-
Página 11: Percent Weighing
OPERATION CONTINUED PERCENT WEIGHING ESTABLISHING A REFERENCE WEIGHT There are two methods to establish the Reference Weight Use percent weighing to measure the weight of a sample value: displayed as a percentage of a pre-established reference • Direct: If the actual Reference Weight is known, it can weight. -
Página 12: Check Weighing
OPERATION CONTINUED The Edit Settings screen shows current Reference Adjust 3. The check limit values are displayed in the settings screen. value. To change it, touch REFERENCE ADJUST button. • To set the over limit value, touch the OVER LIMIT button. 1. -
Página 13: Dynamic/Animal Weighing
OPERATION CONTINUED DYNAMIC/ANIMAL WEIGHING 3. Press DONE to begin check weighing. 4. To use check weighing, touch EDIT SETTINGS to set the Use this application to weigh an unstable load, such as nominal, and upper and lower tolerance values a moving animal. Three different start/reset modes can (in weight). - Página 14 OPERATION CONTINUED DYNAMIC WEIGHING – MANUAL (DEFAULT) 5. When the countdown ends, the result is displayed and held. 1. To set the mode, touch the SETUP wrench. When you make a selection, the setup options screen reappears. Press DONE. 6. Press RESET to clear the held weight and return to the initial screen.
- Página 15 OPERATION CONTINUED 4. Place specimen on the pan. The cycle starts 3. The dynamic – automatic screen appears with the automatically. default (or last) averaging time displayed. Place objects on the pan to begin. The cycle starts automatically. 5. After the cycle ends, the weight reading is held. Press the RESET button to clear the reading and return to zero.
- Página 16 OPERATION CONTINUED FILLING ESTABLISH USING A KNOWN TARGET WEIGHT The current Target Weight appears on the Settings screen, This application allows the user to slowly fill a container to on the TARGET WEIGHT button. a pre-determined target weight. The progress bar displays the filling status, and within 10 percent of the target value the progress bar converts to fine resolution (+/–...
- Página 17 OPERATION CONTINUED TOTALIZATION TOTALIZATION – AUTOMATIC The weight of the item is added automatically when stable. Totalization measures the cumulative weight of a sequence of items. Two different totalization accumulation modes can 1. To enable this feature: Touch the SETUP icon be selected: manual accumulation (requires key press) to enter application setup.
- Página 18 OPERATION CONTINUED FREE FORMULATION (DEFAULT) 7. A popup message window appears, prompting for the filler material to be added. Add the filler if This mode allows the user to freely add components. A needed, then press ACCEPT. (If no filler is needed, filler material is asked for at the end.
- Página 19 OPERATION CONTINUED 5. If no items have been previously set up, the settings 11. Continue adding components as required for your screen appears. If items already exist in memory, formula. formulation begins. Press the ADD NEW button. 12. To change the order of a component in the formula, touch the item to highlight it, then press MOVE UP or MOVE DOWN.
-
Página 20: Item Settings
OPERATION CONTINUED FORMULATION RESULTS 3. New items are added with default name and weight information (no initial or final weights). Press PRINT to send the results to the enabled COM part. 4. To change the default item name, press EDIT NAME. The alpha-numeric entry screen appears. -
Página 21: Density Determination
OPERATION CONTINUED DENSITY DETERMINATION DIFFERENTIAL WEIGHING WITH AUTO-PROCESS ON Differential weighing with auto process ON requires the The balance can be used to determine an object's density. initial and final weights to be sequentially gathered for Four types of density determination can be made: a single item. - Página 22 OPERATION CONTINUED THE EDIT SETTINGS SCREEN 3. Once the necessary weights have been determined, the density of the sample is displayed in g/cm • Settings available: Water temperature (along with the weight in air, weight in water) on the • Functions available: Return to application application screen.
-
Página 23: Measuring The Density Of A Liquid Using Acalibrated Sinker (Not Supplied)
OPERATION CONTINUED 8. Begin the density determination process as per STEP 2 OF 2 – WEIGH THE SINKER SUBMERGED above. IN THE TEST LIQUID. MEASURING THE DENSITY OF A LIQUID USING A Follow the screen instructions, then press ACCEPT to CALIBRATED SINKER (NOT SUPPLIED) store the sinker weight (submerged in liquid). - Página 24 OPERATION CONTINUED 4. The balance calculates water density based on the STEP 3 OF 3 – WEIGH THE OILED SAMPLE SUBMERGED IN water temperature value entered (look-up table). LIQUID. Follow the screen instructions then press ACCEPT to 5. Measure the actual water temperature using a store the oiled sample weight (submerged in liquid).
- Página 25 OPERATION CONTINUED PEAK HOLD – SEMI-AUTOMATIC (DEFAULT) THE PEAK HOLD – MANUAL HOME SCREEN Follow the screen instructions: Place item on the pan. In the upper left portion of the home screen, select PEAK HOLD. Follow the screen instructions to begin. 2.
- Página 26 OPERATION CONTINUED 4. The highest stable weight reading is held until the 10. To clear all items, press CLEAR ALL. A confirmation weight is removed. is required. When finished, press RETURN TO APPLICATION. 5. The process starts automatically once the weight is removed from the pan (after 10 second delay).
- Página 27 OPERATION CONTINUED PIPETTE ADJUSTMENT 6. To adjust the water temperature, touch the WATER TEMP button. 7. The balance calculates water density based on Pipette adjustment checks the accuracy and precision the water temperature value entered. Measure values of pipettes by weight analysis. The balance has a the actual water temperature using a precision built-in density reference table for water at temperatures between 10 °...
- Página 28 OPERATION CONTINUED STATISTICAL QUALITY CONTROL (SQC) DISPENSE THE FIRST SAMPLE Follow the screen instructions, then press ACCEPT to The statistical quality control (SQC) feature is useful during store the first sample weight (liquid). various types of process filling operations, to monitor and/ or control the process to eliminate under- and over-filling.
- Página 29 OPERATION CONTINUED 6. Continue to enter the required information following the above procedure: • Positive Tolerance 1, via the +TOLERANCE 1 button. • Negative Tolerance 1, via the -TOLERANCE 1 button. • Positive Tolerance 2, via the +TOLERANCE 2 button. •...
- Página 30 OPERATION CONTINUED STATISTICS Statistics can operate manually (key press after each step) or automatically (weights automatically recorded Statistics are used to compare a number of samples when stable). To use the statistics feature, enable it in and examine the relative deviation of the samples the application setup menu.
-
Página 31: Weigh Below
OPERATION CONTINUED WEIGH BELOW RETRIEVING A LIBRARY RECORD Load a library record from the home screen. The balance is equipped with a weigh below hook for weighing below the balance. Press the LIBRARY bar in the upper right area of the screen. - Página 32 Weight reading is not stable Move balance to suitable location Screen Displays "------" Busy (tare, zero, printing) Wait until completion If the troubleshooting section does not resolve your problem, contact ULINE Customer Service at 1-800-295-5510. 1-800-295-5510 uline.com PAGE 32 OF 96 0721 IH-4737...
-
Página 33: Resumen De Los Controles
H-4737, H-4738 800-295-5510 H-4739 uline.mx OHAUS EXPLORER ® BALANZA RESUMEN DE LOS CONTROLES CONTROLES Esta balanza utiliza una pantalla táctil. Toque áreas y botones para controlar las funciones. Toque para acceder al menú de ajuste de aplicaciones Toque para cambiar... -
Página 34: Las Funciones Y Sus Iconos
RESUMEN DE LOS CONTROLES LAS FUNCIONES Y SUS ICONOS Menú: Toque MENU para ingresar a la lista del menú de la balanza. Siete iconos están disponibles en el inicio para utilizar Más…: Toque MORE para acceder a la la balanza y tener acceso al menú. Vea la sección Asistencia de Nivelación, Cero, Tara, Unidades, Configuraciones del Usuario para información acerca Pre-Tara, Prueba de Calibración, Calculadora y... -
Página 35: Continuación Del Resumen De Los Controles
CONTINUACIÓN DEL RESUMEN DE LOS CONTROLES Cronómetros: Para utilizar el cronómetro integrado, Terminar Sesión: Utilizado para terminar la toque STOPWATCH. Aparecerá un cronómetro con sesión de un usuario y volver a la pantalla de intervalos (lapsos) estará disponible. Inicio de Sesión del Usuario. Esta función solo está... -
Página 36: Continuación De Funcionamiento
CONTINUACIÓN DE FUNCIONAMIENTO HABILITAR LAS UNIDADES DE PESAJE UNIDADES PERSONALIZADAS Utilice cada unidad personalizada para mostrar el peso En el menú de configuración de la balanza, encontrará el en una unidad alternativa de medición. La unidad submenú de unidades de pesaje para activar las personalizada se define utilizando un factor de conversión, unidades de medición deseadas. -
Página 37: Calibración
La pantalla muestra el estado y luego regresa a la fábrica aparecen en negritas. aplicación actual. Para cancelar en cualquier PESOS DE CALIBRACIÓN momento, pulse CANCELAR. NO. DE MODELO NO. DE MODELO DE ULINE DE OHAUS PUNTOS DE CAL. DE AMPLITUD (G) CALIBRACIÓN AUTOMÁTICA H-4737 EX224 100g, 150g, 300g... -
Página 38: Calibración Por El Usuario
CONTINUACIÓN DE FUNCIONAMIENTO CALIBRACIÓN POR EL USUARIO 4. Una vez que se activa una aplicación (se enciende), se puede seleccionar del acceso directo Use este método para calibrar la balanza utilizando Aplicaciones (esquina superior izquierda de todas una pesa definida. las pantallas de inicio). -
Página 39: Conteo De Piezas
CONTINUACIÓN DE FUNCIONAMIENTO PESAJE CONTEO DE PIEZAS Utilice esta aplicación para determinar el peso de Utilice esta aplicación para contar muestras de peso elementos en la unidad de medición seleccionada. uniforme. Se pueden seleccionar tres modos diferentes: En la porción superior izquierda de la pantalla de Conteo Estándar, Conteo de Prueba o Conteo de Llenado. -
Página 40: Establecer Un Peso Medio Por Pieza (Apw)
CONTINUACIÓN DE FUNCIONAMIENTO ESTABLECER UN PESO MEDIO POR PIEZA (APW) 2. Siga las instrucciones en pantalla para establecer un nuevo peso medio por pieza. Acciones Cada vez que se cuenta un nuevo tipo de pieza, se disponibles: Tare, Cancel o Accept. debe establecer el peso nominal de una pieza (peso 3. -
Página 41: Editar Configuraciones
CONTINUACIÓN DE FUNCIONAMIENTO 2. Presione la tecla del tamaño de la muestra 2. Cambie de modo de conteo de piezas a check counting. deseado y luego presione √. 3. Aparecerá la siguiente pantalla, con el mensaje para colocar el número de piezas introducido en la ventana de entrada numérica. -
Página 42: Conteo De Partes - Llenar
CONTINUACIÓN DE FUNCIONAMIENTO 3. Aparecerá una nueva pantalla con el mensaje: EDITAR CONFIGURACIONES Coloque 30 piezas. Presione ACCEPT. Toque el botón EDIT SETTINGS. Aparecerá la pantalla de configuración. NOTA: El valor predeterminado es 10 piezas pero el mensaje coincide con el número de Los botones para APW, SAMPLES y TARGET muestran piezas en el botón SAMPLES. -
Página 43: Pesaje Porcentual
CONTINUACIÓN DE FUNCIONAMIENTO PESAJE PORCENTUAL ESTABLECER UN PESO DE REFERENCIA Existen dos métodos para establecer el valor de Peso de Utilice el pesaje porcentual para medir el peso de una Referencia: muestra como porcentaje de un peso de referencia • Directo: Si se conoce el Peso de Referencia real, se preestablecido. -
Página 44: Comprobación De Peso
CONTINUACIÓN DE FUNCIONAMIENTO La pantalla Editar Configuraciones muestra el valor de 3. Se mostrarán los valores límite de comprobación en Ajuste de Referencia actual. Para modificarlo, toque el la pantalla de configuración. botón REFERENCE ADJUST. • Para ajustar el valor de límite superior, toque el botón OVER LIMIT. -
Página 45: Pesaje Dinámico/De Animales
CONTINUACIÓN DE FUNCIONAMIENTO PESAJE DINÁMICO/DE ANIMALES 3. Presione DONE para iniciar la comprobación de peso. 4. Para utilizar este modo, toque EDIT SETTINGS para Utilice esta aplicación para pesar una carga inestable, ajustar los valores de tolerancia nominal y superior e inferior (en peso). -
Página 46: Pesaje Dinámico - Manual (Predeterminado)
CONTINUACIÓN DE FUNCIONAMIENTO PESAJE DINÁMICO – MANUAL (PREDETERMINADO) 5. Cuando finaliza la cuenta atrás, el resultado permanece en pantalla. Para ajustar el modo, toque la llave de ajuste, SETUP. Cuando se realiza una selección, reaparece la pantalla de opciones de ajuste. Presione DONE. 6. -
Página 47: Pesaje Dinámico - Automático
CONTINUACIÓN DE FUNCIONAMIENTO 4. Coloque una muestra en el plato. El ciclo se inicia 3. Aparecerá la pantalla dinámico – automático con el automáticamente. tiempo promedio predeterminado (o último) mostrado. Coloque objetos en el plato para dar inicio. El ciclo se inicia automáticamente. 5. -
Página 48: Establecimiento Utilizando Un Peso
CONTINUACIÓN DE FUNCIONAMIENTO LLENAR ESTABLECIMIENTO UTILIZANDO UN PESO OBJETIVO CONOCIDO Esta aplicación permite al usuario llenar un contenedor El Peso Objetivo actual aparece en la pantalla de lentamente hasta llegar a un peso objetivo Settings en el botón TARGET WEIGHT. predeterminado. -
Página 49: Totalización
CONTINUACIÓN DE FUNCIONAMIENTO TOTALIZACIÓN TOTALIZACIÓN – AUTOMÁTICA El peso del elemento se añade automáticamente cuando está estable. La totalización mide el peso acumulado de una secuencia de elementos. Se pueden seleccionar dos Para activar esta función: Toque el icono de SETUP modos de acumulación de totalización diferentes: para ingresar al ajuste de la aplicación. -
Página 50: Formulación Libre (Predeterminada)
CONTINUACIÓN DE FUNCIONAMIENTO FORMULACIÓN LIBRE (PREDETERMINADA) 7. Aparecerá una ventana emergente con un mensaje indicando que se debe añadir el material de relleno. Este modo de formulación permite al usuario añadir Añada el relleno en caso de ser necesario, luego componentes libremente. - Página 51 CONTINUACIÓN DE FUNCIONAMIENTO 5. Si no se han ajustado elementos previamente, 11. Continúe añadiendo componentes según lo aparece la pantalla de configuración. Si ya existen requiera la fórmula. elementos en la memoria, se inicia la formulación. 12. Para cambiar el orden de un componente en la Presione el botón ADD NEW.
-
Página 52: Resultados De Formulación
CONTINUACIÓN DE FUNCIONAMIENTO RESULTADOS DE FORMULACIÓN 3. Se añaden nuevos elementos con información predeterminada de nombre y peso (sin pesos iniciales Presione PRINT para enviar los resultados al puerto o finales). COM activado. 4. Para cambiar el nombre del elemento 2. -
Página 53: Pesaje Diferencial Con Auto-Proceso Activado
CONTINUACIÓN DE FUNCIONAMIENTO DETERMINACIÓN DE DENSIDAD PESAJE DIFERENCIAL CON AUTO-PROCESO ACTIVADO El pesaje diferencial con auto-proceso-ON requiere La báscula se puede utilizar para determinar la densidad que los pesos inicial y final se recolecten en secuencia de un objeto. Se pueden realizar cuatro tipos de para un elemento en particular. -
Página 54: Editar La Pantalla De Configuraciones
CONTINUACIÓN DE FUNCIONAMIENTO EDITAR LA PANTALLA DE CONFIGURACIONES 3. Una vez que se han determinado los pesos necesarios, la densidad de la muestra aparece en • Configuraciones disponibles: Temperatura del agua g/cm (junto con el peso en aire y peso en agua) en •... -
Página 55: Medir La Densidad De Un Líquido Utilizando Un Dispositivo De Inmersión Calibrado
CONTINUACIÓN DE FUNCIONAMIENTO 8. Inicie el proceso de determinación de la densidad PASO 2 DE 2 – PESAR EL DISPOSITIVO DE INMERSIÓN según lo indicado anteriormente. SUMERGIDO EN EL LÍQUIDO DE PRUEBA Siga las instrucciones y luego presione ACCEPT para MEDIR LA DENSIDAD DE UN LÍQUIDO UTILIZANDO almacenar el peso del dispositivo de inmersión UN DISPOSITIVO DE INMERSIÓN CALIBRADO... -
Página 56: Retención De Peso Pico
CONTINUACIÓN DE FUNCIONAMIENTO 4. La balanza calcula la densidad del agua PASO 3 DE 3 – PESAR LA MUESTRA OLEOSA SUMERGIDA basándose en el valor de la temperatura del agua EN LÍQUIDO. introducido (tabla de búsqueda). Siga las instrucciones y luego presione ACCEPT para almacenar el peso de la muestra oleosa (sumergida 5. -
Página 57: Retención De Peso Pico - Semiautomático
CONTINUACIÓN DE FUNCIONAMIENTO RETENCIÓN DE PESO PICO – SEMIAUTOMÁTICO LA RETENCIÓN DE PESO PICO – PANTALLA DE INICIO MANUAL (PREDETERMINADO) Siga las instrucciones en pantalla: Coloque un elemento en el plato. En la porción superior izquierda de la pantalla de inicio, seleccione PEAK HOLD. -
Página 58: Cálculo De Costos De Ingredientes
CONTINUACIÓN DE FUNCIONAMIENTO 4. La lectura del peso estable más alto se mantiene 8. Continúe añadiendo elementos según sea hasta que se retira el peso. necesario utilizando ADD NEW. Se pueden añadir nuevos elementos en cualquier momento. 5. El proceso se inicia automáticamente una vez que el peso se retira del plato (después de un retraso de 9. -
Página 59: Ajuste De Pipeta
CONTINUACIÓN DE FUNCIONAMIENTO AJUSTE DE PIPETA 6. Para ajustar el valor de la temperatura del agua, toque el botón WATER TEMP. La balanza calcula la densidad del agua El ajuste de pipetas comprueba la precisión y exactitud basándose en el valor de la temperatura del agua de los valores de las pipetas por análisis del peso. -
Página 60: Control Estadístico De Calidad
CONTINUACIÓN DE FUNCIONAMIENTO CONTROL ESTADÍSTICO DE CALIDAD PREPARAR LA PRIMERA MUESTRA Siga las instrucciones y luego presione ACCEPT para (SQC) almacenar el peso de la muestra (líquido). La función de control estadístico de calidad (SQC) es útil durante varios tipos de procesos de operaciones de 2. -
Página 61: Inicie El Proceso De Sqc
CONTINUACIÓN DE FUNCIONAMIENTO 6. Continúe introduciendo la información necesaria siguiendo el procedimiento anterior: • Tolerancia positiva 1, mediante el botón +TOLERANCE 1. • Tolerancia negativa 1, mediante el botón -TOLERANCE 1. • Tolerancia positiva 2, mediante el botón +TOLERANCE 2. •... -
Página 62: Estadísticas
CONTINUACIÓN DE FUNCIONAMIENTO ESTADÍSTICAS Las estadísticas se pueden determinar manualmente (pulsación de una tecla después de cada paso) o Las estadísticas se utilizan para comparar varias automáticamente (pesos registrados automáticamente muestras y analizar la desviación relativa de las cuando están estables). Para usar la función de muestras junto con otros datos estadísticos. -
Página 63: Mantenimiento
CONTINUACIÓN DE FUNCIONAMIENTO PESO BAJO RECUPERACIÓN DE UN REGISTRO EN LA BIBLIOTECA Cargue un record de la biblioteca de la pantalla de La balanza está equipada con un gancho de peso inicio. bajo para pesada por debajo de la balanza. NOTA: antes de dar vuelta la balanza, quite el Presione la barra de LIBRARY en el área superior plato, soporte para plato, anillo bobinado,... -
Página 64: Solución De Problemas
La pantalla muestra "------" Ocupado (tara, puesta a cero, impresión) Espere hasta que finalice Si la sección de solución de problemas no contesta su pregunta, comuníquese con el Servicio a Clientes de ULINE al 800-295-5510. 800-295-5510 uline.mx PAGE 64 OF 96... -
Página 65: Aperçu Des Commandes
H-4737, H-4738 1-800-295-5510 H-4739 uline.ca OHAUS EXPLORER – BALANCE APERÇU DES COMMANDES PANNEAU DE COMMANDES Cette balance utilise un affichage tactile. Touchez l'écran et les différentes touches pour contrôler les fonctions. Pour accéder au menu de configuration Pour changer Pour accéder aux d'application bibliothèques disponibles... - Página 66 APERÇU DES COMMANDES FONCTIONS ET LEURS ICÔNES Menu : Appuyez sur MENU pour accéder à la liste du menu de la balance. Sept icônes sont initialement disponibles pour faire fonctionner la balance et accéder au menu. Pour plus d'informations au Plus...
-
Página 67: Navigation Du Menu
APERÇU DES COMMANDES SUITE Chronomètre : Pour utiliser l'application Déconnexion : Pour se déconnecter et revenir à chronomètre, appuyez sur STOPWATCH. l'écran de connexion. Cette fonction n'est L'application comprend un compte à rebours disponible que lorsqu'un profil d'utilisateur a été avec compteur d'intervalles. -
Página 68: Activer Les Unités De Mesure
FONCTIONNEMENT SUITE ACTIVER LES UNITÉS DE MESURE UNITÉS PERSONNALISÉES Utilisez chaque unité personnalisée pour afficher le Depuis le menu « balance setup » (réglage de la balance), poids dans une unité de mesure alternative. L'unité allez dans le sous-menu « weighing units » (unités de personnalisée est déterminée par un facteur de pesée) pour activer les unités de mesure désirées. - Página 69 ÉTALONNAGE AUTOMATIQUE POIDS D'ÉTALONNAGE N° DE MODÈLE N° DE MODÈLE POINTS D'ÉTALONNAGE DE Lorsque l'étalonnage automatique est activé, la ULINE OHAUS L'INTERVALLE DE MESURE (G) balance effectue un étalonnage automatique H-4737 EX224 100g, 150g, 300g toutes les 11 heures ou à chaque changement de...
- Página 70 FONCTIONNEMENT SUITE ÉTALONNAGE UTILISATEUR 4. Lorsqu'une application est activée, il est possible de la sélectionner depuis le raccourci APPLICATIONS Utilisez cette méthode d'étalonnage pour étalonner la (en haut à gauche de l'écran d'accueil). balance avec une masse préalablement définie. 5. Le statut en cours de l'élément du menu est indiqué ainsi : Appuyez sur USER CALIBRATION depuis le sous-menu d'étalonnage.
-
Página 71: Modifier Les Paramètres
FONCTIONNEMENT SUITE PESAGE COMPTAGE D'ÉLÉMENTS Utilisez cette application pour compter des échantillons de Utilisez cette application pour déterminer le poids des poids uniforme. Il est possible de sélectionner trois modes articles dans l'unité de mesure sélectionnée. différents : comptage standard, de vérification ou de Sélectionnez WEIGHING en haut à... -
Página 72: Établir Un Poids Moyen Unitaire (Apw)
FONCTIONNEMENT SUITE ÉTABLIR UN POIDS MOYEN UNITAIRE (APW) 2. Suivez les instructions affichées sur l'écran pour établir un nouvel APW. Les actions disponibles sont : À chaque nouveau type d'élément pesé, le poids nominal Tare, Cancel ou Accept. d'une unité (poids moyen unitaire ou APW)) doit être établi 3. - Página 73 FONCTIONNEMENT SUITE 2. Entrez la taille d'échantillon désirée, puis appuyez 2. Changez le mode de comptage à comptage de sur √. vérification. 3. L'écran suivant s'affiche, demandant de placer le nombre d'unités entré dans la fenêtre de saisie numérique. 4. Placez le nombre d'unités indiqué sur le plateau de pesée.
- Página 74 FONCTIONNEMENT SUITE 3. Un nouvel écran s'affiche avec le message : placez 30 MODIFIER LES PARAMÈTRES unités. Appuyez sur ACCEPT. Appuyez sur EDIT SETTINGS. L'écran de paramètres REMARQUE : Le nombre d'unités par défaut est s'affiche. de 10, mais la quantité indiquée sur le message Les touches APW, SAMPLES et TARGET indiquent les correspond à...
-
Página 75: Pesage En Pourcentage
FONCTIONNEMENT SUITE PESAGE EN POURCENTAGE ÉTABLIR UN POIDS DE RÉFÉRENCE Il existe deux manières différentes d'établir la valeur du poids de référence : Utilisez le pesage en pourcentage pour mesurer le poids d'un échantillon sous forme de pourcentage d'un poids •... -
Página 76: Pesage De Vérification
FONCTIONNEMENT SUITE L'écran de modification de paramètres affiche la valeur 3. Les valeurs limites de vérification s'affichent sur l'écran d'ajustement de la référence en cours. Pour la modifier, de paramètres. appuyez sur REFERENCE ADJUST. • Pour établir une valeur de limite maximale, Une fenêtre de saisie numérique s'affiche. -
Página 77: Pesage En Mouvement/Animal
FONCTIONNEMENT SUITE PESAGE EN MOUVEMENT/ANIMAL 3. Appuyez sur DONE pour commencer le pesage de vérification. Utilisez cette application pour peser une charge instable, 4. Pour utiliser le pesage de vérification, appuyez sur EDIT comme un animal en mouvement. Il est possible de SETTINGS pour entrer la valeur nominale, ainsi que les sélectionner trois modes différents : manuel (activation valeurs de tolérance maximale et minimale (en poids). -
Página 78: Pesage En Mouvement - Manuel (Par Défaut)
FONCTIONNEMENT SUITE PESAGE EN MOUVEMENT – MANUEL (PAR DÉFAUT) 5. Lorsque le compte à rebours est terminé, le résultat est maintenu affiché. Pour activer ce mode, appuyez sur la clé SETUP. L'écran d'options réapparaît lorsque vous faites une sélection. Appuyez sur DONE. 6. -
Página 79: Pesage En Mouvement - Mode Automatique
FONCTIONNEMENT SUITE 4. Placez l'article sur le plateau. Le cycle commence 3. L'écran de pesage en mouvement automatique automatiquement. affiche le temps de calcul des moyennes par défaut (ou le dernier entré). Placez l'article sur le plateau. Le cycle commence automatiquement. 5. -
Página 80: Établir Avec Un Poids Cible Connu
FONCTIONNEMENT SUITE REMPLISSAGE ÉTABLIR AVEC UN POIDS CIBLE CONNU Le poids cible actuel s'affiche sur l'écran de paramètres, Cette fonction permet à l'utilisateur de remplir lentement sur la touche TARGET WEIGHT. un récipient avec un poids cible prédéterminé. La barre de progression affiche le degré... - Página 81 FONCTIONNEMENT SUITE TOTALISATION TOTALISATION – MODE AUTOMATIQUE Le poids de l'article est automatiquement ajouté après stabilisation. La fonction totalisation mesure le poids cumulatif d'une séquence d'articles. Il est possible de sélectionner deux Pour activer ce mode, appuyez sur l'icône SETUP modes d'accumulation de totalisation : accumulation pour accéder au menu de configuration de manuelle (nécessite l'appui de touches) et accumulation...
-
Página 82: Résultats De Formulation Libre
FONCTIONNEMENT SUITE FORMULATION LIBRE (PAR DÉFAUT) Une fenêtre de message s'affiche, invitant à ajouter un matériau de remplissage. Ajoutez si nécessaire, Ce mode permet à l'utilisateur d'ajouter librement des puis appuyer sur ACCEPT (si le matériau n'est pas composants. Il est nécessaire de fournir un matériau de nécessaire, appuyez immédiatement sur ACCEPT). - Página 83 FONCTIONNEMENT SUITE 5. L'écran de configuration s'affiche si aucun article 11. Continuez d'ajouter les éléments requis par la formule. n'a été configuré au préalable. Si les articles 12. Pour changer l'ordre d'un composant dans la formule, sont déjà en mémoire, la formulation commence. appuyez sur sa touche pour le mettre en surbrillance, Appuyez sur ADD NEW.
-
Página 84: Résultats De Formulation
FONCTIONNEMENT SUITE RÉSULTATS DE FORMULATION 2. Pour paramètrer un article, appuyez sur ADD NEW. Appuyez sur PRINT pour envoyez les résultats vers le port 3. Chaque nouvel article est ajouté avec un nom et un de communication activé. poids par défaut (pas de poids initial ou final). 2. -
Página 85: Détermination De Densité
FONCTIONNEMENT SUITE DÉTERMINATION DE DENSITÉ PESAGE DIFFÉRENTIEL AVEC PROCESSUS AUTOMATIQUE La pesage différentiel avec processus automatique La balance peut être utilisée pour déterminer la densité d'un article. Il est possible de déterminer une densité de requiert d'entrer les poids initial et final d'un article de quatre manières différentes: manière séquentielle. -
Página 86: Étapes De Détermination De Densité
FONCTIONNEMENT SUITE ÉCRAN DE MODIFICATIONS DES PARAMÈTRES 3. Après détermination des poids nécessaires, la densité de l'échantillon est affichée en g/cm³ (ainsi • Paramètres disponibles : Température de l'eau que le poids à l'air et le poids dans l'eau) sur l'écran •... - Página 87 FONCTIONNEMENT SUITE 8. Commencez le processus de détermination de ÉTAPE 2 DE 2 – PESER LE PLOMB SUBMERGÉ densité comme indiqué plus haut. DANS UN LIQUIDE D'ESSAI Suivez les instructions à l'écran, puis appuyez sur MESURER LA DENSITÉ D'UN LIQUIDE AVEC UN PLOMB ACCEPT pour enregistrer le poids du plomb (submergé...
- Página 88 FONCTIONNEMENT SUITE 4. La balance calcule la densité de l'eau en fonction ÉTAPE 3 DE 3 – PESER L'ÉCHANTILLON HUILÉ SUBMERGÉ de la valeur de température entrée (table interne). DANS UN LIQUIDE Suivez les instructions à l'écran puis appuyez sur 5.
- Página 89 FONCTIONNEMENT SUITE MAINTIEN DE VALEUR MAXIMALE – MAINTIEN DE VALEUR MAXIMALE – SEMI-AUTOMATIQUE (PAR DÉFAUT) ÉCRAN D'ACCUEIL DU MODE MANUEL Suivez les instructions à l'écran. Placez un article sur Sélectionnez PEAK HOLD dans le coin supérieur le plateau. gauche de l'écran d'accueil. Suivez les instructions 2.
- Página 90 FONCTIONNEMENT SUITE 4. La valeur maximale de poids stable reste enregistrée 10. Pour effacer tous les articles, appuyez sur CLEAR ALL. jusqu'à ce que l'article soit enlevé du plateau. Une confirmation vous sera demandée. Appuyez sur RETURN TO APPLICATION une fois terminé. 5.
-
Página 91: Ajustement De Pipette
FONCTIONNEMENT SUITE AJUSTEMENT DE PIPETTE 6. Pour ajuster la température de l'eau, appuyez sur WATER TEMP. L'ajustement de pipette vérifie l'exactitude et la précision des valeurs des pipettes par analyse du poids. La La balance calcule la densité de l'eau en fonction balance comprend une table de référence de densité... -
Página 92: Réglage Des Paramètres
FONCTIONNEMENT SUITE CONTRÔLE STATISTIQUE DE LA QUALITÉ (SQC) VERSER LE PREMIER ÉCHANTILLON Suivez les instructions à l'écran, puis appuyez La fonction de contrôle statistique de la qualité (SQC) sur ACCEPT pour enregistrer le poids du premier est utile au cours de différents types d'opérations de échantillon (liquide). - Página 93 FONCTIONNEMENT SUITE 6. Entrez toutes les informations requises en suivant la même procédure. • Tolérance positive 1 avec la touche +TOLERANCE 1 • Tolérance négative 1 avec la touche -TOLERANCE 1 • Tolérance positive 2 avec la touche +TOLERANCE 2 •...
- Página 94 FONCTIONNEMENT SUITE STATISTIQUES automatiquement (les poids sont automatiquement enregistrés après stabilisation). Pour utiliser la fonction de La fonction de statistiques est utilisée pour comparer un statistiques, il est nécessaire de l'activer dans le menu de nombre donné d'échantillons et pour examiner leur écart paramètres de l'application.
-
Página 95: Pesage Sous Balance
FONCTIONNEMENT SUITE PESAGE SOUS BALANCE EXTRAIRE UNE ENTRÉE Chargez une entrée depuis l'écran d'accueil. La balance est équipée d'un crochet pour pesage sous balance. 1. Appuyez sur LIBRARY dans le coin supérieur gauche REMARQUE : Avant de retourner la balance, de l'écran. -
Página 96: Dépannage
L'écran affiche « ----- » En activité (tare, zéro, impression) Attendez que l'opération soit terminée Si le problème persiste ou si la section dépannage ne résout pas votre problème, contactez le service à la clientèle de Uline au 1 800 295-5510. 1-800-295-5510 uline.ca...