
Manuales relacionados para Bresser GPS 7x50


Resumen de contenidos para Bresser GPS 7x50
- Página 1 Art. No. 18-65000 GPS 7x50 BEDIENUNGSANLEITUNG INSTRUCTION MANUAL MODE D’EMPLOI INSTRUCCIONES DE USO...
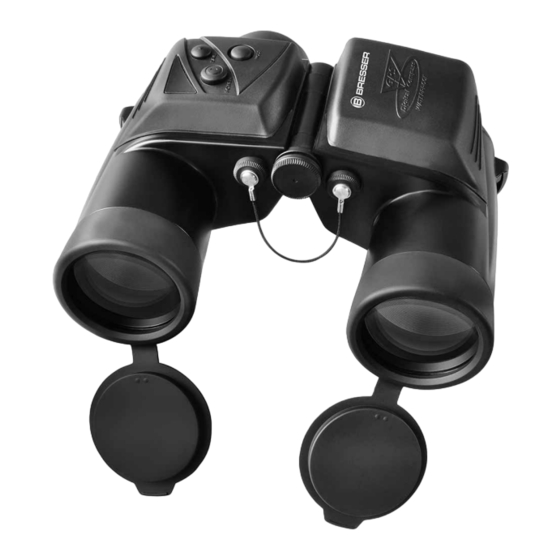
- Página 2 Teile/Parts/Composants/Piezas: µ ✔ ✔ ✘ ✘ ¿ ¿ ´ ² ¶ Okular GPS-Empfänger Eyepiece GPS receiver Lentille oculaire Interrupteur du compas numérique Ocular Kop voor het digitale kompas ¶ Drehbare Augenmuscheln Stativanschlussgewinde Twist-up eyecups Threaded tripod connection Œilletons twist-up Filet de raccord pour le trépied Visores «twist up»...
- Página 3 ¸ Tasten/Buttons/Touches/Botones: [SPEICHERN]-Taste [SAVE] button Touche [Sauvegarde] ¸ Botón [SAVE] ¹ [EIN-/AUS]-Taste ¹ [POWER] button Touche [Marche/Arrêt] Botón [POWER] [MODUS]-Taste [MODE] button Touche [Mode] Botón [MODE] Liquid Crystal Display (LCD): Externes LCD Strichplatte External LCD Reticle LCD externe Réticule La LCD externa Retículo Internes LCD Digitaler Kompass...
-
Página 4: Allgemeine Informationen
Mitmenschen – schauen Sie mit diesem Gerät zum Beispiel nicht in Wohnungen! EG-Konformitätserklärung Eine „Konformitätserklärung“ in Übereinstimmung mit den anwendbaren Richtlinien und ent- sprechenden Normen ist von der Bresser GmbH erstellt worden. Diese kann auf Anfrage jederzeit eingesehen werden. - 4 -... - Página 5 TEILEÜBERSICHT µ Okular Korrekt eingestellter Augenabstand ¸ Drehbare Augenmuscheln [SPEICHERN]-Taste ¹ Fernglas-Mittelachse [EIN-/AUS]-Taste Einzelokulareinstellung [MODUS]-Taste Tragriemenhalterung Externes LCD GPS-Empfänger Internes LCD ¶ Stativanschlussgewinde Strichplatte º Batteriefach Digitaler Kompass ¾ Objektivlinse BATTERIEWECHSEL Wenn die verbleibende Batteriespannung niedrig ist, beginnt die Ladestandsanzeige am externen LCD (14) zu blinken.
- Página 6 GPS FERNGLAS – EIN/AUS • Zum Einschalten drücken Sie die [EIN-/Aus-] Taste (12) ca. 1 Sekunde lang. • Zum Ausschalten drücken Sie die [EIN-/Aus-] Taste (12) ca. 3 Sekunden lang. VERWENDUNG DER BLENDE (15) Im linken Okular des GPS-Fernglases befi ndet sich eine Blende. Diese Blende dient dazu, die Ent- fernung und Größe eines Objektes zu messen.
- Página 7 Kalibrieren bedeutet die Einstellung des Output des Sensors für das geomagnetische Feld. Eine Kalibrierung ist durchzuführen, wenn Sie das Fernglas zum ersten Mal verwenden, wenn sie es nach langer Zeit erstmals wieder benutzen, wenn Sie einen periodisch auftretenden Fehler den Azimut be- treffend feststellen oder wenn das interne LCD häufi...
- Página 8 Ab dem nächsten einschalten wird der Breiten-/Längengrad in der vorherigen Position angezeigt. Die Breiten-/Längengradzahl beginnt sich zu bewegen, wenn das GPS-Signal erkannt wird. Breitengrad Breitengrad (N/S): Der Breitengrad ist in Zonen 90 Grad Süd und Nord des Äquators eingeteilt, der als Breitengrad Null defi niert ist. Der Bereich nördlich des Äquators wird in Grad nördlicher Breite (N) und der Bereich südlich des Äquators in Grad südlicher Breite (S) angegeben.
- Página 9 EINSTELLUNG DES ZEITUNTERSCHIEDES Der Zeitunterschied wird gemäß UTC (Coordinated Universal Time) mit 39 Zeitunterschiedsmus- tern eingestellt. Das GPS-Fernglassignal steht überall auf der Welt zur Verfügung mit Ausnahme von ein paar entlegenen Inseln (bitte beachten Sie, dass das Fernglas die Sommerzeit nicht unter- stützt.) Die Zeitzone wird werkseitig auf UTC+00.00 voreingestellt und muss entsprechend dem aktuellen Standort neu eingestellt werden.
- Página 10 • Es wird empfohlen, die aufgezeichneten Positionsdaten zu protokollieren. • Falls die Speicherung der Positionsdaten misslingt, wird „ERR” angezeigt. Das Gerät bringt Sie daraufhin nach ca. 3 Sekunden in den Modus „Breiten-/Längengrad” zurück. In diesem Fall wiederholen Sie bitte den Ablauf ab Punkt 2 wiederholen. •...
-
Página 11: Fehlerbehebung
• Gehen Sie beim Löschen von Daten mit besonderer Sorgfalt vor. Sobald sie gelöscht wurden, können die Daten nicht wiederhergestellt werden. • Bitte notieren Sie sich gegebenenfalls die Daten vor dem Löschen. FEHLERBEHEBUNG PROBLEM MÖGLICHE URSACHE LÖSUNG Das Fernglas lässt Die verbleibende Batteriespannung könnte Ersetzen Sie bitte die alten durch sich nicht einschalten. - Página 12 SPEZIFIKATIONEN FERNGLAS GPS-EINHEIT Vergrößerung Bildschirm- TN positives größe semitransmissives Durchmesser der 50 mm Monochromsegment Objektivlinse Batterien Zwei AAA-Batterien Beschichtung mehrfach Kontinuierliche Betriebs- Tatsächliches Sichtfeld 7,2” zeit: ca. 6 Stunden (Bei Betrieb mit AAA- Sichtfeld auf 1000 m 125,8 m Alkalibatterien hängt die Austrittspupille 7,1 mm Betriebszeit von den...
- Página 13 über nachfolgenden Link (QR Code) für verfügbare Versionen. • Alternativ können Sie uns auch eine E-Mail an die Adresse manuals@bresser.de schicken oder eine Nachricht unter +49 (0) 28 72 – 80 74-220* hinterlassen. Bitte geben Sie stets Ihren Namen, Ihre genaue Adresse, eine gültige Telefonnummer und E-Mail- www.bresser.de/1865000...
-
Página 14: General Information
Do not use them to look into apartments, for example. EC Declaration of Conformity Bresser GmbH has issued a "Declaration of Conformity" in accordance with applicable guidelines and corresponding standards. This can be viewed any time upon request. - 14 -... - Página 15 PARTS OVERVIEW µ Eyepiece Correctly set eye distance ¸ Twist-up eyecups [SAVE] button ¹ Centre axle [POWER] button Individual eyepiece adjustment [MODE] button Strap holder External LCD GPS receiver Internal LCD ¶ Threaded tripod connection Reticle º Battery compartment Digital compass ¾...
-
Página 16: Calibrating The Digital Compass
USING THE RETICLE (15) A reticle is incorporated in the left eye piece of the GPS Binoculars. This reticle is used to measure the distance and size of an object. Binoculars have vertical and horizontal scales graduated every 5 mils. Those scales use a unit called mil. 1 mil equals the angle in which a 1 m object is seen at a distance of 1000 m away from your position. -
Página 17: Changing Modes
horizontal rotating table with nothing shielding geometric fi elds or generating magnetism in the surroundings. 3. Once the latitude / longitude data is displayed on the external LCD (14), press the [POWER] button and the [MODE] button simultaneously for approximately 1 second. 4. - Página 18 Latitude Latitude (N/S): The latitude is divided into zones 90 degrees south and north of the equator, which is defi ned as 0 degrees latitude. The north of the equator is indicated as the north latitude (N) and the south of the equator is indicated as the south latitude (S) respectively.
- Página 19 1. Press the [POWER] button to switch on. The binoculars will be activated in the “Latitude/Longi- tude Display Mode”. 2. Press the [MODE] button once, and the mode will change to the “Date/Time Mode.” 3. Press the [MODE] button and the [SAVE] button simultaneously once, and the mode will change to the “Auto-timer Difference Adjustment”...
-
Página 20: Troubleshooting
DISPLAY OF RECORDED LATITUDE AND LONGITUDE DATA 1. Press the [POWER] button to switch on. The binoculars will be activated in the “Latitude / Lon- gitude” mode. 2. Press the [SAVE] button for a short time with the “Latitude / Longitude Mode” displayed. 3. - Página 21 Power turns off The remaining battery level may Please replace the used suddenly. be too low. batteries with new ones. The automatic power-off function This product will automatically for power saving may have turn off after fi ve minutes of activated.
- Página 22 SPECIFICATIONS BINOCULARS GPS UNIT Magnifi cation Screen size TN positive semi-transmissive Objective lens diameter 50 mm monochrome segment Coating Multi-Coated Battery Two AAA batteries Actual fi eld of view 7.2” Continuous service time: Approximately 6 Field of view at 1000 m 125.8 m hours (When operated Exit pupil...
-
Página 23: Warranty & Service
Then visit our website via the following link (QR code) for available versions. Alternatively you can also send an email to manuals@bresser.de or leave a message on +49 (0) 28 72 – 80 74-220*. Please always state your name, precise address, a valid phone number and email address, www.bresser.de/1865000... -
Página 24: Informations Générales
! Déclaration de conformité CE Bresser GmbH a émis une « déclaration de conformité » conformément aux lignes direc- trices applicables et aux normes correspondantes. Celle-ci peut être consultée à tout mo- ment sur demande. - Página 25 VUE D'ENSEMBLE DES PIÈCES µ Lentille oculaire Régler correctement la distance de l'oeil ¸ Œilletons twist-up Touche [Sauvegarde] ¹ Axe central des jumelles Touche [Marche/Arrêt] Réglage individuel des oculaires Touche [Mode] Fixation de la dragonne LCD externe Interrupteur du compas numérique LCD interne ¶...
-
Página 26: Calibrage De La Boussole Numérique
JUMELLES GPS – MARCHE/ARRÊT • Appuyez sur la touche [MARCHE/ARRÊT] (12) pendant environ 1 seconde pour allumer. • Appuyez sur la touche [MARCHE/ARRÊT] (12) pendant environ 3 secondes pour éteindre. UTILISATION DU RÉTICULE (15) Un réticule est incorporé à l’oculaire gauche des jumelles GPS. Ce réticule est utilisé pour mesu- rer la distance et la taille d’un objet. -
Página 27: Changement De Modes
1. Appuyez sur la touche [MARCHE/ARRÊT] (12) pendant environ 1 seconde pour allumer. 2. Le calibrage doit être effectué en plaçant les jumelles GPS sur une table horizontale ou sur une table de rotation horizontale sans rien aux alentours qui puisse bloquer les champs géomagné- tiques ou générer du magnétisme. - Página 28 Latitude Latitude (N/S): la latitude est divisée en zones de 90 degrés au sud et au nord de l’équateur, dont la latitude est par défi nition de 0 degré. Le nord de l’équateur est indiqué comme la latitude Nord (N) et le sud de l’équateur est indiqué comme la latitude Sud (S). Longitude (E/O): la longitude est divisée en zones de 180 degrés au sud et au nord du premier méridien (Observatoire royal de Longitude...
- Página 29 1. Appuyez sur la touche [MARCHE/ARRÊT] pour allumer. Les jumelles sont activées en mode d’affi chage « Latitude/Longitude ». 2. Appuyez sur la touche [MODE] une fois et le mode change en « Date/Heure ». 3. Appuyez sur les touches [MODE] et [SAUVEGARDE] une fois en même temps et le mode change à...
-
Página 30: Dépannage
AFFICHAGE DES DONNÉES LATITUDE ET LONGITUDE SAUVEGARDÉES 1. Appuyez sur la touche [MARCHE/ARRÊT] pour allumer. Les jumelles sont activées en mode « Latitude / Longitude ». 2. Appuyez sur la touche [SAUVEGARDE] pendant un court instant avec le mode « Latitude / Longitude »... - Página 31 Les piles ont peut-être été Veuillez replacer les piles placées dans la mauvaise dans la bonne position position + -. conformément au chapitre « Mise en place des piles » de ce manuel. L’appareil s’éteint Le niveau des piles restant est Veuillez remplacer les piles soudainement.
- Página 32 SPÉCIFICATIONS JUMELLES UNITÉ GPS Grossissement Taille de Segment monochrome l’écran TN positif semi- Diamètre de l’objectif 50 mm transmissif Revêtement Multicouche Piles Deux piles AAA Champ d’observation 7,2” Autonomie en réel fonctionnement continu : environ 6 heures Champ de vision à 125,8 m (en cas de 1000 m...
-
Página 33: Garantie Et Service
Internet. Vous pouvez consulter l’intégralité des conditions de garantie ainsi que les informations concernant la prolongation de la garantie et les prestations de service sur www.bresser.de/warranty_terms. Vous souhaitez un mode d’emploi détaillé pour ce produit dans une langue spécifi... -
Página 34: Informaciones De Carácter General
– por ejemplo, no utilice este aparato para mirar en el interior de viviendas. Declaración de conformidad de la Unión Europea (CE) Bresser GmbH ha emitido una "Declaración de conformidad" de acuerdo con las directrices y normas correspondientes. Dicha declaración se puede consultar en cualquier momento, previa petición. - Página 35 ADVERTENCIAS DE CARÁCTER GENERAL ¾ Lente del objetivo Ocular µ Ajuste correctamente la distancia entre ojos Visores «twist up» ¸ Botón [SAVE] Mando central de enfoque para ¹ Botón [POWER] los binoculares Botón [MODE] Ajuste individual del ocular Soporte para la correa La LCD externa La LCD interna Kop voor het digitale kompas...
-
Página 36: Uso Del Retículo
PRISMÁTICOS GPS – POWER ON/OFF • Pulse el botón [POWER] (12) durante aproximadamente 1 segundo para encender. • Pulse el botón [POWER] (12) durante aproximadamente 3 segundos para apagar. USO DEL RETÍCULO (15) Hay incorporado un retículo en la copa de ocular izquierda de los prismáticos GPS. Dicho retículo se usa para medir la distancia y el tamaño de un objeto. -
Página 37: Cambio Entre Modos
1. Pulse el botón [POWER] (12) durante aproximadamente 1 segundo para encender. 2. La calibración se debe realizar colocando los prismáticos GPS sobre una mesa horizontal o una mesa giratoria horizontal de forma que nada obstruya los campos geomagnéticos ni genere magnetismo en los alrededores. -
Página 38: Visualización De La Fecha/Hora
Latitud Latitud (N/S): la latitud se divide en zonas 90 grados al sur y al norte del Ecuador, que se defi ne como la latitud equivalente a 0 grados. El norte del Ecuador se indica como latitud norte (N) y el sur del Ecuador se indica como latitud sur (S), respectivamente. -
Página 39: Registro De Los Datos Posicionales De Latitud/Longitud
1. Pulse el botón [POWER] para encender el aparato. Los prismáticos se activan en el modo Visualización de fecha/hora. 2. Pulse el botón [MODE] una vez, y el modo cambiará a modo Fecha/Hora. 3. Pulse una vez simultáneamente el botón [MODE] y el botón [SAVE], y el modo cambiará a la pantalla Ajuste automático de la diferencia horaria, de forma que el valor numérico parpadeará... -
Página 40: Visualización De Los Datos De Latitud Y Longitud Registrados
• se recomienda registrar los datos posicionales grabados. • si se produce algún error al almacenar los datos posicionales, se muestra «ERR». A continuación, tras unos 3 segundos, el aparato regresa automáticamente al modo Latitud/Longitud. En ese caso, repita la operación a partir del paso 2. •... -
Página 41: Resolución De Problemas
RESOLUCIÓN DE PROBLEMAS PROBLEMA CAUSA PROBABLE SOLUCIÓN Los prismáticos no El nivel de pilas restante puede ser Sustituya las pilas por otras se encienden. demasiado bajo. nuevas. La tapa del compartimento de las pilas Apretar la tapa. está suelta. Puede que los polos de las pilas se Instale de nuevo las pilas en hayan colocado de forma incorrecta. -
Página 42: Especificaciones
ESPECIFICACIONES PRISMÁTICOS UNIDAD DE GPS Aumentos Tamaño de Segmento monocromo Diámetro de la lente de 50 mm la pantalla semitransmisivo positivo objetivo Revestimiento Multirevestimiento Pilas Dos pilas AAA Auto-no- Campo visual real 7,2” mía en funcionamiento continuo: aproximada- Campo visual a 1000 m 125,8 m mente 6 horas (Si se Pupila de salida 7,1 mm... -
Página 43: Eliminación
Entonces visite nuestra página web utilizando el siguiente enlace (código QR) para ver las versiones disponibles. O envíenos un mensaje a la dirección de correo manuals@bresser.de o déjenos un mensaje telefónico en el siguiente número +49 (0) 28 72 – 80 74-220*. - Página 44 Bresser GmbH Gutenbergstr. 2 · DE-46414 Rhede Germany www.bresser.de · service@bresser.de Besuchen Sie uns auf • Find us on: Irrtümer und technische Änderungen vorbehalten. · Errors and technical changes reserved. · Sous réserve d’erreurs et de modifi cations techniques. Vergissingen en technische veranderingen voorbehouden. · Con riserva di errori e modifi che tecniche. · Queda reservada la posibilidad de incluir...