Tabla de contenido
Publicidad
Idiomas disponibles
Idiomas disponibles
Enlaces rápidos
Model: RM622P / RM622PU
User Manual
CONTENTS
Contents ................................................................. 1
Introduction ............................................................. 2
Product Overview ................................................... 3
Front View ......................................................... 3
Back View ......................................................... 4
LCD Display ...................................................... 5
Getting Started ........................................................ 5
Batteries ............................................................ 5
AC Adaptor ....................................................... 6
Clock ........................................................................ 6
Turn Clock ON / OFF ........................................ 6
Setting the Clock Manually .................................... 7
Clock Mode ....................................................... 7
Clock Setting Mode ........................................... 7
The Alarm Function ................................................ 7
Basic Functions ................................................. 7
Displaying the Alarm Time ................................ 7
Setting the Alarm Time ..................................... 7
Activating / Deactivating the Alarm ................... 8
The Snooze Function .............................................. 8
The Projector Function ........................................... 8
Activating the Projector ..................................... 8
The Backlight .......................................................... 9
Indoor Temperature ................................................ 9
Maximum and Minimum Temperatures ............ 9
Reset System .......................................................... 9
Safety and Care ....................................................... 9
Warnings .................................................................. 9
Troubleshooting .................................................... 10
Specifications ........................................................ 10
About Oregon Scientific ....................................... 11
EC-Declaration of Conformity .............................. 11
1
Publicidad
Capítulos
Tabla de contenido
Solución de problemas

Manuales relacionados para Oregon Scientific RM622P


Resumen de contenidos para Oregon Scientific RM622P
-
Página 1: Tabla De Contenido
Basic Functions ..........7 Displaying the Alarm Time ........ 7 Easy Thermo Projection Clock Setting the Alarm Time ........7 Model: RM622P / RM622PU Activating / Deactivating the Alarm ....8 The Snooze Function ..........8 User Manual The Projector Function ........... 8 Activating the Projector ........ -
Página 2: Easy Thermo Projection Clock
INTRODUCTION Thank you for selecting the Oregon Scientific Easy Thermo Projection Clock (RM622P / RM622PU). This device bundles precise time keeping, alarm, and temperature monitoring features into a single tool you can use from the convenience of your home. In this box, you will find: •... -
Página 3: Product Overview
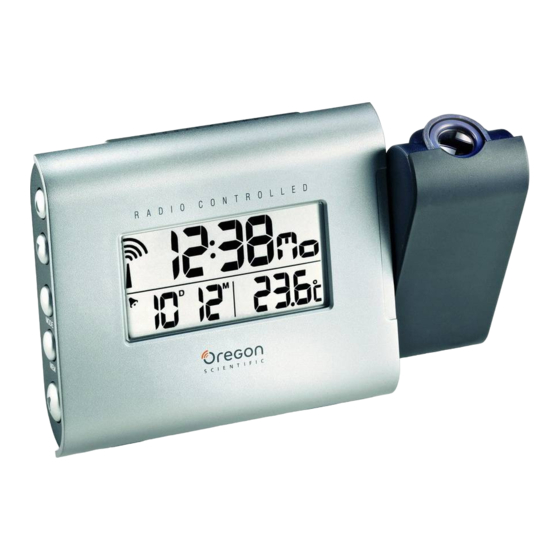
The Easy Thermo Projection Clock features: PRODUCT OVERVIEW FRONT VIEW 1. SNOOZE / LIGHT button UP and DOWN keys 3. MODE button 4. MEM button ALARM button 6. Projector feature 7. LCD display... -
Página 4: Back View
From the back view, the Easy Thermo Projection Clock BACK VIEW features: 1. FOCUS knob 2. IMAGE ROTATION knob 3. Power adaptor socket 4. Battery compartment 5. Projector on switch 6. Table stand 7. RESET hole... -
Página 5: Lcd Display
LCD DISPLAY GETTING STARTED BATTERIES Batteries are supplied with this product: 2 x UM-3 (AA) 1.5V batteries Insert batteries before first use, matching the polarity (+ and -) as shown in the battery compartment. Please press RESET after each battery change. 1. -
Página 6: Ac Adaptor
DCF77 generated from Frankfurt, Germany for Central Europe (model RM622P) or MSF60 generated from Rugby, England (model RM622PU). AC ADAPTOR The main unit has a 3.0V AC/DC adaptor with jack, which NOTE Initial reception takes 2-10 minutes, and is initiated provides continuous clock projection. -
Página 7: Setting The Clock Manually
SETTING THE CLOCK MANUALLY THE ALARM FUNCTION CLOCK MODE BASIC FUNCTIONS The top line of the clock display shows hours, minutes When the alarm goes off, you can turn it off by pressing and seconds / day. The second line shows calendar/ button. -
Página 8: Activating / Deactivating The Alarm
ACTIVATING / DEACTIVATING THE ALARM THE PROJECTOR FUNCTION To activate the alarm on, press the button. (The alarm The projector displays the time on your ceiling for easy bell icon will appear to the left of the alarm time). viewing in a darkened room. To deactivate the alarm, press the button so the alarm ACTIVATING THE PROJECTOR... -
Página 9: The Backlight
This product is designed to give you years of service if handled properly. Oregon Scientific will not be responsible The respective “MAX” or “MIN” indicator will be displayed. for any deviations in the usage of the device from those... -
Página 10: Troubleshooting
PROBLEM SYMPTOM REMEDY Hour format 12hr AM/PM Calendar Strange date / Change language (Model RM622PU) month 24hr (Model RM622P) Clock Cannot adjust Disable clock clock Calendar DD/MM; weekday in 5 languages (E, D, F, I, S) Cannot auto- 1.Adjust batteries. -
Página 11: About Oregon Scientific
Applied Standards ETSI EN 301 489-1-3 (Ver.1.4.1) :2002-08 ABOUT OREGON SCIENTIFIC Visit our website (www.oregonscientific.com) to learn more about Oregon Scientific products such as digital Additional information: cameras; MP3 players; children's electronic learning The product herewith complies with the requirements of products and games;... - Página 12 Grundfunktionen ..........7 Anzeige der Weckalarmzeit ....... 7 Einstellen der Weckalarmzeit ......7 Projektions-Funkuhr Aktivierung / Deaktivierung des Weckalarms ..8 Modell: RM622P / RM622PU Die Schlummerfunktion ........... 8 Bedienungshandbuch Die Projektorfunktion ..........8 Aktivierung des Projektors ......... 8 Die Hintergrundbeleuchtung ........9 INHALT Innentemperatur ............
-
Página 13: Einleitung
EINLEITUNG Wir danken Ihnen, dass Sie sich für die Projektions- Funkuhr mit Weckalarm (RM622P / RM622PU) von Oregon Scientific entschieden haben. Dieses Gerät vereint die Beibehaltung einer präzisen Zeitanzeige, den Weckalarm und die Überwachung der Temperatur zu einem Instrument, das Sie bequem in Ihrem Haus benutzen können. -
Página 14: Produktübersicht
Die Funktionen der Funk-Projektionsuhr mit Weckalarm PRODUKTÜBERSICHT und Raumthermometer: VORDERANSICHT 1. SNOOZE / LIGHT-Taste 2. Pfeiltasten nach OBEN und UNTEN 3. MODE-Taste: 4. MEM-Taste WECKALARM-Taste 6. Projektorfunktion 7. LCD-Anzeige... -
Página 15: Rückansicht
Die Funktionen der Funk-Projektionsuhr mit Weckalarm RÜCKANSICHT und Raumthermometer auf der Rückseite: 1. Fokus-Drehknopf 2. Bild-Drehknopf 3. Netzadapterbuchse 4. Batteriefach 5. Projektor-Einschalter 6. Tischständer 7. Reset-Loch... -
Página 16: Lcd-Anzeige
LCD-ANZEIGE VORBEREITUNG ZUM EINSATZ BATTERIEN Batterien sind im Lieferumfang dieses Produktes enthalten: Empfangseinheit: 2 x UM-3 (AA) 1,5 V Batterien Legen Sie die Batterien vor der ersten Benutzung ein und beachten Sie dabei die im Batteriefach abgebildeten (+ und -)-Polaritäten. Drücken Sie bitte nach jedem Batteriewechsel auf RESET. -
Página 17: Netzadapter
FUNKUHR Die Uhr synchronisiert sich automatisch mit der aktuellen HINWEIS Um eine längere Lebensdauer zu erzielen, Zeit und dem Datum, wenn sie (Modell RM622P) in den wird für dieses Gerät die Verwendung von Alkaline- Empfangsbereich des Funksignals DCF77, das für Batterien empfohlen. -
Página 18: Manuelle Uhreinstellung
HINWEIS Bei der Betätigung der MODE-Taste ist die MANUELLE UHREINSTELLUNG Reihenfolge der blinkenden Einstellungen: Monat, Tag, UHR-MODUS Anzeigesprache, Wochentag, Stunde, Minuten und dann Die oberste Zeile der Uhr zeigt Stunden, Minuten und der Abschluss des Einstellmodus. Sekunden/Wochentag an. In der zweiten Zeile werden der Kalender oder die Weckalarmzeit und die Innentemperatur angezeigt. -
Página 19: Aktivierung / Deaktivierung Des Weckalarms
3. Drücken Sie nochmals die Taste . (Die HINWEIS Die Schlummerfunktion wird deaktiviert, wenn Minutenanzeige der Weckalarmzeit blinkt.) die Taste gedrückt wird. 4. Benutzen Sie zur Einstellung der Minuten die HINWEIS Wenn die Schlummerfunktion aktiviert wird, Pfeiltasten nach oder blinkt das Glockensymbol. 5. -
Página 20: Die Hintergrundbeleuchtung
Sie die MEM-Taste, um durch die maximale, WARNUNGEN minimale und aktuelle Temperatur zu blättern. Dieses Gerät ist für viele Betriebsjahre vorgesehen, sofern es richtig gehandhabt wird. Oregon Scientific Die betreffenden Indikatoren: “MAX” oder “MIN” werden übernimmt keine Verantwortung für beliebige angezeigt. -
Página 21: Fehlersuche Und Abhilfe
• Tauchen Sie das Gerät niemals in Wasser. Dies Datum und Zeit 1. Batterien überprüfen k a n n e i n e n e l e k t r i s c h e n S c h o c k u n d kann nicht 2. -
Página 22: Über Oregon Scientific
Angewandte(r) Standard(s) ÜBER OREGON SCIENTIFIC ETSI EN 301 489-1-3 (Ver.1.4.1) :2002-08 Besuchen Sie unsere Website (www.oregonscientific. de) und erfahren Sie mehr über unsere Oregon Scientific- Produkte wie zum Beispiel Digitalkameras, MP3-Player, Kinderlerncomputer und Spiele, Projektionsfunkuhren, Produkte für Gesundheit und Fitness, Wetterstationen und Digital- und Konferenztelefone. - Página 23 Zusätzliche Information: D a m i t i s t d a s P r o d u k t k o n f o r m m i t d e r Niederspannungsrichtlinie 73 / 23 / EG, der Richtlinie für elektromagnetische Verträglichkeit 89 / 336 / EG und entspricht den Anforderungen des Artikels 3 der R &...
- Página 24 Vista Delantera ..........4 Solución de Problemas......... 10 Pantalla LCD ............. 5 Especificaciones ............ 10 Primeros Pasos ............5 Acerca de Oregon Scientific ......... 11 Pilas ..............5 EC-Declaración de Conformidad ......11 Adaptador CA ............ 6 Reloj ................. 6 Encender el Reloj On/Off ........
-
Página 25: Introducción
INTRODUCCIÓN Gracias por elegir el Reloj Proyector Radio Controlado y termómetro interior de Oregon Scientific RF (RM622P / RM622PU). Este dispositivo incluye un sistema de media la hora extremadamente exacto, alarma y opciones para la medición de la temperatura, todo ello integrado en un atractivo y útil dispositivo electrónico... -
Página 26: Vista Del Producto
El Reloj con Proyector RF, alarma y termómetro interior VISTA DEL PRODUCTO dispone de: VISTA FRONTAL 1. Botón SNOOZE / LIGHT 2. Botones de UP y DOWN 3. Botón MODE 4. Botón MEM Botón de ALARMA 6. Foco Proyector 7. Pantalla LCD... -
Página 27: Vista Trasera
Visto desde atrás, el Reloj con Proyector RF, alarma y VISTA TRASERA termómetro interior dispone de: 1. Mando del enfoque 2. Mando de Rotación 3. Conexión para el Adaptador de Corriente 4. Compartimiento de las Pilas 5. Interruptor del Proyector 6. -
Página 28: Pantalla Lcd
PANTALLA LCD PILAS LAS PILAS SE SUMINISTRAN CON ESTE Las pilas se suministran con este producto: Unidad Principal: Pilas 2 x UM-3 (AA) 1.5V Inserte las pilas antes de usar el producto, haciendo coincidir la polaridad ( + y - ) tal y como se muestra en el dibujo. -
Página 29: Adaptador Ca
DCF77 generada desde Frankfurt, Alemania, para el centro de Europa (modelo RM622P) o MSF60 generado desde Rugby, Inglaterra (modelo RM622P). ADAPTADOR CA La unidad principal tiene un adaptador con clavija de NOTA La recepción inicial lleva de 2 a 10 minutos y se... -
Página 30: Configurando El Reloj Manualmente
CONFIGURANDO EL RELOJ MANUALMENTE LA FUNCIÓN DE ALARMA MODO RELOJ FUNCIONES BÁSICAS La línea superior de la pantalla del reloj muestra las Cuando la alarma cese, puede apagarla pulsando el horas, minutos y segundos / día. La segunda línea botón muestra el calendario / hora de la alarma y la temperatura NOTA La alarma parará... -
Página 31: Activando / Desactivando La Alarma
ACTIVANDO / DESACTIVANDO LA ALARMA LAS FUNCIONES DEL PROYECTOR Para Activar la alarma, pulse el botón . ( El icono de la El proyector muestra la hora en el techo para una visión campana de alarma aparecerá a la izquierda de la fácil en una habitación oscura. -
Página 32: Temperatura Interior
RESET DE LA UNIDAD LA LUZ TRASERA El botón RESET está situado en el compartimiento de El usuario puede pulsar el botón SNOOZE / LIGHT , las pilas de la unidad principal. Pulse RESET cuando situado en lo parte superior del producto para habilitar la cambia las pilas y siempre que el funcionamiento no sea función de luz trasera. -
Página 33: Solución De Problemas
Formato de la Hora 12hr AM/PM (Modelo RM622PU) Temperatura Muestra “LLL” o Temperatura fuera de 24hr (Modelo RM622P) “HHH” Rango Calendario DD/MM; días de la semana en 5 idiomas (E, D, F, I, S) Alarma... -
Página 34: Alimentación
La seguridad de equipo de tecnología de información (Artículo 3.1.a de la Directiva R&TTE) el standard(s) aplicado EN 60950: 2000 SOBRE OREGON SCIENTIFIC La compatibilidad electromagnética Visite nuestra página web (www.oregonscientific.com) (Artículo 3.1.b de la Directiva R&TTE) para conocer más sobre los productos de Oregon... -
Página 35: Países Bajo La Directiva Rtte
Carmelo Cubito Agrate Brianza (MI) / Italia January 2004 Representante de R&TTE de fabricante PAÍSES BAJO LA DIRECTIVA RTTE Todos los Países de la UE, Suiza y Noruega N... - Página 36 Horloge ............10 Horloge radio pilotée ..........6 Alimentation ............ 11 Activer / Désactiver l’horloge radio pilotée ..6 À propos d’Oregon Scientific ....... 11 Réglage de l’horloge manuelle ......7 Déclaration de conformité CE ....... 11 Mode Horloge manuelle ........7...
-
Página 37: Introduction
INTRODUCTION Merci d’avoir choisi ce réveil radio piloté à projection et Thermomètre d’intérieur d’Oregon Scientific (RM622P / RM622PU). Cet appareil vous offre l’heure avec précision, ainsi qu’une fonction réveil et un relevé de la température ; le tout en un seul outil, pratique et facile d’utilisation pour votre domicile. -
Página 38: Vue D'ensemble Du Produit
Équipement du réveil radio piloté à projection et VUE D’ENSEMBLE DU PRODUIT température ambiante : FACE AVANT 1. Bouton SNOOZE / LIGHT [RÉPÉTITION DE L'ALARME / ÉCLAIRAGE] 2. Touches UP et DOWN 3. Bouton MODE 4. Bouton MEM 5. Bouton ALARME 6. -
Página 39: Face Arrière
Équipement du réveil radio piloté à projection et FACE ARRIERE température ambiante, face arrière : 1. Mise au point 2. Rotation de l’image projetée 3. Prise de l’adaptateur secteur 4. Compartiment de piles 5. Projecteur activé 6. Support de table 7. -
Página 40: Affichage Lcd
AFFICHAGE LCD MISE EN MARCHE PILES Les piles sont fournies avec le produit : Appareil principal : x 2 piles UM-3 (AA) 1,5 V Insérer les piles avant la première utilisation, en respectant la polarité (+ et -) indiquée dans le compartiment de piles. -
Página 41: Adaptateur Secteur
DCF77, émis depuis Frankfort en Allemagne optimales. pour l’Europe centrale (modèle RM622P) ou du signal MSF60 émis depuis Rugby en Angleterre (modèle RM622PU). ADAPTATEUR SECTEUR AC/DC L’appareil principal est équipé... -
Página 42: Réglage De L'horloge Manuelle
REMARQUE Lors de l’utilisation du bouton MODE, les REGLAGE DE L’HORLOGE MANUELLE éléments clignotent dans l’ordre suivant : mois, jour MODE HORLOGE MANUELLE date, langue, jour de la semaine, heures, minutes, puis La ligne supérieure de l’affichage horaire affiche les il sort du mode de réglage de l’horloge. -
Página 43: Réglage De L'heure De L'alarme
3. Appuyer de nouveau sur le bouton . (La partie FONCTION PROJECTION « minutes » de l'alarme se met à clignoter). Le projecteur permet de mieux voir l’heure dans une 4. Utiliser les boutons pour régler les minutes. pièce sombre en la projetant au plafond. 5. -
Página 44: Rétro-Éclairage
Ce produit est conçu pour offrir des années de service s’il Les indicateurs « MAX » ou « MIN » s’affichent est manipulé correctement. Oregon Scientific décline respectivement. toute responsabilité en cas d’utilisation de cet appareil non conforme aux instructions d’utilisation spécifiées... -
Página 45: Résolution Des Problèmes
Affichage de l’heure HH:MM:SS Impossible de 1. Vérifier les piles. synchroniser 2. Appuyer sur RESET Format de l’heure 12 h AM / PM automatiquement 3. Activer (Modèle RM622PU) la date et manuellement la 24 h (Modèle RM622P) l’heure fonction horloge... -
Página 46: Alimentation
Nous espérons que vous trouverez toutes les informations porte la mention CE correspondante. dont vous avez besoin sur notre site, néanmoins, si vous souhaitez contacter le service client Oregon Scientific directement, allez sur le site www2.oregonscientific. com/service/support ou appelez le 949-608-2848 aux... - Página 47 Carmelo Cubito Agrate Brianza (MI) / Italie January 2004 Représentant du fabricant R&TTE PAYS CONCERNES RTT&E Tous les pays de l’UE, Suisse et Norvège N...
- Página 48 Orologio ............10 Orologio ..............6 Alimentazione ..........11 Accensione / spegnimento dell’Orologio ... 6 A proposito di Oregon Scientific ......11 Impostare manualmente l’orologio ....... 7 Dichiarazione di conformità ......... 11 Modalità Orologio ..........7 Modalità di impostazione dell’orologio ....7...
-
Página 49: Contenuto
INTRODUZIONE Grazie per aver scelto l’Orologio Sveglia radiocontrollato con Proiezione dell'ora e termometro Interno (RM622P / RM622PU) di Oregon Scientific . Questo è un dispositivo multifunzionale, in grado di fornire l’ora precisa, la sveglia e di monitorare la temperatura, il tutto in unico strumento. -
Página 50: Caratteristiche Del Prodotto
L’Orologio Sveglia radiocontrollato con Proiezione dell'ora CARATTERISTICHE DEL PRODOTTO e Termometro Interno presenta: VISTA ANTERIORE 1. Pulsante SNOOZE / LIGHT 2. Pulsanti SU e GIÚ 3. Pulsante MODE 4. Pulsante MEM 5. Pulsante ALLARME 6. Proiettore 7. Display LCD... -
Página 51: Vista Posteriore
Sul pannello posteriore, l’Orologio presenta: VISTA POSTERIORE 1. Manopola per la messa a fuoco 2. Manopola di rotazione dell’immagine 3. Presa per adattatore di corrente 4. Vano batterie 5. Interruttore di accensione del proiettore 6. Supporto da tavolo 7. Foro Reset... -
Página 52: Display Lcd
DISPLAY LCD OPERAZIONI PRELIMINARI BATTERIE Le batterie sono fornite in dotazione al prodotto: Unità principale 2 batterie tipo UM-3 (AA) da 1,5V Inserire le batterie prima di utilizzare l’unità per la prima volta, accordando le polarità (+ e -) come mostrato nel vano batterie. -
Página 53: Adattatore Ac
NOTA Per una maggiore durata, si consiglia di utilizzare correnti quando viene utilizzato entro il raggio d’azione batterie alcaline. del segnale radio DCF77 generato da Francoforte, Germania per il Centro Europa (modello RM622P) o MSF60 generato da Rugby, Inghilterra (modello ADATTATORE AC RM622PU). -
Página 54: Impostare Manualmente L'orologio
NOTA Utilizzando il pulsante MODE, l’ordine delle opzioni IMPOSTARE MANUALMENTE L’OROLOGIO lampeggianti è il seguente: mese, giorno, lingua, giorno MODALITÀ OROLOGIO della settimana, ora, minuti e modalità di impostazione La riga superiore del display dell’orologio visualizza le dell’orologio. ore, i minuti e i secondi o il giorno della settimana. La seconda riga visualizza il calendario o l’ora dell’allarme e la temperatura interna. -
Página 55: Attivazione / Disattivazione Dell'allarme
3. Premere nuovamente il pulsante . (La sezione FUNZIONE PROIETTORE “minuti“dell’allarme lampeggerà. Il proiettore consente di visualizzare l’ora corrente sul 4. Usare i pulsanti per selezionare i minuti. soffitto o su una parete, in questo modo l'informazione è visibile anche al buio. 5. -
Página 56: Retroilluminazione
Il presente prodotto è progettato per offrire molti anni di Verranno visualizzati i rispettivi indicatori “MAX” o “MIN”. funzionamento soddisfacente a condizione che venga maneggiato con cura. Oregon Scientific declina ogni Per cancellare i valori in memoria, tenere premuto il responsabilità per danni derivanti da un utilizzo pulsante MEM per due secondi. -
Página 57: Risoluzione Dei Problemi
POSSIBILI SOLUZIONI Formato dell’ora 12 ore AM/PM Calendario Data / mese non Cambiare la lingua (Modello RM622PU) comprensibili 24 ore (Modello RM622P) Orologio Non è possibile Disattivare la funzione di regolare l’orologio radiocontrollo Calendario GG/MM; giorni della Non è possibile 1. -
Página 58: Alimentazione
Requisiti essenziali sulla sicurezza dell’apparecchio batterie alcaline. (Articolo 3.1.a della direttiva R&TTE) Standard applicati EN 60950: 2000 INFORMAZIONI SU OREGON SCIENTIFIC Compatibilità Elettromagnetica Per avere maggiori informazioni sui nuovi prodotti Oregon (Articolo 3.1.b della direttiva R&TTE) Scientific, come le fotocamere digitali, il lettori MP3, i... - Página 59 Carmelo Cubito Agrate Brianza (MI) / Italia January 2004 Rappresentante EU del Produttore per la R&TTE PAESI CONFORMI ALLA DIRETTIVA R&TTE Tutti i Paesi Europei, Svizzera e Norvegia N...
- Página 60 Nakijken van de wektijd op de display ....7 Instellen van de wektijd ........7 RF-projectiewekker De wekker activeren / deactiveren ..... 8 Model: RM622P / RM622PU De sluimerfunctie ............ .8 Gebruilsaanwijzing De projectorfunctie ..........8 Activeren van de projector ........8 De displayverlichting ..........
-
Página 61: Inleiding
INLEIDING Wij danken u voor uw keuze van deze RF-projectiewekker met binnenthermometer (RM622P / RM622PU) van Oregon Scientific . Dit toestel bundelt een uiterst nauwkeurige tijdaanduiding, een wekker en verschillende kenmerken voor het registreren van de temperatuur in één enkel toestel dat u met gemak van thuis uit kunt gebruiken. -
Página 62: Overzicht Van Het Product
Kenmerken van de RF-projectiewekker met OVERZICHT VAN HET PRODUCT binnenthermometer: VOORAANZICHT 1. Toets SNOOZE / LIGHT 2. Toetsen UP en DOWN 3. Toets MODE 4. Toets MEM 5. Toets ALARM 6. Projectorkenmerk 7. LCD-display... -
Página 63: Achteraanzicht
Op de achterzijde van de RF-projectiewekker met ACHTERAANZICHT binnenthermometer ziet u: 1. Focusknop 2. Knop beeldrotatie 3. Contact voor stroomadapter 4. Batterijenvak 5. Schakelaar projector aan 6. Tafelstaander 7. Terugsteltoets... -
Página 64: Lcd-Display
LCD-DISPLAY OM TE BEGINNEN BATTERIJEN De batterijen zijn bij dit product geleverd: Voor het hoofdtoestel: 2 batterijen van het type UM-3 (AA) 1,5 V Wanneer u het product voor het eerst gebruikt moet u eerst de batterijen inzetten, daarbij lettend op de aanduiding van de polariteiten (+ en -) in het batterijenvak. -
Página 65: Wisselstroomadapter
DCF77, dat wordt uitgezonden is het gebruik van alkaline batterijen voor dit product vanuit Frankfurt in Duitsland voor Midden-Europa (model aanbevolen. RM622P), of het radiosignaal MSF60 dat wordt uitgezonden vanuit Rugby in Engeland (model RM622PU). WISSELSTROOMADAPTER Het hoofdtoestel is uitgerust met een 3,0 V wissel / gelijkstroomadapter met stekker, waarmee u de klok OPMERKING De initiële signaalontvangst neemt 2-10... -
Página 66: Handmatig Instellen Van De Klok
HANDMATIG INSTELLEN VAN DE KLOK DE WEKKERFUNCTIE KLOKMODUS BASISFUNCTIES De bovenste lijn van de klokdisplay geeft het uur, de Wanneer de wekker rinkelt kunt u hem uitschakelen door minuten en de seconden / dag aan. De tweede lijn geeft te drukken op de toets d e k a l e n d e r / w e k k e r a a n , s a m e n m e t d e binnentemperatuur. -
Página 67: De Wekker Activeren / Deactiveren
4. Gebruik de toetsen om de minuten in te DE PROJECTORFUNCTIE stellen. De projector projecteert de tijd op uw plafond zodat u in 5. Druk op de toets om de instelmodus voor de wektijd het donker gemakkelijk kan zien hoe laat het is. te verlaten. -
Página 68: De Displayverlichting
De overeenkomstige indicator “MAX” of “MIN” is ook op jaren trouw te kunnen dienen, op voorwaarde dat het de display aangegeven. correct wordt gehanteerd. Oregon Scientific is niet aansprakelijk voor de gevolgen van afwijkend gebruik Om het geheugen te wissen, houd de toets MEM twee van de instructies die in de gebruiksaanwijzing seconden lang ingedrukt. -
Página 69: Het Oplossen Van Problemen
Deactiveer de Tijdaanduiding 12 uur AM / PM worden automatische klok (Model RM622PU) ingesteld 1. Controleer de 24 uur (Model RM622P) De datum en tijd batterijen worden niet 2. Druk op RESET Kalender DD / MM; weekdag in automatisch 3. Activeer handmatig... -
Página 70: Over Oregon Scientific
Bezoek onze website (www.oregonscientific.com) om ETSI EN 301 489-1-3 (Ver.1.4.1) :2002-08 meer te weten over uw nieuwe product en andere Oregon Scientific producten zoals digitale fototoestellen, gezondheids- en fitnessuitrusting en weerstations. Op deze website vindt u tevens de informatie over onze klantendienst, voor het geval u ons wenst te contacteren. - Página 71 Carmelo Cubito Agrate Brianza (MI) / Italië January 2004 R&TTE-vertegenwoordiger van de fabrikant LANDEN DIE ZIJN ONDERWORPEN AAN RTT&E Alle EEG-landen, Zwitserland en Noorwegen N...
-
Página 72: Sumário Sumário
Diagnóstico de falhas ..........10 Tela de cristal líquido ......... 5 Especificações ............10 Primeiros passos ............. 5 Sobre a Oregon Scientific ........11 Pilhas ..............5 Declaração de conformidade CE ......11 Adaptador AC ............ 6 Relógio ..............6 Ligar e desligar a sincronização ...... -
Página 73: Apresentação
Agradecemos sua preferência pelo Relógio de Projeção radio controlado e temperatura interna e externa da Oregon Scientific (RM622P / RM622PU). Este aparelho incorpora funções de relógio, de alarme e de temperatura em um dispositivo único que pode ser usado no conforto da sua casa. -
Página 74: Visão Geral Do Produto
VISÃO GERAL DO PRODUTO VISTA FRONTAL 1. BOTÃO SNOOZE / LIGHT 2. Teclas UP e DOWN 3. Botão MODE 4. Botão MEM 5. Botão ALARM 6. Projetor 7. Visor de cristal líquido... -
Página 75: Vista Traseira
VISTA TRASEIRA 1. Botão de foco 2. Botão de rotação da imagem 3. Conector do adaptador 4. Compartimento das pilhas 5. Chave liga/desliga do projetor 6. Apoio de mesa 7. Orifício de RESET [Reinicialização]... -
Página 76: Tela De Cristal Líquido
TELA DE CRISTAL LÍQUIDO PRIMEIROS PASSOS PILHAS As pilhas acompanham este produto: Unidade principal: 2 pilhas AA de 1,5 V Antes de usar o aparelho pela primeira vez, insira as baterias, coincidindo as polaridades (+ e –) conforme mostradas no compartimento das baterias. Pressione RESET depois de cada troca de baterias. -
Página 77: Adaptador Ac
OBSERVAÇÃO É recomendável usar baterias alcalinas DCF77 gerado de Frankfurt, Alemanha, para a Europa neste produto, para obter o máximo desempenho. Central (modelo RM622P), ou o sinal MSF60 gerado de Rugby, Inglaterra, (modelo RM622PU). ADAPTADOR AC A unidade principal dispõe de um adaptador AC de de OBSERVAÇÃO A recepção inicial demora de 2 a 10... -
Página 78: Ajuste Manual Do Relógio
OBSERVAÇÃO Usando o botão MODE, a ordem dos AJUSTE MANUAL DO RELÓGIO itens piscando é: mês, dia, idioma, dia da semana, hora, MODO RELÓGIO minutos e, por fim, ocorre a saída do modo de ajuste do A linha superior do visor do relógio exibe as horas, os relógio. -
Página 79: Ativação E Desativação Do Alarme
2. Use os botões para ajustar a hora. OBSERVAÇÃO A função “soneca” será desativada se for pressionado o botão 3. Pressione novamente o botão . (Os “minutos” da hora do alarme piscarão.) OBSERVAÇÃO Quando a função “soneca” é acionada, 4. Use os botões para ajustar os minutos. -
Página 80: A Iluminação De Fundo
As temperaturas máxima e mínima serão apagadas. A ILUMINAÇÃO DE FUNDO O usuário pode pressionar o botão SNOOZE / LIGHT na OBSERVAÇÃO Se você pressionar o botão MEM parte superior do aparelho para ativar a função de nesse momento, as temperaturas máxima e mínima iluminação de fundo. -
Página 81: Avisos
SINTOMA REPARAÇÃO funcionamento correto, desde que manuseado Calendário Data/mês Altere o idioma adequadamente. A Oregon Scientific não se estranhos responsabiliza por utilizações do aparelho divergentes Relógio Não é possível Desative o relógio do especificado nas instruções do usuário, nem por ajustar o relógio. -
Página 82: Sobre A Oregon Scientific
12 h AM / PM dados para contato com nosso SAC, assim como (Modelo RM622PU) perguntas e respostas mais recentes e downloads. 24 h (Modelo RM622P) Esperamos que você encontre todas informações que Calendário DD / MM; dia da semana necessitar, entretanto se você... -
Página 83: Países Sujeitos Á Norma R&Tte
Informações Adicionais: O produtos está em conformidade com as diretrizes de Baixa Voltagem 73 / 23 / EC, a diretriz EMC 89 / 336 / EC e diretriz R&TTE 1999 / 5 / EC (apêndice II) e leva a marca CE respectiva. Carmelo Cubito Agrate Brianza (MI) / Itália January 2004 Representante do Fabricante na Comunidade Européia... - Página 84 Alarmfunktionen ............ 7 Basfunktioner ........... 7 Visning av alarmtid ........... 7 RF Projektionsklocka Inställning av alarmtid ........7 Aktivera/avaktivera alarmet ......8 Modell: RM622P / RM622PU Snoozefunktionen ..........8 Bruksanvisning Projektionsfunktionen ........... 8 Aktivering av projektorn ........8 Bakgrundsbelysning ..........9 INNEHÅLL...
-
Página 85: Rf Projektionsklocka
INTRODUKTION Tack för ditt val av en Oregon Scientific Projektionsklocka med inomhustermometer (RM622P / BAR622PU). Denna utrustning knyter samman tid, väderprognos, inomhus- och utomhustemperatur till ett komplett verktyg som lämpar sig för hemmet. I denna förpackning hittar du: • RF Projektionsklocka •... -
Página 86: Produktöversikt
RF projektionsklocka med inomhustemperatur har PRODUKTÖVERSIKT följande funktioner: VY FRAMSIDA 1. SNOOZE / LIGHT knapp UP och DOWN tangenter 3. MODE-knapp 4. MEM-knapp ALARM-knapp 6. Projektionsfunktionen 7. LCD display... -
Página 87: Vy Baksida
RF projektionsklockan med inomhustemperatur har VY BAKSIDA följande funktioner på baksidan: 1. Fokusvred 2. Rotationsvred 3. Anslutningsjack 4. Batterifack 5. Projektionsknapp av/på 6. Bordsstativ 7. Resetknapp... -
Página 88: Lcd Display
LCD DISPLAY ATT KOMMA IGÅNG BATTERIER Batterier medföljer produkten: Huvudenhet: 2 x UM-3 (AA) 1.5V batterier Se till att batterierna sätts in enligt figuren i batterifacket. Tryck RESET efter varje batteribyte. 1. Radiokontrollerad klocka 2. Radiofrekvenssignal Ikon för aktiverat alarm Alarmindikator 5. -
Página 89: Nätadaptor
DCF77 som sänds ut från Frankfurt, Tyskland för centraleuropa (modell RM622P) eller MSF60 som sänds från Rugby, England (modell RM622PU). AC NÄTADAPTOR Huvudenheten har en medföljande 3.0V AC/DC adaptor NOTERING Den initiala mottagningen tar 2-10 minuter som ger kontinuerlig projektion vid anslutning. -
Página 90: Ställ In Klockan Manuellt
STÄLL IN KLOCKAN MANUELLT ALARMFUNKTIONEN KLOCKLÄGE BASFUNKTIONER Översta raden av displayen visar timmar, minuter och När alarmet är igång kan det stängas av genom att trycka sekunder / veckodag. Andra raden visar datum / alarmtid på knappen. och inomhustemperatur. NOTERING Alarmet kommer automatiskt att sluta ljuda För att växla mellan sekund- och veckodagsvisning: efter 1 minut. -
Página 91: Aktivera / Inaktivera Alarmet
AKTIVERA / INAKTIVERA ALARMET PROJEKTORFUNKTIONEN Att ställa alarm aktivt: Projektorn visar tiden i taket för att underlätta avläsning 1. Tryck på knappen. (Alarmikonen kommer att i ett mörkt rum. visas till vänster om alarmtiden). För att avaktivera alarmet: AKTIVERING AV PROJEKTORN 1. -
Página 92: Inomhustemperatur
BAKGRUNDSBELYSNINGEN ÅTERSTÄLLNING AV PRODUKTEN RESET knappen finns i huvudenhetens batterifack. Tryck Tryck SNOOZE / LIGHT knappen på ovansidan av på RESET så fort du bytt batterier eller när produkten enheten för att aktivera bakgrundsbelysningen. inte fungerar som förväntat (t.ex. när radiosignalen inte kan etablera kontakt med den automatiska klockan). -
Página 93: Felsökning
12 timmars AM / PM manuellt (->X) (Modell RM622PU) Temp Visar ” LLL” Temperaturen är 24 timmars eller "HHH" rutanför mätområdet (Modell: RM622P) Kalender DD / MM; veckodag på 5 språk (E, D, F, I, S) Alarm Enkelalarm med 1 minuters stigande i ljudstyrka... -
Página 94: Om Oregon Scientific
(Artikel 3.1.b i R&TTE-direktivet) Tillämpad standard ETSI EN 301 489-1-3 (Ver.1.4.1) :2002-08 OM OREGON SCIENTIFIC Besök vår hemsida (www.oregonscientific.se) för att se mer av våra produkter såsom digitalkameror; MP3 Ytterligare information: spelare; projektionsklockor; hälsoprodukter;...