Tabla de contenido
Publicidad
Idiomas disponibles
Idiomas disponibles
Enlaces rápidos
Publicidad
Tabla de contenido
Solución de problemas

Manuales relacionados para Tristar BM-4582

Resumen de contenidos para Tristar BM-4582
- Página 1 BM-4582...
-
Página 2: Belangrijke Veiligheidsmaatregelen
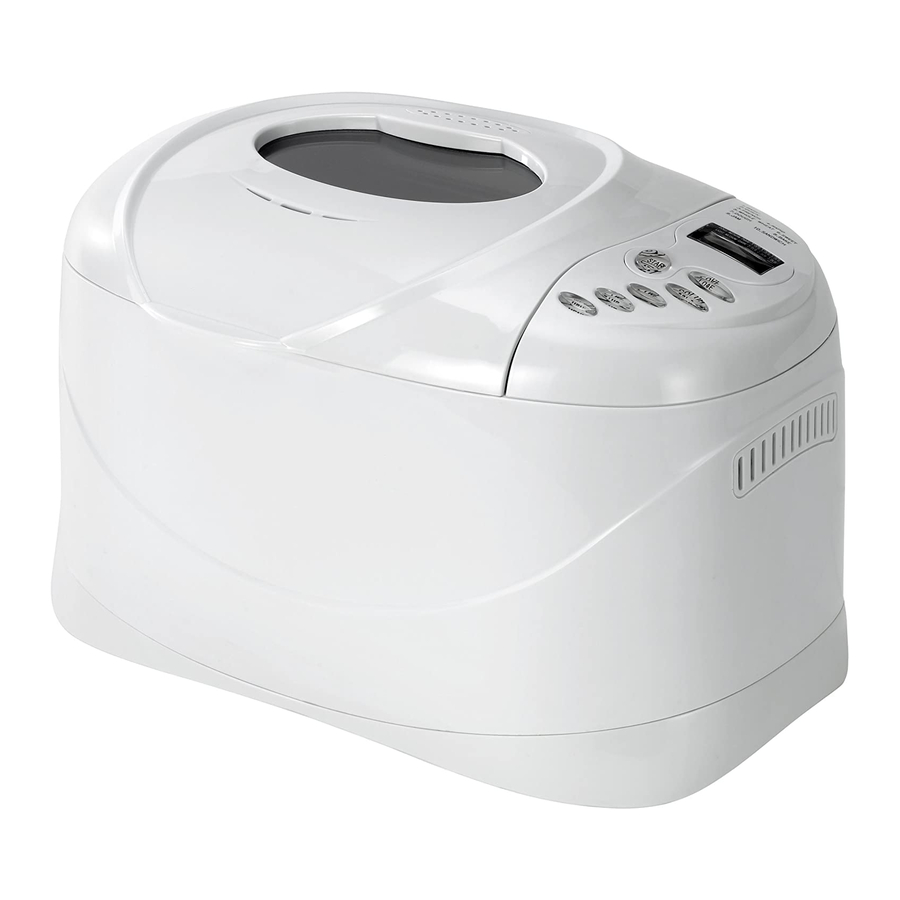
Lees deze brochure zorgvuldig vóór u het toestel gebruikt en hou ze bij ter referentie BELANGRIJKE VEILIGHEIDSMAATREGELEN: Vooraleer u het elektrisch apparaat gebruikt, moet u de volgende basisvoorzorgsmaatregelen volgen: 1. Lees alle instructies. 2. Vóór gebruik ga na of de spanning van het stopcontact overeenkomt met diegene op het etiket. 3. - Página 3 Kijkvenster Deksel Handvat pan Kneedmes Broodpan Bedieningspaneel Stroomschakelaar De pijl toont hoe u moet inladen en uitladen. Behuizing Functievoorstelling BASIS SNEL FRANS ULTRASNEL VOLKOREN ZOET DEEG BAKKEN 10. SANDWICH De baktijd voor elk programmma. Dit geeft het programma weer dat u gekozen hebt.
- Página 4 Om het programma te stoppen, druk ongeveer 3 seconden op de knop “START/STOP” tot een biep bevestigt dat het programma gestopt werd. Dit kenmerk helpt om een toevallige onderbreking in de werking van het programma te voorkomen. Afhankelijk van het door u gekozen programma wordt er een vóórverwarming uitgevoerd : Tijdens het voorverwarmen draait de motor niet en u hoort dus niets.
- Página 5 WARMHOUDEN Brood kan automatisch 60 minuten warm gehouden worden na het bakken. Als u het brood er wil uit nemen, schakel het programma uit met de knop START/STOP. GEHEUGEN Als de stroomtoevoer afgebroken wordt tijdens het brood maken, wordt het maakproces automatisch voortgezet binnen 15 minuten, zelfs zonder op de knop Start/stop te drukken.
- Página 6 tijdens het bakken. Dit is normaal. 12. Als het proces gedaan is, hoort u 10 biepgeluiden. U moet ongeveer 3-5 seconden op de knop START/STOP drukken om het proces te stoppen en neem daarna het brood eruit. Open het deksel en met ovenwanten neemt u stevig het broodpanhandvast vast;...
- Página 7 7. Suiker Suiker is een heel belangrijk ingrediënt om een zoete smaak en kleur aan het brood te geven. Hiermee wordt brood een voedingsmiddel; vooral witte suiker wordt gebruikt. Bruine suiker, poedersuiker en katoensuiker kunnen gebruikt voor speciale behoeften. 8. Gist Gist gaat door het gistproces van het deeg en produceert daarna koolstofdioxide, waardoor het brood uitzet en de binnenvezels zacht worden.
- Página 8 Problemengids probleem Reden oplossing Sommige ingrediënten kleven aan het Trek broodmaker Rook uit het ventilatiegat verwarmingselement of er vlakbij; bij het stopcontact reinig tijdens het bakken eerste gebruik doet u olie op het verwarmingselement. Let op dat u oppervlak van het verwarmingselement. zich niet verbrandt.
- Página 9 ***** Lisez ce livret entièrement avant l’utilisation et conservez-le à titre d’information BM-4582 MISES EN GARDE IMPORTANTES : Avant d’utiliser l’appareil électrique, les précautions de base suivantes doivent toujours être prises : 1. Lisez toutes les instructions. 2. Avant l’utilisation, vérifiez que la tension de la prise murale correspond à celle indiquée sur la plaque signalétique.
- Página 10 Introduction aux fonctions Hublot Couvercle Poignée du moule Malaxeur Moule à pain Panneau de contrôle La flèche indique comment Interrupteur charger ou décharger le moule d’alimentation Boîtier...
- Página 11 ORDINAIRE TRÉS RAPIDE FRANÇAIS RAPIDE COMPLET BRIOCHÉ PÂTE CUIRE CONFITURE PAIN DE MIE Ceci indique programme que vous avez choisi. La durée du programme pour chaque programme. APRÈS MISE SOUS TENSION Dès que la machine à...
- Página 12 présente une croûte plus croustillante et une texture légère. 4.Rapide : pétrissage, levée et cuisson en quelques étapes. 5.Complet : pétrissage, levée et cuisson d’un pain complet. Ce réglage comprend une durée de préchauffage plus longue pour permettre aux céréales d’absorber de l’eau et de gonfler. Il n’est pas conseillé d’utiliser la fonction Délai qui peut provoquer de piètres résultats.
- Página 13 2、Si l’afficheur indique : « E:EE » après que vous ayez appuyé sur DÉMARRAGE/ARRÊT (reportez-vous ci-dessous, figure 2), le capteur de température est déconnecté, veuillez le faire vérifier par un expert agréé. Figure 1 Figure 2 .Pour la première utilisation 1、Veuillez vérifier que toutes les pièces et accessoires sont présents et en bon état.
- Página 14 Remarque : Avant de couper le pain en tranche, utilisez le crochet pour sortir le malaxeur noyé au fond du pain. Le pain est chaud, n’utilisez jamais les mains pour sortir le malaxeur. . Introduction spéciale 1、Pour une préparation rapide pour pains Les pains fabriqués suivant une p réparation rapide pour pain sont faits avec de la levure chimique et du bicarbonate de sodium qui sont activés par l’humidité...
- Página 15 sucre en poudre ou autres sucres peuvent être demandés pour des besoins spéciaux. 8. Levure La levure active le processus de levurage pâteux, puis génère le dioxyde de carbone, faisant dilater la pâte et assouplissant les fibres internes. Cependant, la reproduction rapide de la levure nécessite l’apport de glucides dans du sucre et de la farine en tant qu’aliment.
-
Página 16: Guide De Dépannage
vous utilisez la fonction de retard pour une longue période, n’ajoutez jamais les ingrédients périssables tels que les œufs, les ingrédients fruits. Guide de dépannage déroulement des faits N° problème solution adhèrent à Fumée par le trou de Débranchez la machine à pain et certains ingrédients l’élément chauffant ou à... -
Página 17: Wichtige Sicherheitshinweise
2. ne se mélange pas correctement car vérifiez l’eau et la construction mécanique de la machine à pain pas assez d’eau si la couleur de cuisson est trop croûte trop épaisse et foncée pour la recette avec un différentes recettes ou ingrédients ont sucre, appuyez couleur de cuisson trop... - Página 18 Haken Messbecher Measuring cup Messlöffel Measuring spoon Sichtfenster Deckel Brotformhand griff Knethaken Brotform Bedienteil Netzschalter Der Pfeil zeigt, Brotform heraus genommen oder eingesetzt wird Gehäuse Vorstellung der Funktionen NORMAL SCHNELL FRANZÖSISCH SCHNELL VOLLKORN SÜSS ...
-
Página 19: Nach Dem Einschalten
NACH DEM EINSCHALTEN Sobald der Brotbackautomat an die Stromversorgung angeschlossen und der Netzschalter eingeschaltet wurde, ertönt ein Signalton und nach kurzer Zeit erscheint “ 3:00” auf der Anzeige, aber die zwei Punkte zwischen der “3” und “00” blinken nicht ständig. Der Pfeil zeigt auf 3.0 LB (1.361 kg) und MITTEL. Das ist die Werkseinstellung. START / STOPP Starten und Stoppen eines gewählten Backprogramms. - Página 20 Programm und der Bräunungsgrad gewählt werden, dann drücken Sie ZEIT + oder ZEIT - Tasten zum Erhöhen oder Verringern der Verzögerungszeit in Schritten von 10 Minuten. Die maximale Verzögerungszeit beträgt 13 Stunden. Beispiel: Es ist jetzt 20:30, Sie möchten Ihr Brot am nächsten Morgen um 7:00 fertig gebacken haben, d. h. in 10 Stunden und 30 Minuten.
- Página 21 schwerem Teig mit hohem Roggen- oder Vollkornmehlanteil, wird empfohlen, die Reihenfolge der Zutaten umzukehren, d. h. fügen Sie zuerst die Trockenhefe, das Mehl und anschließend die Flüssigkeiten hinzu und erhalten damit ein besseres Knetergebnis. 3. Machen Sie mit dem Finger auf einer Seite des Mehls eine kleine Mulde. Geben Sie die Hefe in diese Mulde.
- Página 22 Vorstellung der Brotzutaten 1. Brotmehl Brotmehl hat einen hohen Anteil von Kleber (es kann auch Hoch-Kleber Mehl genannt werden, da es viel Protein enthält) Es hat gute elastische Eigenschaften und kann verhindern, dass das Brot nach dem Aufgehen zusammenfällt. Da der Kleberanteil höher als in gewöhnlichem Mehl ist, kann es zum Backen großer Brote mit höherer Kompaktheit verwendet werden.
- Página 23 ssen gut verrührt werden. 11. Fett, Butter und Gemüseöl Fett kann das Brot weich machen und die Aufbewahrungszeit verlängern. Butter sollte vor der Verwendung geschmolzen oder in kleine Stücke geschnitten werden. Sie sollte auch gleichmäßig verrührt werden, wenn sie aus dem Kühlschrank genommen wurde. 12.
- Página 24 3. Nach dem Einschalten haben Sie die Abdeckung mehrmals geöffnet und das Öffnen Sie die Abdeckung beim Brot ist zu trocken geworden, so dass letzten Aufgehen nicht keine braune Kruste entsteht Überprüfen Sie die Kneteröffnung, 4. Der Knetwiderstand ist zu groß, so dann nehmen Sie die Brotform dass der Kneter sich fast nicht mehr heraus...
-
Página 25: Important Safeguards
***** Read this booklet thoroughly before using and save it for future reference IMPORTANT SAFEGUARDS Before using the electrical appliance, the following basic precautions should always be followed: Read all instructions 2. Before use check that the voltage of wall outlet corresponds to the one shown on the rating plate. 3. -
Página 26: Function Introduction
View window Pan handle Kneading blade Bread pan Control panel Power switch The arrow shows how to load or unload the Housing Function Introduction This indicates program have chosen. The operation time for each program. AFTER POWER-UP As soon as the bread maker is plugged the power supply and turn on the power switch, a beep will be heard and “... - Página 27 Some programms will preheat; during this preheating-period the motor will not ne working so you will not hear anything. these preheating-times vary: 1st program will start kneading after 20 minutes . 2nd program need not preheat ,and may knead directly . 3rd program is the same as first program .
-
Página 28: Warning Display
WARNING DISPLAY: 1、If the display shows “H:HH” after the program has been started, (see below figure1) the temperature inside is still too high. Then the program has to be stopped. Open the lid and let the machine cool down for 10 to 20 minutes. 2、If the display shows “E:EE”... - Página 29 be necessary to help machine mix to avoid flour clumps. If so, use a rubber spatula. . Cleaning and Maintenance Disconnect the machine from the power and let it cool down prior to cleaning. 1. Bread pan: Rub inside and outside with a damp cloth. Do not use any sharp or abrasive agents for the consideration of protecting the non-stick coating.
-
Página 30: Troubleshooting Guide
without salt. 10. Egg Eggs can improve bread texture, make the bread more nourish and larger in size, add special egg flavor to bread, when using it must be peeled and stirred evenly. 11. Grease, butter and vegetable oil Grease can make bread be soft and delay storage life. Butter should be melted or chopped to small particles prior use, so as to be stir evenly when you take it out from refrigerator. -
Página 31: Importanti Norme Di Sicurezza
pressing“start/stop”button high to make bread. unplug bread maker, then take bread pan out and open cover until the toaster cools down Check whether bread pan is fixed hear the motor noises but bread pan is fixed improperly or dough properly dough made dough isn’t still stirred... - Página 32 7. Non lasciare pendere il cavo oltre il bordo del tavolo o su superfici bollenti. 8. L’uso di accessori non raccomandato dal produttore può causare danni alle persone. 9. È necessaria una stretta supervisione quando l'apparecchio viene utilizzato nelle vicinanze di bambini o di persone non esperte.
-
Página 33: Introduzione Alle Funzioni
Finestrella ispezione Coperchio Maniglia cestello Braccio impastatore Cestello Pannello di controllo Interruttore freccia indica come accensione/speg agganciare sganciare cestello Struttura Introduzione alle funzioni BASE VELOCE FRANCESE RAPIDO INTEGRALE DOLCE IMPASTO COTTURA CONFETTURE SANDWICH Indica programma selezionato Durata di ogni programma DOPO L’ACCENSIONE Quando si collega la macchina per il pane alla presa di corrente e si accende l’interruttore, viene emesso un segnale acustico e dopo breve sul display appare “... -
Página 34: Mantenimento Del Calore
Per arrestare il programma, premere il tasto “START/STOP” per circa 3 secondi fino a quando un segnale acustico confermerà che il programma è stato arrestato. Questa funzione impedisce che il programma venga arrestato non intenzionalmente. MENU Imposta i diversi programmi. Premendolo ripetutamente (sarà accompagnato da un breve segnale acustico) è possibile scegliere il programma. -
Página 35: Primo Utilizzo
AMBIENTE La macchina lavora bene a tutte le temperature, ma potrebbero esserci delle differenze nella quantità del pane se la macchina viene utilizzata in ambienti molto caldi o molto freddi. La temperatura consigliata è tra i 15 e i 34 C˚. DISPLAY: 1 Se una volta avviato il programma sul display viene visualizzato “H:HH”... - Página 36 15. Rimuovere con cura il pane dal cestello e lasciar raffreddare per circa 20 minuti prima di affettarlo. 16. Se al termine del processo di cottura non ci si trova nella stanza o non si è premuto il tasto START/STOP, il pane verrà...
- Página 37 o altre varietà di zucchero possono essere utilizzati per esigenze particolari. 8. Lievito Il lievito effettua il processo di lievitazione, quindi produce di-ossido di carbonio che causa la lievitazione del pane e ne rende soffice la consistenza. Tuttavia il lievito necessita dei carboidrati contenuti nello zucchero e nella farina come nutrimento.
- Página 38 problema causa soluzione Fumo dall’apertura Alcuni ingredienti aderiscono Scollegare la macchina per il pane e all’elemento riscaldante, per il primo uso riscaldante, ventilazione durante pulire l’elemento l’elemento è stato oliato cottura attenzione, pericolo di ustioni Il pane si affloscia nel Tenere il pane al caldo, lasciare il pane nel Togliere subito il pane senza lasciarlo mezzo e la crosta inferiore...
-
Página 39: Advertencias De Seguridad Importantes
Lea este libreto en su totalidad antes del uso y consérvelo como referencia ADVERTENCIAS DE SEGURIDAD IMPORTANTES: Antes de usar este aparato eléctrico, debería seguir siempre las siguientes precauciones elementales: 1. Lea todas las instrucciones. 2. Antes del uso compruebe que el voltaje de la toma de corriente se corresponda con la que se muestra en la placa de información. -
Página 40: Introducción A Las Funciones
Ventana Tapa Hoja de amasar Cazo del pan Panel de control Interruptor La flecha muestra como liberar encendido el cazo Chasis Introducción a las funciones BÁSICO RÁPIDO FRANCÉS RÁPIDO INTEGRAL DULCE MASA COCER MERMELADA SÁNDWICH Esto indica el programa seleccionado Tiempo de operación de cada programa DESPUÉS DE ENCENDER... -
Página 41: Tamaño De Hogaza
Para detener el programa, pulse “INICIAR / DETENER” durante aprox. 3 segundos hasta que un pitido confirme que el programa se ha apagado. Esta característica permite evitar disrupciones no intencionadas del funcionamiento del programa. MENÚ Se utiliza para configurar diversos programas. Cada vez que se presione (acompañado por un breve pitido) variará... -
Página 42: Señal De Aviso
AMBIENTE La máquina funcionará correctamente en un amplio rango de temperaturas, pero pueden producirse diferencias de tamaño de hogaza entre una habitación muy cálida y otra muy fría. Sugerimos una temperatura ambiente entre 15ºC y 34ºC. SEÑAL DE AVISO: 1、 Si la pantalla muestra “H:HH” después de iniciar el programa, (ver figura 1 debajo) la temperatura en el interior es demasiado alta. - Página 43 15. Retire el pan con cuidado del cazo y déjelo enfriar durante unos 20 minutos antes de cortarlo. 16. Si no está en la sala o no ha pulsado INICIAR/DETENER al final del proceso, el pan se mantendrá caliente automáticamente durante 1 hora y luego se apagará la máquina. 17.
- Página 44 de levadura como alimento, se usa generalmente azúcar blanco. Se puede solicitar como requisito especial azúcar moreno, azúcar en polvo o algodón de azúcar. 8. Levadura La levadura produce el proceso de incremento de la masa, y genera dióxido de carbono, que expande el pan y suaviza las fibras interiores.
-
Página 45: Guía De Solución De Problemas
Guía de solución de problemas problema causa solución Algunos ingredientes se adhieren al Desenchufe el preparador de pan y Sale humo de las ranuras elemento calentador o cerca; en el primer de ventilación al cocer uso el elemento calentador está aceitado limpie el elemento calentador, cn cuidado de no quemarse en la superficie... - Página 46 ***** Leia esta brochura cuidadosamente antes do uso, e guarde-a para futura referência. MEDIDAS IMPORTANTES DE SEGURANÇA: Antes de usar apaprelhos eléctricos, existem certas precauções básicas que devem ser tidos em conta: 1. Leia todas as instruções. 2. Antes de usar, verifica-se a tomada tem mesma voltagem do que a indicada na etiqueta do aparelho. 3.
-
Página 47: Introdução Das Funções
Janela de visualização Tampa Manuseador da panela Lâmina de massar Panela Painel de controle fazer pão Botão Power A seta indica como carregar e descarregar a panela Estrutura exterior Introdução das funções BÁSICO RÁPIDO FRANCÊS RAPIDO TRIGO COMPLETO DOCE MASSA ASSAR GELEIA SANDUICHE... - Página 48 a brilhar na ecrã do aparelho. Todas os outros botões ficam activos, á excepção do botão “START/STOP”. Para cancelar o programa, pressiona o botão “START/STOP” durante aproximadamente 3 segundos, até escutares um som, indicando que o programa foi canecelado. Essa característica, pemite lhe prevenir contra qualquer disrupção não intencional dos programas de operação.
- Página 49 pressionar o botão ‘Start/stop’ para iniciar nova operação. Pois, a memorização desaparece, mas se o tempo necessário, for equivalente ao tempo restante, pressiona “START/STOP” directamente para finalizar o ciclo préviamente escolhido. AMBIENTE O aparelho funciona sem problemas a temperatura ambiental, mas a dimensão da massa faz diferença, quando usado em local quente ou local frio.
- Página 50 cuidado! Deixa a panela arrefecer antes de remover o pão. Depois usa espátula inoxidável, e de forma gentíl para despegar o pão da panela. Vira o pão de cabeça para baixo dentro de um cesto ou em cima de uma superfície limpa e ...
- Página 51 6. Farinha de milho e aveia Farinha de milho e aveia são feitas respectivamente, á base de aditivos de massa de pão, que é usado para melhorar o sabor e a textura. 7. Açucar A açucar é um ingrediente muito importante para adicionar sabor doce e côr ao pão. Sabendo que é também importante na dieta diária, o açucar branco é...
-
Página 52: A Massa É Demasiado
dos ingredients liquidos, ovo, sal, leite em pó etc. Ao colocar os ingredientes, não deves molhar a farinha completamente. O centeio só pode ser colocado em farinha seca e não pode tocar directamente no sal. Depois de misturar a farinha, não esqueça de colocar os recheios de frutas. Se adicionares as frutas tão cedo, o sabor desaparece com o tempo. - Página 53 Se a côr for demasiado escura para A crosta é demasiado fina receita contendo açucar, pressiona o Diferentes receitas ou ingredientes, tem e de côr escura, ao fazer efeitos no tipo do pão resultante; a côr botão ‘start/stop’ com 5-10min de boloou pão usando açucar antecedência, e só...