Steren TEL-235 Manual De Instrucciones
Ocultar thumbs
Ver también para TEL-235:
- Manual de instrucciones (40 páginas) ,
- Manual de instrucciones (20 páginas)
Tabla de contenido
Publicidad
Idiomas disponibles
Idiomas disponibles
Enlaces rápidos
Publicidad
Capítulos
Tabla de contenido

Manuales relacionados para Steren TEL-235


Resumen de contenidos para Steren TEL-235
- Página 2 Teléfono para adultos mayores. Por favor, revíselo completamente para estar seguro de cómo utilizar apropiadamente el producto. Para apoyo, compras y todo lo nuevo que tiene Steren, visite nuestro sitio web: www.steren.com La información que se muestra en este manual sirve únicamente como referencia sobre el producto.
-
Página 3: Importante
IMPORTANTE • Antes de comenzar a utilizar su nuevo teléfono asegúrese de instalar 3 baterías tipo AA, de lo contrario la pantalla azul no encenderá. El compartimento de baterías se localiza en la parte inferior del equipo. • Desconecte el teléfono del contacto eléctrico antes de limpiarlo. •... -
Página 4: Tabla De Contenido
ÍNDICE 1. Características ....................5 2. Instalación ...................... 6 3. Controles ..............7 ........... 4. Ajustes preliminares..................9 5. Instrucciones ....................10 5.1 Cómo realizar una llamada ...............10 5.2 Remarcado (redial) y premarcado ............11 5.3 Cómo contestar una llamada..............11 5.4 Timbre....................12 5.5 Música de espera.................13 5.6 Alarmas ....................13 5.7 Revisar las llamadas realizadas............13... -
Página 5: Características
1. CARACTERÍSTICAS El teléfono con identificador de llamadas tiene un diseño único pensado en niños y adultos mayores, ya que tiene un teclado con números gigantes, lo que facilita el marcado. La pantalla se ilumina en color azul, lo que permite usarlo en total oscuridad o lugares con poca iluminación. -
Página 6: Instalación
2. INSTALACIÓN Instale el equipo telefónico lejos de fuentes de calor y de los rayos directos del sol. 1. La unidad requiere 3 baterías AA de 1,5 V. Abra la tapa del compartimento de baterías ubicada en la parte inferior del teléfono. -
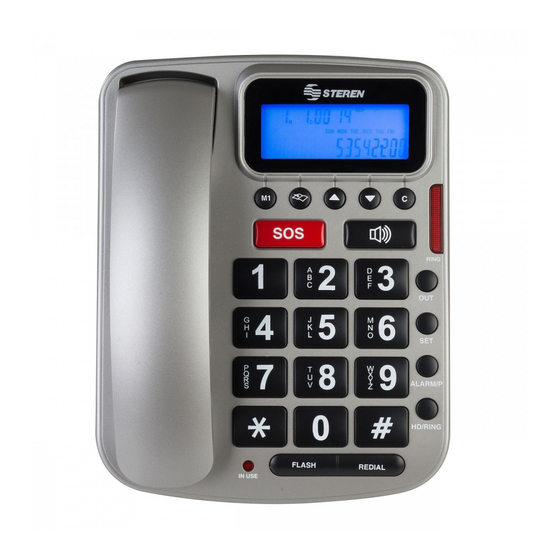
Página 7: Controles
3. CONTROLES RING... - Página 8 1. Pantalla LCD 2. DOWN: Permite navegar hacia abajo en los menús. En el modo de espera reduce el nivel de volumen y muestra las llamadas recibidas. 3. C: Utilice para borrar digitos y salir de los menús. 4. LED indicador de llamada entrante: Enciende al estar recibiendo una llamada.
-
Página 9: Ajustes Preliminares
4. AJUSTES PRELIMINARES 1. Sin descolgar el auricular, presione la tecla de Ajuste. Set 1 Date aparecerá en la pantalla. 2. Presione nuevamente SET, el año comenzará parpadear. Utilice botones para ajustar el año actual. Presione nuevamente el botón SET. 3. -
Página 10: Instrucciones
9. Utilice el botón hasta que aparezca Set 5 FLASH. Seleccione entre 100, 300, 600 y 1000. 10. El teléfono puede configurar hasta 5 alarmas diferentes. Presione el botón ALARM/P, utilice los botones para configurar la hora de la alarma así como la activación o desactivación de ésta. -
Página 11: Remarcado (Redial) Y Premarcado
5.2 Remarcado (redial) y premarcado • REMARCADO Presione la tecla OUT. El último número marcado aparecerá en pantalla, presione la tecla de Remarcado (Redial) para que comience a marcarse y después levante el auricular o presione la tecla Altavoz. • PREMARCADO 1. -
Página 12: Timbre
Si usa el altavoz: 1. Cuando el teléfono comience a timbrar, presione el botón de altavoz y comience a hablar. 2. Cuando termine la conversación, presione el botón de altavoz una vez más. Para recibir correctamente la información del identificador de llamadas, conteste el teléfono después de que haya timbrado 2 veces. -
Página 13: Música De Espera
5.5 Música de espera Si durante una conversación necesita dejar en espera la llamada, presione la tecla HD/RING y coloque el auricular en la base del teléfono. De esta forma no se cortará la llamada y la otra persona escuchará la música de fondo. Cuando requiera continuar con la llamada, simplemente descuelgue el auricular o presione la tecla de altavoz. -
Página 14: Pausa
2. Presione nuevamente la tecla de salida (OUT) para visualizar más números almacenados en la memoria. Si desea borrar los números marcados: 1. Presione la tecla de salida (OUT). mostrarán pantalla números marcados. 2. Presione repetidamente la tecla de salida (OUT) hasta visualizar el número que desea borrar. -
Página 15: Grabar Una Memoria
5.9 Grabar una memoria 1. Marque el número telefónico que desea grabar en la memoria. 2. Presione el botón para guardarlo seguido de M1. 3. Presione M1 para realizar la marcación automática del teléfono almacenado. 5.10 Grabar memoria de dos toques 1. -
Página 16: Especificaciones
6. ESPECIFICACIONES Alimentación: -48 V (línea telefónica) 4,5 V (3xAA) para identificador de llamadas El diseño del producto y las especificaciones pueden cambiar sin previo aviso. - Página 17 1.- Para hacer efectiva la garantía, presente esta póliza y el producto, en donde fue adquirido o en Electrónica Steren S.A. de C.V. 2.- Electrónica Steren S.A de C.V. se compromete a reparar el producto en caso de estar defectuoso sin ningún cargo al consumidor. Los gastos de transportación serán cubiertos por el proveedor.
- Página 19 TEL-235 Thank You on purchasing your new Steren product. This manual includes all the feature operations and troubleshooting necessary to install and operate your new Steren´s Big button elder telephone. Please review this manual thoroughly to ensure proper installation and operation of this product. For support, shopping, and everything new at Steren, visit our website: www.steren.com...
-
Página 20: Important
IMPORTANT • Before using your new Phone Set, assure to install 3 type AA batteries, otherwise ocean blue light will not light on. Battery compartment is located at bottom of device. • Disconnect the device from the electrical outlet before cleaning. •... - Página 21 INDEX 1. Highlights ....................... 5 2. Installation ...................... 6 3. Controls ..............7 ..........4.Settings..................9 5. Instructions ....................10 5.1 Making a call....................10 5.2 Redial and predial.................11 5.3 Answering incoming calls..............11 5.4 Ringtone....................12 5.5 Music on hold ..................13 5.6 Alarms ....................13 5.7 Reviewing outcoming calls..............13 5.8 Pause....................14...
-
Página 22: Highlights
1. HIGHLIGHTS The caller ID telephone has a perfect design for kids or elder people, the keys are big size for an easy dial. The screen has a blue backlite, allowing watch the display in darkness. It has two quick dial memories, and one of them is marked as emergency. It features caller ID, alarm, speaker, and in-call LED indicator. -
Página 23: Installation
2. INSTALLATION Install your telephone device away from heat sources and direct sunlight. 1. The unit requires 3 × 1.5V AA batteries. Open the battery compartment cover located in the back part of the phone. OPEN Verify the polarity and close the cover. 2. -
Página 24: Controls
3. CONTROLS RING... - Página 25 1. LCD screen 2. DOWN: Used to navigate through menus. Press this key to reduce the volume of the speaker. In on-hook state shows incoming calls. 3. C: Use this key to correct a mistake made while dialing a number and exit menus. 4.
-
Página 26: Settings
4. SETTINGS 1. In-on hook state, press Set. The message Set 1 Date, starts to blink on the screen. 2. Press Set again, the year starts to blink. buttons to set the current year. Press Set once again. 3. Repeat last step to set month, day, hour and minutes. Press Set to store the changes. -
Página 27: Instructions
10. The phone can set up to 5 different alarms. Press ALARM/P, use buttons to set the time and alarm. Press SET to program each of the alarms and save changes. 5. INSTRUCTIONS 5.1 Making a call • Using handset 1. -
Página 28: Redial And Predial
5.2 Redial and pre-dial • REDIAL Press the OUT button, the last dialed number appears on LCD screen, press REDIAL it will automatically dial the number, then pick the handset up or the speaker. • PRE-DIAL 1. With the handset on the base, enter the desired number to call. 2. -
Página 29: Ringtone
Using speaker: 1. When the phone rings, press speaker key and begin the conversation. 2. When finishing the conversation, press speaker key once again. To receive the caller ID data correctly, please answer the phone after two rings. Otherwise you cannot receive the caller ID data correctly. 5.4 Ringtone Your phone set has up to 16 different types of ring tones, to choose one of them, follow these... -
Página 30: Music On Hold
5.5 Músic on hold If you need to do something during a conversation, press HD/RING and place the handset on the base. Making this you don’t end the call and the other person will hear a background music. When you need to resume the call, pick the handset up or press the speaker key. 5.6 Alarms 1. -
Página 31: Pause
2. Press OUT once again, to visualize all dialed numbers stored on memory. Erasing dialed numbers: 1. Press OUT. Dialed numbers appear on LCD screen. 2. Press OUT until you visualize the desired dialed number that you want to erase. 3. -
Página 32: One Touch Memory
5.9 One touch memory 1. Enter the phone number you want to store in memory. 2. Press (Store) button, the phone will be stored in memory. 3. Press M1 to dial the desired number automatically. 5.9 Two touch memory 1. Pre-dial the desired number or check incoming and outgoing number that you want to store. -
Página 33: Specifications
6. SPECIFICATIONS Input: -48 V (phone line) 4.5 V (3xAA) for caller ID Product design and specifications are subject to change, without notice. - Página 34 Part number: TEL-235 Brand: Steren WARRANTY This Steren product is warranted under normal usage against defects in workmanship and materials to the original purchaser for one year from the date of purchase. CONDITIONS 1. This warranty card with all the required information, invoice, product box or package, and product, must be presented when warranty service is required.