Tabla de contenido
Publicidad
Idiomas disponibles
Idiomas disponibles
Publicidad
Tabla de contenido

Manuales relacionados para Steren Tel-2480


Resumen de contenidos para Steren Tel-2480
-
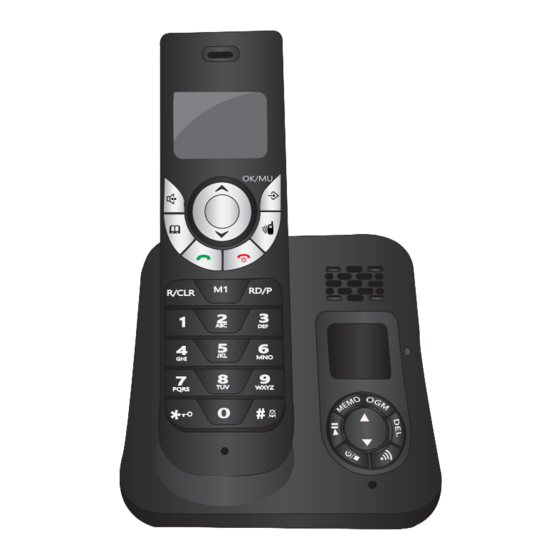
Página 2: Teléfono Inalámbrico Con Contestadora
Teléfono inalámbrico con contestadora. Por favor, revíselo completamente para estar seguro de cómo utilizar apropiadamente el producto. Para apoyo, compras y todo lo nuevo que tiene Steren, visite nuestro sitio web: www.steren.com La información que se muestra en este manual sirve únicamente como referencia sobre el producto. -
Página 3: Instrucciones Importantes De Seguridad
INSTRUCCIONES IMPORTANTES DE SEGURIDAD • Desconecte los equipos del contacto eléctrico antes de limpiarlos. • Use un paño húmedo para la limpieza. No utilice limpiadores líquidos o en aerosol. • Nunca utilice estos equipos cerca de fuentes de agua. • Coloque el teléfono inalámbrico sobre una superficie firme, donde las aberturas y ranuras de la parte posterior reciban ventilación adecuada. -
Página 4: Características
1. CARACTERÍSTICAS El teléfono inalámbrico con contestadora incorpora tecnología DECT, que ayuda a evitar interferencias ocasonadas por otros equipos inalámbricos. Su contestadora automática le permite grabar hasta 60 minutos. Se puede conectar hasta con 4 extensiones adicionales a la misma base, e incorpora una amplia gama de funciones como idiomas, timbres, ajuste de volumen, reloj, identificador de llamada, transferencia de llamada y llamada en conferencia. -
Página 5: Instalación De La Base Y Auricular
2. INSTALACIÓN DE LA BASE Y AURICULAR 1. Retire la tapa del compartimento de baterías del auricular. 2. Introduzca dos baterías AAA recargables (incluidas). Verifique la polaridad. 3. Coloque la tapa del compartimento de baterías. (En el primer uso se recomienda cargar las pilas por 14 horas). -
Página 6: Si Está Suscrito Al Servicio De Dsl (Opcional)
Si usted recibe Internet de alta velocidad a través de su línea telefónica (comúnmente referido como DSL) y oye interferencia durante sus conversaciones identificador llamadas está funcionando apropiadamente, instale un filtro DSL entre la base del teléfono y la conexión de la línea telefónica (modelo Steren 300-997). Al teléfono LINE DC 6V... - Página 7 3. CONTROLES 3.1 Auricular 1. Pantalla de LCD 2. Arriba / Revisión de llamadas entrantes Permite desplazarse hacia arriba en los menús. Al descolgar, permite aumentar el nivel de volumen del auricular (nivel 1 a 5). En el modo de espera, muestra las llamadas recibidas.
- Página 8 7. Flash (R) / Corrección (CLR) • Flash (R): Permite activar funciones adicionales de su proveedor de servicio. • Corrección (CLR): Presione para corregir errores durante el modo de edición de números telefónicos. 8. Teclado numérico 9. Aumentar volumen Permite desplazarse hacia arriba en los menús. Al descolgar, permite aumentar el nivel de volumen del auricular (nivel 1 a 5).
- Página 9 14. Redial (RD) / Pausa (P) Permite volver a marcar el último número. Permite realizar una pausa en el marcado de números usando un conmutador. 15. M1 Memoria rápida 16. LED de carga y señal de que está en uso El LED prenderá...
- Página 10 24. Entrada de línea Use un cable para conectar la base a la línea telefónica 25. DC 6V Entrada de alimentación. 26. DEL Use para borrar mensajes. 27. PAGE Presione para localizar el auricular.
-
Página 11: Íconos Del Teléfono Inalámbrico
LINE DC 6V Íconos del teléfono inalámbrico... - Página 12 Icono Función Señal: Indica que el auricular está registrado y que se encuentra en la zona de cobertura de la base. Parpadea si el auricular está fuera de alcance o buscando su base. v i t á t , r i presionado el botón de llamar.
-
Página 13: Mapa De Teclas
4. MAPA DE TECLAS... -
Página 14: Menú Del Teléfono Inalámbrico
5. MENÚ DEL TELÉFONO INALÁMBRICO Para entrar al menú principal del auricular inalámbrico, presione el botón Presione una vez más el botón una vez más para entrar a los submenus. Durante el modo de espera, en pantalla podrá ver las siguientes opciones: a) AGENDA b) REG. - Página 15 • NUEVA ENTR. (Nueva entrada): Introduzca un nuevo número telefónico a la agenda: - Presione para introducir el nombre del contacto, utilice las teclas numéricas para ingresar el nombre y presione para guardar los cambios. - Utilice las teclas numéricas para introducir el número telefónico del contacto. - Presione para seleccionar una melodía distintiva.
-
Página 16: Registro De Llamadas
• BORRAR TODOS: Borre todos los números telefónicos almacenados en la memoria de la agenda: - Presione para confirmar que desea borrar todos los números. - En pantalla aparecerá el mensaje CONFIRMAR?, presione para que todos los números telefónicos y contactos sean borrados de la memoria. •... -
Página 17: Ajustes Base
c) AJUSTES BASE Permite hacer ajustes a la base del teléfono inalámbrico. El equipo debe estar registrado en la base para hacer cualquier ajuste: • ELIMINAR TLF (Eliminar teléfono): Esta opción le permitirá dar de baja un auricular de la base en uso: - Presione - Ingrese su PIN. -
Página 18: Reset Base
• RESET BASE: Restaura los ajustes predeterminados de la base: - Seleccione el submenú con la tecla - Al aparecer el mensaje PIN?, introduzca el número de identificación. - Presione para reestablecer los valores predeterminados de fábrica de la base. - Una vez seleccionada esta opción, los parámetros configurados por el usuario se borrarán permanentemente. -
Página 19: Batería Baja
TIMBRE EXT: Permite seleccionar un timbre (MELODÍA) y el volumen para las llamadas internas. Puede elegir entre 10 diferentes melodías. - Utilice para modificar la melodía o el volumen. - Presione para confirmar. • CONF TONO: Dentro del submenú, encontrará las siguientes opciones: TONO TECLA: Enciende o apaga el tono que se escucha cuando se presiona un botón. -
Página 20: Fecha Y Hora
• FECHA Y HORA: Configure la hora y fecha actuales. - Presione para editar el año. - Utilice para actualizar el año. Presione para guardar los cambios. - Configure la fecha utilizando - Presione para guardar los cambios. - Presione para editar la hora. -
Página 21: Contestador
f) CONTESTADOR • MENSAJE 1. En estado inactivo, presione la tecla y pulse para seleccionar CONTESTADOR. Pulse para confirmar y entrar. 2. La pantalla mostrará MENSAJE, presione para iniciar la reproducción de mensajes nuevos. Si no hay nuevos mensajes, el teléfono reproducirá los viejos. - Página 22 • AJUSTES CON 1. En estado inactivo, presione la tecla y usar para seleccionar CONTESTADOR. Pulse para confirmar y entrar. 2. La pantalla mostrará MENSAJE, use para seleccionar AJUSTES CON. y pulse para confirmar. CONT/ACT/DES Activar/desactivar contestadora Acceda a AJUSTES CON. y use para seleccionar el submenú...
- Página 23 CONFIG-OGM Acceda a AJUSTES CON. y use para seleccionar el submenú CONFIG. OGM. Pulse . Use para seleccionar OGM1 u OGM2 y para confirmar. Puede seleccionar ESCUCHAR, GRABAR o REINICIAR usando para confirmar. ESCUCHAR: Utilice esta opción para escuchar el OGM grabado. GRABAR: Puede grabar un nuevo OGM mediante esta opción.
- Página 24 REIN CONTEST Acceda a AJUSTES CON. y use para seleccionar el submenú REIN CONTEST. Pulse . La pantalla mostrará PIN? Introduzca el PIN actual (por defecto es “0000”) y pulse para confirmar. Todas las configuraciones de la contestadora volverán al valor predeterminado. 6.
-
Página 25: Otras Operaciones
• REMARCADO 1. Utilice para visualizar los últimos diez números que fueron marcados desde el teléfono o para ver las últimas llamadas recibidas. 2. Oprima “ ” para marcar el número visualizado en pantalla. 3. Para volver a llamar al último múmero marcado oprima y enseguida oprima RD/P, espere a que de linea. -
Página 26: Operación De La Contestadora Desde El Auricular
OPERACIÓN DE LA CONTESTADORA DESDE EL AURICULAR Reproducir/pausar/detener los mensajes en la contestadora Cuando hay mensajes en la contestadora la pantalla mostrará algo como: 01/02 MENS, lo que significa que hay 1 mensaje nuevo y 2 mensajes antiguos. 1. Mantenga presionada la tecla 5 para reproducir los mensajes nuevos. 2. -
Página 27: Control Remoto
Grabación de la conversación 1. Durante una conversación, mantenga pulsada la tecla . La grabación se iniciará. 2. La grabación se detendrá si mantiene presionada la tecla de nuevo. 3. La conversación se almacenará como un mensaje y puede reproducirlo o eliminarlo como tal. -
Página 28: Operación De La Contestadora Desde La Base
Presione 8 para detener la reproducción. Si no está reproduciendo mensajes, puede usar las siguientes teclas: Oprima 1 para escuchar el menú principal. Pulse 5 para reproducir los mensajes. Pulse 7 para cambiar de OGM. Pulse 9 para apagar la contestadora. OPERACIÓN DE LA CONTESTADORA DESDE LA BASE Mantenga pulsado... -
Página 29: Reproducción De Mensajes
Grabación de nota Mantenga presionado MEMO grabar un mensaje. La longitud puede ser de hasta 120 segundos y aparecerá en la pantalla. Pulse para finalizar la grabación. Reproducción de mensajes 1. Pulse para reproducir los mensajes. Use para ajustar el volumen. 2. -
Página 30: Problemas Y Soluciones
7. PROBLEMAS Y SOLUCIONES Problema Solución • El cable de corriente debe estar conectado a un tomacorriente. • El cable de la línea telefónica debe estar conectado a la base del teléfono. • Mi teléfono no funciona • Coloque el auricular de nuevo en la base cuando no esté en uso. - Página 31 • Usted puede mejorar el rendimiento de sus teléfonos inalámbricos si: a) Coloca su teléfono inalámbrico lo más lejos que sea posible de otro sistema • Escucho mucho ruido, estática o una señal inalámbrico. débil en el teléfono inalámbrico cuando me b) Coloca la base del teléfono lejos de alguna encuentro cerca de la base del teléfono computadora.
-
Página 32: Mantenimiento Del Teléfono Inalámbrico Con Contestadora
8. MANTENIMIENTO DEL TELÉFONO INALÁMBRICO CON CONTESTADORA Cómo cuidar de su teléfono • Cuelgue el auricular inalámbrico con cuidado. • Conserve el material de empaque original para proteger su equipo si necesita transportarlo posteriormente. • Evite el contacto con el agua. •... -
Página 33: Especificaciones
9. ESPECIFICACIONES Auricular Alimentación: 2,4 V (2 x AAA) Base Alimentación: 6 V 500 mA (convertidor) -48 V (línea telefónica) Convertidor Alimentación: 100-240 V~ 50/60 Hz 150 mA Salida: 6V 500 mA Consumo nominal: 2 Wh/día Consumo en espera: 1,3 Wh/día El diseño del producto y las especificaciones pueden variar sin previo aviso. - Página 34 1. Para hacer efectiva la garantía, presente esta póliza y el producto, en donde fue adquirido o en Electrónica Steren S.A. de C.V. 2. Electrónica Steren S.A de C.V. se compromete a reparar el producto en caso de estar defectuoso sin ningún cargo al consumidor. Los gastos de transportación serán cubiertos por el proveedor.
- Página 36 The instructions of this manual are for reference about the product. There may be differences due to updates. Please check our website (www.steren.com) to obtain the latest version of the instruction manual. “ The operation of this equipment is subject to the following two conditions: (1)
-
Página 37: Safety Instructions
SAFETY INSTRUCTIONS • Disconnect the device from the electrical outlet before cleaning. • Use a damp cloth for cleaning. Do not use liquid cleaners. • Never use it near water sources. • Place the handset on a firm surface, and where the openings and slots in the back of the unit receive ventilation. - Página 38 1. HIGHLIGHTS The cordless phone has DECT technology, which helps to avoid interferences from other wireless devicces. You can record up to 60 minutes in the built in answering machine. Up to 4 extensions can be paired with the base, and it has wide functions range, such as: languages, ringtones, volume set, clock, among others.
- Página 39 2. INSTALLATION OF THE BASE AND HANDSET (TEL-2480) 1. Remove the battery compartment cover. 2. Place two rechargeable AAA batteries (included), pay attention to polarity. 3. Replace the battery compartment cover. 4. Choose a location for your cordless telephone as far away as possible from any other cordless (wireless) devices such as cordless telephones, wireless routers (i.e., Wi Fi), microwave ovens, televisions, computers, etc.
- Página 40 DSL) and you are experiencing interference during conversations, your caller ID features are not functioning properly, install a DSL filter to the telephone line between the telephone base and the telephone line jack Steren 300-997). LINE DC 6V...
-
Página 41: Cordless Phone
3. CONTROLS Cordless phone 1. LCD screen 2. Up / Incoming call review Use it to move between submenus. Press to increase the volume level (5 levels). Press to check the previously incoming numbers. 3. Freehands If desired, press to answer an incoming call without using the handset. - Página 42 7. Flash (R) / CLR button • Flash: Press to activate the services you are subscribed with your local telephone company. • CLR: During phone edit mode, press it if you have a mistake. The previous letter or number will be deleted, each time you press this button. Press the button for 3 seconds to delete the current input.
- Página 43 15. M1 Quik memory. 16. Use/charge LED Lights up when the handset is charging or is in use. 17. Display Shows the number of messages. 18. Up Use to increase the volume. MEMO Press to record a message. 20. Play/pause Press to play/pause the messages received.
- Página 44 24. Line input Use a cable to connect the base to the telephone line 25. DC 6V Power input. 26. DEL Use to delete messages. 27. PAGE: Press to locate the handset.
- Página 45 LINE DC 6V 24 25 Icons wireless telephone with answering machine...
-
Página 46: Icon Description
Icon description... - Página 47 4. KEY MAP...
- Página 48 5. CORDLESS PHONE MENU To enter main menu and submenus, press During idle mode, you will see next options: a) PHONEBOOK b) CALL LOG c) BS SETTINGS d) HS SETTINGS e) REGISTRATION f) TAM a) PHONEBOOK Use this menu to see the stored contacts in the phone. - Press once, use Down button to select PHONEBOOK option, press confirm.
-
Página 49: New Entry
• NEW ENTRY: Use the option to enter a new phone number in the phonebook. - Use numeric keys to enter the name of the contact. Press to store changes. - Use the numeric keys to enter a phone number. - Press to select a Melody, use the buttons and press... - Página 50 • MEM STATUS: Select this option to know how many contacts are stored in the phonebook. - You can store up to 50 contacts. If you see 10/50 in the screen, means that you have 10 stored phone numbers. b) CALL LOG once, in the screen you will see CALL LOG.
- Página 51 • DIAL MODE: With this option, you can choose the dial options, either tone or pulse. • FLASH TIME: With this option, you may change the flash time. You can choose between 100, 300, 600 and 1000 ms. • MODIFY PIN: With this option you can change the PIN, that it is used to set some parameters.
- Página 52 • ALARM: Select this option to activate or deactivate the phone alarm. - Use the buttons to select an option. - Press in the option ON to activate the alarm. - Enter the time by using the up and down buttons. Press - The word Snooze ON and Snooze OFF will display in the screen.
-
Página 53: Auto Answer
• HS NAME: Select this option to identify the handset with a name. - Use the numeric keys to type a name. - Press to store changes. • AUTO ANSWER: Activate or deactivate the auto answering function. • BARRING: Block all outgoing calls for up to 4 prefixes (up to 4 digits). - Enter the current PIN (0000 predetermined) to activate the function - Select the prefix you want to block - Press... - Página 54 e) REGISTRATION Use this menu to register a handset in an specific base. - Set the base in Searching mode by pressing the Page button in the base for 5 seconds. - Select a base, you have up to 4 options, if you have only one base, select BASE 1.
- Página 55 • DELETE ALL This will only delete old messages. 1. In idle state, press key and use to select TAM. Then press confirm and enter. 2. The screen will show MESSAGE, use to select DELETE ALL and press to confirm. The screen will display CONFIRM? Press to delete all messages.
- Página 56 TAM ON / OFF Enter TAM SETTINGS and use to select TAM ON/OFF submenu. Press to confirm. Use to select ON or OFF. If you select ON, the screen will show OGM1. Use to select OGM1 or OGM2. OGM1: If you select OGM1, when there is an unanswered incoming call, the recorded message will play followed by a beep.
-
Página 57: Making Calls
SET RING Enter TAM SETTINGS and use to select SET RING submenu. Press to select 2-9 or TOLL SAVER and press to confirm. Note: If you do not select a number, the TAM will answer in 5 rings. If you want to check your messages remotely, you can select TOLL SAVER. -
Página 58: Other Operations
PLACING THE HANDSET ON THE BASE 1. Place the handset contacts over the base terminals, make sure it has been placed firmly to prevent slippery. REDIAL 1. When the handset is idle, use button to display the last ten phone numbers dialed from the handset or to display the received calls. - Página 59 HANDSET TAM OPERATION TO PLAY/PAUSE/STOP MESSAGES ON TAM When there are messages on the TAM the display will show something like 01/02 MSGS, meaning that there are 1 new and 2 old messages. 1. Press and hold 5 key to play new messages. 2.
-
Página 60: Remote Control
REMOTE CONTROL Call your telephone from another line. 1. When you hear the OGM, press * key. The TAM will enter remote operation mode and will prompt for the security code (default “0000”). 2. If the code is correct, the machine will tell you if there are new messages and start playback automatically. -
Página 61: Memo Recording
BASE TAM OPERATION Press and hold to turn on/off TAM. Set OGM 1. Press to select OGM1 or OGM2. 2. Press OGM to play the selected message. Use to adjust volume. 3. Press and hold OGM to record the selected message. The display will show message length. -
Página 62: Troubleshooting
7. TROUBLESHOOTING Trouble Solution • Make sure the power cord is plugged in. • Make sure the telephone line cord is plugged firmly into the • My phone doesn´t work corded / cordless phone base and wall jack. • Place the handset on the base when not in use. •... - Página 63 • You can improve the performance of your cordless phone and router by: a) Positioning your new phone as far away as possible from any other existing cordless telephone system. b) Positioning your telephone base as far as possible from your router, computer or other •...
- Página 64 8. MAINTENANCE Taking care of your telephone • Place the handset down gently. • Save the original packing materials to protect your telephone if you ever need to ship it. • Avoid water. • Do not use the handset outdoors in the rain, or handle it with wet hands. Electrical storms •...
- Página 65 9. SPECIFICATIONS Handset Input: 2.4 V (2 x AAA) Base Input: 6 V 500 mA (power converter) -48 V (phone line) Power converter Input: 100-240 V~ 50/60 Hz 150 mA Output: 6 V 500 mA Nominal consumption: 2 Wh/day Stand-by power consumption: 1.3 Wh/day Product design and specifications are subject to change without notice.
- Página 66 Product: Cordless phone with answering machine Part number: TEL-2480 Brand: Steren WARRANTY This Steren product is warranted under normal usage against defects in workmanship and materials to the original purchaser for one year from the date of purchase. CONDITIONS 1. This warranty card with all the required information, invoice, product box or package, and product, must be presented when warranty service is required.