BRAND Dispensette S Instrucciones De Manejo
Ocultar thumbs
Ver también para Dispensette S:
- Instrucciones de manejo (740 páginas) ,
- Instrucciones de manejo (217 páginas) ,
- Instrucciones de manejo (629 páginas)
Tabla de contenido
Publicidad
Idiomas disponibles
Idiomas disponibles
Publicidad
Capítulos
Tabla de contenido

Manuales relacionados para BRAND Dispensette S

Resumen de contenidos para BRAND Dispensette S
- Página 1 Liquid Handling · Easy Handling! Dispensette ® Dispensette S Organic ® F I R S T C L A S S · B R A N D Gebrauchsanleitung Operating Manual Mode d'emploi Instrucciones de manejo Istruzioni per l'uso 您可在www.brand.de/cn/manuals 下载本产品的中文操作手册。...
-
Página 3: Tabla De Contenido
Inhaltsverzeichnis Seite Sicherheitsbestimmungen Funktion und Einsatzgrenzen Leitfaden zur Geräteauswahl Bedienelemente Erste Schritte Inbetriebnahme Entlüften Dosieren Zubehör Fehlergrenzen (Nennvolumen · Teilvolumen) Volumen kontrollieren (Kalibrieren) Justieren Reinigung Austausch der Dosierkanüle/ Ventile Autoklavieren Bestelldaten · Zubehör · Ersatzteile Störung – was tun? Reparatur · Kontaktadressen Kalibrierservice Mängelhaftung ·... -
Página 4: Sicherheitsbestimmungen
Sicherheitsbestimmungen Dieses Gerät kann in Kombination mit gefährlichen Materialien, Arbeitsvorgängen und Apparaturen ver- wendet werden. Die Gebrauchsanleitung kann jedoch nicht alle Sicherheitsprobleme aufzeigen, die hierbei eventuell auftreten. Es liegt in der Verantwortung des Anwenders, die Einhaltung der Sicherheits- und Ge- sundheitsvorschriften sicherzustellen und die entsprechenden Einschränkungen vor Gebrauch festzulegen. - Página 5 Funktion und Einsatzgrenzen S (roter Farbcode) Dispensette ® ( roter Farbcode) Digital Analog Dispensette S Organic (gelber Farbcode) ® ( gelber Farbcode) Digital Analog Bei richtiger Handhabung kommt die dosierte Flüssigkeit nur mit Hinweis: folgenden chemisch resistenten Materialien in Kontakt: Zum Dosieren von Flusssäure Dispensette ®...
-
Página 6: Einsatzbeschränkungen
Funktion und Einsatzgrenzen Einsatzgrenzen Einsatzbeschränkungen Das Gerät dient zum Dosieren von Flüssigkeiten Flüssigkeiten, die Ablagerungen bilden, können zu unter Beachtung folgender physikalischer Grenzen: schwergängigem oder festsitzendem Kolben führen (z. B. kristallisierende Lösungen oder konzentrierte – Einsatztemperatur von +15 °C bis +40 °C Laugen). - Página 7 Funktion und Einsatzgrenzen Lagerbedingungen Gerät und Zubehör nur im gereinigten Zustand kühl und trocken lagern. Lagertemperatur: von -20 °C bis + 50 °C (von -4 °F bis 122 °F). Empfohlener Anwendungsbereich S bietet ein sehr breites Anwen- Dispensette ® dungsspektrum zum Dosieren aggressiver Reagen- zien, z.
-
Página 8: Leitfaden Zur Geräteauswahl
Chemikalien können eine Vielzahl organischer oder anorganischer Salzlösungen (z.B. Siehe separate Gebrauchsanleitung. biologische Puffer), biologische Detergenzien sowie Medien für die Zellkultur dosiert werden. Sollten Sie Aussagen zu Chemikalien benötigen, die nicht in der Liste genannt sind, können Sie sich gerne an BRAND wenden. Stand: 1015/13... -
Página 9: Bedienelemente
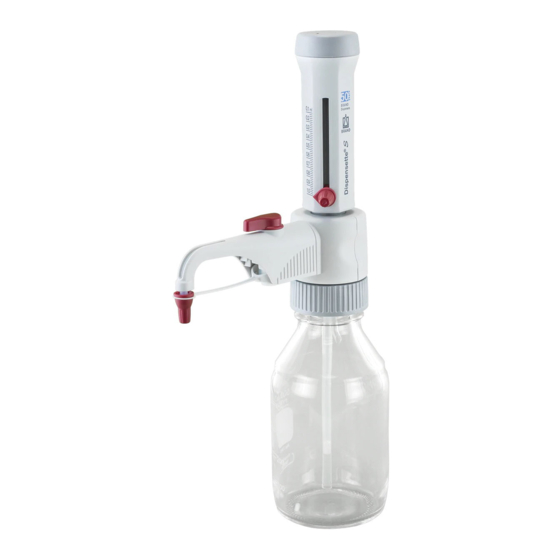
Bedienelemente Kolben- Justierabdeckung Volumeneinstellung lager Verriegelung Volumen- einstellung Anzeigepfeil Gehäuseschalen Kolben Schutzhülse/ Kolben Dosierzylinder Knebel des Rückdosierventils Dosierkanüle Ventilblock (GL 45 Flaschengewinde) Schraubkappe Rückdosierrohr Teleskop-Ansaugrohr Verriegelung Sicherungsschieber Justierabdeckung Kolbenbefestigungs- mutter Drehknopf Montageschlüssel Ansaug- und Rückdosierrohr... -
Página 10: Erste Schritte
Erste Schritte Ist alles in der Verpackung? In der Verpackung befinden sich: Flaschenaufsatz-Dispenser Dispensette S oder Dispensette S Organic, Dosierkanüle bzw. Dosierkanüle ® ® mit Rückdosierventil, Teleskop-Ansaugrohr, Rückdosierrohr (optional bei Geräten mit Rückdosierventil), Montageschlüssel, verschiedene Flaschenadapter, ein Qualitätszertifikat und diese Gebrauchsanleitung. Nennvolumen, ml Adapter für Ansaugrohr... - Página 11 Erste Schritte Inbetriebnahme (Forts.) Hinweis: Für Flaschen mit abweichenden Gewindegrößen passenden Adapter wählen. Im Lieferumfang sind Flaschenadapter aus Polypropylen (PP) ent- halten. Diese dürfen nur für Medien eingesetzt werden, die PP nicht angreifen. Falls eine höhere Chemikalienbeständigkeit gefordert wird ETFE/PTFE-Flaschenadapter verwenden ('Zubehör', Seite 26). Warnung! Gerät und Flasche nur mit Schutzhandschuhen anfassen, insbeson- dere wenn gefährliche Medien eingesetzt werden.
-
Página 12: Entlüften
Entlüften Warnung! Schutzkleidung, Augenschutz und Schutzhandschuhe tragen! Kolben nie niederdrücken, solange die Dosierkanüle mit der Schraubkappe verschlossen ist! Verspritzen von Reagenz vermeiden! In der Schraub- kappe können sich Medienreste ansammeln. Langsam dosieren, um Spritzer zu vermeiden. Alle Sicherheitsbestimmungen befolgen sowie Einsatzausschlüsse und -beschränkungen beachten (Seite 4-5)! Hinweis: Vor dem ersten Gebrauch das Gerät gründlich spülen und die ersten... -
Página 13: Dosieren
Dosieren Volumen wählen – Digital: Volumeneinstellrad Analog: Volumeneinstellschrau- Fix: Das Volumen ist fest einge- drehen, bis das gewünschte be mit einer ¾ Umdrehung lösen stellt und kann nicht verändert Volumen angezeigt wird (1), den Anzeigepfeil vertikal werden. (mechanisches Zählwerk). bis zum gewünschten Volu- men verschieben (2) und die Volumeneinstellschraube wieder festdrehen (3). -
Página 14: Zubehör
Zubehör Folgendes Zubehör ist optional erhältlich: Flexibler Dosierschlauch mit Rückdosierventil Für die Seriendosierung kann der flexible Dosierschlauch für die Fla- schenaufsatz-Dispenser Dispensette S und Dispensette S Organic ® ® eingesetzt werden ('Zubehör', Seite 27). Die für das Gerät angege- benen Werte für Richtigkeit und Variationskoeffizient werden nur dann erreicht, wenn Volumina >... - Página 15 Zubehör Trockenrohr Für feuchtigkeits- oder CO -empfindliche Medien kann der Einsatz eines mit geeignetem Absorbens (nicht im Lieferumfang enthalten) gefüllten Trockenrohres erforderlich sein (Zubehör, Seite 28). Montage Belüftungsstopfen mittels Münze herausschrauben (Abb. 1). Das gefüllte Trockenrohr einschrauben (Abb. 2). PTFE-Dichtring auf das Flaschengewinde legen (Abb. 3) und das Gerät auf die Flasche schrauben.
-
Página 16: Fehlergrenzen (Nennvolumen · Teilvolumen)
Fehlergrenzen Fehlergrenzen bezogen auf das auf dem Gerät aufgedruckte Nennvolumen (= max. Volumen) bei gleicher Temperatur (20 °C/68 °F) von Gerät, Umge- bung und H O dest. Die Prüfung erfolgte gemäß DIN EN ISO 8655-6 bei 20 °C vollständig gefülltem Gerät und gleichmäßiger und ruckfreier Dosierung. Type Digital •... -
Página 17: Volumen Kontrollieren (Kalibrieren)
Wir empfehlen, je nach Einsatz, alle 3-12 Monate eine gravimetrische Volumenprüfung des Gerätes durch- zuführen. Dieser Zyklus sollte entsprechend den individuellen Anforderungen angepasst werden. Die ausführliche Prüfanweisung (SOP) steht unter www.brand.de zum Download bereit. Zusätzlich sollte auch in kürzeren Zeitabständen eine Funktionsprüfung durchgeführt werden, z. B. Dosieren des Nennvolumens in einen Prüfmesskolben (Messkolben mit 3 Marken, DAkkS kalibriert). -
Página 18: Justieren
Justieren Nach längerem Gebrauch kann eine Justierung erforderlich Typ Digital werden. I Kalibrieren, z.B. bei Nennvolumen durchführen (Seite 17). I Mittleres Volumen (Ist-Wert) berechnen (Seite 17). I Gerät justieren (Ist-Wert einstellen). I Nach dem Justieren zur Kontrolle nochmals Kalibrieren. Beispiel: Die gravimetrische Kontrolle eines 10 ml Gerätes ergibt bei ein- gestelltem Nennvolumen 10,00 ml einen Ist-Wert von 9,90 ml. -
Página 19: Reinigung
Reinigung Damit eine einwandfreie Funktion gewährleistet ist, muss das Gerät in folgenden Fällen gereinigt werden: I vor dem Ventiltausch I sofort wenn der Kolben schwergängig wird I regelmäßig bei Verwendung von Flüssig- I vor Reagenzwechsel keiten, die Ablagerungen bilden I vor längerer Lagerung (z. - Página 20 Reinigung Demontage des Kolbens (Fortsetzung). b) Typ Digital Montage und Demontage nur bei eingestelltem Maximalvolumen vornehmen (Abb. 2b). Verriegelung nach links schieben und vordere Mit dem Montageschlüssel die Kolbenbefesti- Gehäuseschale abnehmen. gungsmutter lösen und das Gehäuserückteil nach hinten herausziehen. Dann den Kolben vorsichtig aus dem Zylinder ziehen.
-
Página 21: Austausch Der Dosierkanüle/ Ventile
Austausch der Dosierkanüle/ Ventile Dosierkanüle austauschen Bei Geräten mit Rückdosierventil Ventil auf 'Rückdosieren' stellen und Ventilknebel nach oben abziehen (Abb. 1). Gehäuse der Dosierkanüle ganz nach oben schieben, dann diese unter leichten Auf- und Abbewegungen nach vorn abziehen (Abb. 2). Kupplungsstück der neuen Dosierkanüle festhalten und Ge- häuse nach oben ziehen. - Página 22 Austausch der Dosierkanüle/ Ventile Ventile austauschen (Fortsetzung) Ansaugventil Rückdosierrohr und Teleskop-Ansaugrohr abziehen (Abb. 1). Ansaugventil mit dem Montageschlüssel herausschrauben (Abb. 2). Neues Ansaugventil erst von Hand einschrauben und dann mit Montageschlüssel fest anziehen. Hinweis: Lässt sich das Gerät nicht füllen und ist ein elastischer Widerstand beim Hochziehen des Kolbens spürbar, dann sitzt evtl.
-
Página 23: Autoklavieren
Autoklavieren Das Gerät ist autoklavierbar bei 121 °C (250 °F), 2 bar und einer Haltezeit von mindestens 15 Minuten nach DIN EN 285. Vorbereiten zum Autoklavieren Vor dem Autoklavieren muss das Gerät sorgfältig gereinigt wer- den ('Reinigung', Seite 19-20). Schraubkappe der Dosierkanüle öffnen und bei Geräten mit Rückdosierventil Ventil auf 'Dosieren' stellen. -
Página 24: Bestelldaten · Zubehör · Ersatzteile
Bestelldaten S , Digital Dispensette ® Volumen Teilung Dosierkanüle ohne Dosierkanüle mit Rückdosierventil Rückdosierventil Best.-Nr. Best.-Nr. 0,1 - 0,005 4600 310 4600 311 0,2 - 0,01 4600 320 4600 321 0,5 - 0,02 4600 330 4600 331 0,05 4600 340 4600 341 2,5 - 4600 350... - Página 25 Bestelldaten Dispensette S Organic, Digital ® Volumen Teilung Dosierkanüle ohne Dosierkanüle mit Rückdosierventil Rückdosierventil Best.-Nr. Best.-Nr. 0,5 - 0,02 4630 330 4630 331 0,05 4630 340 4630 341 2,5 - 4630 350 4630 351 4630 360 4630 361 Dispensette S Organic, Analog ®...
- Página 26 Zubehör · Ersatzteile Flaschenadapter PP oder ETFE/PTFE. ETFE/PTFE-Adapter bieten eine höhere Chemikalienbeständigkeit. Außen- für Flaschengewinde/ Material Best.-Nr. gewinde Schliffgröße GL 32 GL 25 7043 25 GL 32 GL 28/ S 28 7043 28 GL 32 GL 30 7043 30 GL 32 GL 45 7043 45 GL 45...
- Página 27 Zubehör · Ersatzteile Dosierkanülen mit Rückdosierventil Verpackungseinheit 1 Stück. Beschreibung Nennvolumen Ausführung Länge Best.-Nr. für Dispensette 1, 2, 5, 10 feine Spitze 7081 02 ® 5, 10 Standard 7081 04 25, 50, 100 feine Spitze 7081 06 25, 50, 100 Standard 7081 09 S Organic 5, 10...
- Página 28 Zubehör · Ersatzteile Rückdosierrohr Teleskop-Ansaug- rohre S und für Dispensette ® S Organic für Dispensette S und Dispensette ® ® S Organic Dispensette ® FEP. Verp.-Einh. 1 Stück FEP. Individuell einstell- bare Länge. Best.-Nr. 6747 Verp.-Einh. 1 Stück. Nennvolumen Außen-Ø Länge Best.-Nr.
-
Página 29: Störung - Was Tun
Störung – was tun? Störung Mögliche Ursache Was tun? Kolben schwergängig oder Kristallablagerungen, Sofort aufhören zu dosieren. Kolben sitzt fest Verunreinigungen durch Drehbewegung lösen, jedoch nicht demontieren. Reinigung durchführen (Seite 19-22). Füllen nicht möglich Volumeneinstellung am Gewünschtes Volumen einstellen unteren Anschlag (Seite 13). -
Página 30: Reparatur · Kontaktadressen
– Senden Sie ausschließlich gereinigte und dekontaminierte Geräte an die Adresse, die Sie zusammen mit der Rücksendenummer erhalten haben. Die Rücksendenummer außen am Paket gut sichtbar anbringen. Kontaktadressen BRAND GMBH + CO KG Indien: Otto-Schott-Straße 25 BRAND Scientific Equipment Pvt. Ltd. -
Página 31: Kalibrierservice
Gerät. Bei hoher Gebrauchshäufigkeit oder aggressiven Medien sollte häufiger geprüft werden. Die ausführliche Prüfanweisung steht unter www.brand.de bzw. www.brandtech.com zum Download bereit. BRAND bietet Ihnen darüber hinaus die Möglichkeit, Ihre Geräte durch un- seren Werks-Kalibrierservice oder durch das BRAND-DAkkS-Labor kalibrie- ren zu lassen. -
Página 32: Mängelhaftung · Entsorgung
Mängelhaftung Wir haften nicht für Folgen unsachgemäßer Behandlung, Verwendung, Wartung, Bedienung oder nicht autorisierter Reparatur des Gerätes oder für Folgen normaler Abnutzung, insbesondere von Verschleißteilen wie z.B. Kolben, Dichtungen, Ventilen sowie bei Glasbruch. Gleiches gilt für die Nichtbeachtung der Gebrauchsanleitung. Insbesondere übernehmen wir keine Haftung für entstandene Schäden, wenn das Gerät weiter zerlegt wurde als in der Gebrauchsanleitung beschrieben oder wenn fremde Zubehör- bzw. - Página 33 Table of Contents Page Safety Instructions Functions and Limitations of Use Dispenser Selection Chart Operating Elements First Steps Assembly Priming Dispensing Accessories Error Limits (Nominal Volume, Partial Volume) Checking the Volume (Calibration) Adjustment Cleaning Replacement of discharge tube/ valves Autoclaving Ordering Information ·...
-
Página 34: Safety Instructions
Safety Instructions This instrument may sometimes be used with hazardous materials, operations, and equipment. It is beyond the scope of this manual to address all of the potential safety risks associated with its use in such applica- tions. It is the responsibility of the user of this instrument to consult and establish appropriate safety and health practices and determine the applicability of regulatory limitations prior to use. - Página 35 Functions and Limitations of Use S (red color code) Dispensette ® color code) Digital Analog-adjustable Fixed-volume S Organic (yellow color code) Dispensette ® ( yellow color code) Digital Analog-adjustable Fixed-volume When the instrument is correctly used, the dispensed liquid comes Note: into contact with only the following chemically resistant materials: For dispensing hydrofluoric acid,...
-
Página 36: Operating Limitations
Functions and Limitations of Use Limitations of Use Operating Limitations This instrument is designed for dispensing liquids, Liquids, which form deposits may make the piston observing the following physical limits: difficult to move or may cause jamming (e.g., crystallizing solutions or concentrated alkaline solu- –... -
Página 37: Storage Conditions
Functions and Limitations of Use Storage Conditions Store the instrument and accessories only in cleaned condition in a cool and dry place. Storage temperature: from -20 °C to +50 °C (from -4 °F to 122 °F). Recommended Application Range S : Its broad range of application Dispensette ®... -
Página 38: Dispenser Selection Chart
(e.g., biological buffers), biological spring (see separate operating manual). detergents and media for cell culture can be dispensed. Should you require information on chemicals not listed, please feel free to contact BRAND. Status as of: 1015/13... -
Página 39: Operating Elements
Operating Elements Cover plate Volume adjustment Piston seat Locking Volume adjustment Pointer Housing Piston Protective sleeve/ Piston Dispensing cylinder Recirculation valve lever Discharge tube Valve block (GL 45 bottle thread) Screw cap Recirculation tube Telescoping filling tube Locking Safety lock Cover plate Piston mounting nut Knob... -
Página 40: First Steps
First Steps Is everything in the package? Confirm that your package includes: S or Dispensette S Organic, discharge tube or discharge tube with Bottle-top dispenser Dispensette ® ® recirculation valve, telescoping filling tube, recirculation tube (included only in recirculation valve models), mounting tool, bottle adapters (listed below), a performance certificate and this operating manual. - Página 41 First Steps Assembly (continued) Note: For bottles with other thread sizes, select a suitable adapter. The adapters supplied with the instrument are made of polypropylene (PP), and can only be used for media which do not attack PP. If a higher chemical resistance is required, please use a EFTE/PTFE bottle adapter ('Accessories', page 56).
-
Página 42: Priming
Priming Warning: Wear protective clothing, eye protection and gloves! Never press down the piston when the screw cap is screwed on! Avoid splash- ing the reagent! Liquid may accumulate in the screw cap. To avoid splashes dispense slowly. Follow all safety instructions and observe limitations of use and operating limitations (page 34-35). -
Página 43: Dispensing
Dispensing Setting the volume – Digital: Rotate the volume- Analog-adjustable: Loosen the Fixed-volume: The volume is setting wheel until the desired volume selector thumb screw non-adjustable and cannot be volume is indicated (mechanical ¾ turn (1), set the pointer to changed. -
Página 44: Accessories
Accessories The following optional accessories are available: Flexible discharge tube with recirculation valve For serial dispensing the flexible discharge tube can be used for the S and Dispensette S Organic bottle-top dispenser Dispensette ® ® ('Accessories', page 57). The specified accuracy and coefficient of variation of the instrument are only obtained for volumes >... -
Página 45: Drying Tube
Accessories Drying tube Use of a drying tube, filled with a suitable absorbent (purchased separately), might be necessary for moisture- and CO - sensitive media ('Accessories', page 58). Assembly Use a coin to unscrew the air vent cap (Fig. 1). Screw the filled drying tube in (Fig. -
Página 46: Error Limits (Nominal Volume, Partial Volume)
Error Limits Error limits related to the nominal capacity (= maximum volume) indicated on the instrument, obtained when instrument and distilled water are equilibrated at ambient temperature (20 °C/68 °F). Testing takes place according DIN EN 20 °C ISO 8655-6 with a completely filled instrument and with uniform and smooth dispensing. -
Página 47: Checking The Volume (Calibration)
This time frame should be adjusted to correspond with individual requirements. The complete testing procedure (SOP) can be downloaded at www.brand.de. In addition, you can also perform a func- tion test at shorter intervals, e.g. dispensing the nominal volume into a volumetric test flask (volumetric flask with 3 marks, DAkkS calibrated). -
Página 48: Adjustment
Adjustment After a long period of usage an adjustment of the instrument Type Digital might be necessary. I Calibrate for example at nominal volume (see page 47). I Calculate mean volume (result of weighing) (see page 47). I Adjust the instrument (to the calculated mean volume). I After the adjustment, further calibration is necessary to confirm appropiate adjustment. -
Página 49: Cleaning
Cleaning The instrument must be cleaned in the following situations to assure correct operation: I prior to changing the valve I immediately when the piston is difficult to move I regularly when using liquids which form deposits (e.g., crystallizing liquids) I before changing the reagent I regularly when liquids accumulate in the I prior to long term storage... - Página 50 Cleaning Disassembly of the piston (continued). b) Digital type Carry out assembly and dismantling at the maximum volume setting only (Fig. 2b). Move the latch to the left and remove the front Place the tip of the mounting tool in the piston housing.
-
Página 51: Replacement Of Discharge Tube/ Valves
Replacement of discharge tube/ valves Replacing the discharge tube Instruments with a recirculating valve should be set to 'Recirculate', and the valve lever pulled upwards to remove (Fig. 1). Slide the discharge tube housing all the way up, then pull it forward with gentle up and down motions (Fig. - Página 52 Replacement of discharge tube/ valves Replacing the discharge tube (cont.) Filling valve Pull out the recirculation tube and the telescoping filling tube (Fig. 1). Use the mounting tool to unscrew the filling valve (Fig. 2). Screw in the new filling valve first by hand and then tighten it with the mounting tool.
-
Página 53: Autoclaving
Autoclaving The instrument can be autoclaved at 121 °C (250 °F), 2 bar with a hold time of at least 15 minutes according to DIN EN 285. Preparation for autoclaving The instrument must be carefully cleaned prior to autoclaving (see 'Cleaning', page 49-50). Open the closure cap on the discharge tube, and for instruments with a recirculation valve, set the valve to 'Dispense'. -
Página 54: Ordering Information · Accessories · Spare Parts
Ordering Information Dispensette S , Digital ® Capacity Subdivision Discharge tube without Discharge tube with recirculation valve recirculation valve Cat. No. Cat. No. 0.1 - 0.005 4600 310 4600 311 0.2 - 0.01 4600 320 4600 321 0.5 - 0.02 4600 330 4600 331 0.05... - Página 55 Ordering Information Dispensette S Organic, Digital ® Capacity Subdivision Discharge tube without Discharge tube with recirculation valve recirculation valve Cat. No. Cat. No. 0.5 - 0.02 4630 330 4630 331 0.05 4630 340 4630 341 2.5 - 4630 350 4630 351 4630 360 4630 361 Dispensette...
- Página 56 Accessories · Spare Parts Bottle adapters PP or ETFE/PTFE. Adapters of ETFE/PTFE offer higher chemical resistance. Outer for bottle thread/ Material Cat. No. thread ground joint GL 32 GL 25 7043 25 GL 32 GL 28/ S 28 7043 28 GL 32 GL 30 7043 30...
- Página 57 Accessories · Spare Parts Discharge tube with recirculation valve Pack of 1. Description Nominal volume Shape Length Cat. No. for Dispensette 1, 2, 5, 10 fine tip 7081 02 ® 5, 10 standard 7081 04 25, 50, 100 fine tip 7081 06 25, 50, 100 standard...
- Página 58 Accessories · Spare Parts Telescoping filling tubes Recirculation tube S and S and for Dispensette for Dispensette ® ® Dispensette S Organic S Organic ® Dispensette ® FEP. Adjusts to various FEP. Pack of 1. bottle heights. Cat. No. 6747 Pack of 1.
-
Página 59: Troubleshooting
Troubleshooting Problem Possible cause Corrective action Piston moves with Formation of crystals, dirty Stop dispensing immediately. Loosen piston with difficulty or is stuck circular motion, but do not disassemble. Follow all cleaning instructions (page 49-52). Filling Volume adjusted to Set to required volume (see page 43). not possible minimum setting Filling valve stuck... -
Página 60: Repairs · Contact Addresses
– Complete the “Declaration on Absence of Health Hazards” and send the instru- ment to the manufacturer or supplier. Ask your supplier or manufacturer for the form. The form can also be downloaded from www.brand.de. In the U.S. and Canada: –... -
Página 61: Calibration Service
Just send in the instruments to be calibrated, accompanied by an indication of which kind of calibration you wish. Your instruments will be returned within a few days together with a test report (BRAND Calibration Service) or with a DAkkS Calibration Certificate. For further information, please contact your dealer or BRAND. -
Página 62: Warranty Information · Disposal
Warranty We shall not be liable for the consequences of improper handling, use, servic- ing, operation or unauthorized repairs of the instrument or the consequences of normal wear and tear especially of wearing parts such as pistons, seals, valves and the breakage of glass as well as the failure to follow the instructions of the operating manual. - Página 63 Table des matières Page Règles de sécutité Fonction et limites d'emploi Guide pour la sélection des appareils Eléments de commande Premiers Pas Mise en service Purge de l'appareil Distribution Accessories Limites d'erreur (Capacité, Volume partiel) Contrôle du volume (Calibrage) Ajustage Nettoyage Remplacement de la canule de distribution/ soupapes Autoclavage...
-
Página 64: Règles De Sécutité
Règles de sécurité Cet appareil peut être utilisé avec des matériaux dangereux ou en relation avec des appareillages ou procé- dés dangereux. Le livret mode d'emploi n'a pas pour but d'exposer tous les problèmes de sécurité pouvant en résulter. Ce sera donc de la responsabilité de l'utilisateur d'être sûr que les consignes de sécurité et de santé... - Página 65 Fonction et limites d'emploi S (Code-couleur rouge) Dispensette ® ( Code-couleur rouge) Digitale Analogique Fixe S Organic (code-couleur jaune) Dispensette ® ( Code-couleur jaune) Digitale Analogique Fixe Quand on utilise l’appareil correctement, le liquide distribué n’entre Remarque: en contact qu’avec les matériaux d’une bonne résistance chimique suivants: Pour le dosage de acide fluorhy- drique, nous recommandons le...
-
Página 66: Restrictions D'emploi
Fonction et limites d'emploi Restrictions d'emploi Limites d'emploi L'appareil sert à le distribution de liquides compte Les liquides qui produisent des dépôts peuvent tenu des limites physiques suivantes: gripper ou bloquer le piston (par ex. des solutions cristallisantes ou des solutions alcalines concen- –... - Página 67 Fonction et limites d'emploi Conditions de stockage Stocker l'appareil et les accessoires seulement une fois nettoyé dans un endroit sec et frais. Température de stockage : de -20 °C à +50 °C (de -4 °F a 122 °F). Table de résistance S offre un très large éventail Dispensette ®...
-
Página 68: Guide Pour La Sélection Des Appareils
(par ex. réagents tampon biologiques), des détergents individuel). biologiques, ainsi que des milieux pour la culture de cellules. Si vous désirez des informations sur les produits chimiques non mentionnés sur cette liste, n’hésitez pas à contacter BRAND. Edition: 1015/13... -
Página 69: Eléments De Commande
Eléments de commande Logement Protection de calibrage Réglage du volume du piston Verrouillage Réglage du volume Flèche indicatrice Parties du boîtier Douille de protection/ Piston Piston Cylindre de distribution Manette de la soupape de purge Canule de distribution Bloc de soupapes (GL 45 filetage de flacon) Capouchon a vis Tube pour distribution inversé... -
Página 70: Premiers Pas
Premiers pas Tout est-il dans l'emballage. L'emballage contient: S ou Dispensette S Organic, canule de distribution ou Distributeur adaptable sur flacon Dispensette ® ® canule de distribution avec soupape de purge, tube d'aspiration télescopique, tube pour distribution inver- sée (en option pour l'appareil avec soupape de purge), clé de montage, différents adaptateurs de flacon, ainsi qu' un certificat de qualité... - Página 71 Premiers pas Mise en service (continuation) Remarque: Pour les flacon avec des filetages de taille différente choisir l'adapta- teur approprié. Les adaptateurs inclus dans l'emballage standard sont en polypro- pylène (PP) et ne doivent être utilisés que pour les milieux n'atta- quant pas le PP.
-
Página 72: Purge De L'appareil
Purge de l'appareil Avertissement! Porter des vêtements de protection, protection des yeux et des gants protecteurs. Ne jamais appuyer sur le piston tant que le capuchon à vis est monté. Eviter les éclaboussures de réactif. Des restes de fluide peuvent s’accumuler dans le capuchon à vis. Distribuer lentement, pour éviter les éclaboussures. -
Página 73: Distribution
Distribution Réglage du volume – Digitale: Tourner la molette de Analogique: Desserrer la vis Fixe: Le volume est réglé de réglage du volume jusqu’à ce de réglage du volume d’un ¾ manière fixe et ne peut pas être que le volume souhaité soit indi- (1), déplacer la flèche indicatrice modifié. -
Página 74: Accessories
Accessoires Les accessoires suivants sont disponibles en option. Tuyaux de distribution flexible avec soupape Pour la distribution en série, il est possible d’utiliser le tuyau flexible de distribution pour le distributeur adaptable sur flacon Dispensette ® et Dispensette S Organic (voir 'Accessoires', page 87). Les valeurs ®... - Página 75 Accessoires Tube de séchage Dans le cas de milieux sensibles à l'humidité et à CO , l'utilisation d'un tube de séchage d'un absorbant approprié (non inclus dans l'emballage standard) peut être nécessaire (voir 'Accessoires', page 84). Montage Dévisser le bouchon d'aération à l'aide d'une pièce de monnaie (Fig.
-
Página 76: Limites D'erreur (Capacité, Volume Partiel)
Limites d'erreur Les limites d'erreur se réfèrent au volume nominal (= volume max.) imprimé sur l’appareil, la température de l’appareil, la température ambiante et celle de l'eau dist. étant les mêmes (20 °C/68 °F). L'essai a été effectué conformément 20 °C à... -
Página 77: Contrôle Du Volume (Calibrage)
3-12 mois. Ce cycle doit être adapté en fonction des exigences individuelles. Les instructions d'essai détaillées (SOP) peuvent être téléchargées sur www.brand.de. Il convient de plus de procéder à un contrôle de fonctionnement à des intervalles plus brefs, par ex. en distribuant le volume nominal dans une fiole jaugée d’essai (fiole jaugée avec 3 traits, étalonnée DAkkS). -
Página 78: Ajustage
Ajustage Après l'usage prolongé l'ajustage est necessaire. Digitale I Calibrer par ex. au volume nominal (voir page 77). I Calculer le volume moyen (valeur réelle) (voir page 77). I Ajuster l’appareil (régler sur la valeur réelle). I Après l’ajustage un nouveau calibrage nécessaire pour le contrôle! Exemple: Pour un volume nominal de 10,00 ml, le contrôle gravimétrique... -
Página 79: Nettoyage
Nettoyage Pour assurer le fonctionnement correct de l’appareil le nettoyer: I avant de remplacer les soupapes I immédiatement quand le piston est grippé I régulièrement, en cas d'utilisation de I avant de changer de réactif liquides qui forme des dépôts (p. ex. des I avant un stockage prolongé... -
Página 80: Type Digitale
Nettoyage Dépose du piston (suite). b) Type Digitale N’effectuer le montage et le démontage uniquement avec l’appareil réglé sur le volume maximal (Fig. 2b). Avec la clé de montage, desserrer l’écrou de Pousser le verrouillage vers la gauche et retirer fixation du piston et extraire la partie arrière du l‘élément avant du boîtier. -
Página 81: Remplacement De Canula De Distribution/ Soupapaes
Remplacement de canula de distribution/ soupapaes Remplacement de la canule de distribution Sur les appareils équipés d'une soupape de purge, régler la soupape en position 'purge' et retirer le levier de soupape par le haut (Fig. 1). Pousser le boîtier de la canule de distribution entièrement vers le haut, puis retirer cette dernière par l'avant en lui imprimant de légers mouvements de va-et-vient vers le haut et vers le bas (Fig. - Página 82 Remplacement de canula de distribution/ soupapaes Remplacement des soupapes (suite) Soupape d'aspiration Extraire le tube d'aspiration télescopique et le tube pour distri- bution inversé (Fig. 1). Dévisser la soupape d'aspiration à l'aide de la clé de montage (Fig. 2). Visser la soupape d'aspiration neuve d'abord à la main, puis la serrer à...
-
Página 83: Autoclavage
Autoclavage L'appareil est autoclavable à une température de 121 °C (250 °F), 2 bars et avec une durée de maintien d'au moins 15 minutes, conformément à la norme DIN EN 285. Préparation à l'autoclavage Avant de passer dans l’autoclave, l’appareil doit être nettoyé soigneusement ('Nettoyage', pages 79-80). -
Página 84: Données De Commande · Accessoires · Pièces De Rechange
Données de commande S , Digitale Dispensette ® Capacité Subdivision Canule de distribution Canule de distribution sans soupape de purge avec soupape de purge Réf. Réf. 0,1 - 0,005 4600 310 4600 311 0,2 - 0,01 4600 320 4600 321 0,5 - 0,02 4600 330... - Página 85 Données de commande Dispensette S Organic, Digitale ® Capacité Subdivision Canule de distribution Canule de distribution sans soupape de purge avec soupape de purge Réf. Réf. 0,5 - 0,02 4630 330 4630 331 0,05 4630 340 4630 341 2,5 - 4630 350 4630 351 4630 360...
- Página 86 Accessoires · Pièces de rechange Adaptateurs pour flacon PP ou ETFE/PTFE. Les adaptateurs en ETFE/PTFE offrent une résistance chimique plus élevée. Filetage ext. Pour filetage de flacon/ pour Matériau Réf. rodage GL 32 GL 25 7043 25 GL 32 GL 28/ S 28 7043 28 GL 32 GL 30...
- Página 87 Accessoires · Pièces de rechange Canules de distribution avec soupape de purge Emballage standard 1 unité. Description Capacité Form Long. Réf. nominal, ml pour Dispensette 1, 2, 5, 10 p. étirée 7081 02 ® 5, 10 standard 7081 04 25, 50, 100 p.
- Página 88 Accessoires · Pièces de rechange Tube pour distrubu- Tubes d'aspiration tion inversé télescopiques pour Dispensette S et ® S et pour Dispensette Dispensette S Organic ® ® S Organic Dispensette ® FEP. FEP. Longueur réglable Emballage standard 1. de façon individuelle. Réf.
-
Página 89: Dérangement - Que Faire
Dérangement – que faire? Dérangement Cause possible Que faire? Piston se déplace diffi- Formation de cristaux, Arrêter immédiatament le distribution. Libérer le cilement ou est bloqué. salissures piston en le tournant. Ne pas démonter l’appa- reil. Procéder à un nettoyage (voir p. 79-82). Remplissage Bouton de réglage du volume Régler sur le volume souhaité... -
Página 90: Réparation · Adresses De Contact
– Remplir l’»Attestation de Décontamination» et la retourner avec l’appareil au fabricant ou au fournisseur. Demander le formulaire au fournisseur ou au fabricant ou bien en téléchargement gratuit sous www.brand.de. Aux États-Unis et au Canada: – Veuillez contacter BrandTech Scientific, Inc. pour demander les conditions de retour de l’appareil avant de le renvoyer au service après-vente. -
Página 91: Service De Calibration
être fréquents. Les instructions de contrôle détaillés sont disponibles en téléchargement gratuit sur www.brand.de ou www.brandtech.com. BRAND vous offre également la possibilité de faire calibrer vos instruments par notre service de calibration ou par le laboratoire de calibration DAkkS de BRAND. -
Página 92: Garantie · Destruction
Garantie Nous déclinons toute responsabilité en cas de conséquences d'un traitement, d'une utilisation, d'un entretien et d'une manipulation incorrecte, d'une répa- ration non-autorisée de l'appareil ou d'une usure normale, notamment des pièces d'usure, telles que les pistons, les joints d'étanchéité, les soupapes et de rupture de pièces en verre. - Página 93 Contenido Página Normas de seguridad Función y limitaciones de empleo Tabla de selección de dispensadores Elementos de manejo Primeros pasos Puesta en marcha Purgar el aire Dosificación Accesorios Límites de errores Controlar el volumen (Calibrar) Ajustar Limpieza Cambio de la cánula de dosificación/ válvulas Autoclavar Referencias ·...
-
Página 94: Normas De Seguridad
Normas de seguridad Este aparato puede entrar en contacto con instalaciones, aplicaciones o materiales peligrosos. Estas instruc- ciones de manejo no tienen por objeto enumerar todas las limitaciones de seguridad que pueden presentarse durante el uso. El usuario del aparato tiene responsabilidad de tomar las medidas suficientes para su seguridad y su salud, así... - Página 95 Función y limitaciones de empleo S (Código de color rojo) Dispensette ® ( Código de color rojo) Digital Analógico Fijo S Organic (Código de color amarillo) Dispensette ® ( Código de color amarillo) Digital Analógico Fijo Con un manejo correcto del aparato, el líquido dosificado sólo entra en Nota: contacto con los siguientes materiales de buena resistencia química: Para dosificación de ácido...
-
Página 96: Limitaciones De Uso
Función y limitaciones de empleo Limitaciones de empleo Limitaciones de uso El aparato se emplea para dosificación de medios Líquidos que originan depósitos pueden dificultar o teniendo en cuenta los siguientes límites físicos: imposibilitar el desplazamiento del émbolo (por ej. soluciones cristalizantes o soluciones alcalinas con- –... -
Página 97: Condiciones De Almacenamiento
Función y limitaciones de empleo Condiciones de almacenamiento Almacene el aparato y los accesorios solamente en lugares frescos y secos. Temperatura de almacenamiento: de -20 °C a +50 °C (de -4 °F a 122 °F). Campos de aplicación recomendados S ofrece un muy amplio campo de Dispensette ®... -
Página 98: Tabla De Selección De Dosificadores
(por ej. reactivos tampón biológicos), detergentes biológicos, manejo separadas). así como medios para el cultivo de células. Si Ud. necesita informaciones sobre productos químicos no mencionados en esta lista, puede comunicarse con BRAND. Edición: 1015/13... -
Página 99: Elementos De Manejo
Elementos de manejo Cabeza del Tapa de ajuste Ajuste del volumen émbolo Bloqueo Ajuste del volumen Flecha indicadora Carcasa Camisa de protección/ Émbolo Émbolo Cilindro dosificador Palanca de la válvula de purga Cilindro dosificador Bloque de válvulas (GL 45 rosca de frasco) Caperuza a rosca Tubo p. -
Página 100: Primeros Pasos
Primeros pasos Contenido del embalaje El embalaje contiene: S o Dispensette S Organic, cánula de dosificación o cánula Dosificador acoplable a frasco Dispensette ® ® de dosificación con válvula de purga, tubo de aspiración telescópico, tubo para dosificación inversa (op- tativa para aparato con válvula de purga), llave de montaje, varios adaptadores para frasco, un certificado de calidad y estas instrucciones de manejo. - Página 101 Primeros pasos Puesta en marcha (continuación) Nota: Para frascos con tamaños de rosca diferente, utlice un adaptador apropiado. Los adaptadores suministrados con el aparato son de polipropileno (PP). Sólo se deben utilizar con medios que no atacan PP. En el caso de que se requiera una mayor resistencia química, utilice un adaptador para frasco de ETFE/PTFE (véase 'Accesorios', pág.
-
Página 102: Purgar El Aire
Purgar el aire ¡Advertencia! Utilizar protección para los ojos, vestimenta y guantes de protec- ción. No desplazar nunca el émbolo hacia abajo estando colocada la caperuza a rosca! Evitar salpicaduras de reactivo! En la caperuza a rosca pueden acumularse restos de medios. ¡Dosificar despacio para evitar salpicaduras! Observar todas las reglas de seguridad así... -
Página 103: Dosificación
Dosificación Ajustar el volumen – Digital: Gire la rueda de regu- Analógico: Mediante ¾ giro Fijo: El volumen queda regu- lación de volumen hasta que se suelte el tornillo de regulación de lado de forma fija y no puede visualice el volumen deseado volumen (1), desplace la flecha modificarse. -
Página 104: Accesorios
Accesorios Los siguientes accesorios están disponibles en opcional. Tubo de dosificación flexible con válvula Para la dosificación en serie puede utilizarse el tubo de dosificación flexible para los dosificadores acoplables a frascos Dispensette ® Dispensette S Organic (véase 'Accesorios', pág. 117). Los valores ®... - Página 105 Accesorios Tubo de secado Con medios sensibles a la humedad y al CO puede ser necesario utilizar un tubo de secado con un medio absorbente adecuado (no incluido en el suministro) (véase 'Accesorios', pág. 118). Montaje Desenrosque el tapón de aireación con una moneda (fig. 1) Enrosque el tubo de secado lleno (fig.
-
Página 106: Límites De Errores
Límites de errores Límites de errores admisibles referidos al volumen nominal impreso en el aparato (= volumen máx.) a igual temperatura (20 °C/68 °F) del aparato, del ambiente, y del agua destilada. La prueba se realizó según DIN EN ISO 8655-6 con el 20 °C aparato completamente lleno y dosificación uniforme y sin sacudidas. -
Página 107: Controlar El Volumen (Calibrar)
3 a 12 meses. La periodicidad debe adaptarse a los requisitos individuales. Las instrucciones detalladas de calibración (SOP) pueden descargase en www.brand.de. Adicionalmente debe efectuarse una prueba de funcionamiento en períodos de tiempo cortos, p. ej. dosificando el volumen nominal en un matraz aforado de prueba (matraz aforado con 3 marcas y con calibración DAkkS). -
Página 108: Ajustar
Ajustar Después de un uso prolongado puede ser necesario un ajuste. Digital I Calibrar p. ej. después del ajuste del volumen nom. (pág. 107). I Calcular el volumen medio (valor real) (pág. 107). I Ajustar el aparato (ajustar el valor real). I Después del ajuste es necesario otro calibrado para control. -
Página 109: Limpieza
Limpieza Para garantizar el funcionamiento correcto del aparato, debe limpiarse en los casos siguientes: I antes de cambiar una válvula I inmediatamente si el émbolo se mueve con dificultad I periódicamente si se utilizan fluidos que forman depósitos (p. ej. medios cristali- I antes de cambiar el reactivo zantes) I antes de un almacenaje prolongado... - Página 110 Limpieza Desmontaje del émbolo (continuación). b) Tipo digital Efectúe el montaje y el desmontaje sólo cuando esté ajustado el volumen máximo (fig. 2b). Empuje el bloqueo hacia la izquierda y retire la Suelte la tuerca de sujeción del émbolo con la carcasa frontal.
-
Página 111: Cambio De La Cánula De Dosificación/ Válvulas
Cambio de cánula de dosificación/ válvulas Cambio de la cánula de dosificación En aparatos con válvula de purga ponga la válvula en la posi- ción 'dosificación inversa' y coloque la palanca de la válvula hacia arriba (fig. 1). Deslice la carcasa de la cánula de dosificación totalmente ha- cia arriba, después retírela mediante movimientos suaves hacia arriba y abajo (fig. - Página 112 Cambio de cánula de dosificación/ válvulas Cambio de válvulas (cont.) Válvula de aspiración Retire el tubo de aspiración telescópico y el tubo de dosificación inversa (fig. 1). Desatornille la válvula de aspiración con la llave de montaje (fig. 2). Atornille la válvula de aspiración nueva inicialmente de forma manual y después apriétela con la llave de montaje.
-
Página 113: Autoclavar
Autoclavar El aparato puede esterilizarse en autoclave a 121 °C (250 °F), 2 bar durante como mínimo 15 minutos, según DIN EN 285. Preparación para esterilización en autoclave Antes de esterilizar en autoclave, el aparato debe limpiarse cuida- dosamente (para 'limpieza' véase pág. 109-110). Abra la caperuza a rosca de la cánula de dosificación y en los aparatos con válvula de purga coloque la válvula en la posición 'dosificar'. -
Página 114: Referencias · Accesorios · Recambios
Referencias S , Digital Dispensette ® volumen graduación cánula de dosificación cánula de dosificación sin válvula de purga con válvula de purga ref. ref. 0,1 - 0,005 4600 310 4600 311 0,2 - 0,01 4600 320 4600 321 0,5 - 0,02 4600 330 4600 331... - Página 115 Referencias Dispensette S Organic, Digital ® volumen graduación cánula de dosificación cánula de dosificación sin válvula de purga con válvula de purga ref. ref. 0,5 - 0,02 4630 330 4630 331 0,05 4630 340 4630 341 2,5 - 4630 350 4630 351 4630 360 4630 361...
-
Página 116: Adaptadores Para Frasco
Accesorios · Recambios Adaptadores para frasco PP o ETFE/PTFE. Los adaptadores en ETFE/PTFE ofrecen una resistencia química más elevada. rosca para rosca de frasco/ material ref. exterior para esmerilado NS GL 32 GL 25 7043 25 GL 32 GL 28/ S 28 7043 28 GL 32 GL 30... -
Página 117: Válvula De Salida Dispensette ® S
Accesorios · Recambios Cánulas de dosificación con válvula de purga 1 unidad por embalaje. descripción volumen forma long. ref. nominal, ml de punta para Dispensette 1, 2, 5, 10 estirada 7081 02 ® 5, 10 estándar 7081 04 25, 50, 100 estirada 7081 06 25, 50, 100... - Página 118 Accesorios · Recambios Tubo para dosifica- Tubos de aspiración ción inversa telescópicos para Dispensette ® para Dispensette ® S yDispensette ® Dispensette S Organic ® Organic, FEP. FEP. Longitud ajustable 1 unidad por embalaje. de manera individual. ref. 6747 1 unidad por embalaje. volumen nominal Ø...
-
Página 119: Qué Hacer En Caso De Avería
¿Qué hacer en caso de avería? Avería Causa probable ¿Qué hacer? Émbolo se mueve con Formación de cristales, Inmediatamente abstenerse de dosificar. dificultad o se pega suciedad Soltar el émbolo con movimientos giratorios, pero no desmontar. Proceder a una limpieza (pág. -
Página 120: Reparación · Direcciones De Contacto
– Rellenar la “Declaración sobre la ausencia de riesgos para la salud” y enviarla con el aparato al fabricante o al distribuidor. Pedir el formulario al proveedor o al fabricante, se puede descargar en www.brand.de para un download. En los EE.UU. y Canadá: –... -
Página 121: Service De Calibración
(véase 'Documentos técnicos'). Además, BRAND le ofrece la posibilidad de calibrar sus instrumentos por medio del servicio de calibrado de BRAND o por el laboratorio de calibrado DAkkS. Mándenos simplemente los instrumentos a calibrar con la información del tipo de calibrado que desea. -
Página 122: Garantía · Eliminación
Garantía No seremos responsables de las consecuencias derivadas del trato, manejo, mantenimiento, uso incorrecto o reparación no autorizada del aparato, ni de las consecuencias derivadas del desgaste normal, en especial de partes susceptibles de abrasión, tales como émbolos, juntas herméticas, válvulas, ni de la rotura de partes de vidrio o del incumplimiento de las instrucciones de manejo. - Página 123 Indice dei contenuti Pagina Norme di sicurezza Funzioni e limiti all'uso Guida alla scelta dello strumento Elementi funzionali I primi passi Messa in funzione Spurgo dell'aria Dosaggio Accessori Limite di errore Verifica del volume (Calibrazione) Calibrazione Pulizia Sostituzione della cannula di dosaggio/ valvole Sterilizzazione in autoclave Dati per l'ordinazione ·...
-
Página 124: Norme Di Sicurezza
Norme di sicurezza Questo strumento può essere utilizzato con materiali, procedure e apparecchiature pericolosi. Le istruzioni per l'uso non possono però coprire tutte le eventuali problematiche di sicurezza che possono presentarsi. È responsabilità dell'utilizzatore osservare adeguate prescrizioni per la sicurezza e la salute e definire prima dell'uso le opportune limitazioni. - Página 125 Funzioni e limiti all'uso S (color-code rosso) Dispensette ® ( color-code rosso) Digitale Regolazione analogica Volume fisso S Organic (color-code giallo) Dispensette ® ( color-code giallo) Digitale Regolazione analogica Volume fisso Nell'uso corretto dello strumento il liquido dosato può venire a contat- Note: to solo con i seguenti materiali resistenti all'attacco chimico: Per il dosaggio di acido fluoridri-...
-
Página 126: Limitazioni All'uso
Funzioni e limiti all'uso Limitazioni all'uso Limiti all'uso Lo strumento può essere utilizzato per il dosaggio Liquidi, che creano depositi possono causare scar- di fluidi con le seguenti limitazioni: sa scorrevolezza o inceppamento del pistone (ad esempio soluzioni cristalline o alcali concentrati). –... - Página 127 Funzioni e limiti all'uso Condizioni per l'immagazzinamento Conservare l'apparecchio e gli accessori perfetta- mente puliti in un luogo fresco e asciutto. Temperatura di immagazzinamento: da -20 °C a +50 °C (da -4 °F a 122 °F) Campo di applicazione raccomandato S offre una gamma molto ampia di Dispensette ®...
-
Página 128: Guida Alla Scelta Dello Strumento
(ad esempio soluzioni tampone biologiche), detergenti biologici e fluidi per colture cellulari. (manuale di istruzioni per l'uso separato). Se dovessero servire dichiarazioni su sostanze che non sono incluse in questo elenco, siete invitati a rivolgervi a BRAND. Revisione: 1015/13... -
Página 129: Elementi Funzionali
Elementi funzionali Supporto Tappo calibrazione Regolazione del volume del pistone Chiusura Regolazione del volume Freccia indicatrice Guscio della copertura Capsula protettiva/ Pistone Pistone Cilindro di dosaggio Levetta valvola di riciclo Tubo di espulsione Blocco delle valvole (GL 45, filettatura della bottiglia) Tappo a vite Tubo per il riciclo Tubo di riempimento... -
Página 130: I Primi Passi
Primi passi C'è tutto nella confezione? Nella confezione sono contenuti: S o Dispensette S Organic, tubo di espulsione o tubo di espulsione Dosatore per bottiglia Dispensette ® ® con valvola riciclo, tubo di riempimento telescopico, tubo per il riciclo (opzionale per strumento con valvola riciclo), utensile per il montaggio, differente adattatori per bottiglia, un certificato delle prestazioni e questi istruzioni per l'uso. - Página 131 Primi passi Messa in funzione (continuazione) Nota: Per bottiglie con filettatura diversa scegliere un adattatore adeguato. Gli adattatori compresi nel materiale fornito sono in polipropilene (PP) e devono essere impiegati solo con fluidi che non attaccano il PP. Se è richiesta una maggiore resistenza alle sostanze chimiche, utilizza- re adattatori per bottiglia ETFE/PTFE (v.
-
Página 132: Spurgo Dell'aria
Spurgo dell'aria Attenzione! Indossare indumenti, occhiali e guanti protettivi. Non premere il pistone finché il tubo di espulsione è chiuso con il tappo a vite! Evitare spruzzi di reagente! Nel tappo a vite possono accumularsi residui di fluidi. Per evitare spruzzi dosare lentamente. Seguire tutte le norme di sicurezza e tenere conto degli usi non previsti e delle limitazioni all'uso (pagina 124-125). -
Página 133: Dosaggio
Dosaggio Regolazione del volume – Digitale: Ruotare la manopola Regolazione analogica: Al- Volume fisso: Il volume è fisso di regolazione del volume finché lentare la vite di regolazione del e non può essere modificato. viene visualizzato il volume desi- volume di ¾ giro (1), spostare derato (contatore meccanico). -
Página 134: Accessori
Accessori I seguenti accessori sono disponibili come optional: Tubo di espulsione flessibile con valvola Per il dosaggio in serie, è possibile impiegare il tubo di espulsione flessibile per il dosatore per bottiglia Dispensette S e Dispensette ® ® S Organic (v. 'Accessori', pagina 147). I valori di accuratezza e coef- ficiente di variazione forniti nelle istruzioni per l'uso sono ottenibili del strumenti solo se vengono dosati volumi >... -
Página 135: Tubo Di Essiccamento
Accessori Tubo di essiccamento Per liquidi sensibili all'umidità e alla CO può essere necessario l'impiego di un tubo di essiccazione con un adsorbente adatto (non compreso nel materiale fornito) (vedi 'Accessori', pagina 148). Montaggio Svitare il tappo di sfiato con una moneta (fig. 1). Avvitare il tubo di essiccamento pieno (fig. -
Página 136: Limite Di Errore
Limite di errore I limiti di errore sono riferiti al volume nominale impresso sull'apparecchio (= volume massimo) con apparecchio, ambiente e acqua distillata alla stessa temperatura (20 °C/68 °F). La verifica è stata eseguita secondo la norma DIN 20 °C EN ISO 8655-6 con strumento completamente riempito e manovra di dosaggio uniforme e senza scosse. -
Página 137: Verifica Del Volume (Calibrazione)
Questo intervallo dovrebbe comunque essere adattato alle prestazioni richieste allo strumento. Le istruzioni dettagliate per la verifica (SOP) possono essere scaricate dal sito www.brand.de. Eseguire anche una prova di funzionamento a intervalli più brevi, ad es. dosando il volume nominale in un matraccio campione (matracci tarati con 3 segni di graduazione, tarati DAkkS). -
Página 138: Calibrazione
Calibrazione Dopo un uso prolungato può essere necessaria una calibrazione. Tipo Digitale I Calibrare ad es. al volume nominale (vedere pagina 137). I Calcolare il volume medio (valore reale) (vedere pagina 137). I Calibrare lo strumento (Impostare il valore reale). I Dopo la calibrazione è... -
Página 139: Pulizia
Pulizia Per assicurare un funzionamento perfetto, lo strumento deve essere pulito nei casi seguenti: I prima della sterilizzazione in autoclave I immediatamente, se il pistone è poco scor- revole I prima di sostituire la valvola I se si cambia reagente I regolarmente in caso di impiego di liquidi che creano depositi (ad es. - Página 140 Pulizia Smontaggio del pistone (segue). b) Tipo Digitale Eseguire il montaggio e lo smontaggio solo a volume massimo impostato (fig. 2b). Spingere la chiusura verso sinistra e rimuovere Con la chiave per il montaggio allentare il dado la metà anteriore della protezione. di fissaggio del pistone ed estrarre da dietro la parte posteriore della protezione.
-
Página 141: Sostituzione Della Cannula Di Dosaggio/ Valvole
Sostituzione della cannula di dossagio/ valvole Sostituzione della cannula di dosaggio Negli strumenti con valvola di riciclo, posizionare la valvola su 'Dosaggio inverso' e tirare la levetta della valvola verso l'alto (fig. 1). Spingere completamente verso l'alto la copertura della cannula di dosaggio, dopo tirare in avanti con piccoli movimenti avanti e indietro (fig. - Página 142 Sostituzione della cannula di dossagio/ valvole Sostituzione delle valvole (cont.) Valvola di aspirazione Rimuovere il tubo telescopico di riempimento e il tubo per il riciclo (fig. 1). Svitare con la chiave per il montaggio la valvola di aspirazione (fig. 2). Avvitare la valvola di aspirazione nuova prima a mano e poi serrare con la chiave di montaggio.
-
Página 143: Sterilizzazione In Autoclave
Sterilizzazione Lo strumento può essere sterilizzato in autoclave a 121°C (250 °F), 2 bar per almeno 15 minuti secondo la norma DIN EN 285. Preparativi per la sterilizzazione in autoclave Prima di utilizzare l'autoclave, pulire accuratamente l'apparecchio (Per 'la pulizia' v. le pagine 139-140). Aprire il tappo a vite della cannula di dosaggio e, sugli strumenti con valvola di riciclo, posizionare la valvola su 'Dosaggio'. -
Página 144: Dati Per L'ordinazione · Accessori · Parti Di Ricambio
Dati per l'ordinazione S , Digitale Dispensette ® Capacità Divisione Tubo di espulsione Tubo di espulsione senza valvola riciclo con valvola riciclo Codice Codice 0,1 - 0,005 4600 310 4600 311 0,2 - 0,01 4600 320 4600 321 0,5 - 0,02 4600 330 4600 331... - Página 145 Dati per l'ordinazione Dispensette S Organic, Digitale ® Capacità Divisione Tubo di espulsione Tubo di espulsione senza valvola riciclo con valvola riciclo Codice Codice 0,5 - 0,02 4630 330 4630 331 0,05 4630 340 4630 341 2,5 - 4630 350 4630 351 4630 360 4630 361...
- Página 146 Accessori · Parti di ricambio Adattatori per bottiglia PP o ETFE/PTFE. Adattatori di ETFE/PTFE offrono la più elevata resistenza chimica. Confezione da 1 Filettatura Per bottiglie filettatura/ Materiale Codice esterna per cono GL 32 GL 25 7043 25 GL 32 GL 28/ S 28 7043 28 GL 32...
- Página 147 Accessori · Parti di ricambio Tubo di espulsione con valvola riciclo Confezione da 1. Descrizione Volumen Forma Lungh. Codice nominale, ml punta per Dispensette 1, 2, 5, 10 fine 7081 02 ® 5, 10 standard 7081 04 25, 50, 100 fine 7081 06 25, 50, 100...
- Página 148 Accessori · Parti di ricambio Tubo di riempimento telescopico Tubo per il riciclo per Dispensette per Dispensette ® ® Dispensette S Organic Dispensette S Organic ® ® FEP. Adattabile alle FEP. Confezione da 1. altezze delle varie bottiglie. Codice 6747 Confezione da 1.
-
Página 149: Individuazione E Soluzione Dei Problemi
Individuazione e soluzione dei problemi Problema Possibile causa Soluzione Pistone poco scorre- Deposito di cristalli, Interrompere subito il dosaggio. Ruotare il pistone vole o bloccato. contaminazione per allentarlo, ma senza smontarlo. Eseguire la pulizia (vedere pag. 139-142). Riempimento La regolazione del volume Eseguire la verifica del volume desiderato impossibile è... -
Página 150: Riparazione · Indirizzi Di Contatto
– Inviare solo strumenti puliti e decontaminati all'indirizzo ricevuto insieme al numero di reso. Applicare il numero di reso bene in vista sull'esterno del pacco. Indirizzi di contatto BRAND GMBH + CO KG India: Otto-Schott-Straße 25 BRAND Scientific Equipment Pvt. Ltd. -
Página 151: Servizio Calibrazione
Inoltre, BRAND vi offre la possibilità di far tarare i vostri strumenti dal nostro Servizio calibrazione o dal Laboratorio DAkkS BRAND. Inviateci semplicemente i vostri strumenti con le indicazione del tipo di tara- tura richiesta. -
Página 152: Garanzia · Smaltimento
Garanzia Non ci assumiamo alcuna responsabilità per le conseguenze di manipolazione, uso, manutenzione e impiego non corretti, o per riparazioni non autorizzate dello strumento o per le conseguenze del normale consumo, in particolare dei componenti soggetti ad usura, come ad esempio pistoni, guarnizioni e valvole, e in caso di rottura del vetro. - Página 153 Notizen / Notes / Notas / Appunti:...
- Página 156 9974 90 · Printed in Germany · 5/1015/3...