
Manuales relacionados para Humanscale M10


Resumen de contenidos para Humanscale M10
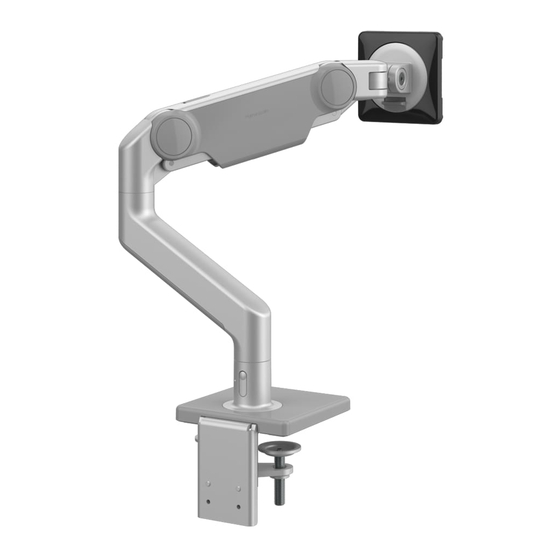
- Página 1 Desk Mount Assembly Instructions North America: +1 800 400 0625 Europe: +353 (0)1 858 0910 Asia Pacific: +852 2581 0570...
-
Página 2: Installation Hardware
INSTALLATION HARDWARE ① ② ③ 4 Standard VESA Bracket 4 Plastic Spacers 5mm Hex Key Screws ④ ⑤ ⑥ 4 Extended VESA Bracket VESA Bracket and Cover NOTE: 4mm and 5mm Hex Key can Screws be found under the plastic base cover. ⑨... - Página 3 Underneath the work surface, reattach the Bottom Clamp to the Top Bracket using the Bracket screws. Fully tighten the Clamp Screws (G) with 5mm hex key. NOTE: Clamp Mounts cannot be used to mount the M10 to any vertical surface. ③...
- Página 4 (cable access is approximately 1.5” x 0.25” with 2” grommets). Position the M10 Base over the work surface hole (J). Align Bolt-Through Plate, foam side up, under the work surface. Pass the Bolt (K) through the hole in the plate and screw into M8 base by using 8mm hex key (L).
- Página 5 Attach Arm To Base Stem ① NOTE: Before adding each link, adjust the smart stop (A) according to step 2. The links should be positioned so that the monitors do not extend beyond the desk surface. Insert the angled link into the mount until release button locks in place.
- Página 6 Attach Vesa Bracket To Monitor Separate the VESA cover from the VESA bracket. Position the VESA Bracket over the mounting holes ① on the back of monitor with the D-shaped cutouts in a vertical orientation. Attach using the 4 VESA screws provided.
-
Página 7: Weight Adjustment
If it is difficult to adjust or moves without assistance, it is ② not properly counterbalanced. M10 Arm - Total Weight Range: 20-48 lbs. (9-21.7 kg) Single Monitor - Max weight: 48 lbs. (21.7 kg) Dual Crossbar - Max weight per monitor: 12.5 lbs. (5.6 kg) Triple Crossbar - Max weight per monitor: 10 lbs. -
Página 8: Cable Management
If using a single monitor, skip to step 2. Route power and monitor cables through the ② flexible cable clips on the M10’s upper link (B). NOTE: Leave enough slack in the cables to allow arms to rotate without difficulty. -
Página 9: Matériel D'installation
[2 po]). pour les surfaces jusqu’à 68 mm (2,7 po) d’épaisseur. A : Pour l’installation sur le bord ouvert de la surface de Positionner la base M10 sur le trou de la surface de travail travail (J). Faire glisser le support (A) contre le bord de la surface de travail et serrer les vis de serrage (B) à... -
Página 10: Réglage Du Poids
Placer le support VESA sur les trous de montage à l’arrière de l’écran avec les découpes en forme de D Bras M10; plage de poids total : 9 à 21,7 kg (20 à 48 lb) Écran unique; poids maximum : 21,7 kg (48 lb) dans une orientation verticale. Fixer à l’aide des 4 vis Double barre transversale;... -
Página 11: Material Para La Instalación
Faire passer les câbles d’alimentation et de l’écran à travers les serre-câbles flexibles sur le lien supérieur du Montaje Con Abrazadera M10 (B). Voir Page 8, ② NOTA: Utilice los orificios superiores para superficies de hasta 1,8” (48 mm) de grosor y los inferiores para REMARQUE : Laisser suffisamment de jeu dans les câbles... -
Página 12: Montaje Atornillado
(el acceso de los cables es de aproximadamente 1,5” x 0,25” con ojales de 2”). ADVERTENCIA: Riesgo de lesiones: no coloque los Coloque la base M10 sobre el orificio de la superficie de travesaños de modo que los monitores se extiendan más trabajo (J). -
Página 13: Fijar El Monitor Al Brazo
Ver página 8, ⑥ Brazo M10 - Intervalo de peso total: 20-48 libras (9-21,7 kg) Monitor único - Peso máximo: 48 libras (21,7 kg) ATENCIÓN: No introduzca alargadores. No introduzca Barra transversal doble - Peso máximo por monitor:... -
Página 14: Componenti Di Installazione
6,3 mm (1,5” x 0,25”). di lavoro: Fare scorrere il supporto (A) contro il bordo della Posizionare la base M10 sul foro della superficie di superficie di lavoro e serrare completamente le viti del lavoro (J). morsetto (B) con la chiave a brugola da 5 mm (C). - Página 15 ③ Il braccio può ruotare senza arrestarsi Posizionare la staffa VESA sopra i fori di montaggio sul ④ Il braccio può ruotare di 180˚ retro del monitor con le aperture a D con orientamento ⑤ Il braccio può ruotare di 90˚ verticale.
- Página 16 Braccio M10 - Intervallo di peso totale: 9-21,7 kg (20-48 lb) Monitor singolo - Peso massimo: 21,7 kg (48 lb) Vedi pagina 8, ⑥...
- Página 17 ③ Arm kann unbegrenzt gedreht werden ④ Arm kann um 180˚ gedreht werden HINWEIS: Klemmhalterungen können nicht verwendet ⑤ Arm kann um 90˚ gedreht werden werden, um den M10 an einer vertikalen Oberfläche zu befestigen. Arm An Der Basisstange Befestigen Siehe Seite 3, ②...
- Página 18 Sie die mitgelieferten verlängerten VESA-Schrauben und M10 Arm - Gesamtgewichtsbereich: 9-21,7 kg (20-48 lbs.) Einzelner Monitor - Max. Gewicht: 21,7 kg (48 lbs.) Kunststoffabstandshalter. Duale Querstange - Max. Gewicht pro Monitor: 5,6 kg Sie können auch die Schrauben verwenden, die mit Ihrem...
-
Página 19: Montage-Instructies
⑨ Bevestigingsboutenl ACHTUNG: Ziehen Sie die Schrauben nicht zu fest an, da ⑩ Schuifbladklem dies den Schraubenkopf oder das Gewinde beschädigen ⑪ Bladklem kann. Siehe Seite 7 , ② Dwarsbalk montagemateriaal ⑫ 4 mm inbussleutel ⑬ 3 dwarsbalk-verbindingsschroeven Kabelführung Wenn Sie zwei Monitore verwenden, führen Sie die Zie pagina 2 Kabel zunächst durch die Kunststoff-Kabelklemmen an der Vorderseite der Querstange. -
Página 20: Arm Bevestigen Tegen De Voet
Schuifbladklem Steek de hoekverbinding in de beugel tot de C - Voor installatie op een bureau met minimale ruimte vrijgaveknop op zijn plaats klikt. voor klemmen: Verwijder de afdekking van de basis. Steek de dynamische verbinding in de hoekverbinding tot de vrijgaveknop op zijn plaats klikt. Bevestig de Bladklem (H) losjes tegen de voet met behulp van drie bijgesloten schroeven (I). -
Página 21: De Monitor Tegen De Arm Bevestigen
Gelenk, bis sie einrastet und ziehen Sie dann die Kabel niet op zijn plaats blijft, is hij niet correct gebalanceerd. vorsichtig durch das Gelenk, um überschüssiges Spiel M10 arm - Totale draagkracht: 9 - 21,7 kg (20-48 lbs) der Kabel zu reduzieren. Zie pagina 8, ⑥... - Página 22 © 2021 Humanscale Corporation. The text and artwork are copyrighted materials. All rights reserved. The Humanscale mark and logo are trademarks of Humanscale Corporation and are registered in the United States and certain other countries. The M10 trademark is owned by Humanscale Corporation. humanscale.com...