
Manuales relacionados para Phonocar VM069


Resumen de contenidos para Phonocar VM069
- Página 1 6,2” TFT/LCD 2 DIN NAVIGATION MANUALE ISTRUZIONI • INSTRUCTIONS MANUAL NOTICE DE MONTAGE ET D’EMPLOI • GEBRAUCHSANWEISUNGEN MANUAL DE INSTRUCCIONES VM069...
- Página 2 Precauzioni • Warnings • Précautions • Vorsicht • Precauciones IT/EN • Per l’installazione rivolgersi al personale tecnico qualificato. • Usare solo con impianto elettrico a 12V DC con negativo a massa. • Scollegare il terminale negativo della batteria del veicolo quando si effettuano le connessioni dell’apparecchio.
-
Página 3: Connessioni • Connections
CONNESSIONI • CONNECTIONS IT/EN INGRESSO ANTERIORE A/V 1 FRONT INPUT A/V 1 FUSE AUX IN 1 R AUX IN 1 L AUX IN VIDEO ANTENNA GPS GPS AERIAL DIGITAL RADIO RECEIVER DAB BUS INGRESSO RICEVITORE DIGITALE COD. VM222 USCITA USCITE PRE-AMP GIALLO/YELLOW VIDEO OUT VIDEO... - Página 4 Activation of Electric Aerial Durante l’avviamento dell’auto il VM069 potrebbe spegnersi per poi riaccendersi. Per evitare questo inconveniente collegare lo stabilizzatore di tensione 5/146. The VM038 could turn-out and turn-on again, when the ignition-key gets activated. You can avoid such inconvenience, by connecting the tension stabilizer 5/146.
-
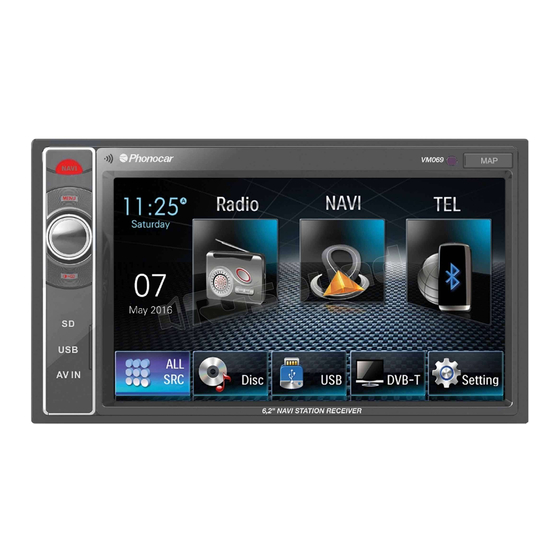
Página 5: Funzioni • Functions
FUNZIONI • FUNCTIONS IT/EN Slot micro SD Card per navigazione Navigation micro SD Card slot Sensore IR IR-Sensor Navigazione Navigation Menù principale Main Menu Accensione/Spegnimento - Volume - Silenziamento Audio ON/OFF - Volume – Audio-Muting Luminosità schermo Screen-Brightness Reset Reset Multimedia micro-SD Card slot Slot SD Card multimediale Porta USB... - Página 6 MENÙ • MENU IT/EN All’accensione dell’autoradio compare il MENU principale. Passa al Menù successivo. Passa al Menù principale. Con le icone sullo schermo si seleziona la sorgente o la funzione Go to following Menu. Go to Main Menu. desiderata. Passa al Menù successivo When you switch-on the car-radio, the Main Menu will appear.
-
Página 7: Impostazioni Di Sistema • System Setup
IMPOSTAZIONI DI SISTEMA • SYSTEM SETUP IT/EN Premere l’icona Setup sul pannello del menù principale per modificare i seguenti settaggi: generali, video, suono, Data e ora, Lingua, Bluetooth, DVD, volume sorgenti. / Press Setup-icon on the Main-Menu-interface, to change following Settings: General, Video, Audio, Date and Time, Language, Bluetooth, DVD, Source-Volume. -
Página 8: Impostazioni Lingua
IMPOSTAZIONI DI SISTEMA • SYSTEM SETUP IT/EN SUONO IMPOSTAZIONI LINGUA REGOLAZIONE DATA E ORA • SUBWOOFER Attiva/Disattiva uscita pre • OSD Cambia la lingua dei menù di sistema. • Posizionarsi sulla voce da modificare ed effettuare subwoofer. le modifiche. • FILTRO Cambia taglio crossover subwoofer LANGUAGE SETTINGS 80/120/160 Hz. -
Página 9: Impostazioni Bluetooth
Selezionare la sorgente ed effettuare la regolazione • AUTO CONNESSIONE Attiva/Disattiva la RESET voluta. connessione automatica del telefono al VM069. Reset Factory reset • AUTO RISPOSTA Attiva/Disattiva la risposta automatica di una chiamata dopo il terzo squillo SOURCES VOLUME •... -
Página 10: Funzioni Radio
RADIO IT/EN FUNZIONI RADIO FUNZIONI RADIO RDS Ricompatta menù. Torna al menù principale. FM/AM Banda. Torna al primo menù. •••• Passa ad altre funzioni. • RDS (quando il servizio è disponibile). Ricerca automatica stazioni / Indietro. • AF frequenza alternativa. Cambia banda radio AM/FM. -
Página 11: Equalizzatore • Equalizer
RIPRODUZIONE • PLAYBACK EQUALIZZATORE • EQUALIZER IT/EN EQUALIZZATORE - LOUDNESS FADER - BILANCIAMENTO - SUB WOOFER FUNZIONI USB/SDCARD • Premere l’icona per modificare le Premere per accedere alle regolazioni. All’inserimento del supporto USB/SD verrà visualizza- impostazioni di fabbrica. Tramite le icone è Utilizzare le frecce presenti sullo schermo per le regola- to il contenuto sullo schermo. - Página 12 RIPRODUZIONE • PLAYBACK USB-SD CARD IT/EN RIPRODUZIONE VIDEO RIPRODUZIONE MUSICA RIPRODUZIONE MUSICA Toccare lo schermo per fare apparire il menù quando Ricompatta menù. •••• Estende il menù il filmato è in riproduzione. SHUFFLE Riproduzione casuale. LIST Torna all’elenco file. •••• Passa al secondo menù.
- Página 13 RIPRODUZIONE • PLAYBACK USB-SD CARD IT/EN RIPRODUZIONE IMMAGINI RIPRODUZIONE VIDEO RIPRODUZIONE IMMAGINI Ricompatta menù. Ricompatta menù. Selezionare il file desiderato per visualizzare l’im- LIST Torna all’elenco file. LIST Torna all’elenco file. magine. Per far comparire il menù premere la parte Ingradisce/Riduce l’immagine.
-
Página 14: Smartphone Link
• Follow the duplication wizard screen on the NETFLIX. tphone Android/iOS nello schermo del VM069 VM069, at the end lower or raise the phone’s drop- È supportata la condivisione di tutte le applicazioni E’ necessario verificare la compatibilità del proprio... -
Página 15: Impostazioni Bluetooth • Bluetooth-Settings
Research through mobile-phone: • Activate Bluetooth-function on the mobile-phone and search for new devices • Select VM069 from the List of Devices and digit Password 0000 on request. When pairing has taken place, phone-name will appear. Starting from the Bluetooth-Settings of the mobile-phone, activate the automatic connection of VM069. -
Página 16: Funzioni Bluetooth • Bluetooth-Functions
FUNZIONI BLUETOOTH • BLUETOOTH-FUNCTIONS IT/EN EFFETTUARE UNA CHIAMATA RICEVERE UNA CHIAMATA RIPRODUZIONE MUSICA BLUETOOTH • Selezionare Bluetooth dal menù principale. All’arrivo di una chiamata lo schermo passa in moda- Se il telefono connesso supporta il profilo A2DP è • Premere una delle icone presenti sullo schermo per lità... - Página 17 You can connect a rear-camera on the specific CAMERA-in- VM069 is compatible with navigation-types iGo 8 and iGo AV IN 2, and press related icon. put (on the back). The VM069 offers the possibility of au- Primo. tomatically visualizing the rear-camera, if you connect the Introduce SD-card into the GPS-port.
- Página 18 RESET INTERFACE Without separating the circuit from the current-supply, press PRG-key until the Green Led switches-off. LED will then flash for some seconds Red, then turn Green, until you select the model of the new car-radio. Le istruzioni delle interfacce sono presenti anche sul nostro sito WWW.PHONOCAR.IT area manuali. The Instructions-Manuals of our Interfaces are also available on our web-site WWW.PHONOCAR.IT Download-Manuals-Area.
- Página 19 BIANCO-MARRONE / WHITE-BROWN GRIGIO / GREY Il VM069 è dotato di Comandi al Volante Resistivi. In caso di incompatibilità, utilizzare le interfacce 04083 - 04085. Per i collegamenti ai connettori originali dell’auto seguire gli schemi presenti sul manuale connessioni interfacce.
- Página 20 KEY2 e così via per tutti gli altri tasti da program- comandi al volante della vettura. Effettuare questa operazione per tutti i com mare. Al termine di tutti i comandi il VM069 tornerà andi presenti sul volante e infine premere l’icona nella schermata iniziale. In caso di errore premere PAIR.
- Página 21 CONNEXIONS • ANSCHLÜSSE FR/D ENTRÉE ANTÉRIEURE A / V EINGANG FRONT A/V AUX IN 1 R FUSE AUX IN 1 L AUX IN VIDEO ANTENNA GPS GPS AERIAL DIGITALER EMPFÄNGER DAB BUS ENTRÉE RÉCEPTEUR NUMÉRIQUE COD. VM222 SORTIE JAUNE/GELB VIDEO / VIDEO-AUSGANG SORTIES PRE –...
- Página 22 Sur certaines voitures, pendant l’allumage, le VM069 peut s’ é teindre avant de se rallumer. Pour éviter cet inconvénient, brancher le temporisateur d’allumage 5/146. Auf einigen Wagen-Modellen kann es vorkommen, dass beim Anlassen des Motors, der VM069 sich von selbst ausschaltet und dann wieder einschaltet. Diesen Umstand kann man verhin-...
-
Página 23: Fonctions • Funktionen
FONCTIONS • FUNKTIONEN FR/D Öffnung für Navigations-SD Slot Carte SD pour navigation IR-Sensor Senseur IR Navigation Navigation Hauptmenü Menu principal Ein-/Ausschalten – Lautstärke – Stummschaltung Allumage/Extinction - Volume - Audio mis à zéro Bildschirm-Helligkeit Luminosité écran Reset Reset Öffnung für Multimedia-SD Slot Carte SD multimédia USB-Öffnung Port USB... - Página 24 MENÙ • MENÜ FR/D Retourne au Menu suivant. Retourne au Menu pricipale. À l’allumage de l’autoradio, le MENU principal apparaît. Zurück zum folgende Menü Zurück zum vorhergehenden Menü Avec les icônes sur l’écran on sélectionne la source ou la fonction désirée. Va au Menu suivant Beim Einschalten des Geräts erscheint das Haupt-MENÜ.
-
Página 25: Reglages De Systeme • System-Einstellungen
REGLAGES DE SYSTEME • SYSTEM-EINSTELLUNGEN FR/D Appuyer l’icône Setup sur le panneau du menu principal pour modifier les réglages suivants: généraux, vidéo, son, Date et Heure, Langue, Bluetooth, DVD, volume sources. / Auf dem Hauptmenü, die Ikone Setup wählen, um folgende Einstellungen zu ändern: Allgemein, Video, Klang, Datum und Uhrzeit, Sprache, Bluetooth, DVD, Quellen-Lautstärke. - Página 26 REGLAGES DE SYSTEME • SYSTEM-EINSTELLUNGEN FR/D REGLAGE DATE ET HEURE REGLAGES LANGUE • OSD Change la langue des menus de système. • SUBWOOFER Active/Désactive la sortie pre subwoo- • Se placer sur le paramètre à modifier et faire les fer. changements.
- Página 27 On peut régler le volume de chaque source afin • AUTO CONNEXION Active/Désactive la connexion d’éviter des écarts d’intensité durant le passage automatique du téléphone au VM069. d’une source à une autre. RESET • AUTO REPONSE Active/Désactive la réponse automa- Reset Werkseinstellungen tique d’un appel après le troisième bip...
-
Página 28: Fonctions Radio
RADIO FR/D FONCTIONS RADIO FONCTIONS RADIO Retourne au menu principal. Réassemble le menu. FM/AM Bande. Pour retourner au premier menu. •••• Passe à d’autres fonctions. •RDS Active/Désactive la fonction RDS. Recherche automatique stations/ Revient. •AF Recherche station alternative. Change bande radio AM/FM. •EON Active la radio à... -
Página 29: Egaliseur • Equalizer
EGALISEUR • EQUALIZER REPRODUCTION • WIEDERGABE FR/D EGALISEUR - LOUDNESS FADER - EQUILIBRAGE - SUB WOOFER FONCTIONS USB/SD CARD • Appuyer l’icône pour modifier les réglages • Appuyer pour accéder aux réglages. Lorsqu’un support USB/SD est inséré, le contenu est d’origine. - Página 30 REPRODUCTION • WIEDERGABE USB-SD CARD FR/D REPRODUCTION MUSIQUE REPRODUCTION MUSIQUE REPRODUCTION VIDEO •••• Menu Entier Réassemble le menu. Touchez l’ é cran pour afficher le menu lorsque le video LIST Retourne à la liste des fichiers. SHUFFLE Reproduction casuelle. est en cours de lecture. Lance/Interrompt la reproduction.
-
Página 31: Riproduzione Video
REPRODUCTION • WIEDERGABE USB-SD CARD FR/D RIPRODUZIONE VIDEO REPRODUCTION DES IMAGES REPRODUCTION DES IMAGES Réassemble le menu. Sélectionner le fichier désiré pour visualiser l’image. Réassemble le menu. LIST Retourne à la liste des fichiers. Pour faire apparaître le menu, appuyer la partie infé- LIST Retourne à... -
Página 32: Smartphone Link
über Bluetooth mit dem VM069 verbinden (siehe Seite • Suivre la procédure de duplication d’écran sur le 33). VM069, à la fin, baisser ou lever le menu déroulant iOS SMARTPHONELINK-Funktion du portable et activer le dédoublement. • Sélectionner dans la page-écran qui apparait le •... -
Página 33: Reglages Bluetooth • Bluetooth-Einstellungen
Suche mittels Telefon: • Auf dem Mobil-Telefon, Bluetooth-Funktion aktivieren. Dann neue Vorrichtungen suchen. • Aus der betreffenden Liste, die Vorrichtung VM069 wählen. Auf Anfrage, das Passwort 0000 eingeben. Sobald die Koppelung erfolgt ist, erscheint der Name des Mobil-Telefons. Innerhalb der Bluetooth-Einstellun- gen des Mobil-Telefons, die automatische Verbindung des VM069 aktivieren.. - Página 34 REGLAGES BLUETOOTH • BLUETOOTH-EINSTELLUNGEN FR/D EFFECTUER UN APPEL RECEVOIR UN APPEL REPRODUCTION MUSIQUE BLUETOOTH • Sélectionner Bluetooth à partir du menu principal. A l’ e ntrée d’un appel, l’ é cran va en modalité bluetooth Si le téléphone branché supporte le profil AD2P, c’est •...
-
Página 35: Camera De Recul
La reproduction de deux sources externes branchée C’ e st possible brancher une caméra de recul à l’ e ntrée Le VM069 est compatible avec la navigation iGo 8 et aux entrées AV IN 1 (en façade) et AV 2 (postérieure) prédisposée CAMERA (postérieure). - Página 36 INTERFACE-RESET Ohne den Kreislauf vom Strom zu trennen, PRG so lange gedrückt halten, bis das GRÜNE Led erlischt. Nun wird das Led, für ein paar Sekunden, ROT blinken, dann auf GRÜN schalten, bis man das neue Autoradio-Modell wählt. Les instruction des interfaces sont aussi présentes dans notre site Internet WWW.PHONOCAR.IT zone Notices d’utilisation. Die Anweisungen der Interface sind auch auf unserer Home-Page www.phonocar.de erhältlich (Info-Sektor-zum Herunterladen-Betriebsanleitungen)..
- Página 37 BLANCHE-MARRON / WEISS-BRAUN GRIS/GRAU Le VM069 est intégré des commandes au volant Résistives. En cas d’incompatibilité, utiliser les interfaces 4/083 - 4/085. Pour les branchements aux connecteurs originaux de la voiture, suivre les schémas présents sur les instructions de connexion des interfaces.
- Página 38 PAIR drücken, und so weiter für alle weiteren Funktionen. drücken. Am Ende angelangt, geht der VM069 auf die Anfangs- Seite zurück. Sollten sich Fehler ergeben, auf die Ikone RESET drücken: die eingegebenen Daten werden gelöscht und die Programmierung kann ganz neu...
-
Página 39: Conexiones
CONEXIONES ENTRADA ANTERIOR A/V AUX IN 1 R FUSE AUX IN 1 L AUX IN VIDEO DIGITAL RADIO RECEIVER DAB BUS SALIDA RECEPTOR DIGITAL COD. VM222 AMARILLO VIDEO OUT SALIDA VIDEO SALIDAS PRE-AMP ROJO AV IN DERECHO BLANCO ENTRADA A/V 2 AV IN IZQUIERDO AMARILLO... -
Página 40: Conexiones Y Programacion Ver Pag
NEGRO Masa BLACK MARRÓN ILLUMI Iluminación / Dimmer AZUL AMP/ANT Remote Encendido antena eléctrica En algunos coches durante el arranque del motor el VM069 podría apagarse y después encenderse. Para evitar esta molestias conectar el temporizador de encendido art. 5/146. - Página 41 FUNCIÓNES Ranura SD Card para la navegación Sensor IR Navegación Menú principal Encendido/ Apagado - Volumen - Mute Audio Brillo pantalla Reset Ranura SD Card multimedia Puerto USB 10. A/V AUX-IN...
- Página 42 MENÙ Pasa al Menú siguiente Pasa al Menú principal Al encender el coche aparece en el menú principal. Con los iconos que aparecen en pantalla para seleccionar la fuente o la función deseada. Pasa al Menú siguiente Pasa al Menú precedente Pasa al Menú...
-
Página 43: Ajustes Del Sistema
AJUSTES DEL SISTEMA Presionar el icono Setup en la pantalla del menú principal para modificar los siguientes ajustes: generales, video, sonido, fecha y horario, idioma, Bluetooth, DVD, volumen fuentes. VIDEO SONIDO • PARKING Activa/Desactiva la visión en movimiento • SUBWOOFER Activa/Desactiva salida pre de los videos. -
Página 44: Configuracion Fecha Y Hora
• Posicionarse y efectuar los ajustes. bluetooth. • AUTO CONEXION Activa/Desactiva la conexión automática del teléfono al VM069. • AUTO CONTESTACIÓN Activa/Desactiva la respuesta automática de una llamada después del tercer timbrazo • ACC configura el código de emparejamiento que se digita en el teléfono (código de fábrica 0000). -
Página 45: Ecualizador
RADIO ECUALIZADOR FUNZIONI RADIO RDS EQUALIZADOR - LOUDNESS FUNCIÓNES RADIO Re-compacta menú. Presionar el icono para modificar los ajustes de Vuelve al menú principal. fábrica. Mediante los iconos es posible seleccionar Para volver al primer menú. FM/AM Banda. 8 diferentes modos de ecualización pre ajustados: •... -
Página 46: Reproducción Usb-Sd Card
REPRODUCCIÓN USB-SD CARD FUNCIÓNES USB/SDCARD REPRODUCCIÓN MUSICA REPRODUCCION VIDEO Tocar la pantalla para que aparezca el menú cuando la Introduciendo una USB/SD será visualizado el •••• contenido en la pantalla. película se está reproduciendo. LIST Vuelve al listado de los archivos. Si están presentes canciones la reproducción iniciará... -
Página 47: Reproduccion Video
REPRODUCCIÓN USB-SD CARD REPRODUCCION IMÁGENES REPRODUCCION VIDEO REPRODUCCION IMÁGENES Re-compacta menú. Re-compacta menú. Seleccionar el archivo deseado para visualizar la LIST Vuelve al listado de los archivos. LIST Vuelve al listado de los archivos. imagen. Para que aparezca el menú presionar la Para desanchar la imagen (zoom). - Página 48 3) HOTSPOT PERSONAL (habilitar la función). • Seguir el procedimiento guiado para la duplicación de la pantalla para su visión en el monitor del VM069, una vez terminado, bajar el SMARTPHONE LINK menú a cortina del teléfono (o bien subir dependiendo de la versión) y activar la función...
-
Página 49: Configuracción Bluetooth
• Activar la función bluetooth en el teléfono y buscar para llamar desde el listado. en nuevos dispositivos. llamadas recibidas Llamadas pérdidas • Seleccionar VM069 en la lista dispositivos, Llamadas efectuadas contactos telefónico Introducir la password 0000 cuando sea solicitada. (Debe haber sido sincronizada con anterioridad). -
Página 50: Recibir Una Llamada
CONFIGURACCIÓN BLUETOOTH RECIBIR UNA LLAMADA REPRODUCCION MUSICA BLUETOOTH A la llegada de una llamada la pantalla pasa al modo Si el teléfono conectado soporta el perfil AD2P es bluetooth visualizando el número de la llamada posible escuchar los temas musicales. entrante y el nombre si esta sincronizado en los Si el dispositivo soporta AVRCP será... - Página 51 Código cartografía: EUROPA NV980 Es posible visualizar la reproducción de dos fuentes Es posible conectar una retro-cámara a la entrada El VM069 es compatible con la navegación iGo 8 e exteriores conectadas a las entradas AV IN 1 (frontal) específica CAMERA (posterior).
- Página 52 Las instrucciones de los interfaces se pueden encontrar en la Web de Phonocar: sido realizado correctamente el Led realizará un único destello de color Rojo. WWW.PHONOCAR.ES área manuales. Las instrucciones de los interfaces se pueden encontrar en la Web de Phonocar: WWW.PHONOCAR.ES área manuales.
-
Página 53: Programacion Mandos De Volante En El Autoradio
Una vez terminada la operación de programación de las teclas el VM069 volverá a la pantalla inicial. En PAIR. caso de error presionar el icono RESET para volver a configurar nuevamente las teclas. - Página 54 CARATTERISTICHE TECNICHE • TECHNICAL FEATURES • CARACTERISTIQUES TECHNIQUES TECHNISCHE DATEN • CARACTERISTICAS TECNICAS • Monitor 6,2” TFT/LCD WIDE TOUCH SCREEN HIGH SENS • Interfaccia grafica dinamica / Dynamic graphic interface • Risoluzione / Resolution 800x480 pixel • Illuminazione tasti / Red colour keys light •...
- Página 56 The end-user is requested to carry the appliance and its related battery, with no cost, to the municipal waste-recycling-spots for electrical and electronic parts, or take them to the related Retailer shop. Recycling-spots help to avoid negative effects on the environment & health and promote the re-use and/or recycling of the various materials. For further information, please read homepage www.phonocar.it 4 10R - 042875 PHONOCAR S.p.a.