Beurer EM 49 Instrucciones De Uso
Ocultar thumbs
Ver también para EM 49:
- Instrucciones de uso (19 páginas) ,
- Instrucciones de uso (92 páginas) ,
- Instrucciones de uso (148 páginas)
Tabla de contenido
Publicidad
Idiomas disponibles
Idiomas disponibles
DE Digital EMS/TENS
Gebrauchsanweisung ....................................2
EN Digital EMS/TENS unit
Instructions for use ......................................21
FR Appareil EMS/TENS numérique
Mode d'emploi .............................................38
ES Aparato digital TENS/EMS
Instrucciones de uso ...................................57
IT EMS/TENS digitale
Istruzioni per l'uso .......................................76
TR Dijital EMS/TENS
Kullanım kılavuzu .........................................94
RU Тренажер для мышц живота
EMS/TENS
Инструкция по применению ....................111
PL Cyfrowe urządzenie do elektrycznej
stymulacji mięśni i nerwów
Instrukcja obsługi .......................................130
EM 49
Publicidad
Capítulos
Tabla de contenido

Manuales relacionados para Beurer EM 49


Resumen de contenidos para Beurer EM 49
- Página 1 EM 49 DE Digital EMS/TENS Gebrauchsanweisung ........2 EN Digital EMS/TENS unit Instructions for use ........21 FR Appareil EMS/TENS numérique Mode d’emploi ..........38 ES Aparato digital TENS/EMS Instrucciones de uso ........57 IT EMS/TENS digitale Istruzioni per l‘uso ........76 TR Dijital EMS/TENS Kullanım kılavuzu .........94...
-
Página 2: Tabla De Contenido
Lesen Sie diese Gebrauchsanweisung aufmerksam durch, bewahren DEUTSCH Sie sie für den späteren Gebrauch auf, machen Sie sie anderen Be- nutzern zugänglich und beachten Sie die Hinweise. Inhaltsverzeichnis Zeichenerklärung 1. Zum Kennenlernen ................3 2. Wichtige Hinweise ................5 WARNUNG 3. Gerätebeschreibung ................7 Warnhinweis auf Verletzungsgefahren oder Gefahren 4. -
Página 3: Lieferumfang Und Zubehör
4 x Klebeelektroden (45 x 45 mm) Die CE-Kennzeichnung bescheinigt die Konformität mit den grund- legenden Anforderungen der Richtlinie 93/42/EEC für Medizinpro- 3 x AAA-Batterien dukte. Hersteller 1. Zum Kennenlernen Was ist und kann Digital EMS/TENS? Effektive Ausgangswerte über 10mA gemittelt über jedes Digital EMS/TENS gehört zur Gruppe der Elektrostimulationsgeräte. - Página 4 Unter TENS, der transkutanen elektrischen Nervenstimulation, wendung) und zum anderen kann auch eine entspannende, erholen- versteht man die über die Haut wirkende elektrische Anregung von de Wirkung (relaxierende Anwendung) erzielt werden. Nerven. TENS ist als klinisch erwiesene, wirksame, nicht-medika- Zur aktivierenden Anwendung gehören: mentöse, bei richtiger Anwendung nebenwirkungsfreie Methode •...
-
Página 5: Wichtige Hinweise
2. Wichtige Hinweise zess befindliche Wunden, an Operationsnarben die in der Heilung begriffen sind) Eine Anwendung des Gerätes ersetzt keine ärztliche Konsulta- • In Umgebungen mit hoher Feuchtigkeit wie z.B. im Badezimmer tion und Behandlung. Befragen Sie bei jeder Art von Schmerz oder beim Baden oder Duschen oder Krankheit deshalb immer zunächst Ihren Arzt! •... - Página 6 • Zur äußerlichen Anwendung mit den Elektroden gelangen können. Sollten Sie im Bereich der • Mit den mitgelieferten und nachbestellbaren Original-Zubehörtei- Anwendung Schmuck oder Piercings (z.B. Bauchnabelpiercing) len, ansons ten erlischt der Garantieanspruch tragen, müssen Sie die se vor dem Gebrauch des Gerätes entfer- nen, da es sonst zu punktuellen Verbrennungen kommen kann.
-
Página 7: Gerätebeschreibung
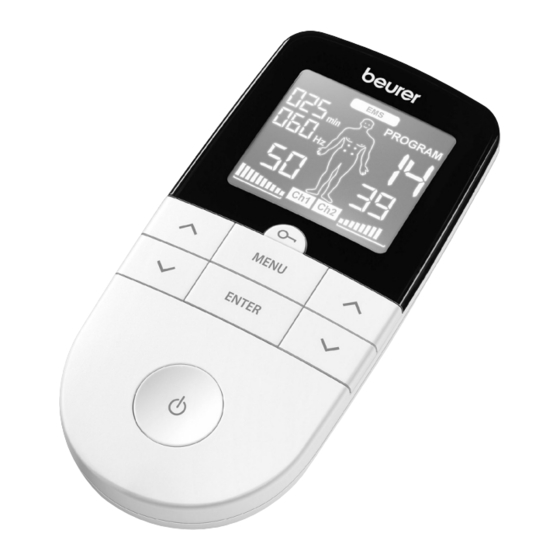
3. Gerätebeschreibung Beschädigung • Benutzen Sie das Gerät bei Beschädigungen nicht und wen den Sie sich an Ihren Händler oder an die angegebene Kundendienst- adresse. Tasten: • Zur Gewährleistung der wirkungsvollen Funktion des Gerätes sollte 1 Taste EIN/AUS es nicht fallengelassen oder zerlegt werden. 2 Taste ENTER •... -
Página 8: Inbetriebnahme
4. Inbetriebnahme 5. Anwendung 1. Nehmen Sie den Gürtelclip, falls aufgesteckt, vom 5.1 Hinweise zur Anwendung Gerät ab. • Wird das Gerät 1 Minute lang nicht verwendet, schaltet es sich 2. Drücken Sie auf die Batteriefachabdeckung auf automatisch ab (Abschaltautomatik). Bei erneutem Einschalten der Rückseite des Gerätes und schieben Sie sie erscheint der LCD-Bildschirm der Menüauswahl, wobei das zu- nach unten. -
Página 9: Allgemeine Information
˄/˅ 6. Programmübersicht Schritt 6: Wählen Sie mit den linken und rechten -Einstelltas- ten jeweils für Ihre gewünschte Impulsintensität. Die Das Digital EMS/TENS verfügt insgesamt über 70 Programme: Anzeige der Impuls intensität im Display passt sich entsprechend an. • 15 TENS-Programme Befindet sich das Programm in einer Pause-Phase, kann die Intensi- •... -
Página 10: Ems-Programmtabelle
6.2 EMS-Programmtabelle Progr.- Sinnvolle Anwendungs bereiche, Indikationen Laufzeit Mögliche (Min.) Elektroden- Progr.- Sinnvolle Anwendungs bereiche, Indikationen Laufzeit Mögliche platzierung (Min.) Elektroden- Maximierung der Kraft der Rückenmuskulatur 4-11 platzierung Spannkraft der Gesäß muskulatur Aufwärmen 1-27 Stärkung der Gesäßmuskulatur Kapillarisierung 1-27 Maximierung der Kraft der Gesäß muskulatur Stärkung der oberen Armmuskulatur 12-15 Maximierung der Kraft der oberen Armmus-... -
Página 11: Massage-Programmtabelle
6.3 MASSAGE-Programmtabelle Progr.- Sinnvolle Anwendungs bereiche, Indikationen Laufzeit Mögliche (Min.) Elektroden- platzierung Klopfmassage 1 Klopfmassage 2 Klopfmassage 3 Knetmassage 1 Knetmassage 2 Druckmassage Entspannende Massage 1 Entspannende Massage 2 Entspannende Massage 3 Entspannende Massage 4 1-28 Spa Massage 1 Spa Massage 2 Spa Massage 3 Spa Massage 4 Spa Massage 5... -
Página 12: Hinweise Zur Elektrodenplatzierung
6.4 Hinweise zur Elektrodenplatzierung... -
Página 13: Individualisierbare Programme
Eine sinnvolle Platzierung der Elektroden ist für den beabsichtigten oder Sie legen eine Elektrode direkt auf den Schmerzpunkt und Erfolg einer Stimulations-Anwendung wichtig. die andere legen Sie mindestens 2 – 3 cm entfernt an. Wir empfehlen Ihnen die optimalen Elektrodenpositionen an Ihrem Die Elektroden des zweiten Kanals können zur gleichzeitigen beabsichtig ten Anwendungsgebiet mit Ihrem Arzt abzustimmen. - Página 14 ˄/˅ 4. Wählen Sie mit den -Einstelltasten Ihre gewünschte Impuls- 2. Wählen Sie das Programm TENS 15 wie unter Kapitel „5.2 An- breite und bestätigen Sie mit der ENTER-Taste. wendung beginnen“ (Schritt 3 bis Schritt 5) beschrieben. ˄/˅ ˄/˅ 5.Wählen Sie mit den -Einstelltasten Ihre gewünschte Behand- 3.
-
Página 15: Doctor's Function
˄/˅ 1. Platzieren Sie die Elektroden im gewünschten Zielbereich (Plat- 4. Wählen Sie mit den -Einstelltasten Ihre gewünschte Pausen- zierungsvorschläge siehe Elektrodenplatzierungen Kapitel 6.4) zeitdauer („off time“) und bestätigen Sie mit der ENTER-Taste. ˄/˅ und verbinden Sie diese mit dem Gerät. 5. -
Página 16: Stromparameter
9.2 Impulsfrequenz 5 Sekunden lang gedrückt, die Impulsintensität von Die Frequenz gibt die Anzahl der Einzelimpul- muss hierbei auf 00 gestellt sein. Die Löschung der Doctor’s Func- se pro Sekunde an, ihre Angabe erfolgt in Hz tion wird durch einen langen Signalton bestätigt. (Hertz). -
Página 17: Zyklusgesteuerte Impulsparameter-Variation
9.5 Zyklusgesteuerte Impulsparameter-Variation Aufbewahrung • Entnehmen Sie die Batterien aus dem Gerät, wenn Sie es längere In vielen Fällen ist es erforderlich durch die Anwendung mehrerer Zeit nicht benutzen. Auslaufende Batterien können das Gerät be- Impuls para meter die Gesamtheit der Gewebestrukturen am Anwen- schädigen. -
Página 18: Ersatz- Und Verschleißteile
14. Technische Angaben mit dem Gerät verbunden ist. (3) EIN/AUS-Taste drücken, um das Programm erneut zu starten. Name und Modell EM 49 (4) Überprüfen Sie die Elektrodenplatzierung bzw. achten Sie darauf, EM 49 dass sich die Klebeelektroden nicht überlappen. Ausgangs-Kurvenform biphasische Rechteckimpulse (5) Impulsintensität schrittweise erhöhen. -
Página 19: Hinweise Zu Elektromagnetischer Verträglichkeit
Kaufes zu führen. Die Garantie ist innerhalb eines Zeitraumes von 5 ßen unter Umständen nur in eingeschränktem Maße nutzbar sein. Jahren ab Kaufdatum gegenüber der Beurer GmbH, Ulm (Germany) Infolgedessen können z.B. Fehlermeldungen oder ein Ausfall des geltend zu machen. - Página 20 Bitte wenden Sie sich im Falle von Reklamationen an unseren Service unter folgendem Kontakt: Service Hotline: Tel.: +49 (0) 731 / 39 89-144 E-Mail: kd@beurer.de www.beurer.com Fordern wir Sie zur Übersendung des defekten Produktes auf, ist das Produkt an folgende Adresse zu senden:...
- Página 21 Read these instructions for use carefully and keep them for later ENGLISH use, be sure to make them accessible to other users and observe the information they contain. Table of contents Signs and symbols 1. Getting to know your device ..............22 2.
-
Página 22: Getting To Know Your Device
4 x adhesive electrodes (45 x 45 mm) The CE labelling certifies that the product complies with the essential requirements of Directive 93/42/EEC on medical 3 x AAA batteries products. Manufacturer 1. Getting to know your device What is a digital EMS/TENS unit and what can it The device can emit effective output values above 10 mA, averaged over every five-second interval Digital EMS/TENS units fall into the electrostimulation device... -
Página 23: Important Notes
TENS, or transcutaneous electrical nerve stimulation, relates • Muscle training to support the strengthening of specific muscles to the electrical stimulation of the nerves via the skin. TENS is or muscle groups, and to achieve the desired changes to physical an effective non-pharmacological method of treating different proportions types of pain that have a variety of causes. -
Página 24: Important
• If you use an insulin pump Before using the device, consult your doctor if any of the • If you have a high temperature (e.g. > 39°C) following applies to you: • If you have a known or acute cardiac arrhythmia, or disorders of •... - Página 25 • For hygiene reasons, the electrodes may only be used on one • Treatment of the skin with moisturising lotions or ointments person. beforehand is not recommended as this considerably increases • If the device does not work properly, or you feel unwell or the electrode wear and may cause unpleasant current peaks.
-
Página 26: Device Description
Display (full screen): • Choking hazard! Small children may swallow and choke on 1 Menu batteries. Store the batteries out of the reach of small children. 2 Program number • Observe the plus (+) and minus (-) polarity signs. 3 Impulse intensity channel 2 ( •... -
Página 27: Use
5. Use intensity in the display changes accordingly. If the program is in a pause phase, the intensity cannot be increased. 5.1 Notes on use • The device switches itself off automatically if it is not used for General information one minute (automatic switch-off). -
Página 28: Program Overview
6. Program overview 6.2 EMS program table The digital EMS/TENS unit features a total of over 70 programs: Progr. Area of application, indications Running time Possible • 15 TENS programs (min) electrode positions • 35 EMS programs Warming up 1-27 •... -
Página 29: Massage Program Table
6.3 MASSAGE program table Progr. Area of application, indications Running time Possible (min) electrode Progr. Area of application, indications Running Possible positions time (min) electrode Tightening the shoulder muscles positions Strengthening the lower back muscles 4-11 Tapping massage 1 Maximising the strength of the lower back 4-11 Tapping massage 2 muscles... -
Página 30: Information Regarding The Positioning Of Electrodes
6.4 Information regarding the positioning of electrodes... -
Página 31: Customisable Programs
It is fundamental to the intended success of electrostimulation electrodes of a channel so that the area affected by the pain applications that electrodes are positioned sensibly. is between the electrodes or to position one electrode directly We recommend that you consult your doctor to establish the ideal on the area affected by the pain and the other electrode at a electrode positions for your intended application area. - Página 32 ˄/˅ 1. Place the electrodes on the desired area for treatment (for 3. Use the setting buttons to select the impulse frequency you positioning suggestions see electrode positions in section 6.4) want and use the ENTER button to confirm. ˄/˅ and connect them to the device.
-
Página 33: Doctor's Function
˄/˅ working time and pause time for this program to between 1 and 30 3. Use the setting buttons to select the working time ("on seconds each. time") you want and use the ENTER button to confirm. ˄/˅ 4. Use the setting buttons to select the pause time ("off time") 1. -
Página 34: Current Parameters
Deletion of the Doctor’s function is confirmed with a long acoustic more easily to lower impulse frequencies up to 15 Hz, whereas fast- signal. reacting fibres only respond from approximately 35 Hz onwards. Impulses of approx. 45 – 70 Hz are linked with constant tension in Therapy memory the muscles and quicker fatigue. -
Página 35: Cleaning And Storage
10. Cleaning and storage electronics retailers. You are legally required to dispose of the batteries. Adhesive electrodes Note: The codes below are printed on • To ensure that the adhesive electrodes remain adhesive for as batteries containing harmful substances: long as possible, clean them carefully with a damp, lint-free cloth Pb = Battery contains lead, Cd = Battery contains or clean the underside of the electrodes under lukewarm, running cadmium, Hg = Battery contains mercury. -
Página 36: Replacement Parts And Wearing Parts
Please note that portable and 14. Technical specifications mobile HF communication systems may interfere with this unit. Name and model EM 49 More details can be requested from the stated Customer Services Type EM 49 address or found at the end of the instructions for use. -
Página 37: Notes On Electromagnetic Compatibility
The following warranty terms shall apply: for medical products, as well as those of the Medizinproduktegesetz 1. The warranty period for BEURER products is either 5 years or- if (German Medical Devices Act). longer- the country specific warranty period from date of Purchase. - Página 38 Lisez attentivement ce mode d’emploi, conservez-le pour un usage FRANÇAIS ultérieur, mettez-le à disposition des autres utilisateurs et suivez les consignes qui y figurent. Table des matières Symboles utilisés 1. Familiarisation avec l’appareil ............39 2. Conseils importants ................41 AVERTISSEMENT 3. Description de l’appareil ..............43 Ce symbole vous avertit des risques de blessures ou 4.
-
Página 39: Familiarisation Avec L'appareil
Le sigle CE atteste de la conformité aux exigences 4 électrodes autocollantes (45 x 45 mm) fondamentales de la directive 93/42/CEE relative 3 piles AAA aux dispositifs médicaux. Fabricant 1. Familiarisation avec l’appareil Qu’est-ce qu’un appareil EMS/TENS numérique et Des valeurs de sortie supérieures à 10 mA ou 10 V sur chaque intervalle de 5 s peuvent être émises par à... - Página 40 un entraînement musculaire régulier mais elle en complète l’effet de tions peut susciter un renforcement ciblé de la musculature (utilisa- façon judicieuse. tion active) et l’autre direction peut produire un effet de détente et de récupération (utilisation relaxante). Par TENS, la stimulation nerveuse électrique transcutanée, on L’utilisation active comprend : entend l’excitation électrique des nerfs par la peau.
-
Página 41: Conseils Importants
2. Conseils importants • dans des environnements à humidité élevée, par ex. dans la salle de bain ou en prenant un bain ou une douche L’utilisation de l’appareil ne remplace pas une consultation et • ne pas utiliser après avoir consommé de l’alcool un traitement médicaux. -
Página 42: Mesures De Précaution
MESURES DE PRÉCAUTION : vous devez les retirer avant d’utiliser l’appareil car ils pourraient provoquer des brûlures locales. • Afin d’éviter de blesser les peaux les plus sensibles (cas extrême- • Gardez l’appareil éloigné des enfants afin d’éviter les éventuels ment rare), tirez toujours modérément sur les électrodes pour les dangers. -
Página 43: Description De L'appareil
3. Description de l’appareil Dommages • Si l’appareil est endommagé, ne l’utilisez pas et adressez-vous à votre revendeur ou au service client indiqué. Touches : • Pour assurer le bon fonctionnement de l’appareil, celui-ci ne doit 1 Touche MARCHE/ARRÊT pas être heurté ni démonté. 2 Touche ENTER •... -
Página 44: Mise En Service
4. Mise en service 5. Utilisation 1. S’il est fixé, détachez le clip ceinture de l’appareil. 5.1 Conseils d’utilisation 2. Appuyez sur le couvercle du compartiment à piles • S’il n’est pas utilisé pendant 1 minute, l’appareil s’arrête automa- à l’arrière de l’appareil et glissez-le vers le bas. tiquement (arrêt automatique). -
Página 45: Informations Générales
˄/˅ 6. Programmes proposés Étape 6 : À l’aide des touches de réglage gauche et droite choisissez l’intensité d’impulsion souhaitée pour L’appareil EMS/TENS numérique dispose au total de plus de 70 pro- L’affichage de l’intensité d’impulsion s’adapte en fonction. Si le pro- grammes : gramme se trouve dans une phase de pause, l’intensité... -
Página 46: Tableau Des Programmes Ems
6.2 Tableau des programmes EMS N° de Domaines d’application utiles, indications Durée de Placements prog. course (min.) possibles N° de Domaines d’application utiles, indications Durée de Placements des électro- prog. course (min.) possibles des électro- Raffermissement des muscles du bas de 26, 27 la jambe Chauffer... -
Página 47: Tableau Des Programmes De Massage
6.3 Tableau des programmes de MASSAGE N° de Domaines d’application utiles, indications Durée de Placements prog. course possibles (min.) des électro- Massage par tapotement 1 Massage par tapotement 2 Massage par tapotement 3 Massage par friction 1 Massage par friction 2 Massage par pression Massage relaxant 1 Massage relaxant 2... -
Página 48: Consignes De Mise En Place Des Électrodes
6.4 Consignes de mise en place des électrodes... -
Página 49: Programmes Personnalisables
Pour obtenir l’effet escompté de la stimulation, il est important de Lors du traitement de la douleur (TENS) au moyen de l’appareil placer les électrodes de manière judicieuse. EMS/TENS numérique et de ses 2 canaux à réglage séparé et Nous vous recommandons de définir les positions optimales des de leurs 2 électrodes autoadhésives, il est conseillé... - Página 50 2. Choisissez le programme TENS 13 comme décrit au chapitre 1. Placez les électrodes sur la zone cible choisie (cf. Placements « 5.2 Mise en service « (étapes 3 à 5). des électrodes au chapitre 6.4 pour des propositions de place- ˄/˅...
-
Página 51: Fonction Docteur
ce programme, vous pouvez également régler la durée de travail et 2. Choisissez le programme EMS 35 comme décrit au chapitre « 5.2 la durée de pause de 1 à 30 secondes. Mise en service « (étapes 3 à 5). ˄/˅... -
Página 52: Paramètres Électriques
Mémoire de la thérapie répondent plutôt à de basses fréquences d’impulsion jusqu’à 15 Hz, L‘EM 49 enregistre la durée de traitement. Pour accéder à la mé- les fibres qui réagissent rapidement s’activent seulement à partir de moire de la thérapie, allumez l‘appareil en appuyant sur la touche 35 Hz environ. -
Página 53: Variation Des Paramètres D'impulsion Commandés Par Le Cycle
9.5 Variation des paramètres d’impulsion commandés Stockage • Si vous ne comptez pas l’utiliser avant longtemps, retirez les piles par le cycle de l’appareil. Des piles qui fuient peuvent endommager l’appareil. Dans de nombreux cas, l’ensemble des structures de tissu doit être •... -
Página 54: Pièces De Rechange Et Consommables
(3) Appuyez sur la touche MARCHE/ARRÊT pour redémarrer le 14. Caractéristiques techniques programme. Nom et modèle EM 49 (4) Vérifiez l’emplacement des électrodes et vérifiez que les électro- des autoadhésives ne se chevauchent pas. Type EM 49 (5) Augmentez progressivement l’intensité des impulsions. -
Página 55: Informations Sur La Compatibilité Électromagnétique
Les conditions de garantie suivantes s’appliquent : • L’appareil est prévu pour fonctionner dans tous les environnements 1. La période de garantie des produits BEURER est de 5 ans ou, si indiqués dans ce mode d’emploi, y compris dans un environnement elle est plus longue, elle est applicable dans le pays concerné... - Página 56 3. La garantie n’est pas valable en cas de dommages dus : a. à une utilisation inappropriée, par exemple le non-respect des instructions par l’utilisateur ; b. à des réparations ou des modifications réalisées par le client ou par une personne non autorisée ; c.
- Página 57 Lea atentamente estas instrucciones de uso, consérvelas para su ESPAÑOL futura utilización, póngalas a disposición de otros usuarios y respete las indicaciones. Índice Símbolos 1. Información general ................58 2. Indicaciones importantes ..............60 ADVERTENCIA 3. Descripción del aparato ..............62 Indicación de advertencia sobre peligro de lesiones o 4.
-
Página 58: Artículos Suministrados Y Accesorios
El sello CE certifica que este aparato cumple con los 4 electrodos adhesivos (45 x 45 mm) requisitos establecidos en la Directiva 93/42/CEE rela- 3 pilas AAA tiva a los productos sanitarios. 1. Información general Fabricante ¿Qué es el aparato digital TENS/EMS y para qué El aparato puede emitir valores de salida efectivos sirve? superiores a 10 mA como media en intervalos de 5... - Página 59 habitual en los músculos, pero es una práctica forma de comple- musculatura (efecto activador) y, por otro, también puede obtenerse mentarlo. un efecto tranquilizante y reparador (efecto relajante). Como efecto activador: Por TENS, estimulación nerviosa transcutánea, se entiende la • Entrenamiento muscular para aumentar la resistencia y/o estimulación eléctrica de los nervios a través de la piel.
-
Página 60: Indicaciones Importantes
2. Indicaciones importantes siones, hinchazones, heridas abiertas o en proceso de curación, o en cicatrices postoperatorias en fase de curación) La utilización del aparato no exime de acudir al médico ni de • En entornos con un nivel de humedad elevado, como el cuarto de seguir el tratamiento que este le indique. -
Página 61: Medidas De Precaución
• De forma externa en el ombligo) en la zona de aplicación, deberá quitárselos antes • Con los accesorios originales que incluye o de postventa; de lo de utilizar el aparato, dado que podrían producirle quemaduras. contrario, la garantía queda invalidada •... -
Página 62: Descripción Del Aparato
3. Descripción del aparato Deterioro • No utilice este aparato en el caso de que presente daños y diríjase a su distribuidor o a la dirección de atención al cliente indicada. Teclas: • Para garantizar el funcionamiento eficaz del aparato, no deberá 1 Tecla ON/OFF desmontarlo y deberá... -
Página 63: Puesta En Funcionamiento
4. Puesta en funcionamiento 5. Aplicación 1. Retire el clip para el cinturón del aparato si está 5.1 Indicaciones de utilización colocado. • Si el aparato no se utiliza por espacio de 1 minuto, se desconec- 2. Presione la tapa del compartimento de pilas en la tará... -
Página 64: Visión General De Los Programas
6. Visión general de los programas Paso 6: Seleccione con las teclas de ajuste izquierda y derecha ˄/˅ para la intensidad de impulso que desee. En la El Digital EMS/TENS ofrece un total de 70 programas: pantalla se adaptará correspondientemente la indicación de la inten- •... -
Página 65: Tabla De Programas Ems
6.2 Tabla de programas EMS N.° Campos de aplicación adecuados, Duración Posible progr. indicaciones (min.) posiciona- N.° Campos de aplicación adecuados, Duración Posible miento de progr. indicaciones (min.) posiciona- electrodos miento de Conformación de los músculos de la pierna 26, 27 electrodos Tensado de los músculos de la pierna 26, 27... -
Página 66: Tabla De Programas Massage
6.3 Tabla de programas MASSAGE N.º de Campos de aplicación adecuados, indica- Duración Posible prog. ciones (min.) posiciona- miento de electrodos Masaje por golpeteo 1 Masaje por golpeteo 2 Masaje por golpeteo 3 Masaje de fricción 1 Masaje de fricción 2 Masaje de presión Masaje relajante 1 Masaje relajante 2... -
Página 67: Indicaciones Para La Colocación De Los Electrodos
6.4 Indicaciones para la colocación de los electrodos... -
Página 68: Programas Individualizables
Colocar correctamente los electrodos es importante para obtener transversal a la dirección de las fibras. Para el último caso los elec- los resultados deseados con la aplicación de estimulación. trodos pueden colocarse p. ej. en cruz (= transversalmente), p. ej. Es recomendable consultar con el médico cuáles son las posiciones A –... - Página 69 1. Coloque los electrodos en la zona de aplicación deseada (para Programa TENS 15 sugerencias sobre la colocación, consulte el capítulo “6.4 Indi- El programa TENS 15 es un programa que se puede personalizar. caciones para la colocación de los electrodos”) y conéctelos al En este programa se puede ajustar la frecuencia de los impulsos aparato.
-
Página 70: Función Doctor
Programa EMS 34 1. Coloque los electrodos en la zona de aplicación deseada (para El programa EMS 34 es un programa que se puede personalizar. En sugerencias sobre la colocación, consulte el capítulo 6.4) y co- este programa se puede ajustar la frecuencia de los impulsos entre néctelos al aparato. -
Página 71: Parámetros De Corriente
señal acústica prolongada confirma que el ajuste se ha guardado bifásicos la corriente de estimulación cambia de dirección alterna- en la Función Doctor. tivamente. Al volver a encender el aparato se accede directamente al progra- En el Digital EMS/TENS se producen exclusivamente corrientes de ma almacenado con la función Doctor. -
Página 72: Variación Cíclica De Parámetros De Impulsos
lleo es señal de que la energía de estimulación es suficiente, cual- Evite que penetre agua en el aparato. quier ajuste que provoque dolor deberá evitarse. En caso de una aplicación prolongada puede ser necesario un re- Reutilización del aparato ajuste debido a los procesos de adaptación temporales en la zona Tras prepararlo, el aparato quedará... -
Página 73: Problemas/Solución De Problemas
(3) Pulse la tecla ON/OFF para volver a iniciar el programa. Nombre y modelo EM 49 (4) Compruebe el posicionamiento de los electrodos y asegúrese de Tipo EM 49 que los electrodos adhesivos no se solapen. -
Página 74: Indicaciones Relativas A La Compatibilidad Electromagnética
15. Indicaciones relativas a la compatibilidad elec- Condiciones de servicio 5 °C – 40 °C (41 °F – 104 °F) con una hu- medad relativa del 15 – 93 % tromagnética Condiciones de almace- -25 °C – 70 °C (-13 °F – 158 °F) con una ADVERTENCIA namiento humedad relativa del 0 –... -
Página 75: Garantía/Asistencia
Se aplican las siguientes condiciones de garantía: 1. El periodo de garantía para productos de BEURER es de 5 años o, si es superior, se aplica el periodo de garantía vigente en el país correspondiente a partir de la fecha de compra. - Página 76 Leggere attentamente le presenti istruzioni per l'uso, conservarle ITALIANO per impieghi futuri, renderle accessibili ad altri utenti e attenersi alle indicazioni. Sommario Spiegazione dei simboli 1. Introduzione ..................77 2. Indicazioni importanti .................78 AVVERTENZA 3. Descrizione dell'apparecchio ............81 Segnalazione di rischio di lesioni o pericoli per la 4.
-
Página 77: Fornitura E Accessori
4 elettrodi adesivi (45 x 45 mm) Il marchio CE certifica la conformità ai requisiti di base della direttiva 93/42/CEE sui dispositivi medici. 3 batterie AAA Produttore 1. Introduzione Che cos'è l'EMS/TENS digitale e come funziona? L'apparecchio è in grado di visualizzare valori di L'EMS/TENS digitale fa parte del gruppo degli elettrostimolatori. -
Página 78: Indicazioni Importanti
Clinicamente testato e autorizzato, si tratta di un metodo efficace, • allenamento muscolare per il potenziamento di singoli muscoli o non medicale, privo di effetti collaterali (se usato correttamente), di gruppi muscolari per ottenere il cambiamento desiderato delle ideato per il trattamento di dolori di origine diversa e utile anche per proporzioni fisiche l'autotrattamento. -
Página 79: Precauzioni D'impiego
• in presenza di apparecchi elettrici impiantati (ad es. pa- re tramite gli elettrodi applicati al torace, alla parte superiore della cemaker) schiena oppure sopra il cuore. • in presenza di impianti in metallo Prima di utilizzare l'apparecchio, consultare il proprio medico •... - Página 80 • Non esporre l'apparecchio alla luce diretta del sole o alle alte • Non utilizzare batterie ricaricabili e inserire solo batterie dello temperature. stesso tipo. • Proteggere l'apparecchio da polvere, sporcizia e umidità. • Durante i primi minuti di applicazione stare seduti o sdraiati per •...
-
Página 81: Descrizione Dell'apparecchio
• Il produttore non risponde di danni causati da un uso inappropria- Display (schermo intero): to o non conforme. 1 Menu 2 Numero programma Avvertenze sull'uso delle batterie 3 Intensità impulsi canale 2 ( • Se il liquido della batteria viene a contatto con la pelle e con gli 4 Indicazione del posizionamento occhi, sciacquare le parti interessate con acqua e consultare il degli elettrodi... -
Página 82: Impiego
Verificare che in caso di cambio o rimozione delle batterie tutte degli impulsi di e di su 00. Agli elettrodi non viene inviato le impostazioni vengano riportate alla condizione iniziale della ancora alcun impulso. consegna. ˄/˅ Fase 6: Con i pulsanti di impostazione sinistra e destra selezio- 5. -
Página 83: Panoramica Dei Programmi
6. Panoramica dei programmi 6.2 Tabella programmi EMS L'EMS/TENS digitale dispone di 70 programmi: Ambiti di applicazione utili, indicazioni Durata (min.) Possibili • 15 programmi TENS progr.: posiziona- menti degli • 35 programmi EMS elettrodi • 20 programmi MASSAGGE Riscaldamento 1-27 Per tutti i programmi è... -
Página 84: Tabella Programmi Massage
6.3 Tabella programmi MASSAGE Ambiti di applicazione utili, indicazioni Durata (min.) Possibili progr.: posiziona- Ambiti di applicazione utili, indicazioni Durata Possibili menti degli progr.: (min.) posiziona- elettrodi menti degli Massimizzazione della potenza della musco- 26, 27 elettrodi latura della gamba Massaggio a impulsi 1 Forza esplosiva della muscolatura della 26, 27... -
Página 85: Note Sul Posizionamento Degli Elettrodi
6.4 Note sul posizionamento degli elettrodi... -
Página 86: Programmi Individuali
Il posizionamento corretto degli elettrodi è importante per ottenere il elettrodo direttamente sul punto dolorante e l'altro ad almeno risultato di stimolazione desiderato. 2 - 3 cm di distanza. Si consiglia di concordare le posizioni ottimali degli elettrodi nella Gli elettrodi del secondo canale possono essere utilizzati per zona di applicazione desiderata con il medico. - Página 87 ˄/˅ ˄/˅ 5. Con i pulsanti di impostazione selezionare la durata del trat- 3. Con i pulsanti di impostazione selezionare la frequenza degli tamento desiderata e confermare con il pulsante ENTER. impulsi desiderata e confermare con il pulsante ENTER ˄/˅ ˄/˅...
-
Página 88: Funzione Doctor
˄/˅ 2. Selezionare il programma EMS 34 come descritto al capitolo "5.2 6. Con i pulsanti di impostazione selezionare l'ampiezza degli Inizio uso dell'apparecchio" (Fase 3 e Fase 5). impulsi desiderata e confermare con il pulsante ENTER ˄/˅ ˄/˅ 3. Con i pulsanti di impostazione selezionare il tempo di lavoro 7. -
Página 89: Parametri Della Corrente
Memoria della terapia basse frequenze di eccitazione fino a 15 Hz, le fibre che reagiscono EM49 registra la durata del trattamento. Per accedere alla memoria velocemente rispondono invece a partire da circa 35 Hz in poi. della terapia, accendere l‘apparecchio con il pulsante ON/OFF Con impulsi di circa 45 - 70 Hz si ottiene una tensione permanente ˄... -
Página 90: Pulizia E Conservazione
10. Pulizia e conservazione 11. Smaltimento Elettrodi adesivi Smaltire le batterie esauste e completamente scariche negli appo- siti punti di raccolta, nei punti di raccolta per rifiuti tossici o presso • Per garantire un'aderenza degli elettroni applicati per il maggior i negozi di elettronica. -
Página 91: Pezzi Di Ricambio E Parti Soggette A Usura
(5) Aumentare progressivamente l'intensità dell'impulso. 14. Dati tecnici (6) Le batterie sono quasi esaurite. Sostituirle. Appare il simbolo della batteria. Cosa fare? Nome e modello EM 49 Cambiare tutte le batterie. Modello EM 49 Si percepisce una sensazione sgradevole sugli elettrodi. Cosa... -
Página 92: Avvertenze Sulla Compatibilità Elettromagnetica
Si applicano le seguenti condizioni di garanzia: spositivi medici 93/42/CEE e alla legge sui dispositivi medici. 1. La garanzia dei prodotti BEURER dura 5 anni oppure, se più lun- 15. Avvertenze sulla compatibilità elettromagnetica ga, fa fede la durata di garanzia valida dalla data di acquisto di ciascun paese. - Página 93 d. La garanzia non è valida per gli accessori soggetti a comune usura (manicotto, batterie, ecc.). 4. La responsabilità per danni diretti o indiretti causati dall‘apparecchio è esclusa se viene riconosciuta una rivendicazione della garanzia per il danno dell‘apparecchio.
-
Página 94: İşaretlerin Açıklaması
Lütfen bu kullanım kılavuzunu dikkatle okuyun, ileride gerekebileceği TÜRKÇE için saklayın, diğer kullanıcıların erişebilmesini sağlayın ve içindeki yönergelere uyun. İçindekiler İşaretlerin açıklaması 1. Ürün özellikleri ..................95 2. Önemli bilgiler ..................96 UYARI 3. Cihaz açıklaması .................99 Yaralanma tehlikelerine veya sağlığınızla ilgili tehlikele- 4. -
Página 95: Ürün Özellikleri
4 x Yapışkanlı elektrot (45 x 45 mm) CE işareti, tıbbi ürünler için 93/42/EEC direktifinin temel şartları ile uyumluluğu belgeler. 3 x AAA pil Üretici 1. Ürün özellikleri Dijital EMS/TENS nedir ve ne için kullanılır? Cihaz tarafından, ortalama olarak 5 saniye aralıklarla Dijital EMS/TENS, elektrikli stimülasyon cihazları... -
Página 96: Önemli Bilgiler
ve ilaç tedavisine dayanmayan, doğru uygulandığında yan etkileri Gevşetici uygulama için şunlar sayılabilir: olmayan bir yöntemdir. Tedaviyi kendiniz de kolayca uygulayabilir- • Kas tutulmalarının çözülmesi için kas gevşetme siniz. Ağrıları azaltan veya bastıran etkisi, başka nedenlerin yanı sıra • Kaslardaki yorgunluk belirtilerinin iyileştirilmesi ağrının, sinir liflerine (özellikle yüksek frekanslı... - Página 97 • Hamilelik sırasında • Ağrının daha az hissedilmesine neden olan tüm duyusal bozukluk- • Mevcut kanser hastalıklarında larda (örn. metabolizma bozuklukları) • Daha kuvvetli kas kontraksiyonlarının iyileşme sürecine zarar • Aynı zamanda uygulanan tıbbi tedavilerde verebileceği ameliyatlardan sonra • Stimülasyon uygulaması ile meydana gelen şikayetlerde •...
- Página 98 ğeri, 9 mA/cm², 2 mA/cm² değerinin üstünde efektif akım yoğun- bir şekilde yapışmaması sonucu ciltte yaralanmalar olabilir. luğunda çok dikkatli olunmalıdır). Elektrotları en geç 20 uygulamadan sonra yenileriyle değiştirin. • Uykuda ve araç veya aynı zamanda makine kullanırken uygulamayın. Hasar •...
-
Página 99: Cihaz Açıklaması
3. Cihaz açıklaması 4. Çalıştırma 1. Eğer takılı ise kemer klipsini cihazdan çıkarın. Düğmeler: 2. Cihazın arka tarafındaki pil yuvası kapağına bastı- 1 AÇMA/KAPAMA düğmesi rın ve kapağı aşağıya doğru itin. 2 ENTER düğmesi 3. Alkalin AAA 1,5 V tipi 3 pili yerleştirin. Pillerin, 3 Ayar düğmeleri ˄/˅... -
Página 100: Kullanım
5. Kullanım Genel bilgi 5.1 Kullanım ile ilgili bilgiler Önceki seçim menüsüne geri dönmek için MENU düğmesine ba- • Cihaz 1 dakika süresince kullanılmazsa otomatik olarak kapanır sın. ENTER düğmesine uzun süre basarak münferit ayar adımlarını (otomatik kapanma işlevi). Cihaz yeniden açıldığında, menü se- atlayabilir ve doğrudan stimülasyon uygulamasıyla başlayabilirsi- çimi için LCD ekran görüntülenir ve en son kullanılan menü... -
Página 101: Programlara Genel Bakış
6. Programlara genel bakış 6.2 EMS programları tablosu Dijital EMS/TENS cihazında toplam 70'in üstünde program vardır: Program Mantıklı uygulama alanları, belirtiler Çalışma sü- Mümkün • 15 TENS programı resi (dakika) olan elektrot konumlan- • 35 EMS programı dırması • 20 MASAJ programı Isıtma 1-27 Tüm programlarda, iki kanalın impuls yoğunluğunu ayrı... -
Página 102: Masaj Programları Tablosu
6.3 MASAJ programları tablosu Program Mantıklı uygulama alanları, belirtiler Çalışma sü- Mümkün resi (dakika) olan elektrot Program Mantıklı uygulama alanları, belirtiler Çalışma Mümkün konumlan- süresi (da- olan elekt- dırması kika) rot konum- Omuz kasları kuvvetini maksimuma çıkarma landırması Omuz kasları için esneklik Tapotman 1 Sırt kaslarını... -
Página 103: Elektrotların Konumlandırılmasına Yönelik Bilgiler
6.4 Elektrotların konumlandırılmasına yönelik bilgiler... -
Página 104: Kişiselleştirilebilir Programlar
Stimülasyon uygulamasının başarılı olması için elektrotların mantıklı likte ağrı bölgesini sınırlamak (karşı taraftan) için kullanılabilir. konumlandırılması önemlidir. Burada da elektrotların çapraz yerleştirilmesi mantıklıdır. İstediğiniz uygulama bölgesinde en uygun elektrot pozisyonlarını Masaj fonksiyonu için ipucu: optimum bir uygulama için her doktorunuzla birlikte kararlaştırmanızı öneririz. zaman 4 elektrodu da kullanın. - Página 105 TENS 14 programı EM 33 programı TENS 14 programı, ilave olarak kişiselleştirebileceğiniz bir Burst EMS 33 programı, ilave olarak kişiselleştirebileceğiniz bir programdır. programıdır. Bu programda farklı impuls sıraları uygulanır. Burst Bu programda impuls frekansını 1 ile 150 Hz arasında ve impuls ge- programları, değişen sinyal deseni ile uygulama yapılabilen tüm uy- nişliğini 80 ile 320 µs arasında ayarlayabilirsiniz.
-
Página 106: Doctor's Function
˄/˅ 8. Doctor’s Function ayar düğmeleriyle istediğiniz impuls genişliğini seçin ve seçi- minizi ENTER düğmesiyle onaylayın. Doctor’s Function, kişisel programınızı daha kolay ve hedefli bir şe- ˄/˅ ayar düğmeleriyle istediğiniz uygulama süresini seçin ve se- kilde açmanızı sağlayan özel bir ayardır. çiminizi ENTER düğmesiyle onaylayın. -
Página 107: Akım Parametreleri
9. Akım parametreleri yeri, ciltteki kan dolaşımı, cilt kalınlığı ve elektrot kontağı kalitesi gi- bi birçok faktörle belirlenir. Yapılan ayar etkili olmalıdır, ancak asla Elektrikli stimülasyon cihazları, aşağıdaki akım ayarları ile çalışır ve uygulama yerinde ağrı gibi hoş olmayan hislere neden olmamalıdır. bunlar ayara bağlı... -
Página 108: Bertaraf Etme
Cihazın tekrar kullanımı Elektrotlar vücuttan ayrılıyor. Ne yapmalıyım? Cihaz hazırlandıktan sonra tekrar kullanılabilir. Hazırlama işlemi, uy- (1) Elektrodun yapışkan yüzeyini nemli, lif bırakmayan bir bezle te- gulama elektrotlarının değiştirilmesini ve cihazın yüzeyinin sabunlu mizleyin. Elektrotlar hala sıkı bir şekilde yapışmıyorsa, değiştiril- suyla hafifçe nemlendirilmiş... -
Página 109: Yedek Parçalar Ve Yıpranan Parçalar
14. Teknik veriler tik uyumluluk ile ilgili özel koruyucu önlemlere tabidir. Lütfen taşına- bilir veya mobil HF iletişim sistemlerinin bu cihazı etkileyebileceğini Ad ve model EM 49 dikkate alın. EM 49 Ayrıntılı bilgileri belirtilen müşteri servisi adresinden talep edebilir ve- Başlangıç... -
Página 110: Garanti / Servis
Cihazı geri gönderirken faturanızın bir kopyasını ve arızanın kısa açıklamasını ekleyin. Aşağıdaki garanti koşulları geçerlidir: 1. BEURER ürünlerinin garanti süresi 5 yıldır veya – daha uzun ise – ilgili ülkede geçerli olan satın alma tarihinden itibaren garanti süresi kabul edilir. - Página 111 Внимательно прочитайте данную инструкцию по применению, РУССКИЙ сохраняйте ее для последующего использования и предостав- ляйте другим пользователям возможность с ней ознакомиться, Содержание а также всегда следуйте ее указаниям. 1. Для ознакомления ................112 Пояснения к символам 2. Важные указания ................113 3. Описание прибора ................116 ПРЕДОСТЕРЕЖЕНИЕ...
-
Página 112: Для Ознакомления
Символ CE подтверждает соответствие основным 4 самоклеящихся электрода (45 x 45 мм) требованиям директивы о медицинских изделиях 3 батарейки типа ААА 93/42/EЭC. Производитель 1. Для ознакомления Прибор способен передавать эффективные зна- Что такое тренажер для мышц живота EMS/ чения выходных сигналов свыше 10 мА, усреднен- TENS и в... -
Página 113: Важные Указания
Под TENS понимается метод электрической стимуляции не- ет целенаправленное укрепление мускулатуры (тонизирующее рвов, осуществляемой через кожу. TENS — это клинически применение), а с другой стороны, с ее помощью также можно доказанный, эффективный, немедикаментозный, при правиль- достичь расслабляющего эффекта и снижения напряжения ном... - Página 114 • при высокой влажности, например в ванной комнате или во ПРЕДОСТЕРЕЖЕНИЕ! время приема душа; Во избежание причинения вреда здоровью категорически • после употребления алкоголя; не рекомендуется использовать тренажер EMS/TENS • при одновременном подключении к высокочастотному хирур- в следующих случаях: гическому прибору; •...
-
Página 115: Меры Предосторожности
• для наружного применения; касались с электродами. Если в зоне применения имеются • с оригинальными элементами из комплекта поставки или украшения или пирсинг (например, в пупке), то перед исполь- зованием прибора их необходимо снять, т. к. в противном оригинальными элементами, приобретаемыми отдельно случае... -
Página 116: Описание Прибора
Повреждение • Используйте батарейки только одного типа или равноценных • При наличии повреждений не используйте прибор и обрати- типов. тесь к продавцу или по указанному адресу сервисной службы. • Заменяйте все батарейки сразу. • Для обеспечения эффективной работы прибора не роняйте и •... -
Página 117: Подготовка К Работе
4. Подготовка к работе 5. Применение 1. Снимите с прибора защелку для ремня, если 5.1 Указания к применению она установлена. • Если прибор не используется в течение 1 минуты, то он ав- 2. Нажмите на крышку отделения для батареек томатически отключается (автоматика отключения). При на... -
Página 118: Общая Информация
˄/˅ 6. Обзор программ Шаг 6. С помощью левой и правой кнопок настройки вы- берите необходимую интенсивность импульса для и В тренажер для мышц живота EMS/TENS встроено 70 программ: соответственно. Индикация интенсивности импульса на дисплее • 15 программ TENS, изменится соответствующим образом. Если программа нахо- •... -
Página 119: Таблица Программ Ems
6.2 Таблица программ EMS № про- Рекомендуемые зоны применения, инди- Время рабо- Возможное граммы кация ты (мин.) расположе- № про- Рекомендуемые зоны применения, инди- Время рабо- Возможное ние элект- граммы кация ты (мин.) расположе- родов ние элект- Усиление мышц плечевого пояса 1–4 родов... -
Página 120: Таблица Массажных Программ
6.3 Таблица массажных программ Прогр. Рекомендуемые зоны применения, инди- Время ра- Возможное № кация боты (мин.) распо- ложение электро- дов Похлопывающий массаж 1 Похлопывающий массаж 2 Похлопывающий массаж 3 Разминающий массаж 1 Разминающий массаж 2 Массаж надавливанием Расслабляющий массаж 1 Расслабляющий... -
Página 121: Указания По Размещению Электродов
6.4 Указания по размещению электродов... -
Página 122: Программы Для Индивидуальной Настройки
Правильное размещение электродов важно для успешного при- лируемых каналов с двумя самоклеящимися электродами менения стимуляции. на каждом канале мы рекомендуем располагать электроды Мы рекомендуем обсудить с врачом оптимальное расположе- одного канала так, чтобы болевая точка находилась меж- ние электродов на каждом участке применения ду... - Página 123 2. Выберите программу TENS 13, как описано в разделе «5.2 1. Разместите электроды в необходимой области (рекоменда- Начало использования» (этапы с 3 по 5). ции по размещению электродов см. раздел 6.4) и подключите ˄/˅ 3. С помощью кнопок настройки выберите необходимую ча- их...
-
Página 124: Функция Doctor's Function
˄/˅ 1. Разместите электроды в необходимой области (рекоменда- 3. С помощью кнопок настройки выберите необходимую ции по размещению электродов см. раздел 6.4) и подключите продолжительность работы (on time) и подтвердите ее нажа- их к устройству. тием кнопки ENTER. ˄/˅ 2. Выберите программу EMS 34, как описано в разделе «5.2 На- 4. -
Página 125: Параметры Тока
Удаление функции Doctor’s Function 9.2 Частота импульса Для разблокировки прибора и для получения доступа к другим Частота импульса показывает количество от- Длитель- ность ˅ периода программам удерживайте нажатой кнопку в течение 5 се- дельных импульсов в секунду, она указывает- кунд, интенсивность импульса и... -
Página 126: Варианты Параметров Импульса, Управляемые Циклами
9.5 Варианты параметров импульса, управляемые Повторное использование прибора После обработки прибор готов к повторному использованию. циклами Обработка включает в себя замену электродов, а также очистку В некоторых случаях необходимо за счет использования не- поверхности прибора салфеткой, смоченной слабым мыльным скольких параметров импульса обеспечить целостность струк- раствором. -
Página 127: Неполадки/Решение
(4) Проверьте расположение электродов, следите за тем, чтобы они не располагались друг на друге. 14. Технические данные (5) Постепенно увеличивайте интенсивность импульса. (6) Батарейки почти разряжены. Замените батарейки. Название и модель EM 49 Отображается символ батарейки. Что делать? Тип EM 49 Замените все батарейки. Форма кривой... -
Página 128: Указания По Электромагнитной Совместимости
Более точные данные можно запросить по указанному адресу Источник питания 3 батарейки типа ААА сервисной службы или найти в конце инструкции по применению. Длительность регулируется от 5 до 100 минут Данный прибор соответствует требованиям Европейской ди- процедуры рективы о медицинских изделиях 93/42/EEC, а также Закону Интенсивность... -
Página 129: Гарантия/Сервисное Обслуживани
16. Гарантия/сервисное обслуживани Более подробная информация по гарантии/сервису находится в гарантийном/сервисном талоне, который входит в комплект поставки. - Página 130 Należy dokładnie przeczytać i zachować niniejszą instrukcję obsługi, POLSKI przechowywać ją w miejscu dostępnym dla innych użytkowników i przestrzegać podanych w niej wskazówek. Spis treści Objaśnienie symboli 1. Informacje ogólne ................131 2. Ważne wskazówki................133 OSTRZEŻENIE 3. Opis urządzenia ................135 Ostrzeżenie przed niebezpieczeństwem obrażeń ciała 4.
-
Página 131: Informacje Ogólne
Oznakowanie CE potwierdza zgodność z zasadniczymi 4 x elektroda samoprzylepna (45 x 45 mm) wymogami dyrektywy 93/42/WE w sprawie wyrobów 3 x baterie AAA medycznych 1. Informacje ogólne Producent Czym jest cyfrowe urządzenie do elektrycznej sty- mulacji mięśni i nerwów i do czego służy? Urządzenie może emitować... - Página 132 TENS, przezskórna elektrostymulacja nerwów, to elektryczna Zastosowanie aktywujące: stymulacja nerwów działająca przez skórę. TENS to sprawdzona • Trening mięśni zwiększający wytrzymałość i/lub klinicznie, skuteczna, niefarmakologiczna metoda zwalczania dole- • Trening mięśni umożliwiający wzmocnienie określonych mięśni gliwości bólowych o określonym podłożu, która przy prawidłowym lub grup mięśniowych w celu uzyskania odpowiednich proporcji stosowaniu nie powoduje skutków ubocznych –...
-
Página 133: Ważne Wskazówki
2. Ważne wskazówki • Nie stosować po spożyciu alkoholu • Równoczesne podłączenie do urządzenia chirurgicznego o wyso- Stosowanie urządzenia nie zastępuje konsultacji ani leczenia le- kiej częstotliwości karskiego. W przypadku wszelkiego rodzaju bólów lub choroby • W przypadku ostrych lub przewlekłych schorzeń przewodu po- należy najpierw zasięgnąć... -
Página 134: Środki Ostrożności
ŚRODKI OSTROŻNOŚCI: • Aby wykluczyć ewentualne zagrożenie, urządzenie trzymać z dala od dzieci. • Elektrody należy odklejać delikatnie, aby uniknąć bolesnego • Nie należy zamieniać kabla elektrod ze stykiem z kablem słucha- uszkodzenia skóry. wek lub innych urządzeń oraz nie podłączać elektrod z innymi •... -
Página 135: Opis Urządzenia
3. Opis urządzenia Uszkodzenie • W przypadku uszkodzeń nie należy używać urządzenia. Należy Przyciski: skontaktować się z dystrybutorem lub serwisem. 1 Przycisk WŁ/WYŁ • Upuszczenie lub rozmontowanie urządzenia może skutkować je- 2 Przycisk ENTER go nieprawidłowym działaniem. 3 Przycisk ustawiania •... -
Página 136: Uruchomienie
4. Uruchomienie 5. Zastosowanie 1. Zdejmij zaczep na pasek z urządzenia. 5.1 Wskazówki dotyczące użytkowania 2. Naciśnij osłonę schowka na baterie z tyłu urzą- • Jeżeli urządzenie nie jest używane przez 1 min, wyłączy się auto- dzenia i przesuń ją w dół. matycznie (automatyczne wyłączanie). -
Página 137: Przegląd Programów
6. Przegląd programów Jeśli program znajduje się w fazie przerwy, nie można zwiększać intensywności. Cyfrowe urządzenie do elektrycznej stymulacji mięśni i nerwów dys- ponuje ponad 70 programami: Informacje ogólne • 15 programów do stymulacji mięśni Aby powrócić do poprzedniego menu, należy nacisnąć przycisk •... -
Página 138: Tabela Programów Ems
6.2 Tabela programów EMS Nr prog. Wskazane obszary zastosowań Czas trwania Możliwości (min) umieszcze- Nr prog. Wskazane obszary zastosowań Czas trwania Możliwości nia elektrod (min) umieszcze- Zwiększenie siły mięśni pleców 4–11 nia elektrod Napinanie mięśni pośladków Nagrzewanie 1–27 Wzmacnianie mięśni pośladków Kapilaryzacja 1–27 Zwiększenie siły mięśni pośladków... -
Página 139: Tabela Programów Do Masażu
6.3 Tabela programów do masażu Nr prog. Wskazane obszary zastosowań Czas trwa- Możliwości nia (min) umieszcze- nia elektrod Masaż ostukujący 1 Masaż ostukujący 2 Masaż ostukujący 3 Masaż ugniatający 1 Masaż ugniatający 2 Masaż uciskowy Masaż odprężający 1 Masaż odprężający 2 Masaż... -
Página 140: Wskazówki Dotyczące Umieszczenia Elektrod
6.4 Wskazówki dotyczące umieszczenia elektrod... -
Página 141: Programy Z Indywidualnymi Ustawieniami
Odpowiednie umieszczenie elektrod jest ważne dla uzyskania za- kanału tak, aby punkt bólu znajdował się pomiędzy nimi, lub mierzonego efektu stymulacji. tak, aby jedna elektroda znajdowała się na punkcie bólu, a dru- Zalecamy skonsultować optymalne umieszczenie elektrod w miej- ga przynajmniej 2–3 cm dalej. scu zastosowania z lekarzem. - Página 142 ˄/˅ 1. Umieść elektrody w wybranym miejscu (propozycje umieszcze- 3. Wybierz za pomocą przycisków ustawiania odpowiednią nia – patrz umieszczenia elektrod w rozdziale 6.4) i podłącz je do częstotliwość impulsów i potwierdź swój wybór przyciskiem EN- urządzenia. TER. ˄/˅ 2. Wybierz program TENS 15 w sposób opisany w rozdziale „5.2 4.
-
Página 143: Doctor's Function
Program EMS 34 1. Umieść elektrody w wybranym miejscu (propozycje umieszcze- Program EMS 34 to program, który dodatkowo można dostosować nia – patrz umieszczenia elektrod w rozdziale 6.4) i podłącz je do do własnych potrzeb. W tym programie można ustawić częstotli- urządzenia. -
Página 144: Parametry Prądowe
Po ponownym włączeniu urządzenia można bezpośrednio uru- ponieważ odciążają mięśnie i prowadzą do mniejszego zmniejszenia chomić program zapisany za pomocą Doctor´s Function. mięśni oraz bezpieczniejszego użytkowania. Kasowanie Doctor’s Function 9.2 Częstotliwość impulsów Aby ponownie aktywować urządzenie i mieć dostęp do innych pro- Częstotliwość... -
Página 145: Wariacja Parametrów Impulsowych Sterowana Okresowo
9.5 Wariacja parametrów impulsowych sterowana okre- Ponowne użycie urządzenia Urządzenie jest gotowe do ponownego użytku po odpowiednim sowo przygotowaniu. Przygotowanie obejmuje wymianę elektrod oraz W wielu przypadkach konieczne może okazać się pokrycie całości wyczyszczenie powierzchni urządzenia ściereczką lekko zwilżoną struktur tkanek w miejscu zastosowania poprzez zastosowanie licz- wodą... -
Página 146: Problemy/Rozwiązywanie Problemów
14. Dane techniczne (5) Stopniowo zwiększaj intensywność impulsów. (6) Baterie są prawie wyczerpane. Należy wymienić je na nowe. Nazwa i model EM 49 Wyświetla się symbol baterii. Co należy zrobić? EM 49 Wymienić wszystkie baterie. Kształt impulsów wyj- dwufazowe impulsy prostokątne... -
Página 147: Wskazówki Dot. Kompatybilności Elektromagnetycznej
Niniejsze urządzenie spełnia wymogi dyrektywy europejskiej dla Czas trwania zabiegu ustawiana w zakresie od 5 do 100 minut wyrobów medycznych 93/42/EWG oraz ustawy o wyrobach me- Intensywność ustawiana w zakresie od 0 do 50 dycznych. Warunki eksploatacji 5°C–40°C (41°F–104°F) przy względ- 15. - Página 148 Servicecenter. Obowiązują następujące warunki gwarancji: d. Ponadto nie obejmuje akcesoriów dostarczonych z urządze- 1. Okres gwarancji na produkty firmy BEURER wynosi 5 lat lub, jeśli niem, które ulegają regularnemu zużyciu. jest dłuższy, obowiązuje w danym kraju od daty zakupu.