Publicidad
Idiomas disponibles
Idiomas disponibles
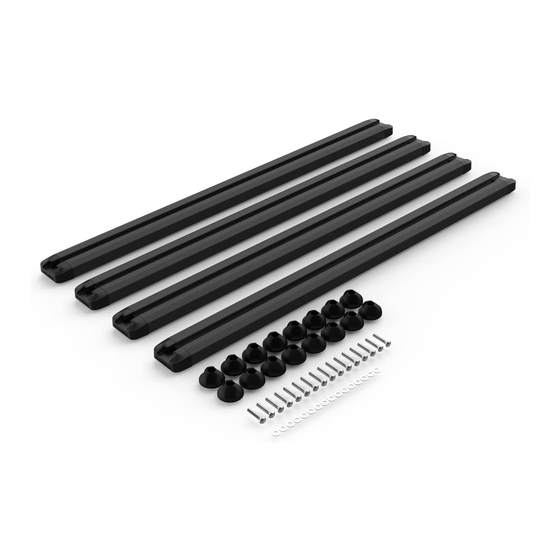
CONTENTS
• CONTENU • CONTENIDO
cap nuts (16X)
écrou borgne (x 16)
tuerca capuchón (16X)
button head screw (16X)
vis à tête ronde (x 16)
tornillo de cabeza redonda (16X)
track end caps (8X)
obturateur de glissière (x 8)
protector terminal de riel (8X)
Tools Required
• Outils Nécessaires • Herramientas Necesarias
DETERMINE WHERE THE CROSSMEMBERS, HANDLES,
1
OR OTHER OBSTRUCTIONS ARE LOCATED.
• Open the panels of your cover and locate the crossmembers on
each panel. When you mark and drill the holes to mount your tracks
in a subsequent step you must avoid these crossmembers. Look for
any other potential obstruction and make note of their locations.
• You will need to secure the ends of
each track so it's important that you
make sure there is no obstruction
where the ends of track will be placed.
To allow clearance for cap nuts, the
holes must be a minimum of 3⁄4" from
cross members or other obstructions.
• You must also avoid installing the
tracks above the handles to avoid
interference.
NOTE: The SE cover
has 1 crossmember
per lifting panel and
the HD cover has 2
or 3 crossmembers
per lifting panel.
Pour le français, aller à la page 6.
Instruction #1036093B-1/9
washers (16X)
rondelle (x 16)
arandela (16X)
• power drill
• perceuse électrique
• 1⁄8" drill bit
• mèche de 3 mm (
• 1⁄4" drill bit
• mèche de 6 mm (
• marking pen
• marqueur
• tape measure
• ruban à mesurer
• 1⁄8" Allen wrench
• clé Allen de 3 mm (
crossmember
Diamondback Base Track
HD tracks (4X)
1⁄8
po)
1⁄4
po)
1⁄8
po)
Para español ir a la página 6.
glissière HD (x 4)
riel HD (4X)
• taladro eléctrico
• mecha de 1⁄8 pulg.
• mecha de ¼ pulg.
• marcador
• cinta métrica
• llave Allen de 1⁄8 pulg.
crossmember
traverse
travesaño
Publicidad
Tabla de contenido

Manuales relacionados para Yakima Diamondback Base Track


Resumen de contenidos para Yakima Diamondback Base Track
- Página 1 Diamondback Base Track CONTENTS • CONTENU • CONTENIDO washers (16X) cap nuts (16X) rondelle (x 16) écrou borgne (x 16) arandela (16X) tuerca capuchón (16X) button head screw (16X) vis à tête ronde (x 16) tornillo de cabeza redonda (16X)
- Página 2 Thouroughly clean your Diamondback Cover. POSITION THE TRACKS FOREWARD AND AFT. Set the tracks on your vehicle in the approximate location that you will install them. Measure and position the track ends equally from the front and rear of the cover being sure to pay attention to the locations of the crossmembers and handles you identified in step 1.
- Página 3 DRILL THE REAR PANEL HOLES. DRILL THE FRONT PANEL HOLES. Move the tracks aside and drill an 1⁄8” pilot hole Move the tracks aside and drill an 1⁄8” pilot hole through the center of the marks you made through the center of the marks you made in step 6.
- Página 4 ENSURE THE TRACKS ARE SQUARE AND PARALLEL. NOTE: This step is critical. 1. Using a measuring tape, measure the track to track distances at your installed bolts (A). 2. Make sure distance B is equal to measurement A. 3. Once A and B are equal, make sure the outside corner to outside corner diagonal measurements are equal as shown.
- Página 5 INSTALL 1 BOLT, 1 WASHER, AND MARK THE REMAINING HOLES. 1 CAPNUT ON EACH TRACK . Install 1 bolt with 1 washer through each track Use a marker to mark 2 more holes on each where you drilled the holes in step 13. Then track.
-
Página 6: Instalación
FRANÇAIS ESPAÑOL INSTALLATION INSTALACIÓN DÉTERMINER OÙ SE TROUVENT LES DETERMINE DÓNDE SE ENCUENTRAN LOS OBSTRUCTIONS (TRAVERSES, POIGNÉES, ETC.). TRAVESAÑOS, MANIJAS U OTROS OBSTÁCULOS. • Ouvrir les panneaux du couvre-caisse et repérer où se trouvent • Abra los paneles de la cubierta y localice los travesaños en cada les traverses sur chaque panneau. - Página 7 FRANÇAIS ESPAÑOL POSER 4 BOULONS, 4 RONDELLES ET 4 INSTALE 4 TORNILLOS, 4 ARANDELAS Y 4 ÉCROUS BORGNES. TUERCAS CAPUCHÓN. Poser un boulon muni d’un écrou à travers les glissières dans les trous Instale 1 tornillo con 1 arandela a través de cada riel y agujero que percés aux opérations 8 et 9.
-
Página 8: Important Warnings
à www. In order to replace any lost or defective keys, note the lock and key yakima.com. numbers below and register them at www.yakima.com. Anote el número de su llave: Record Your Key Number:... -
Página 9: Advertencias Importantes
Para reemplazar una llave perdida o defectuosa, anote más abajo los números de la cerra- dura y de la llave y regístrelos en www.yakima.com. Anote el número de su llave: (grabado en las llaves de bloqueo)