Tabla de contenido
Publicidad
Idiomas disponibles
Idiomas disponibles
Enlaces rápidos
Publicidad
Tabla de contenido

Manuales relacionados para Oster CKSTAF3202D


Resumen de contenidos para Oster CKSTAF3202D
- Página 1 CKSTAF3202D MODELO/MODEL Manual de Instrucciones FREIDORA DE AIRE DIGITAL LEA TODAS LAS INSTRUCCIONES ANTES DE USAR ESTE APARATO Instruction Manual DIGITAL AIR FRYER PLEASE READ ALL INSTRUCTIONS BEFORE USING THIS APPLIANCE...
-
Página 3: Importantes Medidas De Seguridad
Gracias por comprar la Freidora de Aire Multifuncional, un artefacto innovador que te ayudará a preparar comidas más saludables. Es muy importante leer este manual de instrucciones con atención, la información aquí contenida le ayudará a hacer un mejor uso de todas las funciones del artefacto y utilizarlo de forma segura. - Página 4 • No intente desarmar ni reparar el artefacto. Cualquier reemplazo de una pieza dañada debe ser realizado únicamente por un Centro de Servicio Técnico Autorizado Oster®. • Este artefacto no está diseñado para que lo utilicen personas (incluyendo niños) con capacidades físicas, sensoriales o mentales reducidas, o con falta de experiencia o...
- Página 5 • Al colocar la canasta para freír o colocar el sartén, asegúrese de que esté colocado y bloqueado correctamente. • El mantenimiento y la limpieza del artefacto no deben ser realizados por niños. Nunca permita que objetos afilados y abrasivos entren en contacto con las superficies antiadherentes del artefacto, ya que podrían dañarlo.
-
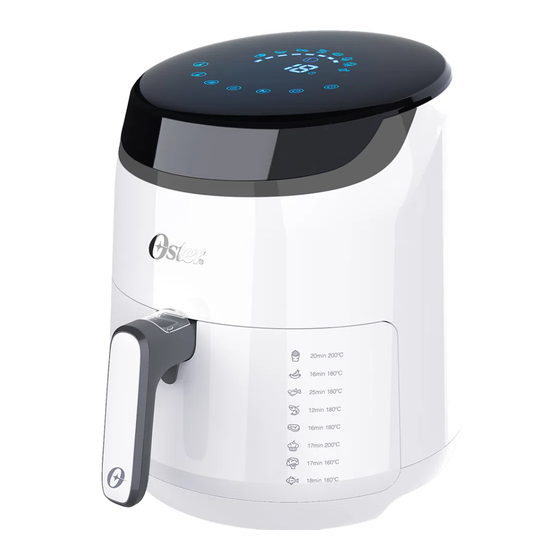
Página 6: Descripción Del Artefacto
DESCRIPCIÓN DEL ARTEFACTO 1. Panel de control táctil 2. Botón de extracción de la canasta con cubierta protectora 3. Canasta con sartén 4. Mango o asa 5. Cuerpo del producto 6. Salida de aire caliente... -
Página 7: Funciones De La Freidora
Funciones de la Freidora CANASTA DE FREÍR La canasta de freír de la unidad cuenta con una capacidad de 3,2 litros. Es el lugar donde debe colocar los alimentos para su preparación. MANGO Utilícelo para manipular el sartén y para abrir la canasta del artefacto. TEMPORIZADOR Ajusta el tiempo de preparación y se puede programar hasta por 60 minutos. -
Página 8: Sugerencias Para Asar, Freír Y Descongelar
Sugerencias para asar, freír y descongelar Revolver a Tiempo de la mitad del Alimento Tipo Cantidad Temperatura proceso o preparación del tiempo Papas Papas fritas 20-25 Frescas 500g 200°C (6x6mm) minutos 25-30 Papas fritas Congeladas 500g 200°C minutos Otras verduras Frescos en 10-15 Pimientos... - Página 9 Revolver a Tiempo de la mitad del Alimento Tipo Cantidad Temperatura preparación proceso o del tiempo Rebanadas rebanadas 10-15 de cerdo con Frescas 200°C (1cm de minutos grasa grosor). 10-15 Carne molida Fresca 250g 180°C minutos 15-20 Carne molida Fresca 500g 180°C minutos...
-
Página 10: Consejo De Durabilidad Para Su Freidora
CONSEJO DE DURABILIDAD PARA SU FREIDORA Antes del primer uso, es necesario curar el antiadherente con aceite para que su freidora le dure más. Para ello, engrase bien la freidora con aceite y deje actuar durante 20 minutos a una temperatura de 200°C. Permita que se enfríe de manera natural y retire el exceso de aceite. - Página 11 Mantenga presionado este botón y el tiempo se puede cambiar rápidamente. Luz indicadora de funcionamiento del ventilador. Luz indicadora de la pantalla, que alterna la información del tiempo y la temperatura. Luz indicadora de modo predefinido (que varía según el alimento elegido). Alterna el indicador cuando se presiona el botón Luz de indicadora de que la unidad está...
- Página 12 Nota: Si es el primer uso de la freidora y ésta se encuentra aún fría, agregue 5 minutos más al tiempo de preparación. Este tiempo es necesario para calentar la cavidad de la freidora. Para las preparaciones donde la unidad ya está caliente, el tiempo de preparación a considerar es el normal.
-
Página 13: Mantenimiento Y Limpieza
• Los alimentos congelados o grandes cantidades de agua pueden tardar más en estar listos y los resultados finales no serán tan satisfactorios. Procure preparar porciones pequeñas de comida previamente descongelada y picada en trozos más pequeños. • Los alimentos precocinados generalmente necesitan una temperatura más alta que los alimentos crudos. - Página 14 • Para limpiar el sartén: utilice un paño húmedo o una esponja suave con detergente neutro para desengrasarlo. Seque el sartén inmediatamente después de lavarlo con un paño seco o una toalla de papel. • Para limpiar la superficie exterior: el exterior de la freidora debe limpiarse con un paño suave y húmedo.
-
Página 15: Important Safeguards
Thank you for purchasing the Oster® Digital Air Fryer, an innovative appliance that will help you prepare healthier meals. It is very important to read this instruction manual carefully, the information included herein will help you make better use of all the functions of the appliance and use it safely. - Página 16 • Do not use the appliance if it presents any kind of damage to the power cord, plug or other components. Please contact the nearest Authorized Oster® Service Center to have the power cord, plug or component replaced or repaired.
- Página 17 Never allow sharp and abrasive objects to come into contact with the non-stick surface of the unit, as they could damage it. ATTENTION! It is normal for a new electrical appliance to release some smoke or odor during the first times it is used.
-
Página 18: Description Of The Appliance
DESCRIPTION OF THE APPLIANCE 1. Touch Control Panel 2. Basket Removal Button with Protective Cover 3. Frying Basket with Pan 4. Handle 5. Product Housing 6. Hot Air Vent... -
Página 19: Product Functions
Product Functions FRYING BASKET The frying basket with 3.2L capacity. It is where the foods to be prepared should be placed. HANDLE Use the handle to open and insert the frying basket with pan into the product cavity. TIMER Use it to adjust the preparation time, it can be programmed for up to 60 minutes. TEMPERATURE SELECTOR Allows to select the cooking temperature from 80°C to 200°C. - Página 20 Tips to bake, fry and defrost Stir halfway Preparation Food Type Quantity Temperature through the time process? Potatoes French Fries 20-25 Fresh 500g 200°C (6x6 mm) minutes 25-30 French Fries Frozen 500g 200°C minutes Other Vegetables 10-15 Peppers Fresh, sliced 500g 150-180°C minutes...
- Página 21 Stir halfway Preparation Food Type Quantity Temperature through the time process? 15-20 Cubed Beef Fresh 500g 180°C minutes 15-20 Meatballs Frozen 500g 180°C minutes 15-20 Hamburger Frozen 1-2 units 180-200°C Patties minutes Fish and Seafood Fresh 10-15 Camarones 250g 180°C (peeled) minutos Fresh...
-
Página 22: Operating The Unit
Operating the Unit TOUCH CONTROL PANEL Plug unit into the appropriate wall electrical outlet and make sure the basket/pan is inserted into the appliance’s cavity. The on/off button light will illuminate. Press the on/off button for 2 seconds to set the air fryer to the default temperature of 180°C and the timer to 15 minutes. - Página 23 Heating indicator light. Display temperature indicator light. Display time indicator light. OPERATING INSTRUCTIONS Wash all removable parts before using the unit for the first time. Plug unit into the appropriate electrical outlet. Place the air fryer on a flat, stable and dry surface.
- Página 24 WARNING! Do not press the basket release button while shaking the pan/basket. WARNING! The unit does not turn off while you remove the basket halfway through the process to stir or turn the foods. Please make sure to add any time required to complete the cooking cycle.
-
Página 25: Cleaning And Maintenance
CLEANING AND MAINTENANCE TIPS TO MAINTAIN THE AIR FRYING BASKET • If you prefer, grease the basket/pan with a thin layer of oil before using your air fryer. This will extend the lifetime of the non-stick surfaces and help remove food residues. •... - Página 26 Note: The heating element is located at the top of the cavity and can be hot even if it is not red. Always make sure the product is completely cool before cleaning it. Never immerse the appliance in water. Clean only with a soft, soapy cloth. After cleaning, dry it well.
- Página 28 Características eléctricas de los modelos de la serie: CKSTAF3202D-XXX Electric characteristics of series models: Voltaje/Voltage Frecuencia/Frequency Potencia/Power 120 V 60 Hz XXXX W 127 V 60 Hz XXXX W XXX en donde X es cualquier numero entre 0 y 9 o cualquier letra entre A y Z.