Tabla de contenido
Publicidad
Idiomas disponibles
Idiomas disponibles
Enlaces rápidos
ISLAND
RANGE HOOD
READ AND SAVE THESE INSTRUCTIONS
WARNING
TO REDUCE THE RISK OF FIRE, ELECTRIC SHOCK, OR
INJURY TO PERSON(S) OBSERVE THE FOLLOWING:
1. Use this unit only in the manner intended by the manufacturer.
If you have questions, contact the manufacturer at the
address or telephone number listed in the warranty.
2. Before servicing or cleaning unit, switch power off at service
panel and lock service disconnecting means to prevent
power from being switch on accidentally. When the service
disconnecting means cannot be locked, securely fasten a
prominent warning device, such as a tag, to the service
panel.
3. Installation work and electrical wiring must be done by
qualified personnel in accordance with all applicable codes
and standards, including fire-rated construction codes and
standards.
4. Sufficient air is needed for proper combustion and exhausting
of gases through the flue (chimney) of fuel burning equipment
to prevent backdrafting. Follow the heating equipment
manufacturer's guidelines and safety standards such as
those published by the National Fire Protection Association
(NFPA), the American Society for Heating, Refrigeration
and Air Conditioning Engineers (ASHRAE) and the local
code authorities.
5. This product may have sharp edges. Be carefule to avoid
cuts and abrasions during installation or cleaning.
6. When cutting or drilling into wall or ceiling, do not damage
electrical wiring and other hidden utilities.
7. Ducted fans must always be vented to the outdoors.
8. Do not use this unit with any other solid-state speed control
device.
9. Use only metal ductwork.
10. This unit must be grounded.
TO REDUCE THE RISK OF A RANGE TOP GREASE FIRE:
a) Never leave surface units unattended at high settings.
Boilovers cause smoking and greasy spillovers that may
ignite. Heat oils slowly on low or medium settings.
b) Always turn hood ON when cooking at high heat or when
cooking flaming foods (i.e. Crêpes Suzette, Cherries Jubilee,
Peppercorn Beef Flambé).
c) Clean ventilating fans frequently. Grease should not be
allowed to accumulate on fan or filters.
d) Use proper pan size. Always use cookware appropriate for
the size of the surface element.
INSTALLER: LEAVE THIS GUIDE WITH THE HOMEOWNER.
HOMEOWNER: OPERATION AND MAINTENANCE INFORMATION ON PAGE 2.
!
INTENDED FOR DOMESTIC COOKING ONLY
To register this product visit:
www.broan-nutone.com or
www.broan-nutone.ca
WARNING
TO REDUCE THE RISK OF INJURY TO PERSON(S) IN THE
EVENT OF A RANGE TOP GREASE FIRE, OBSERVE THE
FOLLOWING*:
1. SMOTHER FLAMES with a close-fitting lid, cookie sheet, or
metal tray, then turn off the burner. BE CAREFUL TO PREVENT
BURNS. IF THE FLAMES DO NOT GO OUT IMMEDIATELY,
EVACUATE AND CALL THE FIRE DEPARTMENT.
2. NEVER PICK UP A FLAMING PAN – You may be burned.
3. DO NOT USE WATER, including wet dishcloths or towels –
This could cause a violent steam explosion.
4. Use an extinguisher ONLY if:
A. You know you have a Class ABC extinguisher and you
know how to operate it.
B. The fire is small and contained in the area where it
started.
C. The fire department has been called.
D. You can fight the fire with your back to an exit.
* Based on "Kitchen Fire Safety Tips" published by NFPA.
CAUTION
1. For indoor use only.
2. For general ventilating use only. Do not use to exhaust
hazardous or explosive materials and vapors.
3. To avoid motor bearing damage and noisy and/or
unbalanced impeller, keep drywall spray, construction dust,
etc. off power unit.
4. Do not use over cooking equipment greater than 60,000
BTU/hr. as the blower motor will shut down intermittently.
5. Your hood motor has a thermal overload which will
automatically shut off the motor if it becomes overheated.
The motor will restart when it cools down. If the motor
continues to shut off and restart, have the hood serviced.
6. The bottom of the hood MUST NOT BE LESS than 26" and
at a maximum of 36" above cooktop for best capture of
cooking impurities.
7. Two installers are recommended because of the size of
this hood.
8. To reduce risk of fire and to properly exhaust air, be sure
to duct air outside. Do not exhaust air into spaces within
walls or ceilings or into attics, crawl spaces, or garages.
9. Be careful when installing the decorative flue and hood,
they may have sharp edges.
10. Please read specification label on product for further
information and requirements.
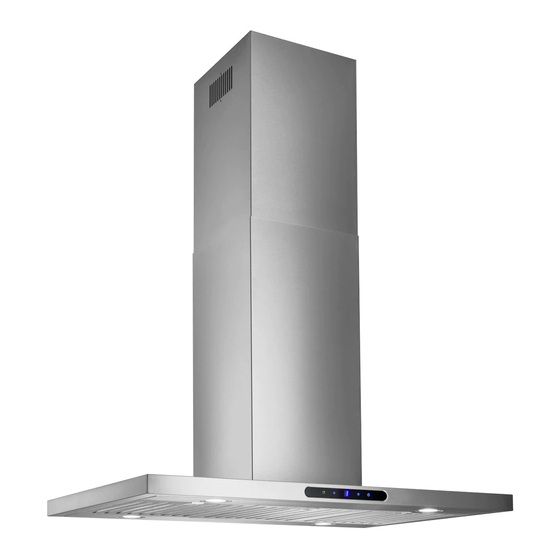
MODEL EIT1366SS
!
.
!
Page 1
Publicidad
Tabla de contenido

Manuales relacionados para Broan Elite EIT1366SS


Resumen de contenidos para Broan Elite EIT1366SS
- Página 1 MODEL EIT1366SS Page 1 ISLAND To register this product visit: RANGE HOOD www.broan-nutone.com or www.broan-nutone.ca READ AND SAVE THESE INSTRUCTIONS INTENDED FOR DOMESTIC COOKING ONLY WARNING WARNING TO REDUCE THE RISK OF FIRE, ELECTRIC SHOCK, OR TO REDUCE THE RISK OF INJURY TO PERSON(S) IN THE...
-
Página 2: Cleaning & Maintenance
MODEL EIT1366SS Page 2 OPERATION CLEANING & MAINTENANCE Proper maintenance of the Range Hood will assure proper 8. 8. performance of the unit. MOTOR The motor is permanently lubricated and never needs oiling. If 15-MINUTE LIGHT BLOWER POWER the motor bearings make excessive or unusual noise, replace... -
Página 3: Prepare The Hood
MODEL EIT1366SS Page 3 INSTALL THE DUCTWORK PREPARE THE HOOD (Ducted Hoods Only) Unpack hood and check contents. You should receive: 1. Decide where ROOF CAP 1 - Hood the ductwork will 6” ROUND 1 - Decorative Flue Assembly (2 pieces) - Página 4 MODEL EIT1366SS Page 4 INSTALL THE HOOD INSTALL CEILING SUPPORT (Ducted Installation only) 1. Assemble 1. At hood location 6” ROUND DUCTWORK CEILING angle brackets install JOISTS lower cross framing (8) M4 x 10 mm PAN HEAD hood mounting between ceiling...
-
Página 5: Install The Hood
MODEL EIT1366SS Page 5 INSTALL THE HOOD INSTALL THE HOOD (Ducted Installation only) (cont'd) (Ducted Installation only) (cont'd) 5. Measure 9. Connect power cable to house wiring inside of electrical length 6” outlet box. Connect the neutral conductor of product... - Página 6 MODEL EIT1366SS Page 6 INSTALL THE HOOD INSTALL THE HOOD (Non-Ducted Installation Only) (Non-Ducted Installation Only) (cont'd) NON-DUCT KIT MODEL ANKIBF4 CONTENTS 3. Assemble angle brackets lower (8) M4 x 10 mm PAN HEAD hood mounting NON-DUCTED MACHINE F R O N...
- Página 7 MODEL EIT1366SS Page 7 INSTALL THE HOOD INSTALL THE HOOD (Non-Ducted Installation Only) (cont'd) (Non-Ducted Installation Only) (cont'd) 7. Measure 12. Connect power cable to house wiring inside of electrical (4) M4 x 8 mm length 6” outlet box. Connect the neutral conductor of product...
-
Página 8: Service Parts
MODEL EIT1366SS Page 8 SERVICE PARTS PART NO. DESCRIPTION QTY. S99528364 Ceiling Mounting Plate W/Outlet Box S99527130 Angle Mounting Brackets (set of 8) S1108788 Decorative Upper and Lower Flues S99010491 30 μf Capacitor S1104711 Main PCB S99529088 PCB Plastic Box... - Página 9 MODEL EIT1366SS Page 9 WARRANTY Limited Warranty Warranty Period and Exclusions: Broan-NuTone LLC and Venmar Ventilation ULC (either being the “Company”) warrants to the original consumer purchaser of its product (“you”) that the product (the “Product”) will be free from material defects in the Product or its workmanship for a period of one (1) year from the date of original purchase (or such longer period as may be required by applicable law).
- Página 10 MODÈLE EIT1366SS Page 10 Pour enregistrer ce produit, HOTTE ILÔT visitez : www.broan-nutone.com ou www.broan-nutone.ca LIRE CES DIRECTIVES ET LES CONSERVER POUR USAGE DOMESTIQUE SEULEMENT AVERTISSEMENT AVERTISSEMENT AFIN DE RÉDUIRE LES RISQUES D’INCENDIE, DE DÉCHARGES OBSERVEZ LES CONSIGNES SUIVANTES AFIN DE RÉDUIRE ÉLECTRIQUES OU DE BLESSURES CORPORELLES, VEUILLEZ...
-
Página 11: Nettoyage Et Entretien
MODÈLE EIT1366SS Page 11 FONCTIONNEMENT NETTOYAGE ET ENTRETIEN Un entretien adéquat de la hotte assurera son bon 8. 8. fonctionnement. MOTEUR Le moteur est lubrifié en permanence et n’a pas besoin d’être ARRÊT ÉCLAIRAGE AFFICHAGE VENTILATION MARCHE/ huilé. Si les roulements du moteur sont anormalement bruyants, DIFFÉRÉ... -
Página 12: Préparation De La Hotte
MODÈLE EIT1366SS Page 12 POSE DU CONDUIT PRÉPARATION DE LA HOTTE (Hottes avec conduit seulement) 1. Planifier la pose Déballer la hotte et vérifier le contenu de la boîte. CAPUCHON DE TOIT du conduit en Celle-ci doit contenir les éléments suivants : CONDUIT ROND déterminant... -
Página 13: Installation De La Plaque De Fixation Au Plafond
MODÈLE EIT1366SS Page 13 INSTALLATION DE LA PLAQUE INSTALLATION DE LA HOTTE DE FIXATION AU PLAFOND (Inst. avec conduit seulement) 1. À l’emplacement 1. Assembler CONDUIT ROND DE 6 PO SOLIVES choisi pour la équerres (8) VIS hotte, installer partie MÉCANIQUES... -
Página 14: Installation De La Hotte
MODÈLE EIT1366SS Page 14 INSTALLATION DE LA HOTTE INSTALLATION DE LA HOTTE (Inst. avec conduit seulement) (suite) (Inst. avec conduit seulement) (suite) 5. Mesurer 9. Connecter le câble d’alimentation au câblage de la maison l o n g u e u r dans la boîte de jonction. - Página 15 MODÈLE EIT1366SS Page 15 INSTALLATION DE LA HOTTE INSTALLATION DE LA HOTTE (Inst. sans conduit seulement) (Inst. sans conduit seulement) (suite) CONTENU DE L’ENSEMBLE MODÈLE ANKIBF4 3. Assembler équerres POUR HOTTE SANS CONDUIT (8) VIS partie MÉCANIQUES inférieure de la À...
- Página 16 MODÈLE EIT1366SS Page 16 INSTALLATION DE LA HOTTE INSTALLATION DE LA HOTTE (Inst. sans conduit seulement) (suite) (Inst. sans conduit seulement) (suite) 7. Mesurer 12. Connecter le câble d’alimentation au câblage de la maison l o n g u e u r dans la boîte de jonction.
-
Página 17: Pièces De Rechange
MODÈLE EIT1366SS Page 17 PIÈCES DE RECHANGE REPÈRE N° DE PIÈCE DESCRIPTION QTÉ Plaque de montage au plafond avec S99528364 boîte de jonction S99527130 Équerres (jeu de 8) Conduits décoratifs supérieur S1108788 et inférieur S99010491 Condensateur 30 μf S1104711 Carte électronique Boîtier de plastique de la... - Página 18 MODÈLE EIT1366SS Page 18 GARANTIE Garantie limitée Période de garantie et exclusions : Broan NuTone LLC (la « Société ») ou Venmar Ventilation ULC et/ou son subsidiaire garantit au consommateur acheteur initial (« vous ») de son produit (le « Produit ») que celui-ci est exempt de tout vice de matériau ou de fabrication pour une période de un (1) an à...
-
Página 19: Campana De Isla Para Chimenea
MODELO EIT1366SS Página 19 Para registrar este producto visite: CAMPANA DE www.broan-nutone.com o www.broan-nutone.ca ISLA PARA CHIMENEA LEA Y CONSERVE ESTAS INSTRUCCIONES INDICADA SOLAMENTE PARA COCINAR EN CASA ADVERTENCIA ADVERTENCIA PARA REDUCIR EL RIESGO DE INCENDIO, DESCARGA PARA REDUCIR EL RIESGO DE LESIONES PERSONALES EN EL ELÉCTRICA O LESIONES PERSONALES, OBSERVE LO... -
Página 20: Funcionamiento
MODELO EIT1366SS Página 20 FUNCIONAMIENTO LIMPIEZA Y MANTENIMIENTO El mantenimiento correcto de la campana de la estufa asegurará 8. 8. el funcionamiento adecuado de la unidad. MOTOR El motor está permanentemente lubricado y nunca necesitará APAGADO PANTALLA ALIMENTACIÓN CONTROL ponerle aceite. Si los cojinetes del motor están haciendo ruido... -
Página 21: Instale Los Conductos
MODELO EIT1366SS Página 21 INSTALE LOS CONDUCTOS PREPARE LA CAMPANA (sólo en campanas con conductos) 1. Decida dónde Desempaque la campana y revise el contenido del paquete. TAPA DE TECHO instalará el Debe contener lo siguiente: conducto entre CONDUCTO REDONDO 1 - Campana DE 6 PULG. -
Página 22: Instale El Soporte Para El Cielo Raso
MODELO EIT1366SS Página 22 INSTALE EL SOPORTE PARA EL INSTALE LA CAMPANA CIELO RASO (sólo en instalaciones con conductos) 1. En la ubicación 1. Arme VIGAS CONDUCTO REDONDO DE 6 PULG. de la campana, soportes DE CIELO RASO (8) TORNILLOS i n s t a l e ángulo... -
Página 23: Instale La Campana
MODELO EIT1366SS Página 23 INSTALE LA CAMPANA INSTALE LA CAMPANA (sólo en inst. con conductos) (cont.) (sólo en inst. con conductos) (cont.) 5. Mida la longitud 9. Conecte el cable eléctrico al cableado de la casa por dentro de conducto la caja de conexiones eléctricas. - Página 24 MODELO EIT1366SS Página 24 INSTALE LA CAMPANA INSTALE LA CAMPANA (sólo en instalaciones sin conductos) (sólo en inst. sin conductos) (cont.) CONTENIDO DEL KIT PARA SISTEMAS SIN 3. Arme soportes CONDUCTOS MODELO ANKIBF4 (8) TORNILLOS ángulo sobre MAQUINADOS las ubicaciones...
- Página 25 MODELO EIT1366SS Página 25 INSTALE LA CAMPANA INSTALE LA CAMPANA (sólo en inst. sin conductos) (cont.) (sólo en inst. sin conductos) (cont.) 7. Mida la longitud 12. Conecte el cable eléctrico al cableado de la casa. Conectar conducto el hilo neutro del cable de alimentación de la campana...
-
Página 26: Piezas De Servicio
MODELO EIT1366SS Página 26 PIEZAS DE SERVICIO CLAVE N.° DE PIEZA DESCRIPCIÓN CANT. Soporte para el cielo raso con caja S99528364 para el tomacorriente eléctrico S99527130 Soportes en ángulo (juego de 8) Tubos de humos decorativos superior S1108788 e inferior S99010491 Condensador 30 μf... -
Página 27: Garantía
MODELO EIT1366SS Página 27 GARANTÍA Garantía limitada Periodo y exclusiones de la garantía: Broan-NuTone LLC o Venmar Ventilation ULC (sea esta la “Compañía”) garantiza al consumidor comprador original de su producto (“usted”) que el producto (el “Producto”) estará libre de defectos en materiales o en mano de obra, por un periodo de un (1) año a partir de la fecha de compra original (o por un periodo mayor según sea requerido por la legislación aplicable).