biohort HighLine Instrucciones De Montaje
Ocultar thumbs
Ver también para HighLine:
- Instrucciones de montaje (32 páginas) ,
- Instrucciones de montaje (2 páginas) ,
- Instrucciones de montaje (4 páginas)
Publicidad
Enlaces rápidos
AUFBAUANLEITUNG
Seitendach für Gerätehaus „HighLine®"
Assembly manual side canopy for garden shed "HighLine®"
GB
Notice de montage de l'auvent de l'abri de jardin "HighLine®"
FR
Montage handleiding zijdak voor berging "HighLine®"
NL
Instrucciones de montaje techo lateral para la caseta "HighLine®"
ES
Istruzioni di montaggio Tettoia laterale per casetta "HighLine®"
IT
Samlevejledning sidetag til haveskuret "HighLine®"
DK
Monteringsanvisning sidotak till trägårdsbod "HighLine®"
SE
Monteringsanvisning for sidetaket på boden "HighLine®"
NO
Instrukcja montażu daszka bocznego do domku ogrodowego "HighLine®"
PL
Návod na montáž bočnej strechy pre prístrešok "HighLine®"
SK
Navodila za montažo stranskega nadstreška za vrtno lopo "HighLine®"
SI
Návod na montáž boční střechy pro přístřešek "HighLine®"
CZ
Összeszerelési útmutató szerszámos ház "HighLine®" oldaltető
HU
Upute za montažu bočnog krova za vrtnu ostavu "HighLine®"
HR
QUALITÄT AUS
Ö S T E R R E I C H
Publicidad

Manuales relacionados para biohort HighLine


Resumen de contenidos para biohort HighLine
- Página 1 AUFBAUANLEITUNG Seitendach für Gerätehaus „HighLine®“ Assembly manual side canopy for garden shed "HighLine®" Notice de montage de l’auvent de l’abri de jardin "HighLine®" Montage handleiding zijdak voor berging "HighLine®" Instrucciones de montaje techo lateral para la caseta "HighLine®" Istruzioni di montaggio Tettoia laterale per casetta "HighLine®"...
- Página 2 GRÖSSE „H3 L“; SIE GILT SINNGEMÄSS AUCH FÜR ALLE ANDEREN GRÖSSEN. FÜR EINIGE MONTAGESCHRITTE BENÖTIGEN SIE 1 BIS 2 HELFER. These assembly instructions show the assembly of the side canopy „HighLine“ size „H3 L“; they apply equally to all other sizes. For some assembly steps you will need 1 to 2 helpers.
- Página 3 NICHT BEI WIND AUFBAUEN! Do not assembly in windy condition! Ne pas procéder au montage dans des conditions venteuses ! Niet opbouwen in winderige omstandigheden! ¡No se instalen en condiciones de viento! Non montare in condizioni di vento! Bør ikke monteres ved kraftig vind! Genomför inte monteringen när det blåser! Ikke monter når det blåser mye! Nie montować...
- Página 4 ORANGE EINGEFÄRBTE TEILE SIND IN DEN JEWEILIGEN AUFBAUSCHRITTEN ZU DEMONTIEREN! Parts coloured in orange need to be disassembled in the respective construction step! Les pièces de couleur orange doivent être démontées au cours des étapes de montage correspondantes! Oranje gekleurde onderdelen moeten in de desbetreffende bouwstappen los geschroefd worden! Las piezas de color naranja deben desmontarse en los pasos de montaje correspondientes.
- Página 5 SCHRAUBVERBINDUNGEN GRUNDSÄTZLICH ERST AM ENDE DER MONTAGE FESTZIEHEN! Nuts not to be tightened before the end of assembly! Ne serrer les écrous à fond qu´à la fin du montage!. Schroeven pas aan het einde van de montage vastdraaien! En principio, no apriete fijamente las tuercas hasta que no haya terminado de montar la caseta. I dadi devono essere serrati a fondo soltanto alla fine del montaggio! Møtrikkerne må...
- Página 6 Biohort-produktet ditt. PORADA: Regularnie sprawdzaj i czyść łapacz liści i leżące pod nim części rynny - w ten sposób przydłużysz żywotność produktu Biohort. TIP NA UDRŽIAVANIE: Pravidelne kontrolujte a čistite lapač listov a spodné časti odkvapu - prispeje to k dlhodobej životnosti vášho produktu Biohort.
- Página 7 Dette er et uforpliktende fundaments forslag. Kunden er selv ansvarlig for å velge et passende fundament til monteringen. Biohort kan ikke påta seg noe ansvar for skader forårsaket av utilstrekkelig festede produkter eller andre grunnfeil.
- Página 8 Gestione di parti danneggiate: Non installare parti danneggiate! Se si rivela un danno, questo deve essere segnalato in anticipo per mail con materiale fotografico a supporto del reclamo. Se si procede all´installazione delle parti danneggiate, Biohort si riserva il diritto di respingere il reclamo.
- Página 9 STANDARDPAKET Standard package · Colis standard · Standaardpakket · Paquete estándar · Pacchetto standard · Standard pakke · Standardpaket · Standard pakke · Pakiet standardowy · Štandardná dodávka · Standardni paket · Standardní dodávka · standard csomag · Standardni paket ...
- Página 10 Demontage Bauteile Dismantling part - Démonter le ressort à gaz...
- Página 11 H2: 2x H2: 2x H2: 8x H2: 8x H3: 2x H3: 2x H3: 8x H3: 8x H4: 2x H4: 2x H4: 8x H4: 8x H5: 2x H5: 2x H5: 8x H5: 8x Schrauben demontieren! Please disassemble the screws! Démonter les vis!
- Página 12 H2: 1x H2: 1x H2: 4x H2: 4x H2: 8x H2: 8x H3: 1x H3: 1x H3: 6x H3: 6x H3: 10x H3: 10x H4: 1x H4: 1x H4: 6x H4: 6x H4: 12x H4: 12x H5: 1x H5: 1x H5: 8x H5: 8x H5: 14x...
- Página 13 H2: 1x H2: 1x H2: 1x H2: 1x H2: 1x H2: 1x H3: 1x H3: 1x H3: 1x H3: 1x H3: 1x H3: 1x H4: 1x H4: 1x H4: 1x H4: 1x H4: 1x H4: 1x H5: 1x H5: 1x H5: 1x H5: 1x H5: 1x...
- Página 14 H2: 1x H2: 1x H2: 1x H2: 1x H2: 6x H2: 6x H3: 1x H3: 1x H3: 1x H3: 1x H3: 6x H3: 6x H4: 1x H4: 1x H4: 1x H4: 1x H4: 6x H4: 6x H5: 1x H5: 1x H5: 1x H5: 1x H5: 6x...
- Página 15 H2: 2x H2: 2x (1720mm) (1720mm) H2: 8x H2: 8x H2: 1x H2: 1x H3: 2x H3: 2x (2120mm) (2120mm) H3: 10x H3: 10x H3: 1x H3: 1x H4: 2x H4: 2x (1720mm) (1720mm) H4: 12x H4: 12x H4: 1x H4: 1x (800mm) (800mm)
- Página 16 H2: 2x H2: 2x H2: 8x H2: 8x H2: 2x H2: 2x H3: 2x H3: 2x H3: 8x H3: 8x H3: 2x H3: 2x H4: 2x H4: 2x H4: 8x H4: 8x H4: 2x H4: 2x H5: 2x H5: 2x H5: 8x H5: 8x H5: 2x...
- Página 17 H2: 2x H2: 2x H2: 2x H2: 2x H2: 2x H2: 2x H3: 2x H3: 2x H3: 2x H3: 2x H3: 2x H3: 2x H4: 2x H4: 2x H4: 2x H4: 2x H4: 2x H4: 2x H5: 2x H5: 2x H5: 2x H5: 2x H5: 2x...
- Página 18 H2: 1x H2: 1x H2: 1x H2: 1x H2: 2x H2: 2x H3: 1x H3: 1x H3: 1x H3: 1x H3: 2x H3: 2x H4: 1x H4: 1x H4: 1x H4: 1x H4: 2x H4: 2x H5: 1x H5: 1x H5: 1x H5: 1x H5: 2x...
- Página 19 H2: 8x H2: 8x H2: 4x H2: 4x H3: 8x H3: 8x H3: 4x H3: 4x H4: 8x H4: 8x H4: 4x H4: 4x H5: 8x H5: 8x H5: 4x H5: 4x...
- Página 20 H2: 1x H2: 1x H2: 16x H2: 16x H2: 8x H2: 8x H3: 1x H3: 1x H3: 18x H3: 18x H3: 8x H3: 8x H4: 1x H4: 1x H4: 20x H4: 20x H4: 8x H4: 8x H5: 1x H5: 1x H5: 22x H5: 22x H5: 8x...
- Página 21 Wasserwaagen - Symbol: Rechtwinkelig einrichten Betreffendes Einbauteil mit der Wasserwaage ausrichten. rectangular adjusted ajuster en forme rectangulaire Symbol of spirit level: Align the respective parts by using the spirit level. rechthoekig instellen Symbole niveau à bulle: Lorsque ce symbole apparaît, vous devez ajuster l´élément à l´aide d´un niveau à bulle. ajustar en forma rectangular mettere in forma rettangolare Waterpas –...
- Página 22 Größenabhängiger Montageschritt - Size-Dependent assembly step - Dépendant de la taille - Size-Dependent montagestap Paso de montaje de tamaño Dependiente - Taglia-Dependent fase di montaggio - Størrelses-anhængig montage skridt ENTFÄLLT BEI GRÖSSE S · · · Not applicable for size S Ne concerne pas les tailles S Niet van toepassing voor ·...
- Página 23 H2: 1x H2: 2x H2: 1x H2: 2x H2: 6x H2: 12x H3: 1x H3: 2x H3: 1x H3: 2x H3: 6x H3: 12x H4: 1x H4: 2x H4: 1x H4: 2x H4: 6x H4: 12x H5: 1x H5: 2x H5: 1x H5: 2x H5: 6x...
- Página 25 H2: 1x H2: 1x H2: 1x H2: 1x H3: 1x H3: 1x H3: 1x H3: 1x H4: 1x H4: 1x H4: 1x H4: 1x H5: 1x H5: 1x H5: 1x H5: 1x Festziehen tighten H2: 6x H2: 8x H2: 5x H2: 5x serrez fort vastdraaien...
- Página 26 H2: 3x H2: 3x H2: 6x H2: 6x H3: 4x H3: 4x H3: 8x H3: 8x H4: 5x H4: 5x H4: 10x H4: 10x H5: 6x H5: 6x H5: 12x H5: 12x Festziehen H2: 6x H2: 12x H2: 18x H2: 18x tighten serrez fort H3: 8x...
- Página 27 H2: 1x H2: 1x H2: 3x H2: 3x H3: 1x H3: 1x H3: 3x H3: 3x H4: 1x H4: 1x H4: 3x H4: 3x H5: 1x H5: 1x H5: 3x H5: 3x Festziehen tighten H2: 2x H2: 4x H2: 8x H2: 10x serrez fort vastdraaien...
- Página 28 H2: 1x H2: 1x H3: 1x H3: 1x H4: 1x H4: 1x H5: 1x H5: 1x...
- Página 29 H2: 2x H2: 2x H2: 4x H2: 4x H2: 18x H2: 22x H3: 2x H3: 2x H3: 4x H3: 4x H3: 19x H3: 23x H4: 2x H4: 2x H4: 4x H4: 4x H4: 20x H4: 24x H5: 2x H5: 2x H5: 4x H5: 4x H5: 21x...
- Página 30 H2: 2x H2: 2x H2: 8x H2: 8x H2: 8x H2: 8x H3: 2x H3: 2x H3: 8x H3: 8x H3: 8x H3: 8x H4: 2x H4: 2x H4: 8x H4: 8x H4: 8x H4: 8x H5: 2x H5: 2x H5: 8x H5: 8x H5: 8x...
- Página 31 H2: 8x H2: 12x H3: 8x H3: 12x H4: 8x H4: 12x H5: 12x H5: 16x Dachwölbung herstellen! Create a roof arch! Créer une courbure du toit!
- Página 32 H2: 1x H2: 1x H2: 2x H2: 2x H2: 4x H2: 4x H3: 1x H3: 1x H3: 2x H3: 2x H3: 4x H3: 4x H4: 1x H4: 1x H4: 2x H4: 2x H4: 4x H4: 4x H5: 1x H5: 1x H5: 2x H5: 2x H5: 4x...
- Página 33 H2: 6x H2: 6x H2: 2x H2: 2x H3: 6x H3: 6x H3: 2x H3: 2x H4: 6x H4: 6x H4: 2x H4: 2x H5: 6x H5: 6x H5: 2x H5: 2x Auf gleiche Länge achten! Watch out for the same length! Assurez-vous qu'ils soient de la même longueur! Let op dezelfde lengte! ¡Asegúrese de que tengan la misma longitud!
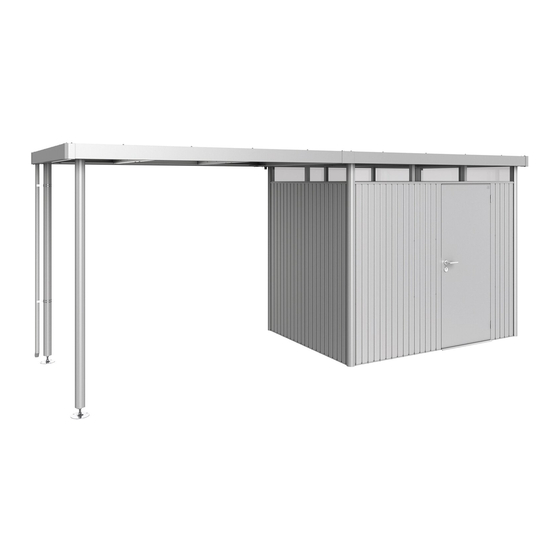
- Página 34 Abmessungen Gerätehaus „HighLine“ und Seitendach Dimensions garden shed “HighLine“ and side canopy Dimensions des abri de jardin “HighLine“ et de l’auvent 89.945 2568 89.848 89.945 2568 89.848 Dateiname des Zeichnungsobjektes: Dateityp: Datein HIGHLINE_H4 ASSEM Allgemeintol. Kanten DIN ISO DIN ISO...
- Página 35 Biohort-Gerätehauses model “HighLine” and de jardin Biohort Modèle het Biohort tuinhuis side canopy « HighLine » et de model “HighLine” en Modell „HighLine“ l’auvent Zijdak und Seitendach Adresse Aufstellort / Address at site of erection / Adresse du terrain / Platsingsadres Grundbuch-Einlagezahl Grundstücks-Nr.
- Página 36 Biohort steht für „LEBEN IM GARTEN“ GERÄTEHÄUSER – Setzen Sie auf Qualität & Langlebigkeit GARDEN SHEDS – rely on quality & longevity Biohort stands for „LIFE IN THE GARDEN“ GARTENBOXEN – Outdoorboxen für Garten, Terrasse & Co. OUTDOOR BOXES – outdoor boxes for garden, patio & more FAHRRAD-GARAGEN –...