Tabla de contenido
Publicidad
Idiomas disponibles
Idiomas disponibles
Enlaces rápidos
Publicidad
Capítulos
Tabla de contenido
Solución de problemas

Manuales relacionados para Yamaha DRX-730


Resumen de contenidos para Yamaha DRX-730
- Página 1 DRX-730 MICRO COMPONENT SYSTEM OWNER'S MANUAL MANUAL DE INSTRUCCIONES...
-
Página 2: Important Safety Instructions
We Want You Listening For A Lifetime Yamaha and the Electronic Industries Association’s Consumer Electronics Group want you to get the most out of your equipment by playing it at a safe level. One that lets the sound come through loud and clear without annoying blaring or distortion –... -
Página 3: Fcc Information (For Us Customers)
Modifications not expressly approved by following measures: Yamaha may void your authority, granted by the FCC, to use the product. Relocate either this product or the device that is being affected by the interference. - Página 4 MOISTURE. may cause fire, damage to this unit, and/or personal injury. Yamaha will not be held responsible for any damage CAUTION resulting from use of this unit with a voltage other than Danger of explosion if battery is incorrectly replaced.
-
Página 5: Legal Notices
• Do not throw away batteries with general house waste; If the power cable is disconnected from the AC wall dispose of them correctly in accordance with your local outlet, the DRX-730 will save the radio presets and regulations. other settings for at least 1 week. - Página 6 DivX, DivX Ultra Certified, and associated logos are trademarks of DivX, Inc. and are used under license. Manufactured under license from Dolby Laboratories. Dolby and the double-D symbol are trademarks of Dolby Laboratories. Manufactured under license under U.S. Patent #’s: 5,451,942; 5,956,674;...
-
Página 7: Tabla De Contenido
Music player playback ....43 Turning on the DRX-730 ....16 iPod playback . -
Página 8: Introduction
• Timer function • On-screen display (OSD) • Full-function remote control • Optical digital output 1. The DRX-730 can play MP3, WMA, MPEG-4 AAC, and JPEG files stored on CD-R/RW, DVD-R/RW, and ® DVD+R/RW discs or USB storage devices, and DivX WMV files stored on CD-R/RW, DVD-R/RW, and DVD+R/RW discs. -
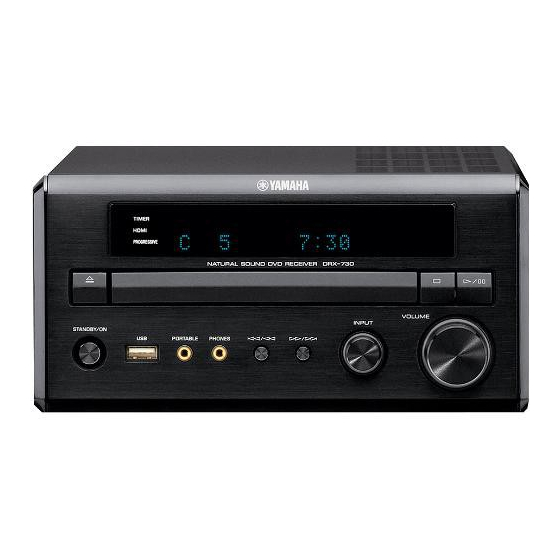
Página 9: Front Panel
STANDBY/ON PORTABLE PHONES STANDBY/ON USB port Sets the DRX-730 to on or standby (see page 16). Used to connect a USB storage device containing music or picture files (see page 45). Open/Close ( ) PORTABLE jack Opens and closes the disc tray (see page 23). -
Página 10: Display
PRESET TIMER Lights up when selecting radio presets (see page 39). Lights up when the DRX-730 is on and the timer is on (see page 42). STEREO TUNED Lights up when listening to an FM station in stereo (see page 36). -
Página 11: Rear Panel
MAINS (power cable) DOCK Connect the power cable to an AC wall outlet (see An optional Yamaha iPod universal dock (YDS-10 or page 15). YDS-11) or a Yamaha YBA-10 Bluetooth Wireless Audio Receiver can be connected here (see pages 43 HDMI output and 47). -
Página 12: Remote Control
Transmits control signals to the DRX-730 (see page 8). This section provides a brief description of the remote control’s buttons. B STANDBY/ON ( Sets the DRX-730 to on or standby (see page 16). C Number buttons Enter numbers. STANDBY/ON OPEN/CLOSE D SUBTITLE (BLUETOOTH OFF) •... - Página 13 Sets the sleep timer (see page 20). DIMMER OPEN/CLOSE ( ) Dims the DRX-730’s display (see page 20). Opens and closes the disc tray (see page 23). ON SCREEN Displays information about the currently playing disc on the connected TV.
-
Página 14: Getting Started
Insert the supplied batteries into the battery meters (20 feet). When using the remote control, compartment with the correct polarity point it toward the DRX-730’s remote control sensor, (+ and –). which is next to the display, see below. Notes: •... -
Página 15: Connecting Speakers
Chapter 2: Getting Started Connecting speakers Connect the NX-E700 speakers to the DRX-730 as shown below. Right speaker Left speaker Speaker cables DRX-730 MAINS HDMI CLASS 2 WIRING UNBAL. CABLAGE CLASSE 2 SPEAKER VIDEO COMPONENT SUBWOOFER OPTICAL SPEAKERS DOCK VIDEO OUT... -
Página 16: Connecting Speaker Cables
Red: positive (+) Black: negative (–) Notes: • Do not connect the power cables to the DRX-730 and powered subwoofer until all other connections have been completed. • The SUBWOOFER OUT jack outputs the low- frequency sounds of a downmix created from all... -
Página 17: Connecting Antennas
Site the antenna away from the DRX-730, speaker cables, and power cables. Notes: • Do not connect the power cable to the DRX-730 until all other connections have been completed. • Before deciding where to install the antennas permanently, tune in to an AM or FM radio station and adjust the position of the AM or FM antenna, respectively, to find the best reception. -
Página 18: Connecting A Tv
Component video connection If your TV supports component video but not HDMI, You can connect the DRX-730 to a TV by using any you can connect the DRX-730 to your TV with a one of four different connection types: HDMI, component video cable. -
Página 19: Hdmi Connection
* If your HDMI-compatible TV does not support the above resolutions, the picture may not display correctly. * The DRX-730 is designed to be connected to an HDMI component. If it’s connected to a DVI component, normal operation may not be possible depending on the DVI... -
Página 20: Connecting A Recorder (Cdr, Mdr, Etc.)
DIGITAL Optical cable See “Recording” on page 49 for more details. (sold separately) Notes: • Do not connect the power cable to the DRX-730 OPTICAL DIGITAL until all other connections have been completed. • Turn off the recording component before AV receiver/decoder connecting it to the DRX-730. -
Página 21: Connecting The Power Cable
Chapter 2: Getting Started Connecting the power cable Once you’ve completed all of the other connections, connect the power cable to an AC wall outlet. Connect to MAINS HDMI an AC wall outlet CLASS 2 WIRING CABLAGE CLASSE 2 SPEAKER SUBWOOFER SPEAKERS... -
Página 22: General Functions
■ Front panel STANDBY/ON 4. Press repeatedly to select AUX or PORTABLE. 5. Optional Yamaha iPod universal dock (YDS-10 or YDS-11) You can also set the DRX-730 to on or standby by required. using STANDBY/ON on the DRX-730. 6. Optional Yamaha YBA-10 Bluetooth Wireless Audio Receiver required. -
Página 23: Adjusting The Volume
■ Front panel VOLUME control MUTE You can also adjust the volume by using the VOLUME control on the DRX-730. To unmute the sound, press MUTE again. “MUTE OFF” appears on the display and the MUTE indicator goes off. M M M M U U U U T T T T E E E E O O O O F F F F F F F F Notes: •... -
Página 24: Adjusting The Bass And Treble
Chapter 3: General Functions Adjusting the bass and treble Adjusting the balance You can adjust the bass and treble to change the tone You can adjust the left and right sound balance. as you like. MENU TOP MENU PRESET MENU TOP MENU PRESET INFO. -
Página 25: Pure Direct Playback Mode
DISPLAY Connect headphones with a mini plug to the To turn on Pure Direct playback mode, press PURE PHONES jack on the DRX-730’s front panel. DIRECT repeatedly until “PURE DIRECT ON” While headphones are plugged into the PHONES appears on the display. -
Página 26: Adjusting The Display Brightness
For example, when you want your room lighting. For example, you’re using the to enjoy a movie or some music until you fall asleep. DRX-730 in a darkened room and the display is too bright. VOLUME... -
Página 27: Setting The Clock
Chapter 3: General Functions Setting the clock Press ENTER. The time is set and the display stops flashing. To display the time or program the timer, you must first set the clock. Notes: • To switch between 12- and 24-hour clock, while the time is being displayed, use Left/Right ( / ). -
Página 28: Viewing The Time
You can view the time while listening to a source. To save energy and prevent screen burn, you can set the DRX-730 so that it automatically goes on standby after 30 minutes of inactivity when using the DVD or USB input source. -
Página 29: Playing Discs
TIMER SLEEP DIMMER DISPLAY • Pressing Open/Close ( ) on the DRX-730 while its on standby will turn it on, open the disc tray, and select the DVD input source, ready for disc playback. -
Página 30: Stopping Playback
Rewind and fast forward To stop playback, press Stop ( ). During playback, you can rewind or fast forward at You can also use Stop ( ) on the DRX-730 to stop various speeds. playback. If “RESUME” or “LAST MEMORY” appears on the To rewind, press Rewind ( ) during playback. -
Página 31: Selecting Chapters And Tracks
ENTER to select the track you want to play. earlier chapters or tracks. The following buttons can be used with menus. You can also use Next/Fast Forward ( ) and Previous/Rewind ( ) on the DRX-730 to Button Description select tracks. Displays the PBC menu when RETURN... -
Página 32: Slow-Motion Playback
Chapter 4: Playing Discs Slow-motion playback Frame-by-frame playback ® ® You can play DVD-Video, VCD, SVCD, DivX , and You can play DVD-Video, VCD, SVCD, DivX , and WMV discs in slow motion at four different speeds. WMV discs frame-by-frame. You can also play You can also play DVD-Video discs in reverse slow DVD-Video discs frame-by-frame in reverse. -
Página 33: Selecting Languages And Audio
Chapter 4: Playing Discs Selecting languages and audio Selecting subtitles ® Some DVD discs have soundtracks in multiple Some DVD and DivX discs have subtitles in one or languages or audio formats, such as Dolby Digital and more languages that you can select during playback. DTS, that you can select during playback. -
Página 34: Selecting Camera Angles
Chapter 4: Playing Discs Selecting camera angles Zoom Some DVD-Video discs have content recorded at You can zoom the picture 2x or 4x when playing a ® multiple camera angles that you can select during DVD-Video, VCD, SVCD, DivX , WMV, or JPEG playback. -
Página 35: Repeat Playback
Chapter 4: Playing Discs Repeat playback A–B repeat playback You can play a title, chapter, track, or disc repeatedly. You can specify two points (A and B) on a DVD, VCD, SVCD, or Audio CD, and then play the section Repeat playback can be combined with program between those two points repeatedly. -
Página 36: Random Playback
Chapter 4: Playing Discs Random playback Program playback You can play titles or chapters (DVD-Video) or tracks You can create a program of your favorite titles, (VCD, SVCD, or Audio CD) in random order. chapters, or tracks for playback. BLUETOOTH ZOOM ON SCREEN AUDIO... -
Página 37: Searching Discs
• The program will be deleted when the disc is MANUAL ejected, an input source other than DVD is TUNER BAND selected, or the DRX-730 is turned off. • Program playback cannot be used with DVD-VR During playback, press SETUP. ® (VR mode DVD-R/RW/R DL), DivX , WMV, The Setup menu appears on-screen. -
Página 38: Playing Jpeg Slideshows
• Large pictures take longer to load and may not ZOOM BLUETOOTH appear immediately. AUDIO SUBTITLE ANGLE • On a single disc, the DRX-730 supports up to 299 PLAY MODE CLEAR folders, and each folder may contain a combination of up to 648 files and folders. TOP MENU MENU... -
Página 39: Using Disc Navigator With Dvd-Video
Chapter 4: Playing Discs The following items are available for each disc type. Using Disc Navigator with DVD-Video, VCD, and SVCD Disc Item discs Title DVD-Video Chapter You can use Disc Navigator to browse and select titles, Track chapters, and tracks on DVD, VCD, and SVCD discs. VCD, SVCD Time Original: Title... -
Página 40: Using Disc Navigator With Mp3, Wma
Chapter 4: Playing Discs Using Disc Navigator with MP3, To play the selected track, file, or folder, press ® ENTER. WMA, MPEG-4 AAC, DivX If you selected an MP3, WMA, MPEG-4 AAC, WMV, and JPEG discs ® DivX , or WMV file, starting with that file, all of You can use Disc Navigator to browse and select MP3, the files in the same folder will be played. -
Página 41: Viewing Disc Information
To hide the information, press ON SCREEN repeatedly until it disappears. Possible audio formats are listed below. Some information, such as remaining disc time, is Display Description also displayed on the DRX-730’s display. PCM (DVD-Video disc) Dolby D Dolby Digital (DVD-Video disc) MPEG2 MPEG2 (DVD-Video disc) -
Página 42: Using The Tuner
You can tune in to radio stations automatically or manually. ■ Tuner display indicators The following display indicators are used for tuning and presetting radio stations. Auto tuning In Auto Tuning mode, the DRX-730 searches for radio stations automatically. PRESET STEREO AUTO TUNED MEMORY A1 FM 100.1 MHz... -
Página 43: Manual Tuning
The frequency will change continuously if you keep your finger on the button. Press STANDBY/ON. The frequency step is set and the DRX-730 goes Note: on standby. Press STANDBY/ON again to turn it • Only mono reception is possible in Manual back on. -
Página 44: Using Presets
8 stations (1–8) in each bank. Presets can be stored automatically or manually. TOP MENU MENU PRESET Auto presetting INFO. ENTER ENTER In Auto Presetting mode, the DRX-730 presets all of RETURN SETUP the radio stations available in your area automatically. VOLUME MEMORY AUTO/ MANUAL MEMORY... - Página 45 Chapter 5: Using the Tuner Selecting presets Once you’ve preset a radio station, you can tune in to it simply by selecting the appropriate preset. STANDBY/ON OPEN/CLOSE Number buttons ZOOM ON SCREEN BLUETOOTH AUDIO SUBTITLE ANGLE PLAY MODE CLEAR TOP MENU MENU PRESET INFO.
-
Página 46: Using The Timer
INPUT control on the DRX-730 to Notes: select the input source. • The DRX-730’s clock must be set in order to If you selected TUNER, use Up/Down ( / ) to program the timer (see page 21). -
Página 47: Setting The On Time
Chapter 6: Using the Timer Setting the on time Setting the off time You can set the time at which you want the DRX-730 You can set the time at which you want the DRX-730 to turn on and start playback. -
Página 48: Turning The Timer On And Off
DRX-730 is on standby by simply pressing TIMER. • When the timer is on, if the DRX-730 is on, the TIMER indicator on the display lights up. If it’s on standby, the TIMER LED on the front panel lights... -
Página 49: Portable Device Playback
DOCK jack, you can enjoy the music stored on your iPod through the DRX-730’s speakers in high quality. Music player playback You can also use the DRX-730’s remote control to control your iPod. In addition, the DRX-730 will You can connect a music player to the PORTABLE recharge your iPod while you enjoy your music. - Página 50 Press again to select earlier tracks. ■ DOCK Menu navigation The following DRX-730 remote control buttons can Lights up when an iPod is seated in the Yamaha dock. be used to navigate iPod menus. PLAYLISTS Button Description Lights up when browsing playlists.
-
Página 51: Usb Playback
If the device is not a USB storage device, Most of the disc playback functions explained in the do not use it with the DRX-730. If the USB storage “Playing Discs” chapter on page 23 can also be used device came with its own power adapter, use it to with USB storage devices. - Página 52 Next ( ), and Previous ( ) will control the • On a single USB storage device, the DRX-730 slideshow, not music playback. supports up to 299 folders, and each folder may • Disc Navigator only plays the files in the current contain a combination of up to 648 files and folder.
-
Página 53: Bluetooth Playback
■ Bluetooth pairing Bluetooth playback Before you can use a Bluetooth device with the DRX-730, you must pair, or register it with the With an optional Yamaha YBA-10 Bluetooth Wireless Yamaha YBA-10. Audio Receiver connected to the DRX-730’s DOCK jack, you can enjoy the music stored on your Press DOCK to select the DOCK input source. -
Página 54: Playback Control
Bluetooth device when a disconnection is initiated on that device, communication becomes impossible because the device is too far away, or the DRX-730 is set to standby. • The Bluetooth device will not be disconnected when a different input source is selected on the DRX-730. -
Página 55: Recording
Chapter 8: Recording You can connect a recording component, such as a CDR, MDR, or casette recorder, to the DRX-730 for recording and playback. Connect your recording component to the DRX-730. See “Connecting a recorder (CDR, MDR, etc.)” on page 14 for details. -
Página 56: Audio Settings And Video Adjust
Chapter 9: Audio Settings and Video Adjust ■ Audio DRC This chapter explains the Audio Settings and Video Adjust menus. The Audio DRC (Dynamic Range Control) function makes loud sounds quieter and quiet sounds louder, which is ideal for watching movies late at night when Audio Settings menu you don’t want to disturb anyone. -
Página 57: Video Adjust Menu
Chapter 9: Audio Settings and Video Adjust ■ Sharpness Video Adjust menu Adjusts the sharpness of edges in the picture. The Video Adjust settings affect the TV picture. • Fine, Standard (default), Soft. ■ Brightness Adjusts the brightness of the picture. TOP MENU MENU PRESET... -
Página 58: Initial Settings Menu
Chapter 10: Initial Settings This chapter explains the Initial Settings menu. Digital Audio Out settings ■ Digital Out Initial Settings menu Turns the OPTICAL DIGITAL OUT on and off. • On (default): OPTICAL DIGITAL OUT is on. The Initial Settings menu contains digital audio output, video, language, display, and other settings. -
Página 59: Video Output Settings
Chapter 10: Initial Settings • If you select Progressive inadvertently and your Video Output settings TV doesn’t support it, you may lose the picture altogether. In this case, connect the DRX-730 to a ■ TV Screen TV with a composite video connection and... -
Página 60: Language Settings
The HDMI Resolution is reset to its default setting and the DRX-730 goes on standby. Press • With some DVD-Video discs, you can select the STANDBY/ON again to turn it back on. The soundtrack language from a menu. -
Página 61: Display Settings
• On (default): Subtitles are displayed by default if to restrict viewing. (See the disc’s case for details.) You available. can set the DRX-730 so that discs with a high parental • Off: Subtitles are not displayed by default. lock level cannot be played without first entering a password. -
Página 62: Changing The Password
Select “Initial Settings,” and then press ENTER. restrict, for example, playback of discs with a parental The Initial Settings menu appears on-screen. level of 4 or higher, set the DRX-730 to level 3. Select “Options,” then “DivX(R) VOD,” then Select “Level Change,” and then press ENTER. -
Página 63: Appendix
CD player on the other. DVD+R DVD+RW DVD+R DL The DRX-730 can play the DVD side of DualDiscs. Since the CD layer does not conform to the Audio CD standard, some DualDiscs may not play. For more details about the DualDisc standard, please... -
Página 64: About Divx
JPEG files • The DRX-730 is compatible with DVD+R/RW and DVD+R DL (Dual Layer) discs recorded with • The DRX-730 can play the following picture disc the following formats: DVD-Video. formats: Fuji Color CD, Kodak Picture CD. It can also play JPEG files stored on CD-R/RW discs and •... -
Página 65: About Wma
About WMV region number cannot be played. WMV, which stands for Windows Media Video, is a The region number for the DRX-730 can be found on video compression technology developed by its rear panel. The DRX-730 can only play discs with Microsoft Corporation. -
Página 66: Looking After Discs
Rental discs often have stickers or labels attached. Make sure there’s no glue jutting out from behind the label before playing such discs. • Do not load more than one disc in the DRX-730 at a time. • For more details on disc handling, refer to the... -
Página 67: Looking After The Drx-730
• Do not place anything on top of the DRX-730. TIMER HDMI PROGRESSIVE • Do not place the DRX-730 on top of your TV. And keep it away from components that are sensitive to magnetism, such as video recorders. VOLUME... -
Página 68: Language, Country, And Region Lists
Appendix Language, country, and region lists Language list ■ Language (abbreviation), code number Japanese (ja), 1001 Bhutani (dz), 0426 Kirghiz (ky), 1125 Sinhalese (si), 1909 English (en), 0514 Esperanto (eo), 0515 Latin (la), 1201 Slovak (sk), 1911 French (fr), 0618 Estonian (et), 0520 Lingala (ln), 1214 Slovenian (sl), 1912... -
Página 69: Troubleshooting
Appendix Troubleshooting If you experience any issues while using the DRX-730, look them up in the following tables and try the suggested solution. If an issue is not listed, or you cannot resolve it yourself, contact your Yamaha dealer. General... -
Página 70: Remote Control
Appendix Issue Possible cause Solution The DRX-730 turned off The sleep timer was set. Turn the DRX-730 back on again. unexpectedly. The Auto Standby function Check the Auto Standby setting automatically set the DRX-730 to (see page 22). standby. One speaker is quieter than the... - Página 71 Use only supported disc formats (see page 57). Condensation on the pickup lens. Wait for one to two hours for the When the DRX-730 is moved from condensation to evaporate, then try a cold environment to a warm one, again.
- Página 72 Appendix Issue Possible cause Solution The disc ejected as soon as it The loaded disc is not supported. Use only supported disc formats was loaded. (see page 57). The message “No Disc” is The disc is not properly set on the Place the disc, label-side up, in the displayed even though a disc is disc tray.
- Página 73 Move the antenna away from the close to the DRX-730. DRX-730, or try adjusting the direction of the antenna. The DRX-730 is too close to the Move the DRX-730 away from the TV, particularly if the noise occurs in the evening.
- Página 74 When playing a video on an The iPod is set to display video on a With the iPod seated in the Yamaha iPod, video playback does not iPod universal dock, set the iPod’s appear on the iPod’s display.
- Página 75 Issue Possible cause Solution The message “NO USB” or “USB The USB device is not compatible, Turn the DRX-730 off and on ERROR” is displayed. or the DRX-730 cannot supply again. enough power to the device for it to Set the DRX-730 to standby, function properly.
-
Página 76: Specifications
Appendix Specifications Amplifier section General • Minimum RMS output power per channel (20 kHz Factory LPF) • Power supply (6 Ω, 1 kHz, 0.9% THD)......... 20 W + 20 W U.S.A. and Canada models.........AC 120 V, 60 Hz • Maximum RMS output power per channel (20 kHz Factory LPF) Australia model............AC 240 V, 50 Hz (6 Ω, 1 kHz, 10% THD).......... - Página 77 PARA REDUCIR EL RIESGO DE INCENDIO O aparato y/o lesiones a las personas. Yamaha no se hará DESCARGA ELÉCTRICA, NO EXPONGA ESTA UNIDAD responsable de ningún daño debido al uso de este aparato A LA LLUVIA NI A LA HUMEDAD.
-
Página 78: Avisos Legales
Bluetooth es una marca comercial registrada de Bluetooth SIG y • Si las pilas tienen fugas, tírelas inmediatamente. Evite tocar el la utiliza Yamaha de acuerdo con un acuerdo de licencia. material que sale de las pilas o dejar que éste entre en ■... - Página 79 DivX, DivX Ultra Certified y logotipos asociados son marcas comerciales de DivX, Inc. y se utilizan bajo licencia. Fabricado bajo licencia de Dolby Laboratories. Dolby y el símbolo de la doble D son marcas comerciales de Dolby Laboratories. Fabricado bajo la licencia bajo los números de patente de los EE.UU.: 5,451,942;...
- Página 80 Activar y desactivar el temporizador ..42 Activar el DRX-730 ..... . 16 7 Reproducción de dispositivos Seleccionar las fuentes de entrada .
-
Página 81: Introducción
• Visualización en pantalla (OSD) • Control remoto con funciones completas • Salida digital óptica 1. El DRX-730 puede reproducir archivos MP3, WMA, MPEG-4 AAC y JPEG almacenados en discos CD-R/RW, DVD-R/RW, y DVD+R/RW o en dispositivos de almacenamiento USB y ®... -
Página 82: Panel Frontal
STANDBY/ON PORTABLE PHONES STANDBY/ON Reproducir/Pausa ( Ajusta el DRX-730 a activado o a en espera (consulte Inicia y pausa la reproducción (consulte la página 23). la página 16). Puerto USB Abrir/Cerrar ( ) Se utiliza para conectar un dispositivo de... - Página 83 C STEREO J TIMER Se ilumina cuando se escucha una emisora FM en Se ilumina cuando el DRX-730 está activado y el estéreo (consulte la página 36). temporizador está activado (consulte la página 42). D AUTO...
-
Página 84: Panel Posterior
Conecte el cable de alimentación a una toma de CA Aquí se puede conectar una base Dock universal para (consulte la página 15). iPod de Yamaha (YDS-10 o YDS-11) o un receptor de audio inalámbrico Bluetooth YBA-10 de Yamaha Salida HDMI (consulte las páginas 43 y 47). -
Página 85: Control Remoto
Transmite las señales de control al DRX-730 (consulte la página 8). En esta sección se describen brevemente los botones del control remoto. B STANDBY/ON ( Ajusta el DRX-730 a activado o a en espera (consulte la página 16). C Botones numéricos Introduzca los números. STANDBY/ON... - Página 86 Visualiza la información acerca del disco que se está formato de audio. reproduciendo actualmente en el televisor conectado. DIMMER ZOOM Oscurece la pantalla del DRX-730 (consulte la Amplia la imagen (consulte la página 28). página 20). ANGLE Selecciona los ángulos de la cámara en los DVDs (consulte la página 28).
-
Página 87: Primeros Pasos
Campo operativo El control remoto tiene un campo operativo de hasta 6 metros. Al utilizar el control remoto, apúntelo hacia el sensor de control remoto del DRX-730, situado Inserte las baterías incluidas en el junto a la pantalla, consulte a continuación. -
Página 88: Conectar Los Altavoces
Capítulo 2: Primeros pasos Conectar los altavoces Conecte los altavoces del NX-E700 al DRX-730 como se muestra a continuación. Altavoz derecho Altavoz izquierdo Cables de los altavoces DRX-730 MAINS HDMI CLASS 2 WIRING UNBAL. CABLAGE CLASSE 2 SPEAKER VIDEO COMPONENT... -
Página 89: Conectar Los Cables De Los Altavoces
SUBWOOFER OUT conectar el cable marcado a los terminales positivos del DRX-730 al jack de entrada del subwoofer (+) del DRX-730 y en los altavoces y conectar el cable autoamplificado. sin marcar a los terminales negativos (–). Si los cruza, los altavoces estarán fuera de fase y el sonido no será... -
Página 90: Conectar Antenas
Terminal GND alimentación. Negro Notas: Sitúe la antena lejos del DRX-730, de los • No conecte el cable de alimentación al DRX-730 cables del altavoz y de los cables de hasta que todas las demás conexiones se hayan alimentación. completado. -
Página 91: Conectar Un Televisor
Si el televisor es compatible con el vídeo componente, Puede conectar el DRX-730 a un televisor utilizando pero no con HDMI, puede conectar el DRX-730 al cualquiera de los cuatro tipos de conexión: HDMI, televisor con un cable de vídeo componente. Esto vídeo componente, o vídeo compuesto. -
Página 92: Conexión Hdmi
* Si el televisor compatible con HDMI no es compatible con las resoluciones mencionadas anteriormente, es posible que la imagen no se visualice correctamente. * El DRX-730 está diseñado para estar conectado a un componente HDMI. Si está conectado a un componente DVI, puede que no sea un funcionamiento normal,... -
Página 93: Conectar Un Grabador (Cdr, Mdr Etc.)
AV Puede conectar un componente de grabación, como El DRX-730 mezcla con reducción de canales las un grabador de cassettes, CDR, o MDR al DRX-730 fuentes multicanal, cómo Dolby Digital y DTS, en para grabar y reproducir. una mezcla estéreo de 2 canales de la que puede disfrutar a través los altavoces conectados al... -
Página 94: Conectar El Cable De Alimentación
Capítulo 2: Primeros pasos Conectar el cable de alimentación Después de completar todas las demás conexiones, conecte el cable de alimentación a una toma de CA. MAINS HDMI Conéctelo a una toma de CA CLASS 2 WIRING CABLAGE CLASSE 2 SPEAKER SUBWOOFER SPEAKERS... -
Página 95: Funciones Generales
3. Pulse varias veces para seleccionar AUX o PORTABLE. entrada 4. Pulse varias veces para seleccionar AUX o PORTABLE. 5. Se requiere una base Dock universal para iPod de Yamaha (YDS-10 o YDS-11). Puede utilizar varias fuentes de entrada con el 6. -
Página 96: Ajustar El Volumen
M M M M U U U U T T T T E E E E O O O O F F F F F F F F Notas: • Si ajusta el volumen o cambia la fuente de entrada mientras el sonido está enmudecido, el enmudecimiento se cancelará. • El enmudecimiento se cancela automáticamente cuando el DRX-730 está ajustado al estado en espera. -
Página 97: Ajustar Los Graves Y Los Agudos
Capítulo 3: Funciones generales Ajustar los graves y los agudos Ajustar el balance Puede ajustar los graves y los agudos para cambiar el Puede ajustar el balance de sonido izquierdo y tono como desee. derecho. TOP MENU MENU TOP MENU MENU PRESET PRESET... -
Página 98: Modo De Reproducción Directo Puro
SLEEP DIMMER DISPLAY Conecte los auriculares con un conector mini al jack PHONES del panel frontal del DRX-730. Para activar el modo de reproducción directo Mientras los auriculares estén conectados al jack puro, pulse PURE DIRECT varias veces hasta que PHONES, los altavoces y, si está... -
Página 99: Ajustar El Brillo De La Pantalla
Puede utilizar el temporizador sleep para detener la iluminación de la habitación. Por ejemplo, está automáticamente la reproducción y ajustar el DRX-730 utilizando el DRX-730 en una habitación oscura y la al estado en espera después de un periodo de tiempo pantalla es demasiado brillante. -
Página 100: Ajustar El Reloj
Capítulo 3: Funciones generales Ajustar el reloj Utilice Arriba/Abajo ( / ) para ajustar los minutos. Para visualizar la hora o programar el temporizador, Utilice Izquierda/Derecha ( / ) para cambiar primero debe ajustar el reloj. entre las pantallas de horas y minutos en caso necesario. -
Página 101: Visualizar La Hora
Puede visualizar la hora mientras escucha una fuente. Para ahorrar energía y evitar que se queme la pantalla, puede ajustar el DRX-730 para que pase automáticamente a estado de espera después de 30 minutos de inactividad al utilizar la fuente de entrada DVD o USB. -
Página 102: Capítulo 4: Reproducir Discos
Consejos: vídeos o imágenes, active el televisor y seleccione • Puede cambiar el idioma de la visualización en la la entrada AV a la que está conectado el DRX-730. pantalla con el ajuste “OSD Language” (consulte la página 55). Sitúe el disco, con la etiqueta de cara arriba, •... -
Página 103: Detener La Reproducción
Memory” en la pantalla y puede continuar la segundos. reproducción desde donde la haya dejado. Notas: Si no desea que el DRX-730 se acuerde del punto de la ® • Para los discos DivX y WMV, sólo está última memoria, en lugar de pulsar Detener ( ),... -
Página 104: Seleccionar Capítulos Y Pistas
También puede utilizar Siguiente/Avanzar Rápido Pueden utilizarse los siguientes botones con los ) y Anterior/Rebobinar ( ) en el menús. DRX-730 para seleccionar las pistas. Botón Descripción Cuando se pulsa, visualiza el menú Seleccionar los elementos por RETURN “PBC”... -
Página 105: Reproducción En Movimiento Lento
Capítulo 4: Reproducir discos Reproducción en movimiento Reproducción fotograma a lento fotograma Puede reproducir discos DVD-Video, VCD, SVCD, Puede reproducir los discos DVD-Video, VCD, ® ® DivX y WMV en movimiento lento a cuatro SVCD, DivX y WMV fotograma a fotograma. velocidades diferentes. -
Página 106: Seleccionar Los Idiomas Y El Audio
Capítulo 4: Reproducir discos Seleccionar los idiomas y el Seleccionar subtítulos audio ® Algunos discos DVD y DivX tienen subtítulos en uno o más idiomas que puede seleccionar durante la Algunos discos DVD tienen pistas de sonido en reproducción. múltiples idiomas o formatos de audio, como Dolby Digital y DTS, que puede seleccionar durante la reproducción. -
Página 107: Seleccionar Los Ángulos De La Cámara
Capítulo 4: Reproducir discos Seleccionar los ángulos de la Zoom cámara Puede aumentar la imagen en 2x o en 4x al reproducir ® un disco DVD-Video, VCD, SVCD, DivX , WMV o Algunos discos DVD-Video tienen el contenido JPEG. grabado en múltiples ángulos de cámara que puede seleccionar durante la reproducción. -
Página 108: Reproducción De Repetición
Capítulo 4: Reproducir discos Reproducción de repetición Reproducción repetida A–B Puede reproducir varias veces un título, un capítulo, Puede especificar dos puntos (A y B) en un disco una pista o un disco. DVD, VCD, SVCD o CD de audio y a continuación reproducir varias veces la sección entre estos dos Puede combinar la repetición de la reproducción con puntos. -
Página 109: Reproducción Aleatoria
Capítulo 4: Reproducir discos Reproducción aleatoria Reproducción programada Puede reproducir títulos o capítulos (DVD-Video) o Puede crear un programa de sus títulos, capítulos o pistas (VCD, SVCD o CD) de audio en orden aleatorio. pistas favoritos para la reproducción. BLUETOOTH ZOOM ON SCREEN AUDIO... -
Página 110: Buscar Discos
Durante la reproducción, pulse SETUP. disco, se selecciona una fuente de entrada Aparece el menú “Setup” en la pantalla. diferente de DVD o se desactiva el DRX-730. • No se puede utilizar la reproducción del Seleccione “Play Mode” y a continuación pulse programa con discos DVD-VR (DVD-R/RW/R ENTER. -
Página 111: Reproducir Los Pases De Diapositivas Jpeg
SUBTITLE ANGLE para cargarse y es posible que no aparezcan de PLAY MODE CLEAR inmediato. • En un único disco, el DRX-730, acepta hasta 299 carpetas y cada carpeta puede contener hasta 648 archivos y carpetas. TOP MENU MENU PRESET MENU INFO. -
Página 112: Utilizar Disc Navigator Con Los Discos Dvd-Video, Vcd Y Svcd
Capítulo 4: Reproducir discos Los siguientes elementos están disponibles para cada Utilizar Disc Navigator con los tipo de disco. discos DVD-Video, VCD y SVCD Disco Elemento Puede utilizar Disc Navigator para buscar y Title seleccionar títulos, capítulos y pistas en discos DVD, DVD-Video Chapter VCD y SVCD. -
Página 113: Utilizar Disc Navigator Con Los Discos Mp3
Capítulo 4: Reproducir discos Utilizar Disc Navigator con los Para reproducir la pista, archivo o carpeta seleccionado, pulse ENTER. discos MP3, WMA, MPEG-4 ® • Si ha seleccionado un archivo MP3, WMA, AAC, DivX , WMV y JPEG ® MPEG-4 AAC, DivX o WMV, se reproducen todos los archivos de la misma carpeta, Puede utilizar Disc Navigator para buscar y... -
Página 114: Visualizar Información Del Disco
Para ocultar la información, pulse varias veces ON A continuación se presentan diferentes formatos de SCREEN hasta que desaparezca. audio. En la pantalla del DRX-730 también se visualiza algún tipo de información, como el tiempo restante Pantalla Descripción del disco. -
Página 115: Utilizar El Sintonizador
■ Indicadores de pantalla del sintonizador Los siguientes indicadores de pantalla se utilizan para sintonizar y presintoninzar emisoras de radio. Sintonización automática En el modo de sintonización automática, el DRX-730 busca automáticamente las emisoras de radio. PRESET STEREO AUTO TUNED MEMORY A1 FM 100.1 MHz... -
Página 116: Sintonización Manual
(indicador AUTO apagado). Se ha ajustado el intervalo de frecuencia y el En el modo de sintonización manual, el indicador DRX-730 pasa a en espera. Pulse STANDBY/ON AUTO de la pantalla está apagado. de nuevo para volver a activarlo. Para incrementar la frecuencia de sintonización, pulse Arriba ( ). -
Página 117: Utilizar Las Presintonías
Empezando por la frecuencia FM inferior, el Si no pulsa ningún botón durante 10 segundos, el DRX-730 busca la banda FM para emisoras de proceso de presintonización se cancelará. radio válidas y, empezando por el número de presintonía A-1, las guarda de una en una. -
Página 118: Seleccionar Presintonías
Capítulo 5: Utilizar el sintonizador Seleccionar presintonías Después de presintonizar una emisora de radio, puede sintonizarla simplemente seleccionando la presintonía adecuada. STANDBY/ON OPEN/CLOSE Botones numéricos ZOOM ON SCREEN BLUETOOTH AUDIO SUBTITLE ANGLE PLAY MODE CLEAR TOP MENU MENU PRESET INFO. ENTER SETUP RETURN... -
Página 119: Utilizar El Temporizador
Notas: También puede utilizar DVD/USB, AUX/PORTABLE, DOCK, TUNER y BAND en el • El reloj del DRX-730 se debe ajustar para control remoto o el control INPUT en el programar el temporizador (consulte la DRX-730 para seleccionar la fuente de entrada. -
Página 120: Ajustar La Hora De Activación
Capítulo 6: Utilizar el temporizador Ajustar la hora de activación Ajustar la hora de desactivación Puede ajustar la hora en que desea que el DRX-730 se Puede ajustar la hora en que desea que el DRX-730 active e inicie la reproducción. -
Página 121: Activar Y Desactivar El Temporizador
DRX-730 pasará a en espera. TOP MENU MENU PRESET • Si el DRX-730 ya está activado a la hora de INFO. activación especificada, los ajustes del ENTER ENTER temporizador no producirán efecto. De la misma... -
Página 122: Capítulo 7: Reproducción De Dispositivos Portátiles
DRX-730 para controlar el iPod. Además, el DRX-730 de música recargará el iPod mientras disfruta de la música. El DRX-730 es compatible con modelos de iPod de 4ª Puede conectar un reproductor de música al jack generación (con rueda de clic) y modelos posteriores,... - Página 123 • En el modo Menu, los menús del iPod aparecen Inserte el iPod en la base Dock de Yamaha. en la pantalla del DRX-730 y se utiliza el control El indicador DOCK de la pantalla se ilumina. remoto del DRX-730 para controlar el iPod. No se...
-
Página 124: Reproducción Usb
USB al puerto USB del panel frontal del DRX-730. Reproducción USB Puede conectar un dispositivo de almacenamiento TIMER USB al puerto USB del panel frontal del DRX-730 y HDMI PROGRESSIVE disfrutar de la música (MP3, WMA, MPEG-4 AAC) guardada a través de los altavoces del DRX-730 en alta calidad. -
Página 125: Controles De Reproducción
JPEG guardadas en un dispositivo de • En un único dispositivo de almacenamiento USB, almacenamiento USB. el DRX-730 acepta hasta 299 carpetas y cada carpeta puede contener hasta 648 archivos y Pulse Reproducir ( ) para iniciar el pase de carpetas. -
Página 126: Reproducción De Bluetooth
Si ha seleccionado un archivo de imagen JPEG, Notas: todos los archivos de la misma carpeta se • Ajuste el DRX-730 a en espera y desconecte el reproducirán en un pase de diapositivas, cable de alimentación antes de conectar o empezando por ese archivo. -
Página 127: Conectar Dispositivos Bluetooth
• Aunque se hayan registrado varios dispositivos dentro de 8 minutos, si se cambia la fuente de durante el emparejamiento, si no se encuentra el entrada en el DRX-730 o se ajusta el DRX-730 a último dispositivo Bluetooth, el YBA-10 de Yamaha en espera. -
Página 128: Grabar
Capítulo 8: Grabar Puede conectar un componente de grabación, como • No se pueden grabar discos ni archivos que un grabador CDR, MDR o de cassettes, al DRX-730 utilicen protección contra copia. para grabar y reproducir. Conecte el componente de grabación al DRX-730. -
Página 129: Capítulo 9: Ajustes De Audio Y Ajuste De Vídeo
Capítulo 9: Ajustes de audio y ajuste de vídeo Este capítulo explica los menús “Audio Settings” y Nota: “Video Adjust”. • Los efectos de los ajustes Audio dependen del nivel de volumen de los altavoces, del televisor y del receptor de AV, así como de otros ajustes. Para Menú... -
Página 130: Menú "Video Adjust
Capítulo 9: Ajustes de audio y ajuste de vídeo ■ Sharpness Menú “Video Adjust” Ajusta la nitidez de los bordes de la imagen. • Fine, Standard (por defecto), Soft. Los ajustes “Video Adjust” afectan a la imagen del televisor. ■ Brightness Ajusta el brillo de la imagen. -
Página 131: Ajustes Iniciales
Capítulo 10: Ajustes iniciales Este capítulo explica el menú “Initial Settings”. • Cuando “HDMI Audio” está ajustado a “ON” (consulte la página 13), 96kHz PCM reduce la frecuencia de muestreo a 48kHz Menú “Initial Settings” independientemente del ajuste “96kHz PCM Out”. - Página 132 En este caso, conecte Ajusta la relación de aspecto de la emisión de imagen el DRX-730 a un televisor con una conexión de a través de las salidas analógicas y de vídeo HDMI. vídeo compuesto y vuelva a cambiar el ajuste a Seleccione una opción que coincida con la relación de...
-
Página 133: Ajustes De Idioma
• English (por defecto): Si está disponible, se La resolución HDMI se ajusta a su ajuste por utilizará la banda sonora inglesa. defecto y el DRX-730 pasa a en espera. Pulse • Languages: Si está disponible, se utilizará el STANDBY/ON de nuevo para volver a activarlo. - Página 134 En este caso, pulse MENU para visualizar • Language: Los idiomas disponibles dependen de el menú y a continuación seleccione el idioma del dónde haya comprado el DRX-730. subtítulo. ■ • El ajuste “Subtitle Language” también se aplica a Angle Indicator ®...
-
Página 135: Bloqueo Parental
Seleccione “Password” y a continuación pulse visualización. (Consulte el estuche del disco para más ENTER. información). Puede ajustar el DRX-730 para que los discos con un elevado nivel de bloqueo parental no Utilice los botones numéricos para introducir puedan reproducirse sin primero introducir la la contraseña antigua y a continuación pulse... - Página 136 ® DivX ® Para reproducir los archivos DivX VOD (Video on Demand) en el DRX-730, es posible que tenga que ® proporcionar un código de registro DivX VOD al ® suministrador de contenido DivX VOD.
-
Página 137: Apéndice
• Es posible que algunos discos no se reproduzcan, produzcan interferencias o el sonido esté El DRX-730 cumple con el estándar de CD de audio. distorsionado. Esto se debe al disco y no es una No se puede garantizar el funcionamiento y función anómala. -
Página 138: Discos Realizados En Un Ordenador
® La tecnología de soportes DivX fue desarrollada por • El DRX-730 puede reproducir los archivos MP3, DivX, Inc. Utiliza la compresión para adecuar el WMA y MPEG-4 AAC guardados en discos contenido de películas y vídeos a los discos CD y CD-R/RW y dispositivos de almacenamiento DVD de alta calidad. -
Página 139: Acerca De Wma
• El DRX-730 es compatible con los archivos WMV9 codificados con la serie Windows Encontrará el número de región del DRX-730 en el Encoder 9. panel posterior. El DRX-730 sólo puede reproducir discos con el mismo número de región o aquellos •... -
Página 140: Mantenimiento De Los Discos
Si se acumula suciedad o polvo en la lente de lectura Manejar los discos del DRX-730, es posible que el sonido salte o que la imagen se distorsione. En tales casos, consulte a su • Sujete siempre los discos por los bordes para distribuidor Yamaha. -
Página 141: Mantenimiento Del Drx-730
• No sitúe el DRX-730 encima del televisor. Y TIMER HDMI manténgalo alejado de componentes sensibles al PROGRESSIVE magnetismo, como grabadores de vídeo. • No sitúe el DRX-730 encima de un amplificador o VOLUME INPUT STANDBY/ON cualquier otro componente que produzca calor. Si PORTABLE PHONES instala el DRX-730 en un estante, sitúe el... -
Página 142: Listas De Idiomas, Países Y Regiones
Apéndice Listas de idiomas, países y regiones Lista de idiomas ■ Idioma (abreviación), número de código Japonés (ja), 1001 Butaní (dz), 0426 Kirghiz (ky), 1125 Sinhala (si), 1909 Inglés (en), 0514 Esperanto (eo), 0515 Latino (la), 1201 Eslovaco (sk), 1911 Francés (fr), 0618 Estonio (et), 0520 Lingala (ln), 1214... -
Página 143: Solucionar Problemas
Apéndice Solucionar problemas Si experimenta cualquier problema mientras utiliza el DRX-730, consulte las siguientes tablas e intente aplicar la solución sugerida. Si un problema no aparece en las tablas o no puede resolverlo usted mismo, contacte con su distribuidor Yamaha. - Página 144 DRX-730 a la entrada de audio PORTABLE. analógica en el componente de grabación (consulte la página 49). El DRX-730 no funciona Es posible que el DRX-730 se haya Ajuste el DRX-730 al modo en correctamente. expuesto a una fuerte descarga espera y a continuación desconecte eléctrica, por ejemplo por un rayo,...
- Página 145 Condensación en la lente de Espere una o dos horas hasta que se lectura. Cuando se traslada el evapore la condensación y vuelva a DRX-730 de un entorno frío a uno intentarlo. cálido, puede formarse condensación en la lente de lectura.
-
Página 146: Sintonizador
Vuelva a presintonizar las emisoras presintonías de radio. de radio (consulte la página 38). Las presintonías se han El DRX-730 se ha desconectado de Asegúrese de que el cable de borrado. una toma de CA durante más de alimentación está correctamente una semana. -
Página 147: Temporizador
AM exterior o derivando la antena a masa (consulte la página 11). La antena AM interior está muy cerca Aleje la antena del DRX-730 o intente del DRX-730. ajustar la dirección de la antena. El DRX-730 está muy cerca del televisor, Aleje el DRX-730 del televisor. -
Página 148: Reproducción De Dispositivos De Almacenamiento Usb
(consulte la página 43). Reproducción de dispositivos de almacenamiento USB Problema Posible causa Solución No es posible reproducir el El DRX-730 no reconoce todos los Pruebe otro dispositivo de contenido guardado en un dispositivos de almacenamiento almacenamiento USB. dispositivo de USB. - Página 149 No se ha llevado a cabo el Empareje el dispositivo Bluetooth con emparejamiento. el DRX-730 (consulte la página 47). La funcionalidad Bluetooth del Asegúrese de que la funcionalidad dispositivo Bluetooth está desactivada. Bluetooth esté activada en el dispositivo Bluetooth.
-
Página 150: Especificaciones
Apéndice Especificaciones Sección del amplificador General • Potencia de salida RMS mínima por canal • Alimentación (LPF predeterminado 20kHz) Modelos para los EE.UU. y Canadá ....CA 120V, 60Hz (6Ω, 1kHz, 0,9% THD) ..........20W + 20W Modelo para Australia...........CA 240V, 50Hz •... - Página 151 Printed in Malaysia WQ26610...