
Manuales relacionados para Bresser Analyth STR Bino


Resumen de contenidos para Bresser Analyth STR Bino
- Página 1 Analyth STR Bino Art. No. 5803800 Bedienungsanleitung Instruction Manual Mode d‘emploi Instrucciones de uso...
- Página 2 (DE/AT/CH) Bedienungsanleitung ....5 (GB/IE) Instruction Manual .......8 (FR/BE) Mode d‘emploi ......11 (ES) Instrucciones de uso ......14...
- Página 3 VORSICHT! Für die Arbeit mit diesem Gerät werden häufig scharfkantige und spitze Hilfsmittel eingesetzt. Bewahren Sie deshalb dieses Gerät sowie alle Zubehörteile und Hilfsmittel an einem für Kinder unzugänglichen Ort auf. Lassen Sie Kinder nur unter Aufsicht mit dem Gerät arbeiten! Verpackungsmaterial (Plastiktüten, Gummibänder etc.) von Kindern fernhalten! CAUTION! To work with this microscope, sharp and pointed aids are being used.
- Página 4 Fig. 1 Fig. 2 Fig. 3 Fig. 4 - 4 -...
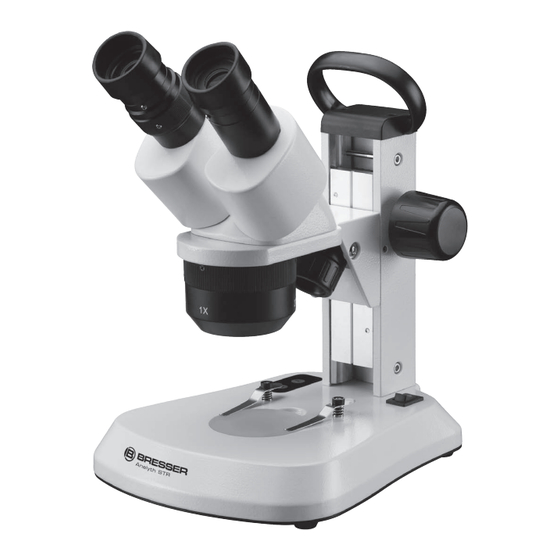
- Página 5 Alle Teile (Fig. 1-4): 1 Okulare 2 Dioptrie-Einstellung 3 Binokularer Aufsatz 4 Fokussiertrieb 5 Auflicht-Beleuchtung 6 Ein-/Aus-Schalter 7 Helligkeitsregelung (Auflicht) 8 Helligkeitsregelung (Durchlicht) 9 Durchlicht-Beleuchtung 1 0 Mikroskoptisch mit Objektplatte 1 1 Objektklammern 1 2 Objektivhalter (drehbar) 1 3 Batteriefach 1 4 Netzteilanschluss 1 5 Staubschutzhülle 1 6 Objektplatte (schwarz/weiß) 17 Netzteil 1 8 Gummiaugenmuschel (2 Stück)
-
Página 6: Pflege Und Wartung
Sie es ggf. mit den Objektklammern (11) fest. Die Objektivvergrößerung (1x, 2x oder 4x) ist durch Drehen des Objektivhalters (12) einstellbar. Beginnen Sie Ihre Beobachtungen immer mit dem 1x-Objektiv. Blicken Sie nun durch die Okulare (1) des binokularen Aufsatzes (3). Mit Hilfe des Fokussiertriebs (4) können Sie nun das Bild scharf stellen. 4. Dioptrie- und Scharfeinstellung Stellen Sie die Dioptrieeinstellung (2) am linken Okular auf die Mittelposition (glänzender Ring) und visieren Sie ein Objekt an. Schließen Sie das linke Auge und stellen Sie die Schärfe für das rechte Auge mit dem Fokussiertrieb (4) ein. Schließen Sie das rechte Auge und stellen Sie die Schärfe für das linke Auge am Dioptriering ein. Jetzt ist Ihr Mikroskop auf Ihre Augen eingestellt. Lesen Sie am linken Okular die Einstellung ab, die Sie künftig immer verwenden wollen. 5. Augenabstand Das Analyth STR ist mit einem verstellbaren binokularen Aufsatz ausgerüstet. Um das Mikroskop auf Ihren Augenabstand einzustellen, schauen Sie durch die Okulare. Durch verdrehen des binokularen Aufsatzes können Sie die Okulare genau auf Ihre Bedürfnisse einstellen. -
Página 7: Konformitätserklärung
Gesamtvergrößerung: 10x, 20x, 40x Beleuchtung: LED Hinweis: Die Gesamtvergrößerung errechnet sich, indem man die Objektiv- mit der Okularver- größerung multipliziert. 10. Konformitätserklärung 10.1. CE-Konformität Eine „Konformitätserklärung“ in Übereinstimmung mit den anwendbaren Richtlinien ist von Bresser GmbH erstellt worden und kann über den folgenden Weblink heruntergeladen werden. http://www.bresser.de/download/58038X0/CE/5803800-5803850_CE.pdf 11. Entsorgung Entsorgen Sie die Verpackungsmaterialien sortenrein. Informationen zur ordnungs- gemäßen Entsorgung erhalten Sie beim kommunalen Entsorgungsdienstleister oder Umweltamt. Werfen Sie Elektrogeräte nicht in den Hausmüll! Gemäß der Europäischen Richtlinie 2002/96/EG über Elektro- und Elektronik- Altgeräte und Umsetzung in nationales Recht müssen verbrauchte Elektrowerkzeuge... - Página 8 All parts (Fig. 1-4): 1 Eyepieces 2 Dioptre scale 3 Binocular head 4 Focus wheel 5 Incident light illumination 6 On/Off switch 7 Brightness control (incident light) 8 Brightness control (transmitted light) 9 Transmitted light illumination 1 0 Microscope stage with object plate 1 1 Object clamps 1 2 Lens holder (rotatable) 1 3 Battery compartment 1 4 Power supply connection 1 5 Dust cover 1 6 Object plate (black/white) 1 7 Power supply 1 8 Rubber eyecups (2 pieces)
-
Página 9: Cleaning And Maintenance
magnification (1x). Now look through the eyepieces (1) at the binocular head (3). Adjust the sharpness with the focuser (4). 4. Focusing and dioptre compensation Set the dioptre scale (2) to to the middle position (shiny ring) and observe an object. Now close your left eye and adjust the focus with the focuser (4) for your right eye. Then, close your right eye and adjust the focus for your left eye with the dioptre scale. Now, the microscope is adjusted for your eyes. Note the setting of the dioptre scale you need to use in future. 5. Eye distance The Analyth STR is equipped with an adjustable binocular head. To set your eye distance, move the eyepieces against each other until you found the ideal position. 6. Replacing the Eyepieces (optional) To replace the eyepieces you need to loosen the clamp screw on the underside of the eyepiece holder. You can then easily remove and replace the eyepieces. -
Página 10: Technical Data
9. Technical data Binocular head Eyepieces: 2pcs. 10x Objectives: 1x, 2x and 4x, Stereo Total magnification: 10x, 20x, 40x Illumination: LED Note: The total magnification can be calculated by multiplying the objective magnification with the eyepiece magnification. 10. Declaration of Conformity 10.1. CE Conformity Bresser GmbH has formed a „Conformity Declaration“ in line with the applicable directive. This declaration is available for review under http://www.bresser.de/download/58038X0/CE/5803800-5803850_CE.pdf 10.2. UKCA Conformity Bresser UK Ltd. has formed a „Declaration of Conformity“ in line with the applicable directive. This declaration is available for review under http://www.bresser.de/download/58038X0/UKCA/5803800-5803850_UKCA.pdf 11. Disposal Dispose of the packaging materials properly, according to their type, such as paper or cardboard. Contact your local waste-disposal service or environmental authority for information on the proper disposal. Do not dispose of electric equipment together with household waste material! In observance of European Directive 2002/96/EC on waste electrical and electronic equipment (WEEE) and its implementation in accordance with national law, electric equipment that have reached the end of its life must be collected separately and returned to an environmentally compatible recycling facility. - Página 11 Descriptif des pièces (Fig. 1-4): 1 Paire d’ o culaires 2 Ajustement dioptrique 3 Tête binoculaire 4 Molette de mise au point 5 Éclairage par lumière incidente 6 Interrupteur marche/arrêt 7 Contrôle de la luminosité (lumière incidente) 8 Contrôle de la luminosité (lumière transmise) 9 Éclairage à lumière transmise 1 0 Platine de microscope avec plaque d‘ o bjet 1 1 Pinces pour objets 1 2 Porte-objectif (orientable) 1 3 Compartiment des piles 1 4 Raccordement de l‘alimentation 1 5 Cache-poussière 1 6 Plaque d‘...
-
Página 12: Nettoyage Et Entretien
3. Observation Placez l‘ o bjet sélectionné au milieu du plan de travail (10) et immobilisez-le avec les pinces valets (11) si nécessaire. Le grossissement peut être changé en tournant 1/4 de tour la tourelle 1x/2x/4x. Il est recommandé de toujours commencer par le grossissement le plus faible (1x). Maintenant regardez à travers les oculaires (1). Réalisez la mise au point en utilisant la molette (4). La netteté s’ o btient en tournant lentement celle-ci. 4. Mise au point et Réglage dioptrique Alignez le repère de la dioptrie (2) sur l‘ o culaire gauche sur la position centrale (anneau brillant). Fermez votre oeil gauche et, avec la molette (4) faites la mise au point en regardant uniquement de votre oeil droit. Maintenant fermez votre oeil droit et réglez la mise au point de votre oeil gauche, à l‘aide de la bague dioptrie. Maintenant, la loupe binoculaire est correctement réglée. Vous pouvez faire varier la mise au point à l‘aide de la molette de mise au point les deux yeux resteront toujours nets. Relevez la position de la bague dioptrie sur le côté gauche, pour un usage futur. -
Página 13: Caractéristiques Techniques
Le grossissement total est obtenu en multipliant le grossissement des oculaires par celui des objectifs. 10. Déclaration de conformité 10.1. Conformité CE Un « Certificat de conformité » conforme aux directives applicables, établi par la société Bresser GmbH est disponible sur http://www.bresser.de/download/58038X0/CE/5803800-5803850_CE.pdf 11. Disposition E liminez l’ e mballage en triant les matériaux. Pour plus d’informations concernant les règles applicables en matière d’ é limination de ce type des produits, veuillez vous adresser aux services communaux en charge de la gestion des déchets ou de l’... -
Página 14: Descripción De Las Piezas (Fig. 1-4)
Descripción de las piezas (Fig. 1-4): 1 Oculares 2 Compensador de dioptrías 3 Cabezal binocular 4 Rueda de enfoque 5 Luz incidente 6 Interruptor de encendido/apagado 7 Control de brillo (luz incidente) 8 Control de brillo (luz transmitida) 9 Luz transmitida 1 0 Platina con placa para objetos 1 1 Pinzas para objetos 1 2 Soporte de la lente (giratorio) 1 3 Compartimento para pilas 1 4 Conexión para el cable de alimentación 1 5 Cubierta protectora 1 6 Placa para objetos (blanca/negra) 1 7 Cable de alimentación 1 8 Protectores oculares de goma (2 piezas) -
Página 15: Observación
3. Observación Sitúe el objeto en el medio de la platina (10) y si es necesario asegúrelo con las pinzas (11). El aumento del objetivo (1x, 2x o 4x) puede ser ajustado desplazando el portaobjetivos (12). Se recomienda empezar las observaciones con el menor aumento. Ahora observe a través de los oculares (1) del cabezal binocular (3). Ajuste la nitidez utilizando la rueda de enfoque (4). 4. Enfoque y compensación de dioptrías Ajuste la escala del tubo compensador de dioptrías (2) a la posición media (anillo brillante), y observe el objeto. A continuación, cierre su ojo izquierdo y ajuste la imagen con la rueda de enfoque (4) hasta conseguir una imagen nítida. Luego, cierre su ojo derecho y enfoque la imagen con el izquierdo utilizando la escala del tubo de ajuste de dioptrías. Ahora el microscopio está ajustado a su visión. Anote la escala utilizada para futuras observaciones. 5. Distancia interpupilar El Researcher ICD está equipado con un cabezal binocular ajustable. Para fijar la distancia interpupilar, mueva los oculares hasta encontrar la posición adecuada. 6. Sustitución de los oculares (Opcional) Para reemplazar los oculares necesita aflojar el tornillo de sujeción en la parte inferior del porta ocular (17). A continuación, puede cambiar fácilmente y reemplazar los oculares. Los tornillos de fijación sólo sirven como protección para que los oculares no se caiga. Nota: La iluminación LED tiene una vida útil de aprox. 20.000 horas. 7. Ajuste de la fricción del mando de enfoque Puede ocurrir que la cabeza del microscopio ya no queda sujeta por el mando de enfoque y se apaga a causa de su peso. -
Página 16: Datos Técnicos
Cabezal binocular Oculares: 2x 10x Objetivos: 1x, 2x y 4x Aumento: 10x, 20x, 40x Iluminación: LED Nota: El aumento total se calcula multiplicando el aumento del objetivo por el del ocular) 10. Declaración de conformidad 10.1. Conformidad CE Bresser GmbH ha elaborado una «Declaración de conformidad» en consonancia con las directivas aplicables que está disponible para su consulta para http://www.bresser.de/download/58038X0/CE/5803800-5803850_CE.pdf 11. Disposal Elimine los materiales de embalaje separados por tipos. Obtendrá información sobre la eliminación reglamentaria en los proveedores de servicios de eliminación municipales o en la agencia de protección medioambiental. No arroje equipos, aparatos o componentes eléctricos y electronicos con la basura doméstica.- De acuerdo a las normas Europeas 2002/96/EC sobre desechamiento de equipamientos electricos o electronicos (WEEE) y en concordancia con las... - Página 17 - 17 -...
- Página 18 (de preferencia por e-mail). E-Mail: service@bresseruk.com Telephone*: +44 1342 837 098 E-Mail: servicio.iberia@bresser-iberia.es Teléfono*: +34 91 67972 69 BRESSER UK Ltd. Suite 3G, Eden House BRESSER Iberia SLU Enterprise Way c/Valdemorillo,1 Nave B Edenbridge, Kent TN8 6HF P.I. Ventorro del Cano United Kingdom 28925 Alcorcón Madrid...
- Página 20 Bresser GmbH Bresser UK Ltd. Gutenbergstraße 2 Suite 3G, Eden House, Enterprise Way 46414 Rhede · Germany Edenbridge, Kent TN8 6HF · Great Britain www.bresser.de www.bresseruk.com @BresserEurope Irrtümer und technische Änderungen vorbehalten. · Errors and technical changes reserved. Sous réserve d’erreurs et de modifications techniques.