Publicidad
Idiomas disponibles
Idiomas disponibles
Enlaces rápidos
Mikroskop · Microscope · Microscope · Microscopio · Microscopio · Microscoop ·
Mikroskop · Mikroskop ·
USB Digital Microscope
Bedienungsanleitung
DE
Instruction manual
EN
Mode d'emploi
FR
Istruzioni per l'uso
IT
Manual de instrucciones
ES
Gebruikershandleiding
NL
Návod k obsluze
CZ
Návod na obsluhu
SK
Publicidad

Manuales relacionados para Bresser 9652200


Resumen de contenidos para Bresser 9652200
- Página 1 Mikroskop · Microscope · Microscope · Microscopio · Microscopio · Microscoop · Mikroskop · Mikroskop · USB Digital Microscope Bedienungsanleitung Istruzioni per l'uso Instruction manual Manual de instrucciones Mode d’emploi Gebruikershandleiding Návod k obsluze Návod na obsluhu...
- Página 2 Download HiView app from the Microsoft Store or at the link below. Mac OSx 10.5 or higher: Download HiView app from the Mac Store or at the link below. Windows XP or Windows 7: Download the setup file at the link below. DOWNLOAD “HiView” SOFTWARE: http://www.bresser.de/download/9652200...
- Página 3 Deutsch ......English ......Français......Italiano......Español ......Nederlands ....Česky........ Slovenská .......
- Página 4 Inhaltsverzeichnis Impressum .................... 6 Gültigkeitshinweis.................. 6 Zu dieser Anleitung .................. 7 Verwendungszweck.................. 7 Allgemeine Sicherheitshinweise............. 8 Über dieses Mikroskop ................ 9 Eigenschaften.................. 10 Software Download ................ 10 Standortwahl................... 10 10 Teileübersicht und Lieferumfang ............ 11 11 Mikroskop montieren ................ 12 12 Stromversorgung herstellen.............. 12 13 Beleuchtung einstellen................ 12 14 Verbindung zu einem PC herstellen ............. 12 15 Standfuß...
- Página 5 20 CE-Konformitätserklärung .............. 15 21 Entsorgung .................... 15...
- Página 6 „Service“ in dieser Dokumentation. Wir bitten um Verständ- nis, dass unaufgeforderte Rücksendungen nicht bearbeitet werden können. Irrtümer und technische Änderungen vorbehalten. © 2023 Bresser GmbH Alle Rechte vorbehalten. Die Reproduktion dieser Dokumentation – auch auszugs- weise – in irgendeiner Form (z.B. Fotokopie, Druck, etc.) so- wie die Verwendung und Verbreitung mittels elektronischer Systeme (z.B.
- Página 7 Informationen bei Serviceanfragen stets angeben. 3 Zu dieser Anleitung HINWEIS Diese Bedienungsanleitung ist als Teil des Gerätes zu betrachten! Lesen Sie vor der Benutzung des Geräts aufmerksam die Si- cherheitshinweise und die Bedienungsanleitung. Bewahren Sie diese Bedienungsanleitung für die erneute Verwendung zu einem späteren Zeitpunkt auf.
- Página 8 5 Allgemeine Sicherheitshinweise GEFAHR Erstickungsgefahr! Bei unsachgemäßer Verwendung dieses Produkts besteht Erstickungsgefahr, insbesondere für Kinder. Beachten Sie deshalb unbedingt die nachfolgenden Sicherheitsinforma- tionen. • Verpackungsmaterialien (Plastiktüten, Gummibänder, etc.) von Kindern fernhalten! Es besteht Erstickungsge- fahr! • Dieses Produkt beinhaltet Kleinteile, die von Kindern verschluckt werden können! Es besteht Erstickungsge- fahr! •...
- Página 9 chem Kontakt mit Augen oder Mund mit Wasser spü- len. Bei Beschwerden unverzüglich einen Arzt aufsu- chen und die Substanzen vorzeigen. HINWEIS Gefahr von Sachschäden! Bei unsachgemäßer Handhabung können das Gerät und/ oder die Zubehörteile beschädigt werden. Verwenden Sie das Gerät deshalb nur entsprechend den nachfolgenden Si- cherheitsinformationen.
- Página 10 • Inkl. Windows PC Software (Download), Stand *Interpoliert 8 Software Download HiView Software Download Erforderliches Betriebssystem: Windows (ab Windows 7) oder Mac (ab 10.13) http://www.bresser.de/download/9652200 Alternativer Download: http://soft.hvscam.com 9 Standortwahl Vor dem Aufbau und der Inbetriebnahme einen geeigneten Standort wählen.
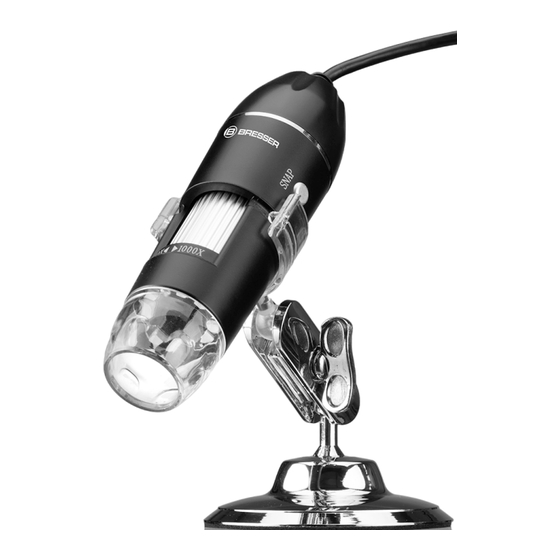
- Página 11 10 Teileübersicht und Lieferumfang Digitalmikroskop-Halterung Halterung zur flexiblen Ausrich- tung Feststellschraube (Halterung) Standfuß Digitalmikroskop Dimmer-Knopf Aufnahme-Knopf Zoom-Rad (50x bis 1000x) LED-Ringbeleuchtung Objektiv Schutzkappe USB-Kabel USB-A-Anschlussstecker Lieferumfang: Digitalmikroskop (A) mit USB-Kabel, Mikroskop-Stand (B) 11 / 104...
- Página 12 11 Mikroskop montieren Für die Montage folgendermaßen vorgehen: Das Mikroskop mittig in die Klemmhalterung am Standfuß einrasten lassen. 12 Stromversorgung herstellen Den USB-A-Stecker des USB-Kabels in einen freien USB-Port des PC stecken. Die Stromversorgung erfolgt über den Computer nachdem dieser eingeschaltet wurde. Die LED- Ringbeleuchtung leuchtet.
- Página 13 Über die Software HiView* können die Bilder vom Digi- talmikroskop betrachtet und gespeichert werden. Des Weiteren können die Bilder beschriftet und vermessen werden. In der Software jetzt auf „Device“ und dann auf „Open“ klicken. Auf das dort gefundene Digitalmikroskop ver- binden (auf „Open“...
- Página 14 17 Objekt fokussieren Für eine optimale Bildschärfe muss das Beobachtungsob- jekt in den Fokusbereich der Digitalkamera gebracht wer- den. Hierzu folgendermaßen vorgehen: Die erforderliche Position in der Halterung für das Digi- talmikroskop einstellen und ggf. nachträglich etwas korrigieren. Die gewünschte Vergrößerungseinstellung in der Soft- ware vornehmen (z.B.
- Página 15 Spannungsversorgung **Interpoliert 20 CE-Konformitätserklärung Eine „Konformitätserklärung“ in Übereinstimmung mit den anwendbaren Richtlinien und entsprechenden Normen ist von der Bresser GmbH erstellt worden. Der vollständige Text der CE-Konformitätserklärung ist unter der folgenden Inter- netadresse verfügbar: www.bresser.de/download/9652200/ CE/9652200_CE.pdf 21 Entsorgung Entsorgen Sie die Verpackungsmaterialien sortenrein.
- Página 16 Table of contents Imprint ..................... 18 Validity note .................... 18 About this Instruction Manual ............. 19 Intended use ................... 19 General safety instructions.............. 19 About this microscope ................ 21 Features .................... 21 Software Download ................ 21 Choice of location ................... 22 10 Parts overview and scope of delivery .......... 22 11 Assembling the microscope .............. 23 12 Power supply ................... 23 13 Adjusting the lighting ................ 23...
- Página 17 20 CE declaration of conformity .............. 26 21 UKCA declaration of conformity ............ 26 22 Disposal.................... 27...
- Página 18 We ask for your understanding that unsolicited returns cannot be processed. Errors and technical changes excepted. © 2023 Bresser GmbH All rights reserved. The reproduction of this documentation - even in extracts - in any form (e.g. photocopy, print, etc.) as well as the use and distribution by means of electronic systems (e.g.
- Página 19 3 About this Instruction Manual NOTICE These operating instructions are to be considered a component of the device. Read the safety instructions and the instruction manual carefully before using this device. Keep these instruction manual in a safe place for future ref- erence.
- Página 20 • This product contains small parts that can be swal- lowed by children! Choking hazard! • If small parts are swallowed, consult a doctor immedi- ately! CAUTION Risk of body injury! This device contains components and/or accessories that can cause minor or serious body injury if used improperly. It is therefore essential that you observe the following safety information in order to prevent body injuries.
- Página 21 • Only use accessories and spare parts for this device that comply with the technical specifications. 6 About this microscope This microscope is only a digital microscope and therefore does not offer the possibility of visual observation. It is equipped with an objective lens and a camera sensor for image recording.
- Página 22 Alternate download: http://soft.hvscam.com 9 Choice of location Choose a suitable location before installation and commis- sioning. Place the device on a stable, level and vibration-free surface. 10 Parts overview and scope of delivery Digital microscope holder Bracket for flexible alignment...
- Página 23 Locking screw (holder) Stand Digital microscope Dimmer button Record button Zoom wheel (50x to 1000x) LED ring lighting Objective Protection cap USB cable USB-A connector Scope of delivery: Digital microscope (A) with USB cable, microscope stand (B) 11 Assembling the microscope For the assembly proceed as follows: Snap the microscope into the center of the clamp on the stand.
- Página 24 14 Connecting to a PC Use of this digital microscope requires a connection via USB to a PC running the Windows operating system (Windows 7 or above) or macOS (10.13 or above). Follow the steps below for proper connection: Download and install the HiView* software on the PC. Mount the digital camera as described.
- Página 25 16 Adjusting the zoom The microscope optics have a zoom range from 50x to 1000x. In the software the zoom range can be changed by setting the display ratio from 100% to another value, e.g. 50% or 200%. NOTICE! When changing the zoom range, the focus may also need to be adjusted.
- Página 26 20 CE declaration of conformity A "Declaration of conformity" in accordance with the applic- able directives and corresponding standards has been pre- pared by Bresser GmbH. The full text of the CE declaration of conformity is available at the following Internet address: www.bresser.de/download/9652200/CE/9652200_CE.pdf 21 UKCA declaration of conformity A "Declaration of Conformity"...
- Página 27 UKCA/9652200_UKCA.pdf Bresser UK Ltd. • Suite 3G, Eden House, Enterprise Way, Edenbridge, Kent TN8 6HF, Great Britain 22 Disposal Dispose of the packaging materials according to its type. In- formation on proper disposal can be obtained from the muni- cipal waste disposal service provider or environmental agency.
- Página 28 Table des matières Impression.................... 30 Note de validité.................. 30 A propos de ce mode d’emploi .............. 31 Usage prévu .................... 31 Consignes générales de sécurité ............ 32 À propos de ce microscope .............. 33 Fonctionnalités .................. 33 Téléchargement du logiciel.............. 34 Choix de l'emplacement ................ 34 10 Vue d’ensemble des pièces et contenu de la livraison....... 35 11 Montage du microscope ................ 36 12 Source d’alimentation................ 36 13 Réglage de l'éclairage ................ 36...
- Página 29 20 Déclaration de conformité CE ............. 39 21 Recyclage .................... 39...
- Página 30 être trai- tés. Sous réserve d’erreurs et de modifications techniques. © 2023 Bresser GmbH Tous droits réservés. La reproduction de cette documentation - même partielle - sous quelque forme que ce soit (par ex. photocopie, impres- sion, etc.) ainsi que l'utilisation et la diffusion au moyen de...
- Página 31 Désignation du manuel : Manual_9652200-L467811_Digital-Microscope_en-de-fr-it-es- nl-cs-sk_BRESSER_v032024a Toujours fournir des informations lors de la demande de service. 3 A propos de ce mode d’emploi INFORMATION Ce mode d’emploi fait partie intégrante de l’appareil. Lire attentivement les consignes de sécurité et le mode d'emploi avant d'utiliser l'appareil.
- Página 32 5 Consignes générales de sécurité DANGER Risque d'étouffement ! Une utilisation incorrecte de ce produit peut entraîner une suffocation, en particulier chez les enfants. Il est donc impé- ratif que vous respectiez les consignes de sécurité sui- vantes. • Conservez les matériaux d'emballage (sacs en plas- tique, élastiques, etc.) hors de portée des enfants ! •...
- Página 33 INFORMATION Danger de dommages matériels ! Une manipulation incorrecte peut entraîner des dommages à l'appareil et/ou aux accessoires. Par conséquent, n'utilisez l'appareil que conformément aux consignes de sécurité sui- vantes. • Ne démontez pas l'appareil ! En cas de défaut, veuillez contacter votre revendeur.
- Página 34 8 Téléchargement du logiciel Téléchargement du logiciel HiView Système d’exploitation requis : Windows (Windows 7 ou version ul- térieure) ou macOS (10.13 ou version ultérieure) http://www.bresser.de/download/9652200 Alternative de téléchargement : http://soft.hvscam.com 9 Choix de l'emplacement Choisissez un emplacement approprié avant l'installation et la mise en service.
- Página 35 10 Vue d’ensemble des pièces et contenu de la livraison Support du microscope numé- Support pour un alignement rique flexible Vis de blocage (support) Socle Microscope numérique Bouton du variateur Bouton d’enregistrement Molette de zoom (50x à 1000x) Éclairage annulaire LED Objectif Capuchon de protection Câble USB...
- Página 36 Microscope numérique (A) avec câble USB, socle du micro- scope (B) 11 Montage du microscope Pour le montage, veuillez procéder comme suit : Emboîtez le microscope au centre de la pince du socle. 12 Source d’alimentation Branchez le connecteur USB-A du câble USB dans un port USB libre de l'ordinateur.
- Página 37 Insérez le connecteur USB-A du câble de connexion USB dans un port USB libre de l’ordinateur. Si la connexion réussit, la LED s’allume. Le microscope nu- mérique est alors opérationnel. Le logiciel HiView* permet de visualiser et de sauvegar- der les images du microscope numérique. De plus, les images peuvent être étiquetées et mesurées.
- Página 38 INFORMATION ! Lorsque vous modifiez la plage de zoom, il peut être nécessaire de régler la mise au point. (Voir égale- ment « Mise au point de l’objet ») 17 Mise au point de l'objet Pour une netteté optimale de l’image, l’objet d’observation doit être amené...
- Página 39 USB de l’ordinateur **interpolé 20 Déclaration de conformité CE Bresser GmbH a délivré une "déclaration de conformité" conformément aux directives applicables et aux normes cor- respondantes. Le texte intégral de la déclaration de confor- mité...
- Página 40 Ne jamais éliminer les appareils électriques avec les ordures ménagères ! Conformément à la directive européenne 2012/19/UE relative aux déchets d'équipements électriques et électroniques et à sa transposition en droit national, les équipements électriques usagés doivent être collectés séparément et recyclés de ma- nière écologique.
- Página 41 Table of contents Impressum .................... 43 Nota di validità .................. 43 Informazioni su questo manuale ............ 44 Utilizzo previsto .................. 44 Istruzioni generali di sicurezza ............ 45 About this microscope ................. 46 Caratteristiche .................. 46 Download del software ................ 47 Choice of location .................
- Página 42 20 Dichiarazione di conformità CE............. 52 21 Disposal.................... 52...
- Página 43 Chiediamo comprensione se i resi non richiesti non potranno essere trattati. Con riserva di errori e modifiche tecniche. © 2023 Bresser GmbH Tutti i diritti riservati. La riproduzione di questo documento - anche parziale - in qualsiasi forma (ad es. fotocopia, stampa, ecc.) e l’uso e la diffusione a mezzo di sistemi elettronici (ad es.
- Página 44 Denominazione di questo manuale: Manual_9652200-L467811_Digital-Microscope_en-de-fr-it-es- nl-cs-sk_BRESSER_v032024a Fornire sempre queste informazioni quando si richiede il as- sistenza. 3 Informazioni su questo manuale AVVERTENZA Le presenti istruzioni per l'uso sono da considerarsi parte integrante dell'apparecchio! Leggere attentamente le istruzioni di sicurezza e le istruzio- ni per l'uso prima di utilizzare l'apparecchio.
- Página 45 5 Istruzioni generali di sicurezza PERICOLO Pericolo di soffocamento! In caso di uso improprio del prodotto sussiste pericolo di soffocamento, soprattutto per i bambini. Pertanto, leggere attentamente e osservare le seguenti indicazioni di sicurez- • Tenere i materiali di imballaggio (sacchetti di plastica, elastici, ecc.) fuori dalla portata dei bambini! PERICOLO DI SOFFOCAMENTO! •...
- Página 46 bocca, risciacquare con acqua. Nel caso di incidente, ri- volgersi immediatamente a un medico e mostrargli le sostanze coinvolte. AVVERTENZA Pericolo di danni materiali! Un uso improprio può causare danni al dispositivo e/o agli accessori. Utilizzare pertanto il dispositivo solo in conformi- tà...
- Página 47 *interpolato 8 Download del software Download del software HiView Sistema operativo richiesto: Windows (Windows 7 o più recente) o macOS (10.13 o più recente) http://www.bresser.de/download/9652200 Download alternativo: http://soft.hvscam.com 9 Choice of location Choose a suitable location before installation and commis- sioning.
- Página 48 10 Panoramica dei componenti e volume di fornitura Supporto per il microscopio digi- Sostegno per l'allineamento fles- tale sibile Vite d'arresto (sostegno) Base d'appoggio Microscopio digitale Pulsante dimmer Pulsante di registrazione Rotella zoom (da 50x a 1000x) Illuminazione LED ad anello Obiettivo Tappo di protezione Cavo USB...
- Página 49 microscopio digitale (A) con cavo USB, supporto del micro- scopio (B) 11 Montaggio del microscopio Per il montaggio procedere come segue: far scattare il microscopio in posizione al centro del disposi- tivo di bloccaggio del supporto. 12 Alimentazione elettrica Inserire il connettore USB-A del cavo USB in una porta USB libera del PC.
- Página 50 Tramite il software HiView* è possibile visualizzare e salvare le immagini del microscopio digitale. Inoltre, è possibile etichettare e misurare le immagini. Nel software fare prima clic su "Device" e poi su "Open". Effettuare la connessione con il microscopio di- gitale trovato (fare clic su "Open").
- Página 51 Impostare la posizione richiesta nel sostegno per il mi- croscopio digitale ed eventualmente correggere legger- mente in un secondo tempo. Nel software selezionare l'impostazione di ingrandi- mento desiderata (ad es. rapporto di visualizzazione 100%). Ruotare quindi la rotella zoom fino alla massima niti- dezza dell'immagine sul monitor.
- Página 52 20 Dichiarazione di conformità CE A "Declaration of conformity" in accordance with the applica- ble directives and corresponding standards has been prepa- red by Bresser GmbH. The full text of the EC declaration of conformity is available at the following Internet address: www.bresser.de/download/9652200/CE/9652200_CE.pdf 21 Disposal Smaltire i materiali dell’imballaggio in base alla loro tipologia.
- Página 53 Índice de contenidos Impresión .................... 55 Nota de validez .................. 55 Sobre este manual de instrucciones de uso........ 56 Uso previsto................... 56 General safety instructions.............. 57 Acerca de este microscopio .............. 58 Características .................. 58 Descarga del software ................. 59 Elección del lugar de observación ............
- Página 54 20 Declaración de Conformidad CE............ 64 21 Reciclaje .................... 64...
- Página 55 Rogamos entienda que las de- voluciones no solicitadas, no pueden tramitarse. Salvo errores y modificaciones técnicas. © 2023 Bresser GmbH Quedan reservados todos los derechos Queda prohibida la reproducción de esta documentación - incluso en fragmentos- en cualquier forma (fotocopias, im- presiones, etc), así...
- Página 56 Proporcione siempre esta información al solicitar un servi- cio. 3 Sobre este manual de instrucciones de uso ¡AVISO! El presente manual de instrucciones debe conside- rarse parte integrante del aparato. Lea atentamente las instrucciones de seguridad y el manual antes de utilizar este dispositivo. Guarde este manual de instrucciones en un lugar seguro para futuras consultas.
- Página 57 5 General safety instructions PELIGRO Peligro de asfixia El uso inadecuado de este producto puede provocar asfixia, especialmente en los niños. Por lo tanto, es imperativo ob- servar la siguiente información de seguridad. • Mantenga los materiales de embalaje (bolsas de plásti- co, bandas de goma, etc) alejadas del alcance de los ni- ños.
- Página 58 ¡AVISO! Peligro de daños materiales. Una manipulación inadecuada puede provocar daños en el aparato y/o en los accesorios. Por lo tanto, utilice el aparato sólo de acuerdo con la siguiente información de seguridad. • No desmonte el aparato. En caso de que haya un defec- to, póngase en contacto con su distribuidor.
- Página 59 8 Descarga del software Descarga del software HiView Sistema operativo necesario: Windows (Windows 7 o posterior) o macOS (10.13 o posterior) http://www.bresser.de/download/9652200 Descarga alternativa: http://soft.hvscam.com 9 Elección del lugar de observación Seleccione un lugar adecuado antes de la instalación y la puesta en marcha.
- Página 60 10 Resumen de las piezas y elementos incluidos en la entrega Soporte del microscopio principal 2 Soporte para la alineación flexible Tornillo de bloqueo (soporte) Base Microscopio digital Botón para regular la luz Botón para grabar Rueda de zoom (de 50x a 1000x) Aro led luminoso Objetivo Tapón protector...
- Página 61 11 Montaje del microscopio Proceda como sigue para el montaje: Encaje el microscopio en el centro del soporte de la base. 12 Suministro de corriente Enchufe el conector USB-A del cable USB en un puerto libre del PC. Se alimenta corriente a través del ordenador una vez encendido este.
- Página 62 En el software, haga clic en «Device» [Dispositivo] y, después, en «Open» [Abrir]. Conéctelo al microscopio digital que detecta (haga clic en «Open» [Abrir]). Si ha iniciado el software primero y, después, conectado el microscopio digital, debe hacer clic en «Refresh» (Ac- tualizar) para detectar el microscopio digital.
- Página 63 Ajuste el aumento deseado en el software (p. ej., rela- ción de visualización del 100 %). Después, gire la rueda de zoom hasta que la imagen aparezca nítida en el monitor. 18 Registro Aquí se selecciona el microscopio digital y se esta- blece la conexión.
- Página 64 USB del PC **interpolado 20 Declaración de Conformidad CE Bresser ha elaborado una "Declaración de conformidad" de acuerdo con las directivas aplicables y las normas correspon- dientes. El texto completo de la declaración de conformidad CE está...
- Página 65 Inhoudsopgave Imprint .................... 67 Geldigheidsverklaring................ 67 Over deze handleiding ................. 68 Beoogd gebruik.................. 68 Algemene veiligheidsinstructies ............ 69 About this microscope ................. 70 Functies.................... 70 Softwaredownload ................ 71 Kies een plaats .................. 71 10 Onderdelenoverzicht en leveringsomvang........ 72 11 De microscoop monteren .............. 73 12 Voeding ....................
- Página 66 20 EG-Verklaring van Overeenstemming .......... 76 21 Verwerking .................... 76...
- Página 67 Fouten en technische wijzigingen voorbehouden. © 2023 Bresser GmbH Alle rechten voorbehouden. De reproductie van deze documentatie - zelfs in uittreksels - in welke vorm dan ook (bv. fotokopie, afdrukken, enz.) even- als het gebruik en de verspreiding door middel van elektro- nische systemen (bv.
- Página 68 Handleiding aanwijzing: Manual_9652200-L467811_Digital-Microscope_en-de-fr-it-es- nl-cs-sk_BRESSER_v032024a Geef a.u.b. altijd de volgende informatie bij het aanvragen van dienstverlening. 3 Over deze handleiding INSTRUCTIE Deze handleiding moet worden gezien als onderdeel van het apparaat. Lees de veiligheidsinstructies en de handleiding zorgvuldig door voordat u dit apparaat in gebruik neemt. Bewaar deze handleiding voor toekomstig gebruik.
- Página 69 5 Algemene veiligheidsinstructies GEVAAR Verstikkingsgevaar! Als dit product op onjuiste wijze wordt gebruikt bestaat ver- stikkingsgevaar, vooral voor kinderen. Het is daarom van essentieel belang de volgende veiligheidsinstructies in acht te nemen. • Houd verpakkingsmaterialen (plastic zakken, elastiek- jes, enz.) buiten de toegang van kinderen! Er is verstik- kingsgevaar! •...
- Página 70 INSTRUCTIE Gevaar voor materiële schade! Onjuiste behandeling kan het apparaat en/of de accessoires beschadigen. Gebruik het apparaat daarom alleen in over- eenstemming met de volgende veiligheidsinformatie. • Haal het apparaat niet uit elkaar! Neem in geval van een defect contact op met uw handelaar. Hij zal contact opnemen met het service-centrum en kan het apparaat zo nodig ter reparatie opsturen.
- Página 71 • Incl. Windows PC software (download), standaard *geïnterpoleerd 8 Softwaredownload HiView softwaredownload Vereist besturingssysteem: Windows (Windows 7 of later) of macOS (10.13 of later) http://www.bresser.de/download/9652200 Alternatieve download: http://soft.hvscam.com 9 Kies een plaats Kies een geschikte plaats vóór de opstelling en inbedrijfstel- ling.
- Página 72 10 Onderdelenoverzicht en leveringsomvang Houder voor digitale microscoop Klembeugel voor flexibele uitlij- ning Borgschroef (houder) Standaard Digitale microscoop Dimmerknop Opnameknop Zoomwiel (50x tot 1000x) Led-ringlamp Objectief Beschermkap USB-kabel USB-A-connector Leveringsomvang: Digitale microscoop (A) met USB-kabel, microscoopstan- daard (B) 72 / 104...
- Página 73 11 De microscoop monteren Ga voor de montage als volgt te werk: Klik de microscoop in het midden van de klem op de stan- daard. 12 Voeding Sluit de USB-A-connector van de USB-kabel aan op een vrije USB-poort van de pc. De stroom wordt geleverd via de com- puter nadat deze is ingeschakeld.
- Página 74 Via de HiView*-software kunnen de beelden van de di- gitale microscoop worden bekeken en opgeslagen. Bo- vendien kunnen de afbeeldingen worden gelabeld en gemeten. Klik in de software op 'Apparaat' en vervolgens op 'Ope- nen'. Maak verbinding met de digitale microscoop die u daar ziet staan (klik op 'Openen').
- Página 75 Stel de gewenste positie in de houder voor de digitale microscoop in en corrigeer deze indien nodig iets daar- Stel de gewenste vergrotingsinstelling in de software in (bijv. beeldverhouding 100%). Draai nu aan het zoomwiel totdat het beeld scherp op de monitor verschijnt.
- Página 76 **geïnterpoleerd 20 EG-Verklaring van Overeenstemming Een "Verklaring van Overeenstemming" in overeenstemming met de toepasselijke richtlijnen en overeenkomstige normen is opgesteld door Bresser GmbH. De volledige tekst van de EG-Verklaring van Overeenstemming is beschikbaar op het volgende webadres: www.bresser.de/download/9652200/ CE/9652200_CE.pdf 21 Verwerking Gooi het verpakkingsmateriaal weg volgens het soort materi- aal.
- Página 77 Obsah Tiráž ...................... 79 Poznámka k platnosti ................ 79 Informace k tomuto návodu ............... 80 Účel použití.................... 80 Všeobecné výstražné pokyny .............. 81 Informace o mikroskopu .............. 82 Funkce.................... 82 Stažení softwaru ................... 83 Výběr místa ................... 83 10 Přehled dílů a rozsah dodávky ............ 84 11 Sestavení...
- Página 78 20 ES Prohlášení o shodě ................ 88 21 Likvidace .................... 88...
- Página 79 „Záruka“ a „Servis“ v tomto dokumentu. Žádáme vás o pochopení, že nevyžádaně vrácené zboží nemůžeme zpracovat. To se netýká chyb a technických změn. © 2023 Bresser GmbH Veškerá práva vyhrazena. Reprodukce této dokumentace, včetně úryvků, v jakékoliv formě (například kopírování, tisk apod.) a rovněž používání a distribuce prostřednictvím elektronických systémů...
- Página 80 Tyto informace uveďte při každé žádosti o servis. 3 Informace k tomuto návodu UPOZORNĚNÍ Tento návod k obsluze musí být pokládán za nedílnou součást přístroje. Před používáním přístroje si pečlivě pročtěte bezpečnostní pokyny a návod k obsluze. Tento návod k obsluze uschovejte pro případné pozdější použití.
- Página 81 5 Všeobecné výstražné pokyny NEBEZPEČÍ Nebezpečí zadušení! Při neodborném použití tohoto produktu existuje nebezpečí zadušení, zvláště pro děti. Dbejte proto bezpodmínečně následujících bezpečnostních pokynů. • Zabraňte dětem v přístupu k balicím materiálům (plastové sáčky, pryžové pásky atd.)! Hrozí NEBEZPEČÍ UDUŠENÍ! •...
- Página 82 UPOZORNĚNÍ Nebezpečí věcných škod! Při neodborném zacházení může být poškozen přístroj a/ nebo jeho části. Používejte proto přístroj pouze podle následujících bezpečnostních pokynů. • Přístroj nerozebírejte! Obraťte se v případě závady na vašeho odborného prodejce. Prodejce se spojí se servisním střediskem a může přístroj příp. zaslat do servisního střediska za účelem opravy.
- Página 83 *interpolované 8 Stažení softwaru Stažení softwaru HiView Požadovaný operační systém: Windows (Windows 7 nebo novější) nebo macOS (10.13 nebo novější) http://www.bresser.de/download/9652200 Alternativní stažení: http://soft.hvscam.com 9 Výběr místa Před instalací a uvedením do provozu vyberte vhodné místo. Zařízení umístěte na stabilní a rovný povrch bez známek otřesů.
- Página 84 10 Přehled dílů a rozsah dodávky Držák digitálního mikroskopu Svorka pro pružné přizpůsobení Pojistný šroub (držák) Stojan Digitální mikroskop Tlačítko regulátoru svitu Tlačítko záznamu Kolečko pro přiblížení (50krát až 1000krát) Kruhové osvětlení diodami LED Objektiv Ochranný kryt Kabel USB Konektor USB-A Rozsah dodávky: digitální...
- Página 85 11 Sestavení mikroskopu Při sestavování postupujte následujícím způsobem: Uchyťte mikroskop do středu svorky na stojanu. 12 Napájení Připojte konektor USB-A kabelu USB k volnému portu USB v počítači. Napájení je zajištěno pomocí počítače po jeho zapnutí. Rozsvítí se kruhové osvětlení diodami LED. 13 Nastavení...
- Página 86 V softwaru klikněte na možnost Device (Zařízení) a poté na možnost Open (Otevřít). Připojte se k nalezenému digitálnímu mikroskopu (klikněte na možnost Open (Otevřít)). Pokud jste nejprve spustili software a poté jste připojili digitální mikroskop, je nutné kliknout na možnost Refresh (Aktualizovat), aby bylo možné digitální...
- Página 87 V softwaru určete požadované nastavení zvětšení (např. poměr stran obrazovky 100 %). Nyní otáčejte kolečkem pro přiblížení, dokud snímek na monitoru nebude vypadat ostře. 18 Záznam Zde vyberete svůj digitální mikroskop a vytvoříte připojení. Pořízení fotografie Záznam videa Nastavení rozlišení (např. až 1920 x 1080 pro nejlepší...
- Página 88 * Přenos dat a napájení se provádí současně pomocí portu USB v počítači. **interpolované 20 ES Prohlášení o shodě „Prohlášení o shodě“ v souladu s použitelnými směrnicemi a odpovídajícími normami zhotovila společnost Bresser GmbH: www.bresser.de/download/9652200/CE/9652200_CE.pdf 21 Likvidace Obalový materiál zlikvidujte podle jeho typu. Informace o správné likvidaci získáte od poskytovatele služeb likvidace komunálního odpadu nebo od orgánu odpovědného za...
- Página 89 Obsah Tiráž ...................... 91 Informácia o platnosti ................. 91 K tomuto návodu .................. 92 Zamýšľané použitie ................ 92 Všeobecné bezpečnostné pokyny............ 93 Informácie o tomto mikroskope............ 94 Vlastnosti.................... 94 Stiahnutie softvéru ................ 95 Výber umiestnenia ................ 95 10 Prehľad súčastí a rozsah dodávky ............ 96 11 Montáž...
- Página 90 20 ES Vyhlásenie o zhode ................ 100 21 Likvidácia.................... 100...
- Página 91 že požiadavky a zásielky nasmerované priamo na ad- resu výrobcu nie je možné spracovať. Omyly a technické zmeny vyhradené. © 2023 Bresser GmbH Všetky práva vyhradené. Reprodukcia tejto dokumentácie – aj čiastočná – v akejkoľ- vek forme (napr. fotokópia, tlač atď.) a použitie a spracova- nie elektronickými systémami (napr.
- Página 92 Názov tohto návodu: Manual_9652200-L467811_Digital-Microscope_en-de-fr-it-es- nl-cs-sk_BRESSER_v032024a Informácie uvádzajte vždy pri servisných dopytoch. 3 K tomuto návodu UPOZORNENIE Tento návod na obsluhu treba považovať za súčasť prístroja! Pred použitím prístroja si pozorne prečítajte bezpečnostné pokyny a návod na obsluhu. Tento návod na obsluhu si uschovajte pre opätovné neskor- šie použitie.
- Página 93 5 Všeobecné bezpečnostné pokyny NEBEZPEČENSTVO Nebezpečenstvo udusenia! Pri neodbornom používaní tohto produktu hrozí nebezpe- čenstvo udusenia, najmä pre deti. Preto bezpodmienečne rešpektujte nasledujúce bezpečnostné informácie. • Obalové materiály (plastové vrecká, gumičky atď.) uschovávajte mimo dosahu detí! Hrozí NEBEZPEČEN- STVO UDUSENIA! •...
- Página 94 UPOZORNENIE Nebezpečenstvo vecných škôd! Pri neodbornej manipulácii sa môže prístroj a/alebo prí- slušenstvo poškodiť. Preto prístroj používajte len podľa na- sledujúcich bezpečnostných informácií. • Prístroj nerozoberajte! V prípade poruchy sa obráťte na špecializovaného predajcu. Predajca sa skontaktuje so servisným strediskom, prípadne tam zašle prístroj za účelom opravy.
- Página 95 (na stiahnutie), stojan *interpolované 8 Stiahnutie softvéru Stiahnutie softvéru HiView Požadovaný operačný systém: Windows (Windows 7 alebo novší) alebo macOS (10.13 alebo novší) http://www.bresser.de/download/9652200 Alternatívny odkaz na stiahnutie: http://soft.hvscam.com 9 Výber umiestnenia Pred inštaláciou a uvedením do prevádzky vyberte vhodné umiestnenie.
- Página 96 10 Prehľad súčastí a rozsah dodávky Držiak digitálneho mikroskopu Svorka na flexibilné nastavenie Zaisťovacia skrutka (držiak) Stojan Digitálny mikroskop Tlačidlo stlmenia Tlačidlo nahrávania Regulátor zväčšenia (50x až 1 000x) Prstencové osvetlenie LED Objektív Ochranný kryt Kábel USB Konektor USB-A Rozsah dodávky: Digitálny mikroskop (A) s káblom USB, stojan na mikroskop 96 / 104...
- Página 97 11 Montáž mikroskopu Pri montáži mikroskopu postupujte takto: Mikroskop prichyťte do stredu svorky na stojane. 12 Napájanie Konektor USB-A na kábli USB zapojte do voľného portu USB na počítači. Po zapnutí počítača sa mikroskop bude napájať z počítača. Prstencové osvetlenie LED sa rozsvieti. 13 Nastavenie osvetlenia Digitálny mikroskop je vybavený...
- Página 98 V softvéri kliknite na položku Device (Zariadenie) a po- tom na položku Open (Otvoriť). Pripojte sa k nájdenému digitálnemu fotoaparátu (kliknite na položku Open (Ot- voriť)). Ak digitálny fotoaparát pripojíte až po spustení softvéru, musíte kliknúť na položku Refresh (Obnoviť), aby sa digitálny fotoaparát našiel. *Informácie o stiahnutí...
- Página 99 Nastavte držiak digitálneho mikroskopu do požadova- nej polohy a potom nastavenie podľa potreby trocha upravte. V softvéri vyberte požadované nastavenie zväčšenia (napr. pomer zobrazenia 100 %). Teraz otáčajte regulátorom zväčšenia dovtedy, kým ob- raz na monitore nebude ostrý. 18 Snímanie Tu vyberiete digitálny mikroskop a vytvoríte pripo- jenie.
- Página 100 **interpolované 20 ES Vyhlásenie o zhode „Vyhlásenie o zhode“ v súlade s platnými smernicami a prí- slušnými normami vyhotovila spoločnosť Bresser GmbH: www.bresser.de/download/9652200/CE/9652200_CE.pdf 21 Likvidácia Obalové materiály zlikvidujte podľa ich druhu. Informácie o správnej likvidácii odpadu vám poskytne miestny poskytova- teľ...
- Página 104 Bresser GmbH Bresser UK Ltd. Gutenbergstraße 2 Suite 3G, Eden House 46414 Rhede · Germany Enterprise Way, Edenbridge, Kent TN8 6HF, Great Britain www.bresser.de @BresserEurope...