Capítulos
Tabla de contenido
Solución de problemas

Manuales relacionados para Bresser National Geographic 90-66000


Resumen de contenidos para Bresser National Geographic 90-66000
- Página 1 SMART WETTERSTATION WEATHER STATION Bedienungsanleitung Operating instructions Mode d’emploi Istruzioni per l’uso Instrucciones de uso Руководство по эксплуатации Art.No. 90-66000...
-
Página 2: Allgemeine Informationen
Allgemeine Informationen Zu dieser Anleitung Lesen Sie bitte aufmerksam die Sicherheitshinweise in dieser Anleitung. Verwenden Sie dieses Produkt nur wie in der Anleitung beschrieben, um Schäden am Gerät oder Verletzungen zu vermeiden. Bewahren Sie die Bedienungsanleitung auf, damit Sie sich jederzeit über alle Bedienungsfunktionen informieren können. -
Página 3: Allgemeine Warnhinweise
EN FR IT ES RU Allgemeine Warnhinweise GEFAHR! Dieses Gerät beinhaltet Elektronikteile, die über eine Stromquelle (Netz- teil und/oder Batterien) betrieben werden. Lassen Sie Kinder beim Um- gang mit dem Gerät nie unbeaufsichtigt! Die Nutzung darf nur wie in der Anleitung beschrieben erfolgen, andernfalls besteht GEFAHR eines STROMSCHLAGS! Kinder sollten das Gerät nur unter Aufsicht benutzen. - Página 4 Hinweise zur Reinigung Trennen Sie das Gerät vor der Reinigung von der Stromquelle (Batterien entfernen)! HINWEIS! Reinigen Sie das Gerät nur äußerlich mit einem trockenen Tuch. Benut- zen Sie keine Reinigungsfl üssigkeit, um Schäden an der Elektronik zu vermeiden. Entsorgung Entsorgen Sie die Verpackungsmaterialien sortenrein.
-
Página 5: Eg-Konformitätserklärung
EN FR IT ES RU EG-Konformitätserklärung Eine „Konformitätserklärung“ in Übereinstimmung mit den anwendbaren Richtlinien ist von Meade Instruments Europe GmbH & Co. KG erstellt worden und kann eingesehen werden. Konform in den folgenden Ländern: Dieses Gerät ist für den EU-Wirtschaftsraum zugelassen sowie für die Schweiz. -
Página 6: Tabla De Contenido
INHALTSVERZEICHNIS 1. Einführung ................6 2. Bedienelemente ..............8 2.1 LCD (Anzeige) Tasten / Ansicht von Vorne / Ansicht von Hinten ......8 2.2 Ständer ................10 2.3 Außensensor (Temperatur) ............10 3. Inbetriebnahme ..............11 4. Bedienung ................13 4.1 Wettervorhersage ..............14 4.2 Temperatur Fenster .............15 4.3 Uhr Fenster ................17 4.3.1 Zeit Funktion ..............17 4.3.2 Wecker Funktion ............. - Página 7 EN FR IT ES RU FUNKTIONEN DER BASISSTATION ZEIT • Absolut genaue Zeit und Datum über Empfang des Zeitzeichensen- ders DCF77 aus Frankfurt, Deutschland. • Zeitformat einstellbar (12 oder 24 Stunden Format) • Zeit und Datum auch manuell einstellbar (ideal für Orte ohne DCF77 Empfang) •...
-
Página 8: Bedienelemente
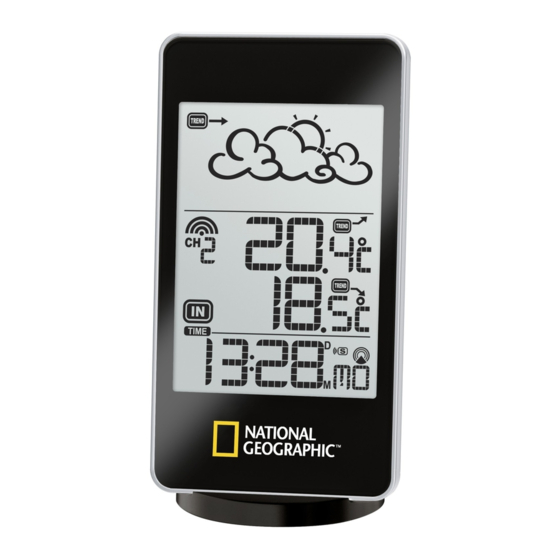
2. BEDIENELEMENTE 2.1 LCD (ANZEIGE) UND TASTEN / ANSICHT VON VORNE / ANSICHT VON HINTEN Alle Funktionen sind auf der Flüssigkristallanzeige (LCD) in 3 Fenstern ablesbar. - Página 9 EN FR IT ES RU A. WETTER Fenster B. TEMPERATUR Fenster C. UHR Fenster D. (▼) (nach unten) Taste • Anwahl des Fensters • Zwei Sekunden gedrückt halten um das Signal des Außensensors zu empfangen. • Die Werte im Einstellmodus verringern. E.
-
Página 10: Ständer
Zeitformat (12/24 Std.) zu bestimmen und die Zeit manuell einzustel- len. • Wenn das TEMPERATUR Fenster angewählt ist: Halten Sie die MODE Taste zwei Sekunden gedrückt, um die Temperatureinheit von Celsius auf Fahrenheit und umgekehrt zu ändern. H. (▲) (nach oben) Taste •... -
Página 11: Außensensor (Temperatur)
EN FR IT ES RU 2.3 AUßENSENSOR (TEMPERATUR) A. BATTERIEFACH Ausgelegt für zwei AAA Batterien B. WANDMONTAGE Verwenden Sie zur Montage die Wandhalterung 3. INBETRIEBNAHME Dank der drahtlosen Messwertübertragung vom Außensensor (Sender) zur Basisstation (Empfänger) ist die Installation sehr einfach. In einem freien und ungestörten Feld können die Messwerte über eine Distanz von bis zu 30 Metern (100 Fuss) übertragen werden. - Página 12 im Außensensor sind, beginnt dieser die Messdaten auszusenden. Die Basisstation beginnt mit dem Einsetzen der Batterien den Emp- fang der Daten. • Bevor Sie den Außensensor am ausgewählten Ort montieren, emp- fehlen wir die Kommunikation, d.h. die Anzeige der Daten auf der Basisstation, sicherzustellen.
-
Página 13: Bedienung
EN FR IT ES RU • Idealerweise wird der Außensensor 1.25m (4 Fuss) über Erd- bzw. Grassboden platziert. Stein-, Asphalt- oder Teer-Flächen können sich stark erwärmen und so die Messung verfälschen. • Die Basisstation muss im Sendebereich aller Außensensoren platziert werden und darf nicht im direkten Einfl... -
Página 14: Wettervorhersage
1-3) im TEMPERATUR Fenster. Während dieses Vorganges besteht kein Bedarf eine Bedienung vorzunehmen, warten Sie bis der Suchvorgang nach wenigen Minuten abgeschlossen ist. Danach wird das Signal des DCF77 Zeitzeichensensors gesucht (im UHR Fenster). Die Werkseinstellung beim Gerätestart ist 12:00 im 24 Stunden Modus. -
Página 15: Temperatur Fenster
EN FR IT ES RU 4.2 TEMPERATUR FENSTER Die Basisstation misst direkt die Innentemperatur und empfängt zusätz- lich die Messungen von bis zu max. 3 Außensensoren. Jeder Außensen- sor ist dabei auf einen der Kanäle 1-3 einzustellen. Die Temperatur kann in °C oder °F angezeigt werden. - Página 16 Mit diesem Suchvorgang sucht das Gerät den gleichen Außensensor mit dem er bereits verbunden war. Wenn Sie die Batterien beim Außen- sensor gewechselt haben, hat sich dieser einen neuen Code gegeben und wird danach von der Basisstation nicht mehr erkannt. Sie können das folgendermassen lösen: •...
-
Página 17: Uhr Fenster
EN FR IT ES RU dem [ ] Symbol (auch hier erscheint “OFF” wenn keine Grenze gesetzt ▬ ist). Bei der entsprechenden Anzeige [ ] drücken und halten Sie ▲ die ALARM Taste bis die Anzeige zu blinken beginnt. Mit den Tasten ▲ oder ▼... - Página 18 und in Mainfl ingen bei Frankfurt am Main ausgestrahlt. Dieser LW Sender hat eine Reichweite von bis zu 1500km. Wird das Zeit-Empfangssymbol ] ohne Wellen dargestellt [ ], haben Sie Empfangsprobleme. Beachten Sie dann folgende Punkte: • Während der Nacht gibt es weniger Störungen in der Atmosphäre wodurch sich die Empfangswahrscheinlichkeit erhöht.
-
Página 19: Manuelle Einstellungen
EN FR IT ES RU indem Sie die Taste ▲ für 3 Sekunden gedrückt halten. Es fi ndet dann sofort ein Empfang statt. Weiter wird täglich um 0:00, 3:00, 6:00 und 12:00 ein Empfang gestartet. Symbol Stärke des Uhrzeitsignals (Blinkend) Keine verwertbaren Daten Kein Empfang in den letzten 24 Stunden Signal schwach, aber dekodierbar... -
Página 20: Wecker Funktion
Bei jeder Einstellung, kann mit den Tasten ▲ oder ▼ eine Änderung vorgenommen werden. Halten Sie die Taste gedrückt, ändert sich der Wert schneller. Zur nächsten Einstellung gelangen Sie mit der MODE Taste, auch wenn Sie eine bestimmte Einstellung überspringen möchten. -
Página 21: Weckzeiten Einstellen
EN FR IT ES RU • Pre-Alarm [PRE-AL] Wenn die Aussentemperatur des Kanals 1 +0°C oder weniger misst, wird der aktive Alarm (W und S) um die eingestellte Zeit “X” früher ertö- nen (X kann auf 15, 30, 45, 60 oder 90 Minuten eingestellt werden). AKTIVIEREN/DEAKTIVIEREN DES WECKERS 1. -
Página 22: Probleme Beheben
Achtung: Die Pre-Alarm Funktion kann nur aktiviert werden, wenn der Wochentag- oder Einzel-Alarm aktiviert ist. DEN WECKER AUSSCHALTEN Der Weckton ertönt für 2 Minuten mit zunehmender Intensität. Um den Wecker auszuschalten, drücken Sie die ALARM Taste während des ertönenden Alarms. Beim Wochentag Alarm wird der Wecker am nächsten Tag (Montag-Freitag) wieder ertönen. -
Página 23: Technische Daten
EN FR IT ES RU 6. TECHNISCHE DATEN BASISSTATION Raum Temperatur Messbereich: -5°C bis +50°C (23.0°F bis 122.0°F) Aufl ösung: 0.1°C / 0.2°F Spannungsversorgung 2 x AAA 1.5V Batterien Abmessungen 69(B) x 128(H) x 15(T) mm AUßENSENSOR Temperatur Messbereich mit Alkali Batterien: -10°C bis + 60°C (14°F bis + 140°F) Aufl... -
Página 24: General Information
General Information About this Instruction Manual Please read the safety instructions in this manual carefully. To avoid dam- age to the unit and the risk of injury, only use this product as described in the manual. Keep the instruction manual handy so that you can easily look up infor- mation on all the functions. -
Página 25: General Warning
FR IT ES RU General Warning DANGER! This device contains electronic components which operate via a power source (power supply and/or batteries). Do not let children use the de- vice while unattended. Only use the device as described in the manual, otherwise you run the risk of an electric shock. - Página 26 Notes on cleaning Separate the device from the power supply or remove the batteries be- fore cleaning. NOTE! Only use a dry cloth to clean the exterior of the device. Do not use any cleaning fl uid to avoid damaging the electronics. Disposal Dispose of the packaging materials properly, according to their type, such as paper or cardboard.
- Página 27 FR IT ES RU EEC conformity explanation Meade Instruments GmbH & Co. KG has formed a Conformity Declara- tion in line with the applicable guidelines. This declaration is available for review. Compliant in the following countries: This device is approved for the EU and Switzerland. Meade Instruments Europe GmbH &...
- Página 28 TABLE OF CONTENTS 1. Introduction ................. 28 2. Operating elements .............. 30 2.1 LCD (display) and keys/front view/rear view ..........30 2.2 Stand ................32 2.3 Outdoor sensor ..............33 3. Putting into operation ............33 4. Operation ................35 4.1 Weather forecast window .............
- Página 29 FR IT ES RU FEATURES OF THE BASE STATION TIME • Precise time and date are set via radio-controlled time signals (DCF77) from the time transmitter in Frankfurt, Germany. • 12- or 24-hour time formats are selectable. • Manual adjustment of time and date (ideal if there is no DCF77 recep- tion) •...
-
Página 30: Operating Elements
2. OPERATING ELEMENTS 2.1 LCD (DISPLAY) AND KEYS/FRONT VIEW/ REAR VIEW All functions are depicted on the liquid crystal display (LCD) in three windows. - Página 31 FR IT ES RU A. WEATHER window B. TEMPERATURE window C. CLOCK window D. (▼) (DOWN) button • Select the other window (CLOCK or TEMPERATURE) • Press and hold for 2 seconds to search for wireless signal from the outdoor sensor. •...
-
Página 32: Battery Compartment
• When TEMPERATURE window has been selected, press and hold MODE for 2 seconds to toggle the temperature unit between Celsius and Fahrenheit. H. (▲) (UP) button • Select the other window (CLOCK or TEMPERATURE) • Increase the parameters in setting mode. •... -
Página 33: Outdoor Sensor
FR IT ES RU 2.3 OUTDOOR SENSOR (TEMPERATURE) A. BATTERY COMPARTMENT: Requires two AAA batteries. B. WALL-MOUNT RECESSED HOLE: Mount the sensor on the wall using the clip. 3. PUTTING INTO OPERATION The communication between the base station (receiver) and the outdoor sensor (transmitter) is wireless, thus simplifying the installation. - Página 34 START UP THE COMMUNICATION: • It is important to power up the outdoor sensor before powering up the base station. Immediately after batteries are installed, the outdoor sensor will start transmitting temperature data to the base station. • It is strongly recommended to power up and test communication between the outdoor sensor and the base station before permanently mounting the sensor outside.
-
Página 35: Operation
FR IT ES RU • Avoid placing the outdoor sensor near sources of heat, such as chim- neys and heating elements. • Avoid areas that collect heat from the sun and radiate heat, such as metal, brick or concrete structures, paving and patios. •... -
Página 36: Weather Forecast Window
Important: After this, the base station will scan the outdoor sensors (channel 1 to channel 3) in the TEMPERATURE window. There is no need to press any button during this process. After this, the base station will start to scan the DCF77 time transmitter in the CLOCK window. -
Página 37: Temperature Window
FR IT ES RU 4.2 TEMPERATURE WINDOW The base station supports up to three outdoor sensors, each corre- sponding to a separate channel of the temperature display. The tem- perature can be displayed in Celsius (C) or Fahrenheit (F). A temperature alert function is available for all channels. It can be pro- grammed to sound when one of the remote sensors detects a tempera- ture that exceeds or falls below the pre set upper and lower limits. - Página 38 During this search procedure, the device searches the same outdoor sensor that was already previously logged in. If you replace the batter- ies in the outdoor sensor, the sensor gives itself a new code and will no longer be recognized by the base station. You can resolve this problem •...
-
Página 39: Temperature Alarm
FR IT ES RU TEMPERATURE ALARM Select the TEMPERATURE window. Press ALARM to select the desired alarm: the upper temperature alert ▬ with [ ] icon (if disabled, display shows OFF), or the lower temperature ▲ alert with [ ] icon (if disabled, display shows OFF). Press and hold ALARM until the temperature digits fl... - Página 40 proximately 1,500 kilometres. If the [ ] tower icon is not fully lit [ ], or if the time and date are not set automatically, please consider the following: During nighttime hours, atmospheric disturbances are typically less severe and radio signal reception may improve. Reception once a day is suffi...
-
Página 41: Manual Settings
FR IT ES RU ICON Time signal reception strength (Flashing) Undefi ned data No reception for the past 24 hours Weak signal, but can be decoded Strong signal 4. If the radio signal is received, the date and time will be set automati- cally and the radio control signal icon [ ] will turn on. -
Página 42: Wake-Up Alarm Function
HOW TO SET THE TIME ZONE To set the time zone, make sure the display shows the time with the [ZONE] icon. Then press and hold MODE. Press ▲ or ▼ to adjust the value in steps of 30 minutes. Press and hold either button to change the value rapidly. - Página 43 FR IT ES RU ACTIVATING/DEACTIVATING THE TIME ALARMS 1. Press ALARM to rotate between: • Weekday Alarm Time (displays OFF if weekday alarm is deactivated) • Single Alarm Time (displays OFF if single alarm is deactivated) • Pre-Alarm Time (displays OFF if pre-alarm is deactivated) 2.
-
Página 44: Troubleshooting
STOP THE ALARM SOUND The alarm will sound for 2 minutes with increasing intensity. To stop it, press ALARM while the alarm is sounding to disable the alarm. Note: For weekday alarm, pressing ALARM will only disable the alarm for the current day. -
Página 45: Technical Data
FR IT ES RU 6. TECHNICAL DATA BASE STATION Indoor Temperature Operating range: -5°C to 50°C (23°F to 122°F) Temperature resolution: 0.1°C/0.2°F Power 2 x AAA 1.5V batteries Dimensions 69 mm L x 128 mm H x 15 mm W OUTDOOR SENSOR Temperature Operating range with alkaline batteries: -10°C to + 60°C... -
Página 46: Informations Générales
Informations générales A propos de ce manuel Veuillez lire attentivement les consignes de sécurité présentées dans ce manuel. N’utilisez ce produit comme décrit dans ce manuel, afi n d’éviter tout risque de blessure ou de dommage sur l’appareil. Conservez le manuel d’utilisation afi n de pouvoir revoir à tout moment les informations concernant certaines fonctionnalités. -
Página 47: Consignes Générales De Sécurité
DE EN IT ES RU Consignes générales de sécurité DANGER ! Cet appareil contient des pièces électroniques raccordées à une source d’alimentation électrique (par bloc d’alimentation et/ou batteries). Ne jamais laisser les enfants manipuler l’appareil sans surveillance ! L’uti- lisation de l’appareil doit se faire exclusivement comme décrit dans ce manuel, faute de quoi un RISQUE d’ELECTROCUTION peut exister ! Les enfants ne doivent utiliser cet appareil que sous surveillance. - Página 48 sant de toute sa capacité. N’utilisez pas de batteries de marques, de types ou de capacités différentes. Les batteries doivent être enlevées de l’appareil lorsque celui-ci est destiné à ne pas être utiliser pendant un certain temps ! Remarque concernant le nettoyage Avant de nettoyer l’appareil, veuillez le couper de son alimentation élec- trique (tirez les batteries) ! REMARQUE !
-
Página 49: Certifi Cat De Conformité Ue
DE EN IT ES RU Les piles qui contiennent des toxines sont marquées avec un signe et un symbole chimique. batterie/pile contenant du cadmium batterie/pile contenant du mercure batterie/pile contenant du plomb Certifi cat de conformité UE Un « Certifi cat de conformité » conforme aux directives applicables, établi par la société... - Página 50 TABLE DES MATIÈRES 1. Introduction ................. 50 2. Eléments d’exploitation ............52 2.1 Affi chage LCD et touches / vue de face / vue arrière ........52 2.2 Support ................54 2.3 Capteur de température a distance ........55 3. Mise en service ..............55 4.
- Página 51 DE EN IT ES RU FONCTIONS DE L’UNITE PRINCIPALE Heure • Heure précise et date réglées par des signaux horaires (DCF 77) radio-pilotés à partir du signal horaire de Frankfurt, Allemagne. • Au choix, format horaire 12/24 heures • Réglage manuel de l’heure et de la date (idéal pour les endroits sans réception DCF77) •...
-
Página 52: Eléments D'exploitation
2. ELEMENTS D’EXPLOITATION 2.1 AFFICHAGE LCD ET TOUCHES / VUE DE FACE VUE ARRIERE Toutes les fonctions sont représentées dans 3 fenêtres de l’affi chage à cristaux liquides (LCD). - Página 53 DE EN IT ES RU A. METEO Fenêtre B. TEMPERATURE Fenêtre C. HORLOGE Fenêtre D. (▼) (VERS LE BAS) Touche • Choisissez la fenêtre (TEMPERATURE ou HORLOGE) • Appuyez et maintenez l’appui sur le bouton pendant 2 secondes pour démarrer la synchronisation avec le signal du capteur sans fi l. •...
-
Página 54: Support
heures), le format calendaire, les chiffres correspondant aux heures et aux minutes. • Lorsqu’a été choisi la fenêtre TEMPERATURE, appuyez et maintenez l’appui sur l’interrupteur à bascule pendant 2 secondes pour paramé- trer l’affi chage de l’unité soit en degrés Celsius ou Fahrenheit. H. -
Página 55: Capteur De Température A Distance
DE EN IT ES RU 2.3 CAPTEUR DE TEMPERATURE A DISTANCE A. COMPARTIMENTS À PILES: peut contenir deux piles AAA B. TROU A DECROCHEMENT POUR INSTALLATION SUR LE MUR : installer le capteur en utilisant l’attache sur le mur 3. MISE EN SERVICE Les communications entre l’unité... - Página 56 Démarrez les communications transmetteur-réceptrice : • Il est important de mettre le capteur à distance sous tension AVANT de mettre sous tension l’unité principale. Immédiatement après l’ins- tallation des piles, le capteur à distance va commencer à transmettre à l’unité principale des données sur la température. •...
- Página 57 DE EN IT ES RU • Le capteur à distance peut être placé sur la surface plane ou installé sur le mur en position verticale en utilisant le support inclus. Pour fi xer le support, utiliser une vis plutôt qu’un clou. •...
-
Página 58: Exploitation
• Installez TOUJOURS les piles dans le capteur à distance avant de les installer dans l’unité principale. • Insérez les piles avant la première utilisation, en faisant correspondre les polarités dans le compartiment à piles. 4. EXPLOITATION Immédiatement après l’installation des piles, le capteur à distance com- mencera à... -
Página 59: Fenêtre Température
DE EN IT ES RU Icônes Partielle- Légère- Fortes Enso- Très Temps ment Nuageux ment Neige chutes leillé pluvieux nuageux pluvieux de neige Remarque : l’exactitude de la prévision météorologique est approximativement de 70 %. La station météo présente les conditions prévues (pronosti- quées), non pas les conditions actuelles. -
Página 60: Visualisation De La Temperature (Canal) A Distance
Le symbole graphique en forme de vague et se trouvant au-dessus du symbole graphique canal courant visualise l’état de la connexion du capteur à distance correspondant: Icon Status L’appareil est en recherche (clignote) Le récepteur fonctionne normalement Le récepteur n’a reçu aucun signal depuis plus de 1 hour Avec ce processus de recherche, l‘appareil recherche le même capteur qui a déjà... -
Página 61: Programmation De La Temperature En Degres Celsius Ou Fahrenheit
DE EN IT ES RU Affi chage autobalayage canal : pour activer un balayage automatique de tous les canaux présents, appuyez et maintenez appuyée CANAL, jusqu’à ce que le symbole [ ] graphique soit affi ché. Les mesures de chaque canal à distance seront affi chées en alternance avec une visua- lisation de 5 secondes. -
Página 62: Fenêtre Horloge
les capteurs (intérieurs et extérieurs) avec le symbole graphique MIN, puis appuyez sur le bouton MEM pour lire les valeurs maximales avec le symbole graphique MAX, puis retour aux valeurs actuelles. REINITIALISATION DES MEMOIRES DES EMPERATURES Choisissez la fenêtre TEMPERATURE. Appuyez et maintenez l’appui sur le bouton MEM pendant 3 secondes pour vider toutes les mémoires max/min. - Página 63 DE EN IT ES RU REMARQUE : dans le cadre d’un quelconque des paramétrages dé- crits ci-dessous, l’unité quittera automatiquement un quelconque mode de programmation si elle ne détecte pas l’appui sur un bouton pendant environ 2 minutes. Un quelconque paramétrage effectué avant cela ne sera pas repris par l’unité.
-
Página 64: Réglages Manuels
5. Si l’horloge ne réussit pas à recevoir le signal, elle affi chera le sym- bole graphique [ ]. Si l’heure est inexacte, vous pouvez paramétrer l’heure manuellement. RÉGLAGES MANUELS Pour paramétrer l’horloge manuellement, veillez à ce que l’affi chage montre l’heure (non pas [ZONE]), puis appuyez et maintenez l’appui sur MODE. -
Página 65: Fonction De Réveil
DE EN IT ES RU • Heure : Minute : Seconde • Heure : Minute : Jour de semaine • Heure : Minute : Jour de semaine du Fuseau horaire • Heure : Minute : Seconde du Fuseau horaire • Jour : Mois 4.3.2 FONCTION DE REVEIL Sur l’unité... -
Página 66: Résolution Des Incidents
Remarque : appuyez sur MODE à tout moment durant le mode de choix d’alarme ci-dessus pour revenir à l’affi chage normal de l’horloge. PARAMETRAGE DES ALARMES HORAIRES Appuyez sur ALARME pour choisir l’alarme que vous souhaitez confi gu- rer. Appuyez et maintenez l’appui sur ALARME jusqu’à ce que l’heure commence à... -
Página 67: Données Techniques
DE EN IT ES RU Avant de contacter le service après-vente, veuillez également passer en revue les incidents susceptibles de survenir. Incident Symptôme Solution Pas de réception Placez l’unité près de la fenêtre Unité du signal horaire et laissez-la à cet emplacement principale radiocommandé... -
Página 68: Informazioni Generali
Informazioni generali Informazioni sul presente manuale Leggere con attenzione le avvertenze di sicurezza riportate nel manuale. Per evitare danni all’apparecchio o possibili lesioni, utilizzare questo pro- dotto soltanto come descritto manuale. Conservare il manuale di istruzioni per poter attingere alle informazioni riguardanti tutte le funzioni di comando dell’apparecchio anche in un se- condo momento. -
Página 69: Avvertenze Di Sicurezza Generali
DE EN FR ES RU Avvertenze di sicurezza generali PERICOLO! Questo apparecchio contiene componenti elettronici azionati da una sorgente di corrente (alimentatore e/o batterie). Non consentire ai bam- bini di utilizzare l‘apparecchio senza supervisione! L’utilizzo deve avvenire soltanto conformemente a quanto descritto nella guida, in caso contrario esiste il PERICOLO di SCOSSA ELETTRICA! I bambini possono utilizzare l’apparecchio soltanto sotto la vigilanza di un adulto. -
Página 70: Smaltimento
NOTE per la pulizia Prima di procedere con la pulizia, staccare l’apparecchio dalla sorgente di corrente (staccare il connettore oppure rimuovere le batterei)! NOTA! Pulire l’apparecchio soltanto con un panno asciutto. Non utilizzare liquidi detergenti per evitare danni ai componenti elettronici. SMALTIMENTO Smaltire i materiali di imballaggio in maniera differenziata. -
Página 71: Dichiarazione Di Conformità Ce
DE EN FR ES RU Dichiarazione di conformità CE Meade Instruments Europe GmbH & Co. KG ha redatto una “dichiara- zione di conformità” in linea con le disposizioni applicabili e le rispettive norme. Su richiesta, è visionabile in qualsiasi momento. Nazioni che si conformano alla Direttiva RTTE: Tutte le nazioni dell’Unione Europea e la Svizzera Meade Instruments Europe GmbH &... -
Página 72: Indice 1. Introduzione
INDICE 1. Introduzione ................ 72 2. Elementi di funzionamento ............74 2.1 Display LCD e tasti / visualizzazione frontale / retro ........74 2.2 Supporto ................76 2.3 Sensore remoto di temperatura ..........77 3. Messa in funzione ..............77 4. Funzionamento ..............80 4.1 Previsioni meteorologiche ............ - Página 73 DE EN FR ES RU CARATTERISTICHE DELL’UNITÀ PRINCIPALE • Data e ora precisa, impostate da segnali orari radiocontrollati (DCF 77) dal trasmettitore orario di Francoforte, Germania. • Visualizzazione con formato orario selezionabile 12 o 24 ore • Regolazione manuale della data e dell’ora (ideale per le posizioni sen- za ricezione DCF77) •...
-
Página 74: Elementi Di Funzionamento
2. ELEMENTI DI FUNZIONAMENTO 2.1 DISPLAY LCD E TASTI / VISUALIZZAZIONE FRONTALE / RETRO Tutte le funzioni sono visualizzate sul display a cristalli liquidi (LCD) in tre fi nestre. - Página 75 DE EN FR ES RU A. Finestra METEO B. Finestra TEMPERATURA C. Finestra OROLOGIO D. Tasto (▼) (GIÙ) • Per selezionare la successiva fi nestra disponibile. • Tenere premuto per 2 secondi per avviare la sincronizzazione con il segnale del sensore remoto. •...
-
Página 76: Supporto
rio (12/24 ore), il formato del calendario, le cifre dell’ora e dei minuti. • Dopo aver selezionato la fi nestra TEMPERATURA, tenere premu- to per 2 secondi per impostare l’unità di misura in gradi Celsius o Fahrenheit. H. Tasto (▲) (SU) •... -
Página 77: Sensore Remoto Di Temperatura
DE EN FR ES RU 2.3 SENSORE REMOTO DI TEMPERATURA A. VANO BATTERIE: Idoneo a due batterie AAA B. Foro per MONTAGGIO A PARETE: Per montare il sensore con l’ausilio del supporto a parete 3. MESSA IN FUNZIONE La comunicazione tra l’unità principale (ricevitore) e il sensore remoto (trasmettitore) funziona in wireless, semplifi... - Página 78 Avvio della comunicazione tra trasmettitore e ricevitore • Importante: accendere il sensore remoto PRIMA di accendere l’unità principale. Immediatamente dopo aver installato le batterie, il sensore remoto inizierà a trasmettere dati di temperatura all’unità principale. • Si consiglia vivamente di accendere e verifi care la corretta comunica- zione tra il sensore remoto e l’unità...
- Página 79 DE EN FR ES RU montato alla parete in posizione verticale utilizzando il supporto in dotazione. Per il fi ssaggio del supporto è opportuno utilizzare una vite e non un chiodo. • Si consiglia di posizionare il sensore remoto sul terreno, ma non sull’asfalto, che potrebbe compromettere una corretta misurazione.
-
Página 80: Funzionamento
• Inserire le batterie prima del primo utilizzo, facendo attenzione alla polarità corretta indicata nello scomparto delle batterie. 4. FUNZIONAMENTO Immediatamente dopo aver installato le batterie, il sensore remoto inizie- rà a trasmettere dati di temperatura all’unità principale a intervalli regolari. Dopo aver acceso l’unità... -
Página 81: Previsioni Meteorologiche
DE EN FR ES RU 4.1 PREVISIONI METEOROLOGICHE L’unità è in grado di rilevare le variazioni della pressione atmosferica. Sulla base dei dati meteorologici raccolti, effettua le previsioni del tempo per le successive 12 - 24 ore. Icone... Pre- Poco Nuvo- Piog- Pioggia... - Página 82 RICERCA FORZATA DI SENSORI REMOTI Selezionare la fi nestra TEMPERATURA. Dall’unità principale è possibile attivare manualmente la ricerca del se- gnale del sensore remoto selezionato tenendo premuto il tasto GIÙ ▼. L’icona delle onde radio sopra all’icona per il canale selezionato indica lo stato di connessione del sensore remoto corrispondente: Icona Stato...
-
Página 83: Allarme Temperatura
DE EN FR ES RU VISUALIZZAZIONE DI TEMPERATURA DAL CANALE REMOTO Selezionare la fi nestra TEMPERATURA. Display statico: Premere il pulsante CHANNEL per selezionare le misu- razioni dai diversi sensori remoti (canale 1, 2 o 3). Visualizzazione di rilevamento del canale: per abilitare il rilevamento au- tomatico di tutti i canali presenti, tenere premuto il pulsante CHANNEL, fi... -
Página 84: Finestra Dell'orologio
VISUALIZZAZIONE DEI VALORI MAX/MIN. RILEVATI Selezionare la fi nestra TEMPERATURA. Premere il tasto MEM per consultare i valori minimi di temperatura di tutti i sensori (interni e remoti) con l’icona MIN; poi premere nuovamente MEM per leggere i valori massimi con l’icona MAX e poi tornare ai valori attuali. - Página 85 DE EN FR ES RU collocare l’unità principale vicino ad una fi nestra per una migliore ricezione. Talvolta è suffi ciente ruotare l’unità di 90°. NOTA: in ciascuna delle impostazioni descritte di seguito, l’unità uscirà automaticamente da ogni modalità di programmazione se non rileva nessun comando (pressione di un tasto) entro due minuti.
-
Página 86: Impostazione Manuale
5. Se l’orologio non riceve il segnale orario, apparirà l’icona [ ] Se l’orario non è corretto, è possibile impostarlo manualmente. IMPOSTAZIONE MANUALE Per impostare manualmente l’orologio, accertarsi di essere nella modali- tà dell’orario (e non [ZONE] - FUSO) e poi tenere premuto MODE. A questo punto occorre impostare la lingua. -
Página 87: Funzionamento Della Sveglia
DE EN FR ES RU • ora: minuti: secondi • ora: minuti: giorno della settimana • ora: minuti: giorno della settimana della zona del fuso orario • ora: minuti: secondi della zona del fuso orario • giorno: mese 4.3.2 FUNZIONAMENTO DELLA SVEGLIA L’unità... -
Página 88: Risoluzione Dei Problemi
IMPOSTAZIONE DELL’ORA DELLA SVEGLIA 1. Premere ALARM per selezionare l’allarme da confi gurare. 2. Temere premuto ALARM fi nché l’ora non inizia a lampeggiare sul display. 3. Impostazione dell’ora della sveglia: premere SU ▲ o GIÙ ▼ per modifi carla. Per modifi care rapida- mente tenere premuto uno dei due pulsanti. -
Página 89: Dati Tecnici
DE EN FR ES RU Argomento Problema Soluzione Mancata ricezione Collocare l‘unità vicino ad una Unità del segnale orario fi nestra e lasciarla lì per una notte principale radio controllato intera Verifi care le batterie Verifi care la posizione Impossibile Sensore rilevare il sensore Tenere premuto il tasto GIÙ... -
Página 90: Informaciones De Carácter General
Informaciones de carácter general Sobre este manual Lea atentamente las indicaciones de seguridad recogidas en este ma- nual. Emplee este producto exclusivamente de la forma descrita en el manual, con el fi n de evitar daños en el aparato o lesiones. Conserve el manual de instrucciones para poder volver a informarse en todo momento sobre las funciones de manejo. -
Página 91: Advertencias De Carácter General
DE EN FR IT Advertencias de carácter general ¡PELIGRO! Este aparato contiene componentes electrónicos que funcionan me- diante una fuente de electricidad (equipo de alimentación y/o pilas). No deje nunca que los niños utilicen el aparato sin supervisión. El uso se deberá... -
Página 92: Instrucciones De Limpieza
INSTRUCCIONES de limpieza Antes de limpiar el aparato, desconéctelo de la fuente de electricidad (desenchúfelo o quite las pilas). ¡ADVERTENCIA! Limpie solamente el exterior del aparato con un paño seco. No utilice productos de limpieza para evitar daños en el sistema electrónico. ELIMINACIÓN Elimine los materiales de embalaje separados por tipos. -
Página 93: Declaración De Conformidad De La Unión Europea (Ce)
DE EN FR IT Declaración de conformidad de la Unión Europea (CE) Meade Instruments Europe GmbH & Co. KG ha emitido una „Declara- ción de conformidad“ de acuerdo con las directrices y normas corres- pondientes. Esto se puede ver en cualquier momento, previa petición. Países donde se aplica la normativa : Todos los paises de la EU, Suiza Meade Instruments Europe GmbH &... -
Página 94: Introducción
CONTENIDO 1. Introducción ................ 94 2. Controles ................96 2.1 LCD (pantalla) Teclas / Vista Anterior y posterior .......... 96 2.2 Base ................98 2.3 Sensor externo (temperatura) ..........99 3. Puesta en funcionamiento ............. 99 4. Operación ................13 4.1 Pronóstico del Tiempo ............14 4.2 Visualizacion de Temperatura ..........15 4.3 Visualización de la hora ............17 4.3.1 Función de tiempo ............17... -
Página 95: Funciones De La Unidad Principal Características
DE EN FR IT FUNCIONES DE LA UNIDAD PRINCIPAL CARACTERÍSTICAS Fecha y hora • La fecha y la hora exacta se establecen a través de señales de radio controlado (DCF77) desde el reloj atómico en el centro de Frankfurt, Germanio. •... -
Página 96: Controles
2. CONTROLES 2.1 LCD (PANTALLA) TECLAS / VISTA FRONTAL / VISTA TRASERA Todas las funciones se muestran en la pantalla de cristal líquido (LCD) legibles en tres ventanas. - Página 97 DE EN FR IT A. CLIMA B. TEMPERATURA C. RELOJ D. TECLA (▼) (hacia Abajo) • Seleccione el modo a operar en la ventana correspondiente • Presione y mantenga presionado durante 2 segundos para buscar la señal inalámbrica de sensores remotos. •...
-
Página 98: Compartimento De La Batería
programada. Presionar durante dos segundos para seleccionar el día de la semana, para ajustar la fecha y el uso horario (24 o 12 horas) para ajustar entonces la hora manualmente. • Si la ventana de temperatura ya ha sido seleccionada: presionar du- rante dos segundos para el cambio de las unidades de temperatura. -
Página 99: Sensor Externo (Temperatura)
DE EN FR IT 2.3 SENSOR EXTERNO (TEMP) A. COMPARTIMENTO DE LA BATERÍAS: Colocar dos pilas de tamaño AAA. B. ACCESORIO ADAPTADOR PARA PARED: Cuelgue el sensor remoto en la pared utilizando este adaptador. 3. PUESTA EN FUNCIONAMIENTO: Gracias a la transmision sin cables desde el sensor externo (Transmisor) hacia la estacion principal ( Receptor) ,la instalacion y puesta en fun- cionamiento de la unidad es muy simple de realizar. - Página 100 sertar las pilas en la unidad principal. Una vez que las pilas se hayan colocado en el sensor externo, comienza la emision de los datos de medicion. La unidad principal comenzara a visualizar en pantalla los datos a recibir luego de la colocacion de las baterias •...
-
Página 101: Funcionamiento
DE EN FR IT • Preferiblemente debe posicionarse el sensor a 1,25 m (4 pies) por encima del piso de tierra o hierba. Las superfi cies de piedra, asfalto o el alquitrán puede ser muy caliente y por lo tanto falsear la medición. -
Página 102: Pronóstico Del Tiempo
Importante: A continuación, en la pantalla comienza la búsqueda de señal del / de los sensores (canal 1 a 3) en la ventana de Temperatura. Completado este proceso no hay necesidad de realizar alguna otra operación hasta que haya fi nalizado la operación de búsqueda después de algunos minutos. (Este proceso puede tardar en caso de interferencias) Luego, se inicia la búsqueda de la señal DCF77 (en la ventana que mostrara la hora). -
Página 103: Ventana De Visualizacion De La Temperatura
DE EN FR IT 4.2 VENTANA DE VISUALIZACION DE LA TEMPERATURA El termometro instalado en la Unidad principal mide directamente la tem- peratura interior y la misma también puede recibir las mediciones de hasta un máx. de 3 sensores externos. Cada sensor debe instalarse en diferentes canales (de 1 a 3). -
Página 104: Visualización Del Canal De Temperatura Y Humedad
OPERACIONES EN VENTANA DE TEMPERATURA Con este proceso de búsqueda la Unidad busca el mismo sensor, que el dispositivo ya registró una vez. Si ha cambiado las pilas en el sensor,en el reinicio este ha enviado un nuevo código y el dispositivo de pantalla ya no lo reconoce. -
Página 105: Activar O Desactivar Alarmas De Temperatura
DE EN FR IT ▬ para altas temperaturas se muestra con el icono [ ] (si está deshabili- ▲ tado, muestra OFF), y la alerta de bajas temperaturas con el icono [ ] (si está deshabilitado, muestra OFF). Presione y mantenga presionado el botón ALARMA hasta que los dígitos de temperatura estén intermiten- tes. -
Página 106: Funcionamiento Del Reloj
tiene un alcance de hasta 1.500 kilometros. Si el icono de recepción de la hora [ ] se muestra sin ondas [ ], es porque hay problemas de recepción. Para esto tenga en cuenta los siguientes puntos: • Durante la noche hay menos perturbaciones en la atmósfera y por lo tanto aumenta la probabilidad de recepción. -
Página 107: Cómo Ajustar Manualmente La Hora
DE EN FR IT 3. Usted puede activar el tiempo de recepción automática nuevamente manteniendo pulsado el botón ▲ durante 3 segundos.Inmediata- mente se restablecera la recepción. La unidad continuara diariamen- te a las 0:00, 3:00, 6:00 y 12:00 actualizando la recepción. Icono Potencia de la señal de la hora No hay recepción de los valores... -
Página 108: Ajuste Del Huso Horario (Zona)
En cada ajuste, con los botones ▲ y ▼ puede realizar un cambio. Mantenga pulsado el botón, el valor cambiará con rapidez. Para pasar a la siguiente confi guración pulse el botón MODE, como tambien si desea saltar una confi guración en particular. Al fi nal del ajuste dirijase con la tecla retornando al indicador de la hora en la pantalla. -
Página 109: Activacion/Desactivacion De La Alarma
DE EN FR IT • Pre-alarma [PRE-AL] Si la temperatura exterior del canal 1 transmite una temperatura de 0°C o -0°, la alarma se activa (W y S) y comienza a sonar por el tiempo establecido “X” que se utiliza para este fi n. (X se puede ajustar a 15, 30, 45, 60 o 90.) ACTIVACION/DESACTIVACION DE LA ALARMA 1. -
Página 110: Detener La Alarma
3. Con la ultima confi rmación, aparecera en la pantalla el tiempo de la alarma instalada. Después de unos 2 minutos vuelve a aparecer, la visualización de la hora. Nota: La función de pre-alarma puede ser activada sólo cuando la alarma semanal o la alarma individual esten activadas. -
Página 111: Especificaciones
DE EN FR IT 6. ESPECIFICACIONES UNIDAD PRINCIPAL Temperatura Interior Rango de temperatura: -5°C a +50°C (23.0°F a 122.0°F) Resolución de temperatura: 0,2 ° F (0.1 ° C) Energia suministrada: 2 pilas tipo AAA de 1.5V Dimensiones: 69 x 128 x 15 mm SENSOR REMOTO Temperatura Rango de temperatura con pilas alcalinas:... -
Página 112: Общая Информация
Общая информация О данном руководстве Внимательно прочитайте инструкции по технике безопасности в данном руководстве. Используйте данное устройство только в со- ответствии с описаниями в руководстве для исключения риска его повреждения или травмирования. Сохраните руководство по эксплуатации, чтобы всегда иметь воз- можность... -
Página 113: Общие Предупреждения
DE EN FR IT ES Общие предупреждения ОПАСНОСТЬ! Этот прибор содержит электронные компоненты, приводимые в действие от источника тока (сетевой адаптер и/или батарейки). Ни в коем случае не разрешайте детям использовать прибор без при- смотра! Использование должно осуществляться в соответствии с приведенными... - Página 114 Заменяйте весь комплект разряженных или использованных батаре- ек целиком. Не устанавливайте батарейки разных марок, типов или емкостей. Если прибор не будет использоваться в течение длитель- ного времени, извлеките из него батарейки! УКАЗАНИЯ по чистке Перед выполнением чистки отключите прибор от источника питания (извлеките...
-
Página 115: Сертификат Соответствия Ес
DE EN FR IT ES ния и аккумуляторов. Вы можете бесплатно сдать использованные элементы питания в нашем магазине или рядом с вами (например, в торговых точках или в пунктах приема). На элементах питания и аккумуляторах изображен перечеркнутый контейнер, а также указано содержащееся ядовитое вещество: Элемент... - Página 116 Оглавление 1. Введение ....................6 2. Описание прибора ................8 2.1 ЖК-экран и кнопки управления / вид спереди / вид сзади ......8 2.2 Подставка ..................10 2.3 Внешний температурный датчик ..........10 3. Подключение датчика ..............11 4. Использование прибора ..............13 4.1 Прогноз...
- Página 117 DE EN FR IT ES ФУНКЦИИ ОСНОВНОГО БЛОКА Время • Точная информация о дате и времени, с автоматической синхро- низацией через передатчик DCF77 во Франкфурте. Германия; • Два формата времени: 12- и 24-часовой; • Ручная настройка даты и времени (если отсутствует сигнал пере- датчика...
-
Página 118: Описание Прибора
2. ОПИСАНИЕ ПРИБОРА 2.1 ЖК-ЭКРАН И КНОПКИ УПРАВЛЕНИЯ / ВИД СПЕРЕДИ / ВИД СЗАДИ ЖК-экран предоставляет всю информацию в трех информативных окнах:... - Página 119 DE EN FR IT ES A. Окно ПОГОДА; B. Окно ТЕМПЕРАТУРА; C. Окно ЧАСЫ; D. Кнопка ▼ (вниз): • Используйте ее для выбора другого окна (ПОГОДА или ТЕМПЕРА- ТУРА); • Нажмите и удерживайте кнопку ▼ в течение двух секунд для по- иска...
-
Página 120: Подставка
двух секунд, чтобы настроить язык отображения дня недели, формат отображения времени, формат отображения даты, год, месяц, дату, час и минуту; • В окне ТЕМПЕРАТУРА нажмите и удерживайте кнопку MODE в течение двух секунд, чтобы переключиться между измерением температуры по Цельсию или по Фаренгейту (°С, °F). H. -
Página 121: Внешний Температурный Датчик
DE EN FR IT ES 2.3 ВНЕШНИЙ ТЕМПЕРАТУРНЫЙ ДАТЧИК A. БАТАРЕЙНЫЙ ОТСЕК: Для работы датчика требуются две (2) батарейки класса ААА. B. КРЕПЛЕНИЕ: При желании датчик можно закрепить закреплен на стене. 3. ПОДКЛЮЧЕНИЕ ДАТЧИКА Передача информации между внешним датчиком и основным бло- ком... - Página 122 блока. После установки батареек внешний датчик сразу начнет передавать информацию на основной блок. • Перед тем как закрепить датчик на месте, рекомендуется под- ключить его и убедиться, что сигнал стабилен; • Во время первого подключения поместите внешний датчик в пределах одного метра от основного блока, вдали от включенных электроприборов;...
-
Página 123: Использование Прибора
DE EN FR IT ES • В соответствии с международными стандартами измерения темпе- ратуры для получения наиболее точной информации датчик должен находиться на высоте 1,25 метра от земли; • Помните, что основной блок должен находиться в радиусе действия каждого из установленных датчиков; •... -
Página 124: Прогноз Погоды
экран покажет предустановленное время (12:00). Во время этих проверок старайтесь не нажимать на кнопки основ- ного блока в течение 6-8 минут. Это позволит прибору синхронизиро- ваться с внешними датчиками и подключить основные настройки. 4.1 ПРОГНОЗ ПОГОДЫ Прибор способен считывать изменения атмосферного давления. Основываясь... - Página 125 DE EN FR IT ES ПРИНУДИТЕЛЬНЫЙ ПОИСК ВНЕШНИХ ДАТЧИКОВ Выберите окно ТЕМПЕРАТУРА. Для того чтобы заставить основной блок искать сигнал выбранно- го внешнего датчика, нажмите и удерживайте кнопку ▼ (вниз) в течение трех секунд. Значок с волнами над именем датчика показывает силу сигнала соответствующего...
- Página 126 ИНФОРМАЦИЯ О ТЕМПЕРАТУРЕ ОТ ВНЕШНИХ ДАТЧИКОВ Выберите окно ТЕМПЕРАТУРА. Режим постоянного просмотра: нажмите кнопку CHANNEL для вы- вода информации одного из датчиков (Channel 1, 2 или 3). Режим автоматического перехода: нажмите и удерживайте кноп- ку CHANNEL, чтобы включить режим автоматического перехода; в этом...
-
Página 127: Часы
DE EN FR IT ES ВКЛЮЧЕНИЕ И ОТКЛЮЧЕНИЕ ПРЕДУПРЕЖДЕНИЯ О ТЕМПЕРАТУРЕ: после выбора необходимого лимита нажмите ▲ (вверх) для включе- ния предупреждения и ▼ (вниз) для его отключения. ПРОСМОТР МИНИМАЛЬНЫХ И МАКСИМАЛЬНЫХ ПОКАЗАНИЙ ДАТЧИКОВ Выберите окно ТЕМПЕРАТУРА. Нажмите кнопку MEM, чтобы просмотреть минимальные показания датчиков... - Página 128 • В ночное время атмосферные помехи минимальны, и прием радиосигнала может улучшаться. Одного подключения к сигналу в течение дня достаточно для того, чтобы поддерживать точность показаний времени до одной секунды. • Убедитесь, что в радиусе двух метров от основного блока нет по- сторонних...
- Página 129 DE EN FR IT ES Значок Сила сигнала (мигает) Неизвестная информация Сигнал отсутствует последние 24 часа Сигнал слабый, но различимый Сильный сигнал • Если сигнал получен, время и дата будут настроены автоматиче- ски, а значок башни [ ] загорится. • Если сигнал не получен, загорится значок [ ]. В случае невер- ной...
-
Página 130: Будильник
КАК УСТАНОВИТЬ ЧАСОВОЙ ПОЯС Перед установкой часового пояса убедитесь, что экран показывает время со значком часового пояса. После этого нажмите и удержи- вайте кнопку MODE. Кнопки ▲ (вверх) и ▼ (вниз) меняют показание времени на 30 минут. Удерживайте кнопку для быстрой прокрутки значений. -
Página 131: Настройка Будильника
DE EN FR IT ES ВКЛЮЧЕНИЕ И ОТКЛЮЧЕНИЕ БУДИЛЬНИКА 1. Выберите нужный будильник последовательным нажатием кноп- ки ALARM: • Ежедневный будильник; • Однократный будильник; • Предупреждение. Если будильник отключен, на экране появится надпись OFF. 2. После выбора нужного будильника включайте его кнопкой ▲ (вверх) и... -
Página 132: Устранение Неполадок
Примечание: При срабатывании ежедневного сигнала кнопка ALARM отключит сигнал на день. На следующий день (с понедельника по пятницу) сигнал сработает вновь. Если сигнал не отключить, он повторится еще три раза с интервалом в восемь минут. Для отключения сигнала во время перерыва необходимо выполнить операцию, описанную в разделе... -
Página 133: Технические Характеристики
DE EN FR IT ES 6. ТЕХНИЧЕСКИЕ ХАРАКТЕРИСТИКИ ОСНОВНОЙ БЛОК Комнатная температура Рабочий диапазон: от -5 °C до +50 °C / от 23,0 °F до 122,0 °F Чувствительность: 0,1 °C / 0,2 °F Питание ве батарейки класса AAA (1,5 В) Габариты... - Página 134 NATIONAL GEOGRAPHIC and Yellow Border Design are trademarks of the National Geographic Society. All rights reserved. Meade Instruments Europe GmbH & Co. KG Gutenbergstr. 2 · DE-46414 Rhede www.bresser.de · info@bresser.de Irrtümer und technische Änderungen vorbehalten. ANL9066000MSP0612NG Errors and technical changes reserved.