Tabla de contenido
Publicidad
Idiomas disponibles
Idiomas disponibles
Enlaces rápidos
Publicidad
Capítulos
Tabla de contenido
Solución de problemas

Manuales relacionados para Lamborghini Caloreclima Reply 51


Resumen de contenidos para Lamborghini Caloreclima Reply 51
- Página 1 Reply 51-71-101 ISTRUZIONI PER L’USO L’INSTALLAZIONE E LA MANUTENZIONE INSTRUCTIONS FOR USE, INSTALLATION AND MAINTENANCE INSTRUCTIONS D'UTILISATION, D'INSTALLATION ET D'ENTRETIEN INSTRUCCIONES DE USO, INSTALACIÓN Y MANTENIMIENTO BETRIEBS-, INSTALLATIONS- UND WARTUNGSANLEITUNG...
-
Página 2: Dichiarazione Di Conformità
Reply 51 - 71 - 101 • Leggere attentamente le avvertenze contenute in • In caso di guasto e/o cattivo funzionamento dell’ap- questo libretto di istruzioni in quanto forniscono im- parecchio, disattivarlo, astenendosi da qualsiasi ten- portanti indicazioni riguardanti la sicurezza di instal- tativo di riparazione o di intervento diretto. -
Página 3: Tabla De Contenido
Reply 51 - 71 - 101 1 Istruzioni d’uso ........................4 1.1 Presentazione ............................4 1.2 Pannello comandi........................... 5 1.3 Accensione e spegnimento ........................7 1.4 Regolazioni............................. 8 2 Installazione ........................... 12 2.1 Disposizioni generali ..........................12 2.2 Luogo d’installazione ..........................12 2.3 Collegamenti idraulici e gas ......................... -
Página 4: Istruzioni D'uso
1.1 Presentazione Gentile cliente, la ringraziamo di aver scelto Reply 51 - 71 - 101, un generatore di calore Lamborghini di ultima generazione, di con- cezione avanzata e tecnologia d'avanguardia. La preghiamo di leggere attentamente il presente manuale perchè forni- sce importanti indicazioni riguardanti la sicurezza di installazione, uso e manutenzione. -
Página 5: Pannello Comandi
Reply 51 - 71 - 101 1.2 Pannello comandi reset comfort 8 14 fig. 1 - Pannello di controllo Il pannello comandi è situato all’interno dell’armadio. Per accedervi, aprire la porta anteriore attraverso l’apposita chiave in dotazione. Legenda Tasto decremento impostazione temperatura... - Página 6 Reply 51 - 71 - 101 Indicazione durante il funzionamento Riscaldamento La richiesta riscaldamento (generata da Termostato Ambiente o Cronocomando Remoto o segnale 0-10 Vdc è indicata dall’attivazione del circolatore e del radiatore (part. 13 e 21 - fig. 1).
-
Página 7: Accensione E Spegnimento
Reply 51 - 71 - 101 1.3 Accensione e spegnimento Accensione caldaia Premere il tasto d’accensione/spegnimento (part 14 fig. 1). reset comfort reset comfort reset reset comfort comfort fig. 4 - Accensione caldaia • Per i successivi 120 secondi il display visualizza FH che identifica il ciclo di sfiato aria dall'impianto riscaldamento. -
Página 8: Regolazioni
Reply 51 - 71 - 101 Per riaccendere la caldaia, premere nuovamente il tasto (part. 7 fig. 1) per 5 secondi. reset comfort fig. 6 La caldaia sarà immediatamente pronta per funzionare ogni qualvolta si prelevi acqua calda sanitaria (con bollitore op- zionale installato) o vi sia una richiesta al termostato ambiente. - Página 9 Reply 51 - 71 - 101 Regolazione temperatura sanitario (con bollitore opzionale installato) Agire sui tasti sanitario (part. 1 e 2 - fig. 1) per variare la temperatura da un minimo di 10°C ad un massimo di 65°C. reset comfort fig.
- Página 10 Reply 51 - 71 - 101 Premendo i tasti riscaldamento (part. 3 e 4 - fig. 1) si accede allo spostamento parallelo delle curve (fig. 13), modificabile con i tasti sanitario (part. 1 e 2 - fig. 1). reset comfort fig.
- Página 11 Reply 51 - 71 - 101 Tabella. 1 Regolazione temperatura riscaldamento La regolazione può essere eseguita sia dal menù del Cronocomando Remoto sia dal pannello comandi caldaia. Regolazione temperatura sanitario (con bollitore La regolazione può essere eseguita sia dal menù del Cronocomando opzionale installato) Remoto sia dal pannello comandi caldaia.
-
Página 12: Installazione
Reply 51 - 71 - 101 è un generatore termico predisposto per funzionare singolarmente o in cascata (batteria).Quando due o più generatori Reply 51 - 71 - 101 sono installati in cascata con i kit originali Lamborghini, rispettando le prescri- zioni del presente manuale, possono essere considerati come un unico generatore termico equivalente di potenzialità... -
Página 13: Collegamenti Idraulici E Gas
Istruzioni di collegamento Reply 51 - 71 - 101 è dotato al suo interno di 3 collettori (gas, mandata e ritorno impianto) e tubo scarico condensa che facilitano sia il collegamento in cascata sia il collegamento del singolo modulo all’impianto. I collettori sono dimensionati per un collegamento di fino a 5 moduli in serie. - Página 14 Reply 51 - 71 - 101 Per il collegamento di più moduli in cascata - fig. 17 • Collegare il primo modulo alle tubazioni impianto e gas, come descritto precedentemente, ma senza montare sul modulo le flange cieche sul lato opposto al collegamento.
- Página 15 Reply 51 - 71 - 101 Collegamento idraulico utilizzando uno o più generatori con pompa diretta fig. 18 Ingresso gas Lato allacciamenti Mandata impianto Flange con tronchetto Ritorno impianto Guarnizioni Scarico condensa Collegamento mandata/ritorno Flange cieche Esempi circuiti idraulici Legenda degli esempi...
- Página 16 Reply 51 - 71 - 101 Un circuito riscaldamento diretto Verificare/Modificare parametro P02 del "Menù Parametri Trasparenti" a 1. Modificare parametro P.02 del "Menù Tipo Impianto" a 1. Modificare parametro P.09 del "Menù Tipo Impianto" a 1. 72/139 fig. 19...
-
Página 17: Un Circuito Riscaldamento Diretto E Un Circuito Sanitario Con Pompa
Reply 51 - 71 - 101 Un circuito riscaldamento diretto e un circuito sanitario con pompa Verificare/Modificare parametro P02 del "Menù Parametri Trasparenti" a 2. Modificare parametro P.02 del "Menù Tipo Impianto" a 1. Modificare parametro P.09 del "Menù Tipo Impianto" a 1. -
Página 18: Un Circuito Riscaldamento Diretto E Un Circuito Sanitario Con Valvola Deviatrice
Reply 51 - 71 - 101 Un circuito riscaldamento diretto e un circuito sanitario con valvola deviatrice Verificare/Modificare parametro P02 del "Menù Parametri Trasparenti" a 3. Modificare parametro P.02 del "Menù Tipo Impianto" a 1. Modificare parametro P.09 del "Menù Tipo Impianto" a 1. - Página 19 Reply 51 - 71 - 101 Due circuiti riscaldamento diretti Verificare/Modificare parametro P02 del "Menù Parametri Trasparenti" a 1. Modificare parametro P.01 del "Menù Tipo Impianto" a 4. Modificare parametro P.02 del "Menù Tipo Impianto" a 1. Modificare parametro P.09 del "Menù Tipo Impianto" a 1.
- Página 20 Reply 51 - 71 - 101 Due circuiti riscaldamento miscelati e un circuito riscaldamento diretto Verificare/Modificare parametro P02 del "Menù Parametri Trasparenti" a 1. Modificare parametro P.02 del "Menù Tipo Impianto" a 1. Modificare parametro P.09 del "Menù Tipo Impianto" a 1.
- Página 21 Reply 51 - 71 - 101 Due circuiti riscaldamento miscelati, un ciruito riscaldamento diretto e un circuito sanitario con pompa Verificare/Modificare parametro P02 del "Menù Parametri Trasparenti" a 2. Modificare parametro P.02 del "Menù Tipo Impianto" a 1. Modificare parametro P.09 del "Menù Tipo Impianto" a 1.
-
Página 22: Collegamenti Elettrici
Reply 51 - 71 - 101 2.4 Collegamenti elettrici Collegamento alla rete elettrica La sicurezza elettrica dell’apparecchio è raggiunta soltanto quando lo stesso è correttamente collegato ad un efficace impianto di messa a terra eseguito come previsto dalle vigenti norme di sicurezza. Far verificare da personale professionalmente qualificato l’efficienza e l’adeguatezza dell’impianto di terra, il costruttore non è... - Página 23 Reply 51 - 71 - 101 Accesso alla morsettiera elettrica La morsettiera elettrica è situata nella parte inferiore sinistra dell’armadio all’interno di una scatola stagna. Effettuare i collegamenti come indicato nello schema elettrico alla sez. 45 e far fuoriuscire i cavi attraverso gli appositi passacavi.
- Página 24 Reply 51 - 71 - 101 Per il collegamento in cascata 1. Collegare i moduli come mostrato in fig. 27 25 26 27 28 29 30 25 26 27 28 29 30 25 26 27 28 29 30 25 26 27 28 29 30 fig.
-
Página 25: Collegamento Camini
Reply 51 - 71 - 101 2.5 Collegamento camini Avvertenze L'apparecchio è di tipo B23 con aspirazione dell'aria comburente dal locale di installazione ed evacuazione fumi tramite ventilatore (funzionamento con camino in pressione) e deve essere collegato ad uno dei sistemi di scarico indicati di seguito. - Página 26 041013X0 come riportato in fig. 29. Ogni kit comprende un terminale Ø80 con griglia (rif. 3), una guarnizione (rif. 1) ed una ghiera di centraggio (rif. 2). Sui modelli Reply 71/i-101/i utilizzare n° 2 kit per modulo, sui modelli Reply 51/i n°1 kit. fig. 29...
-
Página 27: Collegamento Con Collettori
Prima dell’installazione dei camini, aprire l'armadio e riempire il sifone con circa 0,5 lt. di acqua attraverso le con- nessioni camino (vedi fig. 30) A e B per il modello Reply 71/i-101/i e solamente A per il modello Reply 51/i. -
Página 28: Esempi Di Installazione
Reply 51 - 71 - 101 Esempi di installazione 041008X0 041014X0 041017X0 fig. 31 - Installazione di un modulo 041016X0 041010X0 041012X0 041012X0 041012X0 041012X0 A+10 A+15 A+20 A+25 fig. 32 - Installazione di 5 moduli cod. 3540H322 - 09/2008 (Rev. 01) - Página 29 Reply 51 - 71 - 101 Per l’installazione: fig. 33 Inserire dall'esterno dei moduli per ogni connessione camino i tronchetti M-F diametro 100 con ispezione fumi “1” e le relative guarnizioni “2”. Rispettare la quota indicata nel riquadro “B“ di fig. 33. Tale quota deve essere aumentata di 5 mm ad ogni modulo aggiunto.
- Página 30 Inserire sui tronchetti “7” le curve a 90° M-F “8” posizionandole a 45° rispetto il modulo (vedi riquadro “H” fig. 35). Qualora si stia installando un modulo Reply 51/i utilizzare una sola curva a 90° ed il tappo contenuto nel kit di partenza.
-
Página 31: Scarico Condensa
Reply 51 - 71 - 101 2.6 Scarico condensa La caldaia è dotata di sifone interno per lo scarico condensa collegato ad un collettore di scarico condensa interno. Collegamento scarico condensa utilizzando un generatore fig. 37 - Collegamento scarico condensa con un generatore Appoggiare sul lato del generatore il tubo 1 Ø40 (non fornito). -
Página 32: Servizio E Manutenzione
Reply 51 - 71 - 101 3. Servizio e manutenzione Tutte le operazioni di regolazione, trasformazione, messa in servizio, manutenzione descritte di seguito, devono essere effettuate solo da Personale Qualificato e di sicura qualificazione (in possesso dei requisiti tecnici professionali previsti dalla normativa vigente) come il personale del Servizio Tecnico Assistenza Clienti di Zona. - Página 33 Reply 51 - 71 - 101 Attivazione modalità TEST Premere contemporaneamente i tasti riscaldamento (part. 3 e 4 - fig. 1) per 5 secondi per attivare la mo- dalità TEST. La caldaia si accende al massimo della potenza di riscaldamento impostata come al paragrafo successivo.
-
Página 34: Menù Service
Reply 51 - 71 - 101 Menù service La scheda è dotata di due Menù: uno di configurazione e l'altro definito Service. L'accesso al Menù di configurazione avviene premendo i tasti sanitario insieme per 10 secondi. Sono disponibili 4 pa- rametri modificabili solo da scheda per questioni di sicurezza eccetto uno (P02). - Página 35 Reply 51 - 71 - 101 "tS" - Menù Parametri Trasparenti La scheda é dotata di 29 parametri trasparenti modificabili anche da Comando Remoto (Menù Service): Comando Scheda Descrizione Parametri Trasparenti Range Default remoto Non Utilizzato Non modificare 1=Solo riscalda-...
- Página 36 Reply 51 - 71 - 101 Comando Scheda Descrizione Parametri Trasparenti Range Default remoto Non utilizzato (P02=1) Non utilizzato Isteresi Bollitore (P02=2) 0-100°C 2°C Isteresi Bollitore (P02=3) 0-100°C 2°C Non utilizzato (P02=4) Non utilizzato Isteresi Bollitore (P02=5) 0-100°C 2°C Isteresi Bollitore (P02=6) 0-100°C...
- Página 37 Reply 51 - 71 - 101 "In" - Menù Informazioni La scheda è in grado di visualizzare le seguenti informazioni Sensore NTC Riscaldamento (°C) tra 05 e 125 °C Sensore NTC Sanitario (°C) tra 05 e 125 °C Sensore NTC Ritorno (°C) tra 05 e 125 °C...
- Página 38 Reply 51 - 71 - 101 Menù tipo impianto L'accesso al Menù Tipo impianto avviene premendo il tasto Estate/Inverno insieme per 10 secondi. Sono disponibili 21 parametri modificabili solo da scheda. Comando Scheda DescrizioneParametri Trasparenti Range Default remoto Selezione richiesta riscaldamento...
-
Página 39: Messa In Servizio
Reply 51 - 71 - 101 3.2 Messa in servizio Verifiche da eseguire alla prima accensione, e dopo tutte le operazioni di manutenzione che abbiano compor- tato la disconnessione dagli impianti o un intervento su organi di sicurezza o parti della caldaia: Prima di accendere la caldaia •... -
Página 40: Risoluzione Dei Problemi
Reply 51 - 71 - 101 3.4 Risoluzione dei problemi Diagnostica La caldaia è dotata di un avanzato sistema di autodiagnosi. Nel caso di un’anomalia alla caldaia, il display lampeggia insieme al simbolo anomalia (part. 20 - fig. 1) indicando il codice dell’anomalia. Il lampeggio delle frecce (part. 18 e 24 - fig. - Página 41 Reply 51 - 71 - 101 Codice Anomalia Possibile causa Soluzione anomalia Sensore danneggiato Anomalia sensore sanitario Cablaggio in corto circuito Verificare il cablaggio o sostituire il sensore Cablaggio interrotto Sensore danneggiato Anomalia sensore fumi Cablaggio in corto circuito Verificare il cablaggio o sostituire il sensore...
-
Página 42: Caratteristiche E Dati Tecnici
Reply 51 - 71 - 101 4. Caratteristiche e dati tecnici 4.1 Dimensioni e attacchi fig. 41 - Dimensioni e attacchi Modello Reply 51/i Mandata impianto riscaldamento Modello Reply 71/i-101/i Ritorno impianto riscaldamento Entrata gas cod. 3540H322 - 09/2008 (Rev. 01) -
Página 43: Vista Generale E Componenti Principali
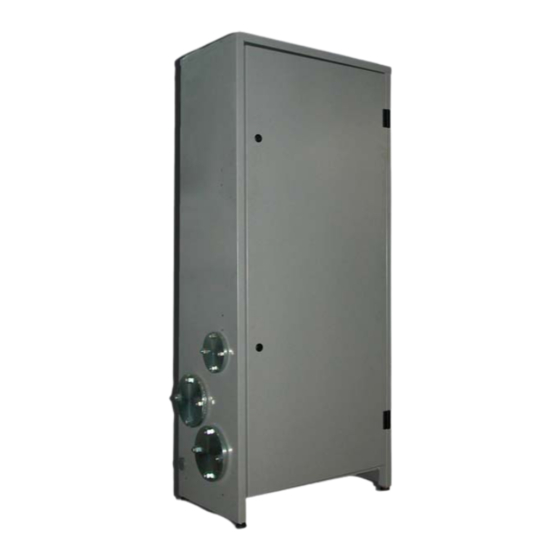
Reply 51 - 71 - 101 4.2 Vista generale e componenti principali fig. 42 - Vista generale Modello Reply 51/i 193 Sifone Modello Reply 71/i-101/i 196 Bacinella condensa Entrata gas 252 Rubinetto di intercettazione e scarico a tre vie Mandata impianto... -
Página 44: Circuito Idraulico
Reply 51 - 71 - 101 4.3 Circuito idraulico fig. 43 - Circuito idraulico Circuito idraulico modello Reply 51/i Circuito idraulico modello Reply 71/i-101/i Entrata gas Mandata impianto Ritorno impianto Ventilatore Circolatore riscaldamento Valvola gas 154 Tubo scarico condensa 161 Scambiatore di calore a condensa... -
Página 45: Tabella Dati Tecnici
Reply 51 - 71 - 101 4.4 Tabella dati tecnici Nella colonna a destra viene indicata l’abbreviazione utilizzata nella targhetta dati tecnici. Dato Unità Reply 51/i Reply 71/i Reply 101/i Portata termica max riscaldamento 49.8 70.0 99.6 Portata termica min riscaldamento 11.2... -
Página 46: Diagrammi
Reply 51 - 71 - 101 4.5 Diagrammi Perdite di carico / prevalenza circolatori H [m H Q [l/h] 1.000 1.500 2.000 2.500 fig. 44 Perdite di carico caldaia 1 - 2 - 3 Velocità circolatore cod. 3540H322 - 09/2008 (Rev. 01) -
Página 47: Schema Elettrico
Reply 51 - 71 - 101 4.6 Schema elettrico DBM12KA DBM12KA FUSE 130/307 3.15A 11 12 230V 50Hz 13 14 15 16 17 18 19 20 21 22 23 24 25 26 27 28 29 30 DSP12A fig. 45 - Schema elettrico... -
Página 48: Declaration Of Conformity
Reply 51 - 71 - 101 • Carefully read the warnings in this instruction book- • In case the unit breaks down and/or functions poorly, let since they provide important information on safe deactivate it, do not make any attempt to repair it or installation, use and maintenance. - Página 49 Reply 51 - 71 - 101 1 Operating instructions ......................50 1.1 Introduction............................50 1.2 Control panel ............................51 1.3 Turning on and off ..........................53 1.4 Adjustments............................54 2 Installation ..........................58 2.1 General Instructions ..........................58 2.2 Place of installation ..........................58 2.3 Gas and water connections ........................
-
Página 50: Reply 51
Please read this manual carefully since it provides important information on safe installation, use and maintenance. Reply 51 - 71 - 101 is a high-efficiency modular premix condensing heat generator for heating with very low emissions, running on natural gas or LPG and arranged for installation in cascade. -
Página 51: Control Panel
Reply 51 - 71 - 101 1.2 Control panel reset comfort 8 14 fig. 1 - Control panel The control panel is located inside the cabinet. To access it, open the front door with the special key supplied. DHW temperature setting decrease button (with... - Página 52 Reply 51 - 71 - 101 Indication during operation Heating A heating demand (generated by the Room Thermostat or Remote Timer Control or 0-10 Vdc signal) is indicated by activation of the circulating pump and the radiator (details 13 and 21 - fig. 1).
-
Página 53: Turning On And Off
Reply 51 - 71 - 101 1.3 Turning on and off Boiler lighting Press the On/Off button (detail 14 fig. 1). reset comfort reset comfort reset reset comfort comfort fig. 4 - Boiler lighting • For the following 120 seconds the display will show FH which identifies the heating system air venting cycle. -
Página 54: Adjustments
Reply 51 - 71 - 101 To relight the boiler, press the button (detail 7 fig. 1) again for 5 seconds. reset comfort fig. 6 The boiler will be immediately ready to operate whenever domestic hot water is drawn (with optional hot water tank in- stalled) or in case of a room thermostat demand. - Página 55 Reply 51 - 71 - 101 DHW temperature adjustment (with optional hot water tank installed) Operate the DHW buttons (details 1 and 2 - fig. 1) to adjust the temperature from a min. of 10 °C to a max. of 65°C.
- Página 56 Reply 51 - 71 - 101 Press the heating buttons (details 3 and 4 - fig. 1) to access parallel curve offset (fig. 13), modifiable with the DHW buttons (details 1 and 2 - fig. 1). reset comfort fig. 11 - Parallel curve offset Press the button (detail 8 - fig.
- Página 57 Reply 51 - 71 - 101 Table. 1 Heating temperature adjustment Adjustment can be made from the Remote Timer Control menu and the boiler control panel. DHW temperature adjustment (with optional hot Adjustment can be made from the Remote Timer Control menu and the boiler water tank installed) control panel.
-
Página 58: Installation
LOCAL REGULATIONS, AND THE RULES OF PROPER WORKMANSHIP. Reply 51 - 71 - 101 is a high-efficiency heat generator arranged to operate alone or in cascade (bank). When two or more generators Reply 51 - 71 - 101 are installed in cascade with the original kits Lamborghini, respecting the prescrip- tions of this manual, they can be considered as a single heat generator of total power equal to the sum of the powers of all the units connected in cascade. -
Página 59: Gas And Water Connections
Connection instructions Reply 51 - 71 - 101 is equipped on the inside with 3 manifolds (gas, system delivery and return) and a condensate drain pipe that facilitate cascade connection and also connection of a single module to the system. The manifolds are sized for connecting up to 5 modules in series. - Página 60 Reply 51 - 71 - 101 To connect several modules in cascade - fig. 17 • Connect the first module to the system and gas pipes, as described above, but without fitting the blind flanges on the opposite side to that of the connection.
- Página 61 Reply 51 - 71 - 101 Plumbing connection using one or more generators with direct pump fig. 18 Gas inlet Connection side System delivery Flanges with joining section System return Seals Condensate drain Delivery/return connection Blind flanges Plumbing circuit examples...
- Página 62 Reply 51 - 71 - 101 One direct heating circuit Check/Change parameter P02 of the "Transparent Parameters Menu" to 1 Change parameter P.02 of the "System Type Menu" to 1. Change parameter P.09 of the "System Type Menu" to 1.
- Página 63 Reply 51 - 71 - 101 One direct heating circuit and one DHW circuit with pump Check/Change parameter P02 of the "Transparent Parameters Menu" to 2. Change parameter P.02 of the "System Type Menu" to 1. Change parameter P.09 of the "System Type Menu" to 1.
- Página 64 Reply 51 - 71 - 101 One direct heating circuit and one DHW circuit with diverter valve Check/Change parameter P02 of the "Transparent Parameters Menu" to 3. Change parameter P.02 of the "System Type Menu" to 1. Change parameter P.09 of the "System Type Menu" to 1.
- Página 65 Reply 51 - 71 - 101 Two direct heating circuits Check/Change parameter P02 of the "Transparent Parameters Menu" to 1. Change parameter P.01 of the "System Type Menu" to 4. Change parameter P.02 of the "System Type Menu" to 1.
- Página 66 Reply 51 - 71 - 101 Two mixed heating circuits and one direct heating circuit Check/Change parameter P02 of the "Transparent Parameters Menu" to 1. Change parameter P.02 of the "System Type Menu" to 1. Change parameter P.09 of the "System Type Menu" to 1.
- Página 67 Reply 51 - 71 - 101 Two mixed heating circuits, one direct heating circuit and one DHW circuit with pump Check/Change parameter P02 of the "Transparent Parameters Menu" to 2. Change parameter P.02 of the "System Type Menu" to 1.
-
Página 68: Electrical Connections
Reply 51 - 71 - 101 2.4 Electrical connections Connection to the electrical grid The unit's electrical safety is only guaranteed when correctly connected to an efficient earthing system exe- cuted according to current safety standards. Have the efficiency and suitability of the earthing system checked by professionally qualified personnel. - Página 69 Reply 51 - 71 - 101 Accessing the electrical terminal block The electrical terminal block is located inside a sealed box at the bottom left of the cabinet. Make the electrical connec- tions as shown in the wiring diagram on sec. 45 and run the cables through the special cable glands.
-
Página 70: Possible Faults
Reply 51 - 71 - 101 For the connection in cascade 1. Connect the modules as shown in fig. 27 25 26 27 28 29 30 25 26 27 28 29 30 25 26 27 28 29 30 25 26 27 28 29 30 fig. -
Página 71: Flue Connection
Reply 51 - 71 - 101 2.5 Flue connection Important The unit is a B23 type with combustion air drawn from the installation room and fume exhaust by means of a fan (oper- ation with flue pressurised) and must be connected to one of the discharge systems indicated below. Before proceeding with installation, check and carefully comply with the local regulations and provisions. - Página 72 29. Each kit comprises a Ø80 terminal with grille (ref. 3), a seal (ref. 1) and a centering ring (ref. 2). For models Reply 71/ i-101/i use 2 kits per module, and 1 kit for models Reply 51/i. fig. 29...
- Página 73 Use a starting kit for each bank and a suitable number of extension kits. The starting kits have a special accessory inside them for connection also to modules Reply 51/i. 90° bends and man- ifold extensions are also available for the flue connection.
-
Página 74: Installation Examples
Reply 51 - 71 - 101 Installation examples 041008X0 041014X0 041017X0 fig. 31 - Installation of one module 041016X0 041010X0 041012X0 041012X0 041012X0 041012X0 A+10 A+15 A+20 A+25 fig. 32 - Installation of 5 modules cod. 3540H322 - 09/2008 (Rev. 01) - Página 75 Reply 51 - 71 - 101 For installation: fig. 33 Insert the diameter 100 M-F pipe sections with fume inspection “1” and the respective seals “2” from the outside of the modules for each flue connection. Respect the distance given in the box “B“ of fig. 33. This distance must be increased by 5 mm with each addi- tional module.
- Página 76 Insert the 90° M-F bends “8” on the pipe sections “7”, positioning them at 45° with respect to the module (see box “H” fig. 35). When installing a module Reply 51/i use only one 90° bend and the cap contained in the starting kit.
-
Página 77: Condensate Drain
Reply 51 - 71 - 101 2.6 Condensate drain The boiler has an internal condensate drain trap connected to an internal condensate outlet manifold. Condensate drain connection using one generator fig. 37 - Condensate drain connection with one generator Place the Ø40 pipe 1 (not supplied) on the side of the generator. -
Página 78: Service And Maintenance
Reply 51 - 71 - 101 3. Service and maintenance All adjustment, conversion, start-up and maintenance operations described below must only be carried out by Qualified Per- sonnel (meeting the professional technical requirements prescribed by current regulations) such as those of the Local After- Sales Technical Service. - Página 79 Reply 51 - 71 - 101 Activating TEST mode Press the heating buttons (details 3 and 4 - fig. 1) at the same time for 5 seconds to activate TEST mode. The boiler lights at the maximum heating power set as described in the following section.
-
Página 80: Service Menu
Reply 51 - 71 - 101 Service Menu The card is equipped with two Menus: one for configuration and the other for Service. The configuration Menu is accessed by pressing the DHW buttons together for 10 seconds. 4 parameters modifiable only from card for security reasons, except one (P02), are available. - Página 81 Reply 51 - 71 - 101 "tS” - Transparent Parameters Menu The card has 29 transparent parameters also modifiable from Remote Control (Service Menu): Remote Card Description of Transparent Parameters Range Default control Not used Do not modify Boiler type selection 1=Heating only Fan min.
- Página 82 Reply 51 - 71 - 101 Remote Card Description of Transparent Parameters Range Default control Not used (P02=1) Not used Hot water tank hysteresis (P02=2) 0-100°C 2°C Hot water tank hysteresis (P02=3) 0-100°C 2°C Not used (P02=4) Not used Hot water tank hysteresis (P02=5) 0-100°C...
- Página 83 Reply 51 - 71 - 101 "In" -Information menu The card can display the following information Heating NTC sensor (°C) between 05 and 125 °C DHW NTC sensor (°C) between 05 and 125 °C Return NTC sensor (°C) between 05 and 125 °C Fumes NTC sensor (°C)
- Página 84 Reply 51 - 71 - 101 System type menu Press the Summer/Winter button for 10 seconds to access the system Type Menu. 21 parameters, modifiable only from card, are available. Remote Card DescriptionTransparent Parameters Range Default control Heating request selection...
-
Página 85: Start-Up
Reply 51 - 71 - 101 3.2 Start-up Checks to be made at first lighting, and after all maintenance operations that involved disconnection from the systems or an operation on safety devices or parts of the boiler: Before lighting the boiler •... -
Página 86: Troubleshooting
Reply 51 - 71 - 101 3.4 Troubleshooting Diagnostics The boiler is equipped with an advanced self-diagnosis system. In case of a boiler fault, the display will flash together with the fault symbol (detail 20 - fig. 1) indicating the fault code. Flashing of the arrows (details 18 and 24 - fig. 1) to- gether with the error code indicates which boiler shell is in fault status. - Página 87 Reply 51 - 71 - 101 Fault Fault Possible cause Cure code Sensor damaged Fume sensor fault Wiring shorted Check the wiring or replace the sensor Wiring disconnected Sensor damaged Delivery sensor 2 fault Wiring shorted Check the wiring or replace the sensor...
-
Página 88: Technical Data And Characteristics
Reply 51 - 71 - 101 4. Technical data and characteristics 4.1 Dimensions and connections fig. 41 - Dimensions and connections Model Reply 51/i Heating system delivery Model Reply 71/i-101/i Heating system return Gas inlet cod. 3540H322 - 09/2008 (Rev. 01) -
Página 89: General View And Main Components
Reply 51 - 71 - 101 4.2 General view and main components fig. 42 - General view Model Reply 51/i 193 Trap Model Reply 71/i-101/i 196 Condensate tray Gas inlet 252 3-way drain and shut-off cock System delivery 253 Shut-off cock... -
Página 90: Plumbing Circuit
Reply 51 - 71 - 101 4.3 Plumbing circuit fig. 43 - Plumbing circuit Plumbing circuit model Reply 51/i Plumbing circuit model Reply 71/i-101/i Gas inlet System delivery System return Heating circulating pump Gas valve 154 Condensate drain pipe 161 Condensing heat exchanger... -
Página 91: Technical Data Table
Reply 51 - 71 - 101 4.4 Technical data table The column on the right gives the abbreviation used on the dataplate. Data Unit Reply 51/i Reply 71/i Reply 101/i Max. heating capacity 49.8 70.0 99.6 Min. heating capacity 11.2 11.2... -
Página 92: Diagrams
Reply 51 - 71 - 101 4.5 Diagrams Circulating pump head / pressure losses H [m H Q [l/h] 1.000 1.500 2.000 2.500 fig. 44 Boiler pressure losses 1 - 2 - 3 Circulating pump speed cod. 3540H322 - 09/2008 (Rev. 01) -
Página 93: Wiring Diagram
Reply 51 - 71 - 101 4.6 Wiring diagram DBM12KA DBM12KA FUSE 130/307 3.15A 11 12 230V 50Hz 13 14 15 16 17 18 19 20 21 22 23 24 25 26 27 28 29 30 DSP12A fig. 45 - Wiring diagram... -
Página 94: Déclaration De Conformité
Reply 51 - 71 - 101 • Lire attentivement les avertissements contenus • Désactiver l'appareil en cas de panne et/ou de mau- dans le présent livret fournissant des indications im- vais fonctionnement en s'abstenant de toute tentati- portantes pour la sécurité de l'installation, son utili- réparation... - Página 95 Reply 51 - 71 - 101 1 Instructions d'utilisation ....................... 96 1.1 Introduction............................96 1.2 Tableau des commandes ........................97 1.3 Allumage et extinction .......................... 99 1.4 Réglages ............................100 2 Installation ..........................104 2.1 Dispositions générales ........................104 2.2 Emplacement ............................. 104 2.3 Raccordements hydrauliques et gaz ....................
-
Página 96: Reply 51
Reply 51 - 71 - 101 reliés en cascade. Les générateurs Reply 51 - 71 - 101 sont conçus pour être installés même en plein air. Les versions Reply 51i-71i- 101i équipées d'une armoire INOX sont particulièrement indiquées pour les lieux caractérisés par des conditions clima- tiques et environnantes défavorables. -
Página 97: Tableau Des Commandes
Reply 51 - 71 - 101 1.2 Tableau des commandes reset comfort 8 14 fig. 1 - Panneau de contrôle Le tableau des commandes se trouve à l'intérieur de l'armoire. Pour y accéder, ouvrir la porte avant à l'aide de la clé... -
Página 98: Sanitaire (Avec Ballon En Option Installé)
Reply 51 - 71 - 101 Indications affichées pendant le fonctionnement Chauffage La demande de chauffage (venant du thermostat d'ambiance ou de la chronocommande à distance ou du signal 0-10 Vcc) est indiquée par l'activation du circulateur et du radiateur (rep. 13 et 21 - fig. 1). -
Página 99: Allumage Et Extinction
Reply 51 - 71 - 101 1.3 Allumage et extinction Allumage de la chaudière Appuyer sur la touche de Marche/Arrêt (rep. 14fig. 1). reset comfort reset comfort reset reset comfort comfort fig. 4 - Allumage de la chaudière • Pendant les 120 secondes qui suivent, l'afficheur visualise FH, qui indique le cycle de purge de l'air du circuit de chauffage. -
Página 100: Réglages
Reply 51 - 71 - 101 Pour rallumer la chaudière, réappuyer sur la touche (rep. 7 fig. 1) pendant 5 secondes. reset comfort fig. 6 La chaudière est prête à fonctionner immédiatement, chaque fois que l'on prélève de l'eau chaude sanitaire ou en pré- sence d'une demande de la part du thermostat d'ambiance. -
Página 101: Réglage Température Eau Chaude Sanitaire (Avec Ballon En Option Installé)
Reply 51 - 71 - 101 Réglage température eau chaude sanitaire (avec ballon en option installé) Pour régler la température entre 10 °C (minimum) et 65 °C (maximum), agir sur les touches sanitaire (rep. 1 et 2 - fig. 1). - Página 102 Reply 51 - 71 - 101 Appuyer sur les touches chauffage (rep. 3 et 4 - fig. 1) pour passer au déplacement parallèle des courbes (fig. 13), qui peut être modifié à l'aide des touches eau chaude sanitaire (rep. 1 et 2 - fig. 1).
- Página 103 Reply 51 - 71 - 101 Tableau 1 Réglage de la température de chauffage La régulation peut s'effectuer par le menu du chronocommande à distance ou par le tableau des commandes de la chaudière. Réglage température eau chaude sanitaire (avec bal- La régulation peut s'effectuer par le menu du chronocommande à...
-
Página 104: Installation
SIONNELLE. Reply 51 - 71 - 101 est un générateur thermique prévu pour fonctionner seul ou en cascade (batterie). Quand plusieurs générateurs sont installés en cascade avec les kits originaux, en respectant Reply 51 - 71 - 101les prescriptions du présent manuel, ils peuvent être considérés Lamborghinicomme un seul générateur thermique équivalent de puissance... -
Página 105: Raccordements Hydrauliques Et Gaz
Instructions de raccordement Reply 51 - 71 - 101 est équipé de 3 collecteurs (gaz, départ et retour installation) et d'un tuyau d'évacuation des con- densats qui facilitent le montage en cascade et le raccordement de chaque module à l'installation. Les collecteurs sont dimensionnés pour un raccordement jusqu'à... - Página 106 Reply 51 - 71 - 101 Pour le raccordement de plusieurs modules en cascade - fig. 17 • Brancher le premier module aux tuyauteries installation et gaz, comme décrit précédemment, mais sans monter sur le module les brides borgnes du côté opposé au raccordement.
-
Página 107: Paramètres
Reply 51 - 71 - 101 Raccordement hydraulique en utilisant un ou plusieurs générateurs avec pompe directe fig. 18 Arrivée du gaz Côté branchements Départ installation Brides avec bloc Retour installation Joints Évacuation des condensats Raccordement refoulement/retour Brides borgnes Exemples de circuits hydrauliques Légende des exemples... -
Página 108: Un Circuit Chauffage Direct
Reply 51 - 71 - 101 Un circuit chauffage direct Vérifier/Modifier le paramètre P02 du "Menu Paramètres Transparents" a 1. Modifier paramètre P.02 du "Menu Type d'installation" sur 1. Modifier paramètre P.09 du "Menu Type d'installation" sur 1. 72/139 fig. 19... - Página 109 Reply 51 - 71 - 101 Un circuit chauffage direct et un circuit eau chaude sanitaire avec pompe Vérifier/Modifier paramètre P02 du "Menu Paramètres Transparents" a 2. Modifier paramètre P.02 du "Menu Type d'installation" sur 1. Modifier paramètre P.09 du "Menu Type d'installation" sur 1.
- Página 110 Reply 51 - 71 - 101 Un circuit chauffage direct et un circuit eau chaude sanitaire avec by-pass Vérifier/Modifier paramètre P02 du "Menu Paramètres Transparents" a 3. Modifier paramètre P.02 du "Menu Type d'installation" sur 1. Modifier paramètre P.09 du "Menu Type d'installation" sur 1.
- Página 111 Reply 51 - 71 - 101 Deux circuits chauffage directs Vérifier/Modifier le paramètre P02 du "Menu Paramètres Transparents" a 1. Modifier paramètre P.01 du "Menu Type d'installation" sur 4. Modifier paramètre P.02 du "Menu Type d'installation" sur 1. Modifier paramètre P.09 du "Menu Type d'installation" sur 1.
- Página 112 Reply 51 - 71 - 101 Deux circuits chauffage mélangés et un circuit chauffage direct Vérifier/Modifier le paramètre P02 du "Menu Paramètres Transparents" a 1. Modifier paramètre P.02 du "Menu Type d'installation" sur 1. Modifier paramètre P.09 du "Menu Type d'installation" sur 1.
- Página 113 Reply 51 - 71 - 101 Deux circuits chauffage mélangés, un circuit chauffage direct et un circuit eau chaude sanitaire avec pompe Vérifier/Modifier paramètre P02 du "Menu Paramètres Transparents" a 2. Modifier paramètre P.02 du "Menu Type d'installation" sur 1.
-
Página 114: Raccordements Électriques
Reply 51 - 71 - 101 2.4 Raccordements électriques Raccordement au réseau électrique La sécurité électrique de l'appareil ne peut être assurée que lorsque celui-ci est correctement raccordé à une ligne de ligne de mise à la terre efficace conforme aux normes en vigueur. Faire vérifier par un professionnel qualifié... - Página 115 Reply 51 - 71 - 101 Accès au bornier électrique Le bornier se trouve dans la partie inférieure gauche de l'armoire, à l'intérieur d'un boîtier étanche. Effectuer les rac- cordements électriques comme indiqué sur le schéma électrique sez. 45 et faire sortir les câbles par les trous appro- priés.
- Página 116 Reply 51 - 71 - 101 Pour le montage en cascade 1. Relier les modules comme le montre la fig. 27 25 26 27 28 29 30 25 26 27 28 29 30 25 26 27 28 29 30 25 26 27 28 29 30 fig.
-
Página 117: Raccordement Des Cheminées
Reply 51 - 71 - 101 2.5 Raccordement des cheminées Avertissements L'appareil est du type B23 à aspiration de l'air comburant du local d'installation et évacuation des fumées par ventilateur (fonctionnement avec une cheminée sous pression) et doit être raccordé à un des systèmes d'évacuation décrits ci- après. - Página 118 Chaque kit inclut un terminal Ø 80 avec grille (rep. 3), un joint (rep. 1) et un collier de centrage (rep. 2). Sur les modèles Reply 71/i-101/i, utiliser 2 kits par module, sur les modèles Reply 51/i, 1 kit. fig. 29...
- Página 119 Les kits de départ sont munis, à l'intérieur, d'un accessoire approprié pour leur raccordement même sur les modules Reply 51/i. Pour le raccordement à la cheminée, des coudes 90° et des rallonges pour collecteur sont disponibles. Rallonge collecteur Coude 90°...
-
Página 120: Exemples D'installation
Reply 51 - 71 - 101 Exemples d'installation 041008X0 041014X0 041017X0 fig. 31 - Installation d'un module 041016X0 041010X0 041012X0 041012X0 041012X0 041012X0 A+10 A+15 A+20 A+25 fig. 32 - Installation de 5 modules cod. 3540H322 - 09/2008 (Rev. 01) - Página 121 Reply 51 - 71 - 101 Pour l’installation : fig. 33 Monter sur chaque raccordement à la cheminée, de l'extérieur des modules, les manchettes M-F diamètre 100 avec regards pour les fumées “1” et les joints correspondants “2”. Respecter la cote indiquée sur le tableau “B“ de fig. 33. Cette cote doit être augmentée de 5 mm pour chaque module supplémentaire.
- Página 122 Monter sur les manchettes “7” les coudes à 90° M-F “8”, en les positionnant à 45° par rapport au module (voir cadre “H” fig. 35). Si l'on est en train d'installer un module, Reply 51/i utiliser un seul coude à 90°, ainsi que le bouchon fourni dans le kit de départ.
-
Página 123: Évacuation Des Condensats
Reply 51 - 71 - 101 2.6 Évacuation des condensats La chaudière est munie d'un siphon interne pour l'évacuation des condensats, reliée à un collecteur d'éva- cuation des condensats interne. Raccordement du tuyau d'évacuation des condensats en utilisant un générateur fig. -
Página 124: Utilisation Et Entretien
Reply 51 - 71 - 101 3. Utilisation et entretien Toutes les opérations de réglage, de transformation, de mise en service et d'entretien décrites ci-après doivent être effec- tuées par un professionnel qualifié conformément aux textes réglementaires et règles de l'art en vigueur (par exemple, le personnel SAT de votre zone). -
Página 125: Réglage De La Puissance De Chauffage
Reply 51 - 71 - 101 Activation du mode TEST Appuyer en même temps sur les touches chauffage (rep. 3 et 4 - fig. 1) pendant 5 secondes de manière à activer le mode TEST. La chaudière s'allume à la puissance maximale de chauffage fixée comme décrit dans le pa- ragraphe suivant. -
Página 126: Menu Service
Reply 51 - 71 - 101 Menu Service La carte est munie de deux menus : le premier sert à la configuration et l'autre est dit "Service". Pour accéder au menu Configuration, appuyer sur les touches Sanitaire en même temps pendant 10 secondes. Les 4 paramètres disponibles peuvent être modifiés uniquement à... - Página 127 Reply 51 - 71 - 101 "tS” - Menu Paramètres Transparents La carte est munie de 29 paramètres transparents modifiables également par commande à distance (Menu Service) : Commande Carte Description Paramètres Transparents Plage Défaut à distance Non utilisé Ne pas modifier 1=uniquement Sélection type chaudière...
- Página 128 Reply 51 - 71 - 101 Commande Carte Description Paramètres Transparents Plage Défaut à distance Non utilisé (P02=1) Non utilisé Hystérésis ballon (P02=2) 0-100 °C 2 °C Hystérésis ballon (P02=3) 0-100 °C 2 °C Non utilisé (P02=4) Non utilisé Hystérésis ballon (P02=5) 0-100 °C...
- Página 129 Reply 51 - 71 - 101 "In" - Menu Informations La carte est en mesure d'afficher les informations suivantes Capteur NTC Chauffage (°C) de 05 à 125 °C Capteur NTC Eau chaude sanitaire (°C) de 05 à 125 °C Capteur NTC Retour (°C) de 05 à...
- Página 130 Reply 51 - 71 - 101 Menu Type d'installation Pour accéder au menu Type d'installation, appuyer sur la touche Eté/Hiver pendant 10 secondes. 21 paramètres peu- vent être modifiés uniquement à partir de la carte. Com- Carte Description Paramètres transparents Plage Défaut...
-
Página 131: Mise En Service
Reply 51 - 71 - 101 3.2 Mise en service Vérifications à effectuer au premier allumage et après toutes les opérations d'entretien ayant occasionné des débranchements des installations ou des interventions sur des dispositifs de sécurité ou parties de la chau- dière :... -
Página 132: Dépannage
Reply 51 - 71 - 101 3.4 Dépannage Diagnostic La chaudière est équipée d'un dispositif d'autodiagnostic avancé. En cas d'anomalies de fonctionnement de la chau- dière, l'affichage clignote avec le symbole d'anomalie (rep. 20 - fig. 1) indiquant le code de l'anomalie. Le clignotement des flèches (rep. - Página 133 Reply 51 - 71 - 101 Code Anomalie Causes probables Solution anomalie Capteur endommagé Anomalie capteur d'eau Câblage en court-circuit Contrôler le câblage ou remplacer le capteur chaude sanitaire Câblage interrompu Capteur endommagé Anomalie capteur des Câblage en court-circuit Contrôler le câblage ou remplacer le capteur fumées...
-
Página 134: Caractéristiques Et Données Techniques
Reply 51 - 71 - 101 4. Caractéristiques et données techniques 4.1 Dimensions et raccordements fig. 41 - Dimensions et raccordements Modèle Reply 51/i Départ installation chauffage Modèle Reply 71/i-101/i Retour installation chauffage Arrivée gaz cod. 3540H322 - 09/2008 (Rev. 01) -
Página 135: Vue Générale Et Composants Principaux
Reply 51 - 71 - 101 4.2 Vue générale et composants principaux fig. 42 - Vue générale Modèle Reply 51/i 193 Siphon Modèle Reply 71/i-101/i 196 Bassine de condensation Arrivée gaz 252 Robinet d'arrêt et de vidange à trois voies Départ installation... -
Página 136: Circuit Hydraulique
Reply 51 - 71 - 101 4.3 Circuit hydraulique fig. 43 - Circuit hydraulique Circuit hydraulique modèle Reply 51/i Circuit hydraulique modèle Reply 71/i-101/i Arrivée gaz Départ installation Retour installation Ventilateur Circulateur circuit chauffage Vanne à gaz 154 Tuyau d'évacuation des condensats 161 Échangeur de chaleur à... -
Página 137: Tableau Des Caractéristiques Techniques
Reply 51 - 71 - 101 4.4 Tableau des caractéristiques techniques Dans la colonne de droite est indiquée l'abréviation utilisée dans la plaque des caractéristiques techniques. Caractéristique Unité Reply 51/i Reply 71/i Reply 101/i Débit calorifique maxi chauffage 49.8 70.0 99.6... -
Página 138: Diagrammes
Reply 51 - 71 - 101 4.5 Diagrammes Pertes de charge / pression circulateurs H [m H Q [l/h] 1.000 1.500 2.000 2.500 fig. 44 Pertes de charge chaudière 1 - 2 - 3 Vitesse circulateur cod. 3540H322 - 09/2008 (Rev. 01) -
Página 139: Schéma Électrique
Reply 51 - 71 - 101 4.6 Schéma électrique DBM12KA DBM12KA FUSE 130/307 3.15A 11 12 230V 50Hz 13 14 15 16 17 18 19 20 21 22 23 24 25 26 27 28 29 30 DSP12A fig. 45 - Schéma électrique Attention : Avant de brancher le thermostat d'ambiance ou la chronocommande à... -
Página 140: Declaración De Conformidad
Reply 51 - 71 - 101 • Leer atentamente las advertencias de este manual • En caso de avería o funcionamiento incorrecto del de instrucciones ya que proporcionan información aparato, desconectarlo y hacerlo reparar únicamen- importante sobre la instalación, el uso y el manteni- te por técnicos cualificados. - Página 141 Reply 51 - 71 - 101 1 Instrucciones de uso ......................142 1.1 Introducción ............................142 1.2 Panel de mandos ..........................143 1.3 Encendido y apagado......................... 145 1.4 Regulaciones............................146 2 Instalación ..........................150 2.1 Disposiciones generales ........................150 2.2 Lugar de instalación ........................... 150 2.3 Conexión del agua y el gas ........................
-
Página 142: Reply 51
GLP. Todos los módulos Reply 51 - 71 - 101 están dotados de doble intercambiador de láminas de aluminio y doble quema- dor de premezcla de cerámica, instalados en un armario vertical de acero inoxidable AISI 316 (versión Reply 51i-71i- 101i) o de acero esmaltado con polvos epoxídicos resistentes a los agentes atmosféricos (versión Reply 51-71-101). -
Página 143: Panel De Mandos
Reply 51 - 71 - 101 1.2 Panel de mandos reset comfort 8 14 fig. 1 - Panel de control El panel de mandos se encuentra dentro del armario. Para acceder a él, es necesario abrir la puerta frontal con la llave que se suministra de serie. -
Página 144: Agua Sanitaria (Con Acumulador Opcional Instalado)
Reply 51 - 71 - 101 Indicación durante el funcionamiento Calefacción La solicitud de calefacción (generada por el termostato ambiente, el reloj programador o la señal 0-10 Vcc se indica mediante la activación de la bomba de circulación y el radiador (13 y 21 - fig. 1). -
Página 145: Encendido Y Apagado
Reply 51 - 71 - 101 1.3 Encendido y apagado Encendido de la caldera Pulsar la tecla de encendido/apagado (14 fig. 1). reset comfort reset comfort reset reset comfort comfort fig. 4 - Encendido de la caldera • Por los sucesivos 120 segundos en la pantalla aparece el mensaje FH, que identifica el ciclo de purga de aire de la instalación de calefacción. -
Página 146: Regulaciones
Reply 51 - 71 - 101 Para volver a activar la caldera, pulsar nuevamente la tecla (7 fig. 1) durante cinco segundos. reset comfort fig. 6 La caldera se pondrá en marcha cada vez que se extraiga agua caliente sanitaria (con acumulador opcional instalado) o lo requiera el termostato de ambiente. -
Página 147: Regulación De La Temperatura Del Agua Caliente Sanitaria (Con Acumulador Opcional Instalado)
Reply 51 - 71 - 101 Regulación de la temperatura del agua caliente sanitaria (con acumulador opcional instalado) Mediante las teclas (1 y 2 - fig. 1) se puede regular la temperatura del agua sanitaria desde un mínimo de 10 °C hasta un máximo de 65 °C. - Página 148 Reply 51 - 71 - 101 Pulsando las teclas de la calefacción (3 y 4 - fig. 1) se accede al desplazamiento paralelo de las curvas (fig. 13), modificable mediante las teclas del agua sanitaria (1 y 2 - fig. 1).
-
Página 149: Regulación De La Presión Hidráulica De La Instalación
Reply 51 - 71 - 101 Tabla. 1 Regulación de la temperatura de calefacción La regulación se puede efectuar desde el menú del reloj programador a dis- tancia o desde el panel de mandos de la caldera. Regulación de la temperatura del agua caliente sani- La regulación se puede efectuar desde el menú... -
Página 150: Instalación
Reply 51 - 71 - 101 es un generador térmico proyectado para funcionar individualmente o en cascada (batería). Cuando dos o más generadores Reply 51 - 71 - 101 se instalan en cascada con los kits originales Lamborghini siguiendo las instrucciones del manual, éstos pueden ser considerados como un único generador térmico equivalente cuya potencia... -
Página 151: Conexión Del Agua Y El Gas
Instrucciones de conexión Reply 51 - 71 - 101 está dotado de tres colectores (gas, envío y retorno de la instalación) y un tubo de descarga de la condensación que facilitan tanto la conexión en cascada como la conexión de módulos separados. Los colectores es- tán dimensionados para conectar hasta cinco módulos en serie. -
Página 152: Para Conectar Varios Módulos En Cascada - Fig
Reply 51 - 71 - 101 Para conectar varios módulos en cascada - fig. 17 • Conectar el primer módulo a las tuberías de la instalación y del gas como se ha descrito anteriormente, pero sin montar las bridas ciegas en el lado opuesto de la conexión. -
Página 153: Conexión Hidráulica De Uno O Más Generadores Con Bomba Directa
Reply 51 - 71 - 101 Conexión hidráulica de uno o más generadores con bomba directa fig. 18 Entrada gas Lado conexiones Ida a calefacción Arandelas Retorno desde calefacción Guarniciones Descarga condensación Conexión envío/retorno Brida ciega Ejemplos de circuitos hidráulicos... -
Página 154: Un Circuito De Calefacción Directo
Reply 51 - 71 - 101 Un circuito de calefacción directo Controlar/Modificar el parámetro P02 del "Menú Parámetros Transparentes" a 1. Modificar el parámetro P.02 del "Menú Tipo Instalación" a 1. Modificar el parámetro P.09 del "Menú Tipo Instalación" a 1. -
Página 155: Un Circuito De Calefacción Directo Y Un Circuito Sanitario Con Bomba
Reply 51 - 71 - 101 Un circuito de calefacción directo y un circuito sanitario con bomba Controlar/Modificar el parámetro P02 del "Menú Parámetros Transparentes" a 2. Modificar el parámetro P.02 del "Menú Tipo Instalación" a 1. Modificar el parámetro P.09 del "Menú Tipo Instalación" a 1. -
Página 156: Un Circuito De Calefacción Directo Y Un Circuito Sanitario Con Válvula Desviadora
Reply 51 - 71 - 101 Un circuito de calefacción directo y un circuito sanitario con válvula desviadora Controlar/Modificar el parámetro P02 del "Menú Parámetros Transparentes" a 3. Modificar el parámetro P.02 del "Menú Tipo Instalación" a 1. Modificar el parámetro P.09 del "Menú Tipo Instalación" a 1. -
Página 157: Dos Circuitos De Calefacción Directos
Reply 51 - 71 - 101 Dos circuitos de calefacción directos Controlar/Modificar el parámetro P02 del "Menú Parámetros Transparentes" a 1. Modificar el parámetro P.01 del "Menú Tipo Instalación" a 4. Modificar el parámetro P.02 del "Menú Tipo Instalación" a 1. -
Página 158: Dos Circuitos De Calefacción Mezclados Y Un Circuito De Calefacción Directo
Reply 51 - 71 - 101 Dos circuitos de calefacción mezclados y un circuito de calefacción directo Controlar/Modificar el parámetro P02 del "Menú Parámetros Transparentes" a 1. Modificar el parámetro P.02 del "Menú Tipo Instalación" a 1. Modificar el parámetro P.09 del "Menú Tipo Instalación" a 1. - Página 159 Reply 51 - 71 - 101 Dos circuitos de calefacción mezclados, un circuito de calefacción directo y un circuito sanitario con bomba Controlar/Modificar el parámetro P02 del "Menú Parámetros Transparentes" a 2. Modificar el parámetro P.02 del "Menú Tipo Instalación" a 1.
-
Página 160: Conexiones Eléctricas
Reply 51 - 71 - 101 2.4 Conexiones eléctricas Conexión a la red eléctrica La seguridad eléctrica del aparato sólo se logra cuando éste se encuentra conectado a una toma de tierra eficaz, según lo previsto por las normas de seguridad. Solicitar a personal profesionalmente cualificado que controle la eficacia y la adecuación de la instalación de tierra ya que el fabricante no se hace responsable por... - Página 161 Reply 51 - 71 - 101 Acceso a la regleta eléctrica La regleta eléctrica se encuentra en la parte inferior izquierda del armario, dentro de una caja hermética. Efectuar las conexiones eléctricas siguiendo las instrucciones del esquema eléctrico sec. 45 y extraer los cables a través de los pasacables.
-
Página 162: Para La Conexión En Cascada
Reply 51 - 71 - 101 Para la conexión en cascada 1. Conectar los módulos como se indica en fig. 27 25 26 27 28 29 30 25 26 27 28 29 30 25 26 27 28 29 30 25 26 27 28 29 30 fig. -
Página 163: Conexión Chimeneas
Reply 51 - 71 - 101 2.5 Conexión chimeneas Advertencias El aparato es de tipo B23, toma el aire de combustión del local de instalación, posee extractor para la evacuación de humos (funcionamiento con chimenea en presión) y se debe conectar a uno de los sistema de evacuación indicados a continuación. -
Página 164: Conexión Con Tubos Separados
Cada kit incluye un terminal Ø80 con rejilla (3), una junta (1) y una abrazadera de centraje (2). En los modelos Reply 71/i-101/i se han de utilizar 2 kits por módulo; en los modelos Reply 51/i, 1 kit. fig. 29... -
Página 165: Conexión Con Colectores
Utilizar un kit de inicio para cada batería y un número adecuado de kits de prolongación. Los kits de inicio incluyen un accesorio para la conexión a módulos Reply 51/i. Están disponibles codos de 90° y alargadores de colector para el empalme con chimenea. -
Página 166: Ejemplos De Instalación
Reply 51 - 71 - 101 Ejemplos de instalación 041008X0 041014X0 041017X0 fig. 31 - Instalación de un módulo 041016X0 041010X0 041012X0 041012X0 041012X0 041012X0 A+10 A+15 A+20 A+25 fig. 32 - Instalación de 5 módulos cod. 3540H322 - 09/2008 (Rev. 01) -
Página 167: Para Realizar La Instalación
Reply 51 - 71 - 101 Para realizar la instalación: fig. 33 Introducir los tubos M-F diámetro 100 con control de humos “1” y las juntas “2” en todas las conexiones de chi- menea, desde el exterior de los módulos. - Página 168 Introducir los codos de 90° M-F “8“ en los tubos “7“ colocándolos a 45º respecto del módulo (véase el re- cuadro “H” fig. 35). Para instalar un módulo, Reply 51/ise debe utilizar un solo codo de 90° y el tapón incluido en el kit de inicio.
-
Página 169: Descarga Condensación
Reply 51 - 71 - 101 2.6 Descarga condensación La caldera está dotada de un sifón interno conectado a un colector que descarga la condensación. Conexión de la descarga de condensación para un generador fig. 37 - Conexión de la descarga de condensación con un generador Apoyar en el lado del generador el tubo 1 Ø40 (bajo pedido). -
Página 170: Servicio Y Mantenimiento
Reply 51 - 71 - 101 3. Servicio y mantenimiento Todas las operaciones de regulación, transformación, puesta en servicio y mantenimiento que se describen a continuación deben ser efectuadas sólo por personal cualificado (con los requisitos técnicos profesionales previstos por la normativa vigente) , por ejemplo un técnico del Servicio de Asistencia local. -
Página 171: Activación De La Modalidad Test
Reply 51 - 71 - 101 Activación de la modalidad TEST Pulsar simultáneamente las teclas de regulación de la temperatura de la calefacción (3 y 4 - fig. 1) durante cinco segundos para activar la modalidad TEST. La caldera se enciende con la potencia de calefacción máxima pro- gramada de la manera ilustrada en el apartado sucesivo. -
Página 172: Menú Service
Reply 51 - 71 - 101 Menú Service La tarjeta posee dos menús: el Menú de Configuración y el Menú Service. Para entrar en el Menú de Configuración, hay que pulsar las teclas de agua sanitaria durante 10 segundos. Desde la tarjeta sólo se pueden modificar 4 parámetros por motivos de seguridad excepto uno (P02). - Página 173 Reply 51 - 71 - 101 "tS" - Menú Parámetros Transparentes La tarjeta está dotada de 29 parámetros transparentes modificables incluso con el mando a distancia (Menú Service): Programador Tarjeta Descripción Parámetros Transparentes Intervalo Prefijado a distancia No se utiliza No modificar 1=Sólo calefac-...
- Página 174 Reply 51 - 71 - 101 Programador Tarjeta Descripción Parámetros Transparentes Intervalo Prefijado a distancia No se utiliza (P02=1) No se utiliza Punto de intervención primario (P02=2) 0-100 °C 80 °C Punto de intervención primario (P02=3) 0-100 °C 80 °C...
- Página 175 Reply 51 - 71 - 101 "In" - Menú de información La tarjeta puede exponer las siguientes informaciones Sensor NTC calefacción (°C) entre 05 y 125 °C Sensor NTC agua sanitaria (°C) entre 05 y 125 °C Sensor NTC Retorno (°C) entre 05 y 125 °C...
-
Página 176: Menú Tipo Instalación
Reply 51 - 71 - 101 Menú tipo instalación Para entrar en el Menú Tipo Instalación, hay que pulsar la tecla Verano/Invierno durante 10 segundos. Desde la tarjeta sólo se pueden modificar 21 parámetros. Programador Tarjeta Descripción Parámetros Transparentes Intervalo... -
Página 177: Puesta En Servicio
Reply 51 - 71 - 101 3.2 Puesta en servicio Controles que se han de efectuar durante el primer encendido, tras las operaciones de mantenimiento que exigen desconectar la caldera y después de toda intervención en los dispositivos de seguridad o componentes... -
Página 178: Solución De Problemas
Reply 51 - 71 - 101 3.4 Solución de problemas Diagnóstico La caldera está dotada de un avanzado sistema de autodiagnóstico. En caso de que se presente una anomalía en la caldera, la pantalla parpadea junto con el símbolo de anomalía (20 - fig. 1) y se visualiza el correspondiente código. - Página 179 Reply 51 - 71 - 101 Código de Anomalía Posible causa Solución anomalía Sensor estropeado Anomalía del sensor del Cableado en cortocircuito Controlar el cableado o sustituir el sensor agua sanitaria Cableado interrumpido Sensor estropeado Anomalía del sensor de Cableado en cortocircuito...
-
Página 180: Características Y Datos Técnicos
Reply 51 - 71 - 101 4. Características y datos técnicos 4.1 Dimensiones y conexiones fig. 41 - Dimensiones y conexiones Modelo Reply 51/i Ida a calefacción Modelo Reply 71/i-101/i Retorno desde calefacción Entrada de gas cod. 3540H322 - 09/2008 (Rev. 01) -
Página 181: Vista General Y Componentes Principales
Reply 51 - 71 - 101 4.2 Vista general y componentes principales fig. 42 - Vista general Modelo Reply 51/i 193 Sifón Modelo Reply 71/i-101/i 196 Depósito de condensados Entrada de gas 252 Llave de interceptación y descarga de 3 vías Ida a calefacción... -
Página 182: Circuito Hidráulico
Reply 51 - 71 - 101 4.3 Circuito hidráulico fig. 43 - Circuito hidráulico Circuito hidráulico modelo Reply 51/i Circuito hidráulico modelo Reply 71/i-101/i Entrada de gas Ida a calefacción Retorno desde calefacción Extractor Bomba de circulación para calefacción Válvula de gas 154 Tubo descarga de condensados 161 Intercambiador de calor por condensación... -
Página 183: Tabla De Datos Técnicos
Reply 51 - 71 - 101 4.4 Tabla de datos técnicos En la columna de la derecha se indica la abreviatura utilizada en la placa de datos técnicos. Uni- Reply 51/i Reply 71/i Dato Reply 101/i Capacidad térmica máx. calefacción 49.8... -
Página 184: Diagramas
Reply 51 - 71 - 101 4.5 Diagramas Pérdidas de carga / carga hidrostática de las bombas de circulación H [m H Q [l/h] 1.000 1.500 2.000 2.500 fig. 44 Pérdidas de cargas de la caldera 1 - 2 - 3 Velocidad de la bomba de circulación... -
Página 185: Esquema Eléctrico
Reply 51 - 71 - 101 4.6 Esquema eléctrico DBM12KA DBM12KA FUSE 130/307 3.15A 11 12 230V 50Hz 13 14 15 16 17 18 19 20 21 22 23 24 25 26 27 28 29 30 DSP12A fig. 45 - Esquema eléctrico Atención: Antes de conectar el termostato de ambiente o el reloj programador a distancia , quitar el puente... -
Página 186: Konformitätserklärung
Reply 51 - 71 - 101 • Der Inhalt der vorliegenden Betriebsanleitung muss • Bei Defekten und/oder Störungen das Gerät ab- aufmerksam durchgelesen werden, da mit ihm schalten und auf keinen Fall eigenhändig Reparatu- wichtige Hinweise und Anweisungen zur sicheren... - Página 187 Reply 51 - 71 - 101 1 Betriebsanleitung......................... 188 1.1 Vorwort ............................... 188 1.2 Bedienblende ............................. 189 1.3 Ein- und Abschaltung ......................... 191 1.4 Einstellungen ............................192 2 Installation ..........................196 2.1 Allgemeine Hinweise .......................... 196 2.2 Aufstellungsort............................ 196 2.3 Wasser- und Gasanschlüsse ......................197 2.4 Elektrische Anschlüsse ........................
-
Página 188: Reply 51
1.1 Vorwort Sehr geehrter Kunde, wir danken Ihnen für die Wahl des Modells Reply 51 - 71 - 101 von Lamborghini. Dieser Wärmeerzeuger der neuesten Generation zeichnet sich durch innovative Konzeption und zukunftsweisende Technologie aus. Bitte lesen Sie dieses Handbuch aufmerksam durch, denn es enthält wichtige Hinweise zur Sicherheit von Installation, Gebrauch und War- tung. -
Página 189: Bedienblende
Reply 51 - 71 - 101 1.2 Bedienblende reset comfort 8 14 abb. 1 - Bedienblende Die Bedienblende befindet sich im Schrank. Um Zugang zur Bedienblende zu haben, muss die vordere Tür mit dem mitgelieferten Schlüssel geöffnet werden. Zeichenerklärung Taste zur Verringerung der Brauchwassertem- 19 = Anzeige der Anforderung einer Störungsrück-... - Página 190 Reply 51 - 71 - 101 Anzeige während des Betriebs Heizbetrieb Die Heizanforderung (herbeigeführt vom Raumthermostat oder vom Raumregler oder vom Signal 0-10 VDC) ist am Ein- schalten der Umwälzpumpe und des Heizkörpers (Pos. 13 und 21 - abb. 1) erkenntlich.
-
Página 191: Ein- Und Abschaltung
Reply 51 - 71 - 101 1.3 Ein- und Abschaltung Einschalten des Kessels Die Ein-/Ausschalttaste (Pos. 14 abb. 1) drücken. reset comfort reset comfort reset reset comfort comfort abb. 4 - Einschalten des Kessels • Nach dem Einschalten wird am Display für 120 Sekunden FH eingeblendet, um auf den laufenden Entlüftungszyklus der Heizanlage hinzuweisen. -
Página 192: Einstellungen
Reply 51 - 71 - 101 Um den Heizkessel wieder einzuschalten, die Taste (Pos. 7 abb. 1) erneut 5 Sekunden lang drücken. reset comfort abb. 6 Damit ist der Heizkessel unmittelbar betriebsbereit für jede Entnahme von Warmwasser (bei Installation des optionalen Boilers) bzw. - Página 193 Reply 51 - 71 - 101 Einstellung der Brauchwassertemperatur (bei Installation des optionalen Boilers) Die Tasten der Warmwasserbereitung (Pos. 1 und 2 - abb. 1) betätigen, um die Temperatur auf einen Wert zwischen mindestens 10 °C und höchstens 65 °C einzustellen.
- Página 194 Reply 51 - 71 - 101 Durch Drücken der Heiztasten (Pos. 3 und 4 - abb. 1) hat man Zugriff zur Parallelverschiebung der Kurven (abb. 13), die mit den Tasten der Warmwasserbereitung (Pos. 1 und 2 - abb. 1) geändert werden kann.
- Página 195 Reply 51 - 71 - 101 Tabelle 1 Einstellung der Heiztemperatur Die Einstellung kann sowohl vom Menü des Raumreglers als auch von der Bedienblende des Kessels vorgenommen werden. Einstellung der Brauchwassertemperatur (bei Instal- Die Einstellung kann sowohl vom Menü des Raumreglers als auch von der lation des optionalen Boilers) Bedienblende des Kessels vorgenommen werden.
-
Página 196: Installation
ANERKANNTEN REGELN DER TECHNIK VORGENOMMEN WERDEN. Reply 51 - 71 - 101 ist ein Wärmeerzeuger, der für den Betrieb als Einzelgerät oder in Kaskadenschaltung (Gerätesatz) ausgelegt ist. Wenn einer oder mehrere Wärmeerzeuger Reply 51 - 71 - 101 mit den Originalbausätzen Lamborghini und gemäß... -
Página 197: Wasser- Und Gasanschlüsse
Module öffnen zu müssen. Anleitungen für den Anschluss Reply 51 - 71 - 101 ist intern mit 3 Sammlern (Gas, Anlagenvorlauf und -rücklauf) und einem Kondensatablassrohr ver- sehen, die den Anschluss sowohl in Kaskadenschaltung als auch des einzelnen Moduls an die Heizanlage ermöglichen. - Página 198 Reply 51 - 71 - 101 Für den Anschluss mehrerer Module in Kaskadenschaltung - abb. 17 • Das erste Modul wie oben beschrieben an den Anlagen- und Gasleitungen anschließen, aber ohne die blinden Flan- sche auf der anderen Seite des Moduls zu montieren.
- Página 199 Reply 51 - 71 - 101 Wasseranschluss bei einem oder mehreren Wärmeerzeugern mit direkter Pumpe abb. 18 Gaseintritt Anschlussseite Anlagenvorlauf Flansche mit Stutzen Anlagenrücklauf Dichtungen Kondensatabführung Verbindung Vor-/Rücklauf Blinde Flansche Beispiele für die Wasserkreise Zeichenerklärung der Beispiele Sicherheitseinrichtungen ISPESL 139 Raumregler (nicht inbegriffen) Wasserversorgungs-Trennschalter 298 Temperaturfühler Kaskade (nicht inbegriffen)
- Página 200 Reply 51 - 71 - 101 Ein direkter Heizkreis Parameter P02 im "Menü Transparente Parameter" kontrollieren / auf 1 ändern. Parameter P.02 im "Menü Anlagentyp" auf 1 ändern. Parameter P.02 im "Menü Anlagentyp" auf 1 ändern. 72/139 abb. 19 cod. 3540H322 - 09/2008 (Rev. 01)
- Página 201 Reply 51 - 71 - 101 Ein direkter Heizkreis und ein Brauchwasserkreis mit Pumpe Parameter P02 im "Menü Transparente Parameter" kontrollieren / auf 2ändern. Parameter P.02 im "Menü Anlagentyp" auf 1 ändern. Parameter P.09 im "Menü Anlagentyp" auf 1 ändern.
- Página 202 Reply 51 - 71 - 101 Ein direkter Heizkreis und ein Brauchwasserkreis mit Umleitventil Parameter P02 im "Menü Transparente Parameter" auf 3 ändern. Parameter P.02 im "Menü Anlagentyp" auf 1 ändern. Parameter P.09 im "Menü Anlagentyp" auf 1 ändern. Parameter P.11 im "Menü Anlagentyp" auf 1 ändern.
- Página 203 Reply 51 - 71 - 101 Zwei direkte Heizkreise Parameter P02 im "Menü Transparente Parameter" kontrollieren / auf 1 ändern. Parameter P.01 im "Menü Anlagentyp" auf 4 ändern. Parameter P.02 im "Menü Anlagentyp" auf 1 ändern. Parameter P.09 im "Menü Anlagentyp" auf 1 ändern.
- Página 204 Reply 51 - 71 - 101 Zwei gemischte Heizkreise und ein direkter Heizkreis Parameter P02 im "Menü Transparente Parameter" kontrollieren / auf 1 ändern. Parameter P.02 im "Menü Anlagentyp" auf 1 ändern. Parameter P.09 im "Menü Anlagentyp" auf 1 ändern.
- Página 205 Reply 51 - 71 - 101 Zwei gemischte Heizkreise, ein direkter Heizkreis und ein Brauchwasserkreis mit Pumpe Parameter P02 im "Menü Transparente Parameter" kontrollieren / auf 2ändern. Parameter P.02 im "Menü Anlagentyp" auf 1 ändern. Parameter P.09 im "Menü Anlagentyp" auf 1 ändern.
-
Página 206: Elektrische Anschlüsse
Reply 51 - 71 - 101 2.4 Elektrische Anschlüsse Anschluss an das Stromnetz Die elektrische Sicherheit des Geräts ist nur gewährleistet, wenn der korrekte Anschluss an eine leistungsfähi- ge Erdungsanlage vorliegt, die nach den einschlägigen Sicherheitsnormen erstellt wurde. Funktionstüchtigkeit und Eignung der Erdungsanlage durch qualifiziertes Fachpersonal überprüfen lassen; der Hersteller übernim- mt keinerlei Haftung bei eventuellen Schäden, die auf die fehlende Erdung der Anlage zurückzuführen sind. - Página 207 Reply 51 - 71 - 101 Zugang zur elektrischen Klemmleiste Die elektrische Klemmleiste befindet sich an der linken unteren Schrankseite in einem dichten Gehäuse. Die Anschlüs- se wie im Schaltplan auf sez. 45 angegeben ausführen und die Kabel durch die entsprechenden Kabelführungen ziehen.
-
Página 208: Mögliche Störungen
Reply 51 - 71 - 101 Für den Anschluss in Kaskadenschaltung 1. Die Module anschließen, siehe abb. 27 25 26 27 28 29 30 25 26 27 28 29 30 25 26 27 28 29 30 25 26 27 28 29 30 abb. -
Página 209: Anschluss Der Schornsteinrohre
Reply 51 - 71 - 101 2.5 Anschluss der Schornsteinrohre Zur Beachtung Das Gerät ist vom Typ B23 mit Ansaugung der Verbrennungsluft aus dem Aufstellraum und Abgasabführung mittels Abgasventilator (Betrieb mit Schornstein unter Druck). Es muss mit einem der nachfolgend beschriebenen Abgassyste- men verbunden werden. - Página 210 041013X0abb. 29 angeschlossen werden. Jedes Set enthält ein Endstück Ø80 mit Gitter (Pos. 3), eine Dichtung (Pos. 1) und eine Zentriermutter (Pos. 2). Für die Modelle Reply 71/i-101/i 2 Sets pro Modul, für die Modelle Reply 51/i 1 Set verwenden. abb. 29...
- Página 211 Vor Installation der Schornsteine den Schrank öffnen und den Siphon über die Schornsteinanschlüsse (siehe abb. 30) A und B bei Modell Reply 71/i-101/i bzw. nur A bei Modell Reply 51/imit ca. 0,5 l Wasser füllen. abb. 30 - Füllen des Siphons Bei Installationen im Freien muss die Dichtung 1 perfekt an der Schrankoberseite haften, damit weder Regen noch sonstige Witterungseinflüsse eindringen können.
- Página 212 Reply 51 - 71 - 101 Installationsbeispiele 041008X0 041014X0 041017X0 abb. 31 - Installation eines Moduls 041016X0 041010X0 041012X0 041012X0 041012X0 041012X0 A+10 A+15 A+20 A+25 abb. 32 - Installation von 5 Modulen cod. 3540H322 - 09/2008 (Rev. 01)
- Página 213 Reply 51 - 71 - 101 Installation: abb. 33 Von außerhalb der Module für jeden Schornsteinanschluss die Stutzen VT/MT Durchmesser 100 mit Abgas-In- spektionsanschluss “1” und den entsprechenden Dichtungen “2” einsetzen. Das im Kästchen “B“ von abb. 33angegebene Maß einhalten. Dieses Maß muss für jedes zusätzliche Modul um 5 mm erhöht werden.
- Página 214 An den Stutzen “7” die 90°Rohrkrümmer VT/MT “8” einsetzen. Diese müssen im Winkel von 45° zum Modul angebracht werden (siehe Kästchen “H” abb. 35). Bei Installation eines Moduls Reply 51/i nur einen 90°- Rohrkrümmer und die im Basisset enthaltenen Verschlusskappe benutzen.
-
Página 215: Kondensatabführung
Reply 51 - 71 - 101 2.6 Kondensatabführung Der Kessel ist mit einem internen Siphon für die Kondensatabführung versehen, der mit einer internen Kon- densatablaufleitung verbunden ist. Anschluss des Kondensatablasses mit einem Wärmeerzeuger abb. 37 - Anschluss des Kondensatablasses mit einem Wärmeerzeuger Auf der Seite des Wärmeerzeugers das (nicht mitgelieferte) Rohr 1 Ø40 anbringen. -
Página 216: Service Und Wartung
Reply 51 - 71 - 101 3. Service und Wartung Alle nachstehend beschriebenen Arbeiten zur Einstellung, Umrüstung, Inbetriebsetzung und Wartung dürfen nur von au- sgebildetem Fachpersonal mit nachgewiesener Qualifikation (d.h. im Besitz der von den geltenden Bestimmungen vorge- schriebenen fachlichen und beruflichen Voraussetzungen) wie beispielsweise das Personal des Technischen Kundendienstes, ausgeführt werden. - Página 217 Reply 51 - 71 - 101 Aktivierung des Testmodus Zur Aktivierung des TESTabb. 1-Modus die Heiztasten (Pos. 3 und 4 - ) fünf Sekunden lang gleichzeitig drücken. Der Kessel wird auf der höchsten Heizleistungsstufe eingeschaltet, die wie im nächsten Abschnitt beschrieben eingestellt wird.
-
Página 218: Servicemenü
Reply 51 - 71 - 101 Servicemenü Die Platine hat zwei Menüs: eines dient zur Konfiguration, das andere heißt Servicemenü. Um das Konfigurationsmenü zu öffnen, die Tasten der Warmwasserbereitung 10 Sekunden lang gleichzeitig drücken. Es gibt 4 Parameter, die aus Sicherheitsgründen nur von der Platine geändert werden können, außer einem (P02). - Página 219 Reply 51 - 71 - 101 "tS” - Menü Transparente Parameter Die Platine hat 29 transparente Parameter, die auch vom Raumregler (Servicemenü) geändert werden können: Raum- Platine Beschreibung der transparenten Parameter Stellbereich Default regler Unbenutzt Nicht ändern Wahl der Kesselart 1=Nur Heizung Min.
- Página 220 Reply 51 - 71 - 101 Raum- Platine Beschreibung der transparenten Parameter Stellbereich Default regler Unbenutzt (P02=1) Unbenutzt Primärer Sollwert (P02=2) 0-100°C 80°C Primärer Sollwert (P02=3) 0-100°C 80°C Unbenutzt (P02=4) Unbenutzt Primärer Sollwert (P02=5) 0-100°C 80°C Primärer Sollwert (P02=6) 0-100°C 80°C...
- Página 221 Reply 51 - 71 - 101 "In" - Menü Info Die Platine kann die folgenden Informationen anzeigen NTC-Heizfühler (°C) zwischen 5 und 125°C NTC-Brauchwasserfühler (°C) zwischen 5 und 125°C NTC-Rücklauffühler (°C) zwischen 5 und 125°C NTC-Abgasfühler (°C) zwischen 5 und 125°C NTC-Außenfühler (°C)
- Página 222 Reply 51 - 71 - 101 Menü Anlagentyp Um das Menü Anlagentyp zu öffnen, die Taste Sommer/Winter 10 Sekunden lang drücken. Es gibt 21 Parameter, die nur von der Platine geändert werden können. Raum- Platine Beschreibung der transparenten Parameter Stellbereich...
-
Página 223: Inbetriebnahme
Reply 51 - 71 - 101 3.2 Inbetriebnahme Auszuführende Überprüfungen bei der ersten Einschaltung/Zündung und nach allen Wartungsarbeiten, für die eine Trennung der Anlagen-Anschlüsse oder ein Eingriff an den Sicherheitsvorrichtungen bzw. an Teilen des Heizkessels erforderlich ist: Vor Einschalten des Heizkessels •... -
Página 224: Störungsbehebung
Reply 51 - 71 - 101 3.4 Störungsbehebung Diagnostik Der Kessel ist mit einer ausgereiften Selbsttestfunktion ausgestattet. Beim Auftreten einer Betriebsstörung des Kessels blinkt das Display zusammen mit dem Störungssymbol (Pos. 20 - abb. 1) und zeigt den Störungscode an. Das Blinken der Pfeile (Pos. - Página 225 Reply 51 - 71 - 101 Störungscode Störung Mögliche Ursache Abhilfe Sensor beschädigt Störung des Sensors Kurzschluss in Verdrahtung Verdrahtung überprüfen oder Sensor ersetzen auf Rücklaufseite Verdrahtung unterbrochen Sensor beschädigt Störung des Brau- Kurzschluss in Verdrahtung Verdrahtung überprüfen oder Sensor ersetzen...
-
Página 226: Eigenschaften Und Technische Daten
Reply 51 - 71 - 101 4. Eigenschaften und technische Daten 4.1 Abmessungen und Anschlüsse abb. 41 - Abmessungen und Anschlüsse Modell Reply 51/i Heizungsvorlauf Modell Reply 71/i-101/i Heizungsrücklauf Gaseintritt cod. 3540H322 - 09/2008 (Rev. 01) -
Página 227: Gesamtansicht Und Hauptkomponenten
Reply 51 - 71 - 101 4.2 Gesamtansicht und Hauptkomponenten abb. 42 - Gesamtansicht Modell Reply 51/i 193 Siphon Modell Reply 71/i-101/i 196 Kondensatwanne Gaseintritt 252 3-Wege-Absperr- und -Ablasshahn Anlagenvorlauf 253 Absperrhahn Anlagenrücklauf 278 Doppelsensor (Sicherheit + Heizung) Gebläse Kaskadenregelgerät und Haltebügel (optional) -
Página 228: Wasserkreis
Reply 51 - 71 - 101 4.3 Wasserkreis abb. 43 - Wasserkreis Wasserkreis Modell Reply 51/i Wasserkreis Modell Reply 71/i-101/i Gaseintritt Anlagenvorlauf Anlagenrücklauf Gebläse Heizungsumwälzpumpe Gasventil 154 Kondensatablassrohr 161 Kondensatwärmetauscher 186 Rücklaufsensor 193 Siphon 252 3-Wege-Absperr- und -Ablasshahn 253 Absperrhahn 278 Doppelsensor (Sicherheit + Heizung) cod. -
Página 229: Tabelle Der Technischen Daten
Reply 51 - 71 - 101 4.4 Tabelle der technischen Daten In der rechten Spalte ist die auf dem Typenschild verwendete Abkürzung angegeben. Maßei Reply 51/i Reply 71/i Merkmal Reply 101/i nheit Max. Wärmebelastungsbereich Heizbetrieb 49.8 70.0 99.6 Min. Wärmebelastungsbereich Heizbetrieb 11.2... -
Página 230: Diagramme
Reply 51 - 71 - 101 4.5 Diagramme Druckverluste / Förderhöhe Umwälzpumpen H [m H Q [l/h] 1.000 1.500 2.000 2.500 abb. 44 Druckverluste Kessel 1 - 2 - 3 Drehzahl Umwälzpumpe cod. 3540H322 - 09/2008 (Rev. 01) -
Página 231: Elektroschaltplan
Reply 51 - 71 - 101 4.6 Elektroschaltplan DBM12KA DBM12KA FUSE 130/307 3.15A 11 12 230V 50Hz 13 14 15 16 17 18 19 20 21 22 23 24 25 26 27 28 29 30 DSP12A abb. 45 - Elektroschaltplan Achtung: Vor Anschluss des Raumthermostats oder des Raumreglers muss die Steckbrücke an der Klem-... - Página 232 BRUCIATORI CALDAIE MURALI E TERRA A GAS GRUPPI TERMICI IN GHISA E IN ACCIAIO GENERATORI DI ARIA CALDA TRATTAMENTO ACQUA CONDIZIONAMENTO Le illustrazioni e i dati riportati sono indicativi e non impegnano. La LAMBORGHINI si riserva il diritto di apportare senza obbligo di preavviso tutte le modifiche che ritiene più...