Tabla de contenido
Publicidad
Idiomas disponibles
Idiomas disponibles
Enlaces rápidos
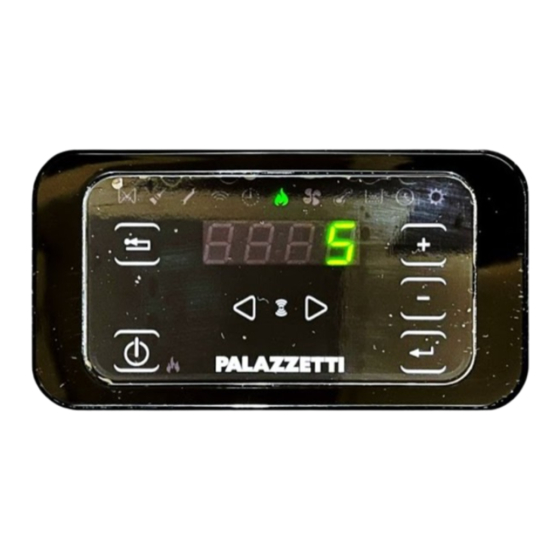
DISPLAY BLE
MANUALE DI UTILIZZO E FUNZIONALITÀ
Il presente manuale è parte integrante del prodotto.
Si raccomanda di leggere attentamente le istruzioni prima
dell'installazione, manutenzione o utilizzo del prodotto.
USE AND FUNCTION MANUAL
This manual is an integral part of the product.
Read the instructions carefully before installing, servicing or
operating the product.
VERWENDUNG UND BETRIEBSANLEITUNGEN
Die vorliegende Anleitung ist fester Bestandteil des Produkts.
Vor der Installation, Wartung und Verwendung die Anleitu-
gen stets aufmerksam durchlesen.
NOTICE D'UTILISATION ET FONCTIONNEMENT
Le présent manuel fait partie intégrante du produit.
Il est conseillé de lire attentivement les consignes avant l'in-
stallation, l'entretien ou l'utilisation du produit.
MANUAL DE USO Y FUNCIONES
Este manual es parte integrante del producto.
Se recomienda leer detenidamente las instrucciones antes
de la instalación, el mantenimiento y el uso del producto.
Publicidad
Tabla de contenido

Manuales relacionados para Palazzetti BLE

Resumen de contenidos para Palazzetti BLE
- Página 1 DISPLAY BLE MANUALE DI UTILIZZO E FUNZIONALITÀ Il presente manuale è parte integrante del prodotto. Si raccomanda di leggere attentamente le istruzioni prima dell’installazione, manutenzione o utilizzo del prodotto. USE AND FUNCTION MANUAL This manual is an integral part of the product.
- Página 4 INDICE IMPOSTAZIONI INIZIALI Scelta della configurazione Configurazione 2 - allacciamento ad un termostato ambiente PANNELLO COMANDI Descrizione 2.2 Uso del pannello comandi 2.3 Parametri di funzionamento OPERAZIONI PRELIMINARI Caricamento pellet 3.2 Alimentazione elettrica 3.3 Impostazioni iniziali UTILIZZO DELLA STUFA Accensione 4.2 Modifica dei parametri 4.3 Spegnimento 4.4 Funzionamento con termostato...
-
Página 5: Impostazioni Iniziali
ITALIANO ENGLISH DEUTSCH FRANÇAIS ESPAÑOL IMPOSTAZIONI INIZIALI In funzione della tipologia di installazione è necessario impostare la stufa secondo la configurazione più corretta per il suo funzionamento. Prima di procedere è necessario dare tensione alla stufa attraverso l’interruttore di sicurezza posto sul retro: a) Agendo sui tasti freccia portarsi sul menu setup e premere il tasto... - Página 6 Configurazione 2 - allacciamento ad un termostato ambiente* Per collegare correttamente il termostato che pilota la stufa fare riferimento al paragrafo “SCHEMA ELETTRICO” libretto prodotto in allegato. Per collegare correttamente i termostati che pilotano i ventilatori fare riferimento al paragrafo “SCHEMA ELETTRICO”...
-
Página 7: Pannello Comandi
ITALIANO ENGLISH DEUTSCH FRANÇAIS ESPAÑOL PANNELLO COMANDI Prima di procedere con la lettura del manuale, prendere visione della descrizione della stufa contenuta nel relativo manuale allegato. Descrizione Il pannello comandi è composto da: A) una parte superiore con i led di stato e le icone retroilluminate che identificano ciascuna funzione;... - Página 8 Visualizza la temperatura letta in ambiente e permette di Temperatura 6°C .. 51°C impostare la temperatura desiderata. Combustibile Funzione non utilizzata Timer Abilita o disabilita il Timer. Quando è abilitato verrà visualizzata ON - OFF l’icona fissa ICONA FUNZIONE SOTTOMENU DESCRIZIONE VALORI Assegnazione dei programmi (max 3) ai vari giorni...
-
Página 9: Uso Del Pannello Comandi
ITALIANO ENGLISH DEUTSCH FRANÇAIS ESPAÑOL 2.2 Uso del pannello comandi • Agendo sui tasti freccia ci si sposta tra i diversi menu che si illuminano di volta in volta. • Soffermandosi su una determinata funzione basta agire sul tasto e modificarne i valori, con i tasti •... -
Página 10: Operazioni Preliminari
OPERAZIONI PRELIMINARI CARICAMENTO PELLET La prima operazione da eseguire prima di accendere il prodotto è quella di riempire il serbatoio di combustibile (pellet) utilizzando preferibilmente una apposita paletta. Non svuotare il sacco direttamente nel serbatoio per evitare di caricare della segatura o altri elementi estranei che potrebbero compromettere il buon funzionamento della stufa e per evitare di disperdere il pellet al di fuori del serbatoio. -
Página 11: Impostazione Volume
ITALIANO ENGLISH DEUTSCH FRANÇAIS ESPAÑOL 3.3 Impostazioni iniziali Prima di utilizzare la stufa è necessario impostare la data e l’ora corrente. 3.3.1 Impostazione orario e data Per modificare la data: a) Portarsi con i tasti sul menu setup e premere il tasto b) Selezionare la password “7”... -
Página 12: Ottimizzazione Della Combustione
3.3.5 Ottimizzazione della combustione Una combustione ottimale dipende da diversi fattori (tipo di installazione, condizioni di funzionamento e di manutenzione, tipologia di pellet ecc..) In linea di massima, se a fine combustione, nel braciere restano molti residui, è consigliabile modificare le configurazioni di combustione (aumentandone il valore) fino a trovare la soluzione più... -
Página 13: Funzioni Disponibili
ITALIANO ENGLISH DEUTSCH FRANÇAIS ESPAÑOL Si raccomanda di spegnere la stufa seguendo scrupolosamente quanto sopra riportato ed evitare assolutamente di farlo togliendo l’alimentazione elettrica. 4.4 Funzionamento con termostato ambiente Quando la stufa viene comandata da un termostato (o cronotermostato) esterno,l’installatore deve aver impostato la configurazione 2. - Página 14 5.1.2 Assegnare i programmi ai giorni Con questa funzione è possibile assegnare fino a tre programmi diversi ad un determinato giorno. a) Agendo sui tasti freccia portarsi sul menu setup e premere il tasto b) Selezionare la password “7” con il tasto e confermare con il tasto c) Selezionare il sottomenu e confermare con il tasto...
-
Página 15: Funzione Antigelo
ITALIANO ENGLISH DEUTSCH FRANÇAIS ESPAÑOL 5.4 Riaccensione dopo il black-out In caso di interruzione di corrente elettrica, la stufa si riaccenderà automaticamente, verificando le condizioni di sicurezza, al ritorno dell’alimentazione. 5.5 Funzione “blocco tastiera” Con questa funzione è possibile bloccare l’utilizzo del pannello comandi per evitare modifiche accidentali. Per abilitare/disabilitare tale funzione: a) Agendo sui tasti freccia portarsi sul menu setup... - Página 16 CODICE DESCRIZIONE POSSIBILI CAUSE ERRORE/AVVISO E111 Malfunzionamento sonda fumi Sonda temperatura fumi difettosa A001 Livello pellet basso. (icona lampeggiante) Pellet in esaurimento Periodicamente la stufa richiede che venga Avviso di manutenzione programmata. (icone A002 effettuata una manutenzione da parte di un tecnico lampeggianti) specializzato La batteria tampone (mod.
- Página 19 ITALIANO ENGLISH DEUTSCH FRANÇAIS ESPAÑOL INDEX INITIAL SETTINGS Configuration selection Configuration 2 - connection to a room thermostat CONTROL PANEL Description 2.2 Use of the control panel 2.3 Operating parameters PRELIMINARY OPERATIONS LOADING PELLETS 3.2 ELECTRIC POWER SUPPLY 3.3 Initial settings USING THE STOVE Power on 4.2 Modifying the parameters...
-
Página 20: Initial Settings
INITIAL SETTINGS Depending on the type of installation, the stove must be set according to the most correct configuration for its operation. Before starting, the stove must be powered on by pressing the safety switch on the back: a) Use the arrow keys to go to the set-up menu and press the key;... - Página 21 ITALIANO ENGLISH DEUTSCH FRANÇAIS ESPAÑOL Configuration 2 - connection to a room thermostat* To correctly connect the thermostats that drive the stove, refer to the “WIRING DIAGRAM” paragraph of the annexed booklet. To correctly connect the thermostats that drive the fans, refer to the “WIRING DIAGRAM”...
-
Página 22: Control Panel
CONTROL PANEL Before reading the manual, look at the description of the stove in the relevant manual enclosed. Description The control panel consists of: A) an upper part with status LEDs and backlit icons that identify each function; B) LED display; C) power on button D) “Cancel"... - Página 23 ITALIANO ENGLISH DEUTSCH FRANÇAIS ESPAÑOL Displays the room temperature reading and allows you to set the Temperature 6°C .. 51°C desired temperature. Fuel Function not used Timer It enables or disables the Timer. When it is enabled the fixed icon ON - OFF will be displayed ICON...
-
Página 24: Use Of The Control Panel
2.2 Use of the control panel • Use the arrow keys to move between the different menus that light up from time to time. • Hover over a specific function and press the key to change the values with the keys. -
Página 25: Preliminary Operations
ITALIANO ENGLISH DEUTSCH FRANÇAIS ESPAÑOL PRELIMINARY OPERATIONS LOADING PELLETS The first operation to perform before switching the stove on is to fill the fuel (pellet) tank using the relevant scoop. Do not empty the bag directly into the tank to avoid introducing sawdust or other foreign elements that could prevent the stove from working properly and avoid scattering pellets outside the tank. -
Página 26: Setting Time And Date
3.3 Initial settings Before using the stove, it is necessary to set the current date and time. 3.3.1 Setting time and date To change the date: a) Use the keys on the set-up menu and press the b) Select the password "7" with the key and confirm with the key;... -
Página 27: Fuel Optimisation
ITALIANO ENGLISH DEUTSCH FRANÇAIS ESPAÑOL 3.3.5 Fuel optimisation Excellent fuel depends on different factors (type of installation, operating and maintenance conditions, type of pellets, etc.) Generally speaking, if at the end of combustion, there is a lot of residue in the burn pot, you should change the combustion configuration (by increasing the value) until you find the best solution. -
Página 28: Available Functions
It is advisable to turn off the stove strictly following the above and always avoid doing so by un- plugging it from the power supply. 4.4 Operation with external thermostat When the stove is controlled by an external thermostat (or chronothermostat), the installer must have input configuration 2. - Página 29 ITALIANO ENGLISH DEUTSCH FRANÇAIS ESPAÑOL 5.1.2 Assigning program to days With this function it is possible to assign up to three different programs to a specific day. a) Use the arrow keys to go to the set-up menu and press the key;...
-
Página 30: Alarm Management
5.4 Reignition after a power failure In the event of a power failure, the stove will automatically switch back on, verifying the safety conditions, when the power supply returns. 5.5 “Keyboard lock” function With this function, it is possible to lock use of the control panel to avoid accidental changes. To enable/disable this function: a) Use the arrow keys to go to the set-up menu... - Página 31 ITALIANO ENGLISH DEUTSCH FRANÇAIS ESPAÑOL CODE DESCRIPTION POSSIBLE CAUSES ERROR/WARNING E111 Fume probe malfunction Defective fume temperature probe A001 Low pellet level. (flashing icon) Pellets depleted Scheduled maintenance warning. (flashing Periodically, the stove requires maintenance by a A002 icon) specialist technician The back-up battery (mod.
-
Página 34: Tabla De Contenido
INHALTSVERZEICHNIS GRUNDEINSTELLUNGEN Auswahl der Konfiguration Konfiguration 2 - Anschluss an einen Raumthermostat BEDIENFELD Beschreibung 2.2 Bedienung der Bedientafel 2.3 Betriebsparameter VORBEREITENDE MASSNAHMEN LADEN DER PELLETS 3.2 ELEKTRISCHE VERSORGUNG 3.3 Grundeinstellungen VERWENDUNG DES OFENS Anfeuern 4.2 Änderung der Parameter 4.3 AUSSCHALTEN 4.4 Betrieb mit externem Thermostat 4.5 Betrieb mit Umgebungssonde am Ofen... -
Página 35: Grundeinstellungen
ITALIANO ENGLISH DEUTSCH FRANÇAIS ESPAÑOL GRUNDEINSTELLUNGEN Je nach Art der Installation muss der Heizofen auf die für seinen Betrieb am besten geeignete Konfiguration eingestellt werden. Bevor Sie fortfahren, muss der Ofen über den Sicherheitsschalter an der Rückseite unter Spannung gesetzt werden: a) mithilfe der Pfeiltasten zum Einstellungsmenü... -
Página 36: Konfiguration 2 - Anschluss An Einen Raumthermostat
Konfiguration 2 - Anschluss an einen Raumthermostat Um die Thermostate, welche der Ofen antreiben, korrekt anzuschließen, lesen Sie den Abschnitt "SCHALTPLAN" in der beiliegenden Produktbroschüre. Um die Thermostate, welche die Ventila- toren antreiben, korrekt anzuschließen, lesen Sie den Abschnitt "SCHALTPLAN" in der beiliegenden Produktbroschüre. -
Página 37: Bedienfeld
ITALIANO ENGLISH DEUTSCH FRANÇAIS ESPAÑOL BEDIENFELD Bevor Sie das Handbuch lesen, konsultieren Sie die Beschreibung des Ofens im beigefügten Handbuch. Beschreibung Das Bedienfeld besteht aus: A) einem oberen Teil mit Status-LEDs und beleuchteten Symbolen, die jede Funktion identifizieren; B) LED-Display; C) Einschalttaste D) Taste „Abbrechen“... - Página 38 Zeigt die im Raum gemessene Temperatur an und ermöglicht Temperatur 6°C .. 51°C das Einstellen der gewünschten Temperatur. Brennstoff Funktion nicht verwendet Zeitschaltuhr Aktivierung oder Deaktivierung der Zeitschaltuhr. Ist sie Aktiviert, ON - OFF wird das Symbol fix angezeigt SYMBOL FUNKTION UNTERMENÜ...
-
Página 39: Bedienung Der Bedientafel
ITALIANO ENGLISH DEUTSCH FRANÇAIS ESPAÑOL 2.2 Bedienung der Bedientafel • Mithilfe der Pfeiltasten kann man zwischen den verschienden Menüs wechseln, die von Zeit zu Zeit aufleuchten. • Wenn Sie bei einer bestimmten Funktion eine Pause machen, drücken Sie einfach die Taste und ändern Sie die Werte mit den Tasten •... -
Página 40: Vorbereitende Massnahmen
VORBEREITENDE MASSNAHMEN LADEN DER PELLETS Der erste Vorgang, der vor dem Einschalten des Produkts ausgeführt werden muss, besteht darin, den Brennstoffbehälter (Pellets) vorzugsweise mit einer speziellen Schaufel zu füllen. Den Inhalt des Sacks nicht direkt in den Behälter leeren, um zu vermeiden, dass Sägemehl oder andere Fremdkörper in den Behälter gelangen, welche die ordnungsgemäße Funktion des Ofens beeinträchtigen könnten, und um ein Verstreuen... -
Página 41: Grundeinstellungen
ITALIANO ENGLISH DEUTSCH FRANÇAIS ESPAÑOL 3.3 Grundeinstellungen Bevor der Ofen benutzt wird, müssen das aktuelle Datum und die Uhrzeit eingestellt werden. 3.3.1 Uhrzeit- und Datumseinstellung Um das Datum zu ändern: a) mithilfe der Tasten auf das Einstellungsmenü zugreifen und die Taste drücken b) das Passwort “7”... -
Página 42: Verwendung Des Ofens
3.3.5 Verbrennungsoptimierung Die optimale Verbrennung hängt von verschiedenen Faktoren ab (Art der Anlage, Betriebs- und Wartungsbedingungen, Art der Pellets, usw.) Wenn am Ende der Verbrennung viele Rückstände in der Brennschale verbleiben, ist es grundsätzlich ratsam, die Verbrennungskonfigurationen zu ändern (ihren Wert zu erhöhen), bis die zufriedenstellendste Lösung gefunden ist. -
Página 43: Ausschalten
ITALIANO ENGLISH DEUTSCH FRANÇAIS ESPAÑOL 4.3 AUSSCHALTEN Zum Ausschalten des Ofens die Taste einige Sekunden lang gedrückt halten. Das Flammensymbol erlischt. Zum Wiedereinschalten ist es ratsam zu warten, bis der Ofen vollständig abgekühlt ist. Es wird empfohlen, den Heizofen genau nach den obigen Anweisungen auszuschalten. Er sollte keinesfalls durch trennen der Stromversorgung abgeschaltet werden. -
Página 44: Sparfunktion „Öko-Modus
5.1.2 Programme den Tagen zuweisen Mit dieser Funktion ist es möglich, einem bestimmten Tag bis zu drei verschiedene Programme zuzuweisen. a) mithilfe der Pfeiltasten zum Einstellungsmenü gehen und die Taste drücken; b) das Passwort „7” mit der Taste wählen und mit der Taste bestätigen;... -
Página 45: Nach Stromausfall Wieder Einschalten
ITALIANO ENGLISH DEUTSCH FRANÇAIS ESPAÑOL 5.4 Nach Stromausfall wieder einschalten Bei einem Stromausfall schaltet sich der Heizofen automatisch wieder ein und überprüft die Sicherheitsbedingungen, wenn die Stromversorgung wiederhergestellt wird. 5.5 Funktion „Tastensperre“ Mit dieser Funktion ist es möglich, die Verwendung des Bedienfelds zu sperren, um versehentliche Änderungen zu vermeiden. - Página 46 CODE BESCHREIBUNG MÖGLICHE URSACHEN FEHLER / MELDUNG E111 Funktionsstörung Rauchfühler Temperaturfühler Rauch defekt A001 Niedriges Pelletniveau. (Symbol blinkt) Pellets gehen aus B e n a c h r i c h t i g u n g ü b e r p l a n m ä ß i g e In bestimmten Abständen muss der Heizofen von A002 Wartungsarbeiten.
-
Página 48: Déclaration De Conformité Ue
Interface utilisateur BLE Marque : PALAZZETTI Nom du modèle : F.ALPHA "EASY/BLE" FLAT/PAL L’objet de la déclaration décrit ci-dessus est conforme à la législation d’harmonisation de l’Union applicable : 2014/53/UE concernant la mise à disposition sur le marché d'équipements radio 1999/519/CE sur la limitation de l'exposition du grand public aux champs électromagnétiques... - Página 49 ITALIANO ENGLISH DEUTSCH FRANÇAIS ESPAÑOL INDEX RÉGLAGES INITIAUX Choix de la configuration Configuration 2 - connexion à un thermostat ambiant PANNEAU DES COMMANDES Description 2.2 Utilisation du panneau de commande 2.3 Paramètres de fonctionnement OPÉRATIONS PRÉALABLES CHARGEMENT DES GRANULÉS DE BOIS 3.2 ALIMENTATION ÉLECTRIQUE 3.3 Programmations initiales...
-
Página 50: Réglages Initiaux
RÉGLAGES INITIAUX En fonction du type d’installation, il est nécessaire de programmer le poêle selon la configuration la plus correcte pour son fonctionnement. Avant de procéder, il faut alimenter le poêle à travers l’interrupteur de sécurité placé au dos : a) En agissant sur les touches fléchées se positionner sur le menu setup puis frapper la touche b) Sélectionner le mot de passe « 7 »... - Página 51 ITALIANO ENGLISH DEUTSCH FRANÇAIS ESPAÑOL Configuration 2 - connexion à un thermostat ambiant* Pour brancher correctement les thermostats qui pilotent le poêle, se référer au paragraphe « SCHÉMA ÉLECTRIQUE » du manuel produit joint en annexe. Pour brancher correctement les thermostats qui pilotent les ventilateurs, se référer au pa- ragraphe « ...
-
Página 52: Panneau Des Commandes
PANNEAU DES COMMANDES Avant de procéder à la lecture du manuel, lire la description du poêle contenue dans le manuel joint en annexe. Description Le panneau de commande est composé de : A) une partie supérieure avec les LED d’état et les icônes rétroéclairées qui identifient chaque fonction ;... - Página 53 ITALIANO ENGLISH DEUTSCH FRANÇAIS ESPAÑOL Affiche la température lue dans la pièce et permet de définir la Température 6°C .. 51°C température souhaitée. Combustible Fonction non utilisée Minuterie Valide ou exclut la minuterie. Quand cette fonction est validée, l’icône (timer) ON - OFF s’affiche de façon fixe ICÔNE...
-
Página 54: Utilisation Du Panneau De Commande
2.2 Utilisation du panneau de commande • En agissant sur les touches fléchées on se déplace parmi les différents menus qui s’allument à chaque passage. • En s’attardant sur une fonction, il suffit d’agir sur la touche et d’en modifier les valeurs, avec les touches •... -
Página 55: Opérations Préalables
ITALIANO ENGLISH DEUTSCH FRANÇAIS ESPAÑOL OPÉRATIONS PRÉALABLES CHARGEMENT DES GRANULÉS DE BOIS La première opération à réaliser avant d’allumer le produit est celle de remplir le réservoir à combustible (granulés de bois) en utilisant de préférence une pelle spéciale. Ne pas vider le sac directement dans le réservoir pour éviter de charger la sciure ou d’autres éléments étrangers qui pourraient compromettre le bon fonctionnement du poêle et pour éviter de... -
Página 56: Programmations Initiales
3.3 Programmations initiales Avant d’utiliser le poêle, il est nécessaire de programmer la date et l’heure courant. 3.3.1 Programmation heure et date Pour modifier la date : a) À l’aide des touches sélectionner le menu setup et appuyer sur la touche b) Sélectionner le mot de passe « 7 »... -
Página 57: Optimisation De La Combustion
ITALIANO ENGLISH DEUTSCH FRANÇAIS ESPAÑOL 3.3.5 Optimisation de la combustion Une combustion optimale dépend de plusieurs facteurs (type d'installation, conditions de fonctionnement et de maintenance, type de granulés, etc.) En règle générale, si de nombreux résidus sont présents dans le brasier à la fin de la combustion, il est conseillable de modifier les configurations de combustion (en augmentant la valeur) jusqu’à... -
Página 58: Fonctions Disponibles
Il est recommandé d'éteindre le poêle en suivant scrupuleusement les éléments indiqués ci- dessus et d’éviter absolument de le faire en coupant l’alimentation électrique. 4.4 Fonctionnement avec thermostat d’ambiance Quand le poêle est commandée par un thermostat (ou chronothermostat) externe, l'installateur doit avoir sélectionné... -
Página 59: Activation/Désactivation De La Minuterie
ITALIANO ENGLISH DEUTSCH FRANÇAIS ESPAÑOL 5.1.2 Attribuer les programmes aux jours Cette fonction permet d’attribuer jusqu’à 3 programmes différents à un jour de la semaine. a) En agissant sur les touches fléchées se positionner sur le menu setup et frapper la touche b) Sélectionner le mot de passe « 7 »... -
Página 60: Fonction Antigel
Défaut du panneau des commandes E002 Erreur de communication signal télécommande Défaut du panneau des commandes Câble de connexion entre la carte et panneau de commande interrompu ou débranché. E004 Erreur de communication Si cette erreur apparaît pendant le changement de configuration, ignorer cette erreur Absence de granulés de bois... - Página 61 ITALIANO ENGLISH DEUTSCH FRANÇAIS ESPAÑOL CODE DESCRIPTION CAUSES POSSIBLES ERREUR/AVERTISSEMENT Sonde air défectueuse E106 Dysfonctionnement sonde de température Problèmes de surchauffe E111 Dysfonctionnement sonde fumées Sonde température fumées défectueuse A001 Niveau granulés bas. (Icône clignotante) Granulés de bois en épuisement Signalisation de maintenance programmée.
- Página 64 ÍNDICE CONFIGURACIONES INICIALES Selección de la configuración Configuración 2 - conexión a termostato ambiente PANEL DE MANDOS Descripción 2.2 Uso del panel de mandos 2.3 Parámetros de funcionamiento OPERACIONES PRELIMINARES CARGA DE PELLET 3.2 ALIMENTACIÓN ELÉCTRICA 3.3 Configuraciones iniciales USO DE LA ESTUFA Encendido 4.2 Modificación de los parámetros 4.3 APAGADO...
-
Página 65: Configuraciones Iniciales
ITALIANO ENGLISH DEUTSCH FRANÇAIS ESPAÑOL CONFIGURACIONES INICIALES En función del tipo de instalación es necesario configurar la estufa según la configuración más correcta para su funcionamiento. Antes de proceder es necesario proporcionar tensión a la estufa a través del interruptor de seguridad colocado en la parte trasera: a) Actuando en las teclas de flecha ir al menú... - Página 66 Configuración 2 - conexión a termostato ambiente* Para conectar correctamente los termos- tatos que pilotean la estufa consulte el párrafo “ESQUEMA ELÉCTRICO” libreto del producto en adjunto. Para conectar correctamente los termos- tatos que pilotean los ventiladores con- sulte el párrafo “ESQUEMA ELÉCTRICO” del libreto del producto en adjunto.
-
Página 67: Panel De Mandos
ITALIANO ENGLISH DEUTSCH FRANÇAIS ESPAÑOL PANEL DE MANDOS Antes de proceder con la lectura del manual, ver la descripción de la estufa contenida en el relativo manual anexo. Descripción El panel de mandos está compuesto por: A) una parte superior con los ledes de estado y los iconos retroiluminados que identifican cada función;... - Página 68 Visualiza la temperatura leída en el ambiente y permite Temperatura 6°C .. 51°C configurar la temperatura deseada. Combustible Función no utilizada Timer Habilita o deshabilita el Timer. Cuando está habilitado se ON - OFF mostrará el icono fijo ICONO FUNCIÓN SUBMENÚ...
-
Página 69: Uso Del Panel De Mandos
ITALIANO ENGLISH DEUTSCH FRANÇAIS ESPAÑOL 2.2 Uso del panel de mandos • Utilizando las teclas de flecha se mueve entre los diferentes menús que se iluminan en cada caso. • Concentrándose en una función determinada basta utilizar la tecla y modificar los valores, con las teclas •... -
Página 70: Operaciones Preliminares
OPERACIONES PRELIMINARES CARGA DE PELLET La primera operación para realizar antes de encender el producto es la de llenar el depósito de combustible (pellet) utilizando preferiblemente una paleta adecuada. No vaciar el saco directamente en el depósito para evitar cargar serrín u otros elementos extraños que podrían comprometer el buen funcionamiento de la estufa y para evitar dispersar el pellet fuera del depósito. -
Página 71: Configuración Horario Y Fecha
ITALIANO ENGLISH DEUTSCH FRANÇAIS ESPAÑOL 3.3 Configuraciones iniciales Antes de utilizar la estufa es necesario configurar la fecha y la hora actual. 3.3.1 Configuración horario y fecha Para modificar la fecha: a) Dirigirse con las teclas al menú setup y presionar la tecla b) Seleccionar la contraseña “7”... -
Página 72: Optimización De La Combustión
3.3.5 Optimización de la combustión Una combustión ideal depende de diferentes factores (tipo de instalación, condiciones de funcionamiento y mantenimiento, tipo de pellet, etc.) En términos generales, si al final de la combustión, en el brasero quedan muchos residuos, se recomienda modificar las configuraciones de combustión (aumentando el valor) hasta encontrar la solución más satisfactoria. -
Página 73: Funcionamiento Con Termostato Ambiente
ITALIANO ENGLISH DEUTSCH FRANÇAIS ESPAÑOL 4.3 APAGADO Para apagar la estufa mantener presionada la tecla por algunos segundos; el icono con forma de llama se apagará. Para realizar un nuevo encendido se aconseja esperar a que la estufa esté completamente fría. -
Página 74: Asignar Los Programas A Los Días
5.1.2 Asignar los programas a los días Con esta función es posible asignar hasta tres programas diferentes a un determinado día. a) Actuando en las teclas de flecha ir al menú setup y presionar la tecla b) Seleccionar la contraseña “7” con la tecla y confirmar con la tecla;... -
Página 75: Función Antihielo
ITALIANO ENGLISH DEUTSCH FRANÇAIS ESPAÑOL 5.4 Reencendido después de la interrupción de la corriente En caso de interrupción de la corriente eléctrica, la estufa se encenderá de nuevo automáticamente, comprobando las condiciones de seguridad, cuando se retome la alimentación. 5.5 Función “bloqueo teclado” Con esta función es posible bloquear el uso del panel de mandos para evitar modificaciones accidentales. - Página 76 CÓDIGO DESCRIPCIÓN POSIBLES CAUSAS ERROR/AVISO E111 Mal funcionamiento de la sonda de humos Sonda de temperatura de los humos defectuosa A001 Nivel pellet bajo. (icono parpadeante) Pellet en agotamiento Aviso de mantenimiento programado. (icono Periódicamente la estufa requiere que se realice un A002 parpadeante) mantenimiento por parte de un técnico especializado...