
Manuales relacionados para Sanus SLF5


Resumen de contenidos para Sanus SLF5
- Página 1 SLF 5 INSTRUCTION MANUAL We’ll Make It Stress-Free If you have any questions along the way, just give us a call. 1-888-333-1376 (UK: 0800-056-2853). We’re ready to help! Scan for easy install video http://san.us/306...
- Página 2 Does your TV weigh more than 56.7 kg (125 lb) including accessories? No — Perfect! (56.7 kg) 125 lb Yes — This mount is NOT compatible. Visit Simplicity.Sanus.com or call 1-888-333-1376 (UK: 0800-056-2853) to fi nd a compatible mount. What is your wall made of? Drywall with Solid concrete or...
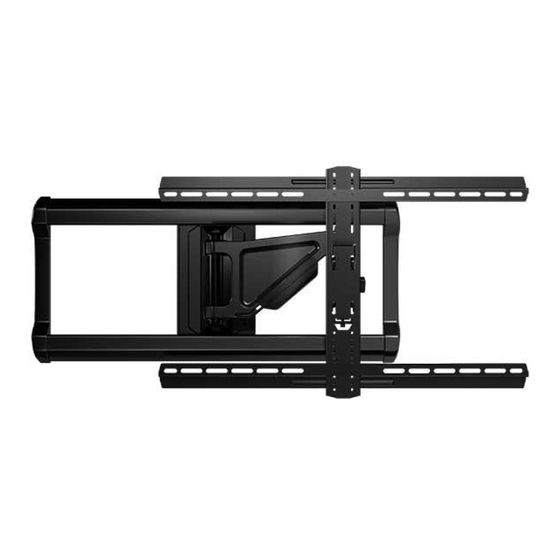
- Página 3 Features Adjustment knobs allow fi ngertip control or to restrict movement Fully articulating arm creates 2-point movement for optimal viewing position Level adjustment creates a worry-free installation 200 x 200mm 700 x 425mm TV tilts up TV bracket expands or down for to fi...
- Página 4 Dimensions [mm] 29.46 1.70 748.4 43.1 12.45 316.2 28.74 730.0 27.56 700.0 15.00° 6.53 165.8 4.00° 200mm 13.46 [342.0] 425mm 9.06 230.0 0.34...
- Página 5 [mm] 24.00 609.6 16.00 2.00 406.4 50.8 10.01 R0.17 254.2 11.59 18.11 294.4 460.0...
- Página 6 Supplied Parts and Hardware WARNING: This product contains small items that could be a choking hazard if swallowed. Before starting assembly, verify all parts are included and undamaged. If any parts are missing or damaged, do not return the damaged item to your dealer;...
- Página 7 STEP 2 Parts and Hardware STEP 3-2 Hardware Lag Bolts Wall Plate Template Safety Screw 5/16 in. x 2 3/4 in. Concrete Anchors 1/4-20 x 3/4 in. STEP 3-3 Hardware Washers Cable Ties Cable Tie Wall Plate 5/16 in. STEP 3-4 Parts and Hardware STEP 3-1 Parts and Hardware Hex Keys Wall Plate Screws...
- Página 8 STEP 1 Attach Brackets to TV 1-1 Select TV Screw Diameter 1-2 Select TV Screw Length If your TV has a flat back, use the shorter screws. Hand thread screws into the threaded inserts Spacers and longer screws are supplied to accommodate: on the back of your TV to determine which ●...
- Página 9 1-3 Assemble TV Brackets Slide horizontal TV brackets onto the vertical TV support as shown. NOTE: Position the slotted holes toward the outside for TV hole patterns larger than 250mm and toward the inside for hole patterns 250mm or less. Screw posts Tilt the brackets...
- Página 10 1-4 Secure TV Bracket Assembly Center the horizontal TV brackets and vertical TV support over the hole pattern on your TV. NOTE: If the vertical TV support is not centered, you may need to reposition the horizontal TV supports (see previous step 1-3). Secure the assembly with the four interface nuts using hex key...
- Página 11 1-5 Attach Bracket Assembly to TV Attach the TV bracket assembly using either the short screw and washer or spacer, long screw and washer combination you selected for your TV. Short screw and washer 03 04 05 06 11 12 Spacer, long screw and washer 08 09 11 12...
- Página 12 ™ ● Minimum wood stud size: common 51 x 102 mm (2 x 4 in.) nominal 38 x 89 mm (1 1/2 x 3 1/2 in.) Simplicity.Sanus.com ● Minimum horizontal space between fasteners: 406 mm (16 in.) Locate studs. Verify the center of the stud(s) using an awl, a thin nail, or an edge to edge stud finder.
- Página 13 Drill pilot holes then remove the wall plate template IMPORTANT: Be sure to drill into the center of the stud. IMPORTANT: Pilot holes must be drilled to a depth of 75 mm (3 in.), using a 5.5 mm (7/32 in.) diameter drill bit. Install the wall plate using four lag bolts and washers...
- Página 14 MountWizard ™ Minimum concrete block size: 203 x 203 x 406 mm (8 x 8 x 16 in.) ● Simplicity.Sanus.com Minimum horizontal space between fasteners: 610 mm (24 in.) Level the wall plate template and mark the hole locations.
- Página 15 Remove the wall plate template and insert concrete anchors CAUTION: Be sure the anchors are seated flush with the concrete surface. Install the wall plate using four lag bolts and washers . Tighten all lag bolts only until they are pulled firmly against the wall plate. CAUTION: Improper use could reduce the holding power of the lag bolt.
- Página 16 STEP 3 Attach TV to Wall Plate 3-1 Attach Arm Assembly to Wall Plate Position the arm assembly on the wall plate by tilting the top into the wall plate channel, then rotating the bottom toward the wall. NOTE: TV shifts 254 mm (10 in.) to the right or left when in the home position. Consider this when selecting the location of your wall mount. Secure using four wall plate screws with hex key Wall Plate Channel...
- Página 17 3-2 Attach TV to Arm Assembly HEAVY! You may need assistance with this step. Hang the TV onto the arm assembly by first hooking the top support, then resting the TV into place. Lock the TV to the arm assembly with safety screw using hex key CAUTION:...
- Página 18 3-3 Manage Cables Remove the cable cover. Use the supplied cable ties to secure your cables in the positions shown. Cable Cover Reattach the cable cover over the cables. Cable Cover Cable Cover...
- Página 19 3-4 Install Cover Plates Store hex keys in the slots provided, for future use. NOTE: Before installing the cover plates, use the hex keys to make any necessary adjustments as shown on pages 20 and 21. Bow the middle of each cover plate to slip the ends into the channels of the wall plate...
- Página 20 TV Adjustments ROTATE ADJUSTMENT TILT ADJUSTMENT Your TV should adjust easily when moved, then stay in place. Your TV should adjust easily when moved, then stay in place. If your TV is too loose or too tight, adjust either the top tension knob If your TV is too loose or too tight, adjust the side tension knob by hand or use hex key by hand or hex key...
- Página 21 LEVEL ADJUSTMENT TV LATERAL SHIFT REMOVING THE TV To remove your TV from the arm Remove the TV from the arm assembly Adjust the leveling of your TV assembly , disconnect all by turning the level screw using Remove the cover plates and the four screws cables and then reverse the hex key...
-
Página 22: Listo Para Comenzar
¿Su televisor pesa más de 56,7 kg (125 libras) incluyendo los accesorios? No — ¡Perfecto! (56,7 kg) Sí — Este soporte NO es compatible. Visite Simplicity.Sanus.com o llame al 1-888-333-1376 (Reino Unido: 0800-056-2853) para 125 libras encontrar un soporte compatible. -
Página 23: Descripción
ESPAÑOL Descripción VER PÁGINA 3 La placa de sujeción se expande para adecuarse a televisores con patrones de orificios de 200 x 200 mm hasta 700 x 425 mm. El televisor se inclina hacia arriba / abajo para obtener el ángulo de visualización perfecto. El ajuste del nivel crea una instalación sencilla. -
Página 24: Paso 1 Colocar Las Placas De Sujeción En El Televisor
ESPAÑOL PASO 1 Colocar las placas de sujeción en el televisor VER PÁGINAS 8-11 1-1 Seleccione el diámetro de los tornillos para el televisor VER PÁGINA 8 Enrosque manualmente los tornillos en los encastres roscados del dorso del televisor a fin de determinar qué diámetro de tornillos (M4, M6 o M8) utilizar. -
Página 25: Paso 2 Fijar La Placa Mural
NOTA: Para ayudar a determinar la posición de la placa mural, pruebe nuestro MountWizard ™ en Simplicity.Sanus.com Localice los montantes. Verifique el centro de los montantes con un punzón o un clavo delgado, o bien utilice un detector de bordes de montantes. -
Página 26: Fijar El Módulo Del Brazo A La Placa Mural
Opción para hormigón sólido o bloques de cemento (continuación) NOTA: Para ayudar a determinar la posición de la placa mural, pruebe nuestro MountWizard ™ en Simplicity.Sanus.com Nivele la placa mural y marque la ubicación de los orificios. NOTA: El televisor se desplaza 254 mm (10”) a la derecha o la izquierda cuando se encuentra en la posición inicial. Considere esto a la hora de seleccionar la ubicación de su soporte mural. -
Página 27: Ajustes Del Televisor
ESPAÑOL 3-3 Organizar los cables VER PÁGINA 18 Retire la cubierta de los cables. 2. Utilice los cinchos sujetacables provistos para fijar los cables en las posiciones que se muestran. NOTA: Antes de instalar las tapas, use las llaves hexagonales para realizar cualquier ajuste necesario, como se muestra en las páginas 20 y 21. Vuelva a colocar la cubierta de los cables por sobre los cables. - Página 28 ©2013 Milestone AV Technologies, a Duchossois Group Company. All rights reserved. Sanus is a division of Milestone. All other brand names or marks are used for identifi cation purposes and are trademarks of their respective owners.