
Manuales relacionados para Sanus BXT3


Resumen de contenidos para Sanus BXT3
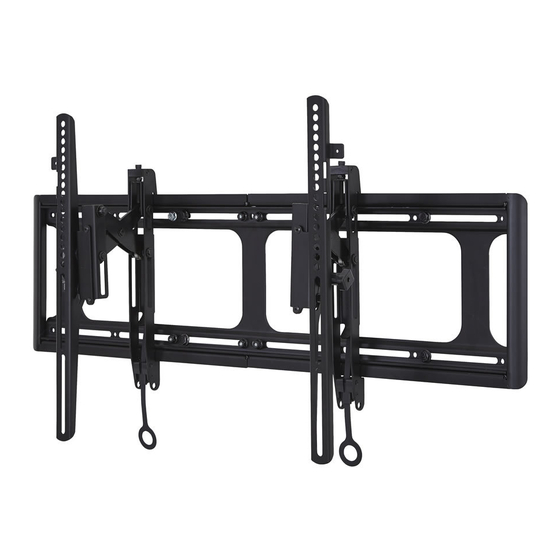
- Página 1 THANK YOU FOR CHOOSING SANUS THE #1 TV MOUNT BRAND IN THE US. BXT 3 Instruction Manual...
- Página 2 Our US-based install experts shows how easy this DIY HeightFinder™ shows you are standing by to help. project will be? where to drill. Call us at: 800-359-5520 Watch it now at: Check it out at: SANUS.com/2689 SANUS.com/1172 Or, chat at: SANUS.com/chatSP...
- Página 3 MORE, this mount is Solid Concrete or (79.3 kg) Concrete Block Walls NOT compatible. TV Weight Limit Visit SANUS.com or call (including accessories) For Steel Stud Walls customer service to find a 110 lbs. DO NOT EXCEED (49.8 kg)
-
Página 4: Tools Needed
Wall Solid concrete CAUTION: wood studs steel studs or concrete Construction block DO NOT install in ONLY install on drywall alone these acceptable wall types. Drywall ACCEPTABLE alone will hold Unsure Steel stud kit #SSMK1 is the weight required [NOT INCLUDED]. ACCEPTABLE ACCEPTABLE of your TV. - Página 5 Supplied Parts and Hardware WARNING: This product contains small items that could be a choking hazard if swallowed. Before starting assembly, verify all parts are included and undamaged. If any parts are missing or damaged, do not return the damaged item to your dealer;...
- Página 6 Parts for STEP 1 Parts and Hardware for STEP 2 [CONTINUED] Adjustments Wall Plate (qty. 1) Hex Key 3/16 in. Lag Bolts (qty. 1) Left TV Bracket 5⁄16 in. x 2 ¾ in. Right TV Bracket (qty. 1) (qty. 8) (qty.
- Página 7 STEP 1 Attach Brackets to TV 1.1 Select TV Screw Diameter 1.2 Select TV Screw Length and Spacers Only one screw size fits your TV. NO SPACER SPACER NEEDED • Flat Back TV • Flat Back TV • Rounded or with Irregular Back TV Extra Space Needed...
- Página 8 1. 3 Attach TV Brackets to Your TV NO SPACER SPACER NEEDED Center TV brackets over your TV's hole pattern and attach using screw combination If your TV included you selected for your TV. inset spacers or wall mount adapters, see NOTE: The tilt tension knob TV brackets...
- Página 9 STEP 2 Attach Wall Plate to Wall For TV VESA width greater than 700 mm, extend the wall plate to accommodate the TV brackets. WARNING: Avoid potential personal injuries! > 700 mm (27 1/2 in.) These areas could be pinch points when sliding back together. NOTE: If needed, loosen the nuts...
-
Página 10: Wood Stud Installation
STEP 2A Wood Stud Installation CAUTION: Avoid potential personal injury or property damage! ● Drywall covering the wall must not exceed 5/8 in. (16 mm) ● Minimum wood stud size: nominal 2 x 4 in. (51 x 102 mm) actual 1 ½ x 3 ½ in. (38 x 89 mm) ●... - Página 11 2 ¾ in. (70 mm) For Extended Wall Plate 7/32 in. (5.5 mm) For Extended Wall Plate Drill the four pilot holes using a 7/32 in. (5.5 mm) diameter drill bit. Install wall plate using four (or six) lag bolts .
- Página 12 STEP 2B Solid Concrete or Concrete Block Installation CAUTION: Avoid potential personal injury or property damage! ● Mount wall plate directly onto concrete surface (no wall covering) ● Minimum solid concrete thickness: 8 in. (203 mm) ● Minimum concrete block size: 8 x 8 x 16 in. (203 x 203 x 406 mm) ●...
- Página 13 Insert six anchors Install wall plate using six lag bolts . Firmly tighten all lag bolts ONLY until the wall plate is securely fastened to the wall. CAUTION: Be sure the anchors are seated flush with the concrete surface. CAUTION: Avoid potential personal injury or property damage! All lag bolts MUST BE firmly tightened to prevent unwanted...
- Página 14 STEP 2C Steel Stud Installation CAUTION: Avoid potential personal injury Steel Stud Installation Kit #SSMK1 is NOT INCLUDED or property damage! ● Studs must be at least 2x4 / 25 ga. ● If back side of wall is unfinished, drywall must be installed to a minimum of one stud left and right of the stud(s) being used to install the mount ●...
- Página 15 Max. 5/8 in. (16 mm) Min. 16 in. (406 mm) CAUTION: FOR EXTENDED WALL PLATES: You MUST install 2 lag bolts into the center (top and bottom) of wall plate , then a minimum of 16 in. (406 mm) out from center, for a minimum of 6 lag bolts total.
- Página 16 1 in. (25 mm) For Extended Wall Plate 1/2 in. (13 mm) Drill the pilot holes using a 1/2 in. (13 mm) diameter drill bit. IMPORTANT : Pilot holes must be drilled to a depth of 1 in. (25 mm). Be sure you drill into the center of the stud.
- Página 17 For Extended Wall Plate Install wall plate using four (or six) screws and washers CAUTION: Be sure cap is seated against the drywall surface. Firmly tighten all screws ONLY until the wall plate is securely fastened to the wall. CAUTION: Avoid potential personal injury or property damage! All lag bolts MUST BE firmly tightened to prevent unwanted...
- Página 18 STEP 3 Attach TV to Wall Plate HEAVY! You may need assistance with this step. Hook the TV/brackets onto the wall plate Press the bottom of the TV into the wall plate until you hear the lock click, securing the TV in place. CAUTION: Avoid potential personal injury or property damage! CAUTION:...
- Página 19 Adjustments Manage Cables LEVEL HEIGHT Move your TV to various To level your TV, turn the level adjustment Adjust the height by turning the positions, as needed to screw on the top of either TV bracket level adjustment screw on the attach your cables, then to raise or lower that respective top of BOTH TV brackets...
- Página 20 TILT EXTEND / RETRACT CAUTION: Avoid potential personal injury! Your TV should adjust easily when moved, then stay in place. The TV brackets contain potential pinch points during operation. Adjust the tilt tension knob Keep fingers away from pinch points your TV naturally tilts up or down.
- Página 21 TV LATERAL SHIFT REMOVING THE TV HEAVY ! You may need assistance with this step. HEAVY ! You may need assistance with this step. CAUTION: Avoid potential personal injury or property damage! Slowly slide the TV along the wall plate to reposition. The wall plate has built-in stops to limit lateral movement.
- Página 22 Troubleshooting If you are uncertain about your hardware selection, contact Customer Service at 800-359-5520. TV supplied spacers TV Supplied Spacers : Use your TV supplied spacer and spacer for: : Use your TV supplied spacer for: • Flat Back TV •...
- Página 23 Dimensions in. [mm] TV INTERFACE 43.31 1100.0 7.87 200.0 0.34 16.93 430.0 WALL PLATE FEATURES SIDE VIEW - TILT 0.33 6.98 177.4 TILT DOWN: 12 TILT UP: 7 18.11 24.00 460.0 609.6 16.00 406.4 ADJUSTABLE LOCK RELEASE 17.72 450.0 23.62 600.0 WALL PLATE OPENING FEATURES...
-
Página 24: Peso Máximo
MÁS, (175 lbs.) esta soporte NO es Peso máximo compatible. Visite Simplicity. SANUS.com o llame al (incluidos los accesorios) número 800-359-5520 para Pour murs à montants en acier NO EXCEDAS 49,8 kg encontrar una montura (110 lbs.) -
Página 25: Piezas Y Accesorios Suministrados
ESPAÑOL La construcción PRECAUCIÓN: Montantes de Hormigón macizo o Montantes de acero de su pared bloque de hormigón madera NO lo instale en tabiques SOLAMENTE instalar en estos únicamente tipos aceptables de la pared. de yeso ACEPTABLE Instalación en ¿No está seguro? panels de yeso solo Se requiere el kit para montantes NO soportará... - Página 26 ESPAÑOL PASO 1 Fijar el soporte al televisor VER PÁGINA 7 1,1 Seleccione el diámetro de los tornillos VER PÁGINA 7 Solo un tamaño de tornillo es compatible con su TV. 1,2 Seleccione el largo de los tornillos VER PÁGINA 7 SIN ESPACIADOR CON ESPACIADOR •...
- Página 27 ESPAÑOL PASO 2 Fijar la placa mural VER PÁGINA 9 Para televisores VESA con una anchura superior a 700 mm, extienda la placa de pared para acomodar los soportes para televisor. PRECAUCIÓN: Evite posibles lesiones personales y daños materiales. Para placas de pared extendidas: DEBES instalar 2 tornillos tirafondo el centro (arriba y abajo) de la placa de pared , a continuación, un mínimo de 406 mm (16") fuera del centro, para un mínimo de 6 tornillos tirafondo total.
- Página 28 ESPAÑOL Instalación en hormigón macizo o bloque de hormigón PASO 2B Fijar la placa de pared VER PÁGINA 12 PRECAUCIÓN: Evite lesiones personales y daños materiales. la placa mural ● Instale montaje directamente sobre la superficie de hormigón ● Grosor mínimo del hormigón macizo: 203 mm (8 pulg.) ●...
- Página 29 ESPAÑOL PASO 2C Fijar la placa de pared Colocación sobre montantes de acero VER PÁGINA 14 Kit de anclaje para paredes con montantes de acero (no incluido) Póngase en contacto con el Servicio de Atención al Cliente en el 800-359-5520 NOTA: Se requieren dos (2) kits si necesita extender la placa de pared para que se ajuste a su televisor (consulte la PÁGINA 9).
-
Página 30: Organizar Los Cables
ESPAÑOL PASO 3 Fije el televisor a la montaje del brazo VER PÁGINA 18 ¡PRODUCTO PESADO! Podría necesitar ayuda para realizar esta operación. Cuelgue el módulo televisor-placas en la placa mural PRECAUCIÓN: Evite posibles lesiones personales y daños materiales. Para placas de pared extendidas: Los soportes para televisor solo deben colgar de la placa de pared de las secciones exteriores Presione la parte inferior del televisor contra la placa mural hasta que las placas de sujeción fijen el televisor en su lugar. -
Página 31: Solución De Problemas
ESPAÑOL VER PÁGINA 20 INCLINACIÓN El televisor debe acomodarse fácilmente al moverlo y, posteriormente, quedar en su lugar. Si el televisor se inclina hacia arriba o hacia abajo de forma natural, T ajuste las perillas de tensión de inclinación a mano. NOTA: Si no pretende ajustar la inclinación a diferentes ubicaciones de visión, puede ajustar las perillas de tensión de inclinación T para evitar movimientos no deseados. - Página 32 If you ever have questions about your SANUS product, give us a call at 1-800-359-5520. We're ready to help! If you ever have questions about your SANUS product, give us a call at 1-800-359-5520. We're ready to help! ‘Monthly prize’...