Tabla de contenido
Publicidad
Enlaces rápidos
Publicidad
Tabla de contenido

Manuales relacionados para Stanley TIMERMAX WEEKLY TM-266


Resumen de contenidos para Stanley TIMERMAX WEEKLY TM-266
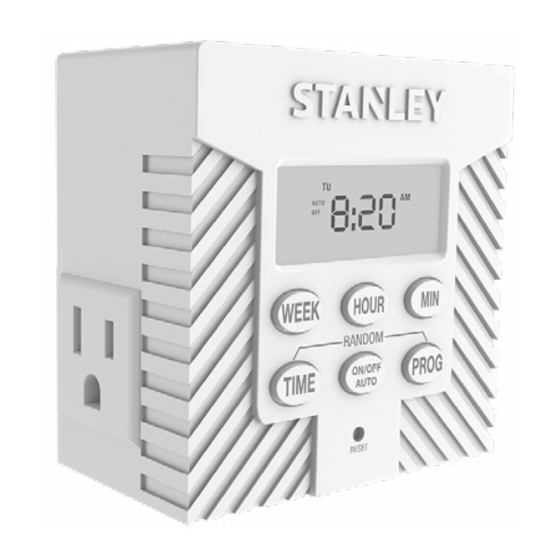
- Página 1 TIMERMAX WEEKLY ™ QUICK START GUIDE GUÍA DE INICIO RÁPIDO GUIDE DE DÉMARRAGE RAPIDE Customer Service / Servicio al Cliente / Service à la Clientèle 1-800-730-3707 • 10AM - 6PM, EST Monday to Friday / Lunes a Viernes / Lundi au Vendredi Model/Modelo/Modele# TM-266...
-
Página 2: Para Establecer La Hora Actual
OPERATING INSTRUCTIONS MODO DE OPERACIÓN MODE D’OPÉRATION To set to the WEEK HOUR current time: RANDOM 1. Press and hold the “TIME” ON / OFF button, then press the TIME PROG AUTO “WEEK” button to set the current day. 2. Press and hold the “TIME” button, then press the RESET “HOUR”... -
Página 3: Program Setting
Program Setting WEEK HOUR 1. Press the “PROG” button to RANDOM enter the program setting; you will see all the days ON / OFF TIME PROG AUTO of the week on the top and “1 ON” to the left of the display. -
Página 4: Réglage Du Programme
5. Pulse el botón “PROG” una vez y repita los pasos 2 a 4 para establecer el programa “1 OFF”. 6. Después de establecer programa “1 OFF” pulse el botón “TIME” una vez para volver a la hora actual. Puede configurar hasta 8 diferentes tiempos de encendido y apagado en el temporizador. -
Página 5: Manual Override
Manual Override Pressing the “ON/OFF AUTO” button when the current time is being displayed will allow you to set the status of the timer: • If “ON” is to the left side of the display, the timer will be active until the “ON/OFF AUTO” button is pressed. •... -
Página 6: Configurar Seguridad De Vacaciones
• Si “OFF” apparait à la gauche de l’afficheur la minuterie sera inactive jusqu’à ce que “ON/OFF AUTO” soit poussé. • Si “AUTO” apparait à la gauche de l’afficheur, la minuterie opérera selon les ajustements du programme jusqu’à ce que “ON/OFF AUTO” soit poussé. Set Vacation Security Pressing the “TIME”... - Página 7 NOTES • The unit you are plugging into the timer has to be on. • Make sure AM and PM are correct on the current time and in the program settings. NOTAS • La unidad que usted enchufa en el temporizador tiene que estar encendida.
- Página 8 SPECIFICATIONS 2 grounded outlets Rated: 120VAC/60Hz/15A/1800W Resistive 5A/600W Tungsten 500W Electronic Ballast Battery: 1.5v LR1130 ESPECIFICACIONES 2 enchufes a tierra Clasificado: 120VAC/60Hz/15A/1800W Resistiva 5A/600W Tungsteno 500W Balasto Eléctronico Batería: 1.5v LR 1130 CARACTÉRISTIQUES 2 prises misé à la terre Calibré à: 120VAC/60Hz/15A/1800W Resistif 5A/600W Tungstène 500W Ballast Électronique...
-
Página 9: Battery Replacement
Battery Replacement • To remove drained battery, use straight head screw driver and pry out the battery holder from timer housing. Remove battery from battery holder. • Insert fresh LR1130 battery into battery holder. Make sure to correctly position the + positive side of the battery into the holder, by matching up the + plus sign on the battery to the + plus sign in a small circle on the battery holder. -
Página 10: Reemplazo De Batería
Reemplazo de Batería • Para retirar la batería drenada, utilice un destornillador cabeza recta y levante el soporte de la batería de la caja del temporizador. Extraiga la batería del compartimiento de la batería. • Inserte la nueva batería de reemplazo LR1130 en el soporte de la batería. - Página 11 WARNING USE INDOORS ONLY. DO NOT USE IN WET, OILY OR HIGH TEMPERATURE CONDITIONS. NOT INTENDED FOR USE WITH AQUARIUMS, REFRIGERATORS, OR DEHUMIDIFI- ERS. FULLY INSERT ONLY INTO A GROUNDED 120VOLT THREE-PRONG RECEPTACLE. DO NOT SPLICE, REPAIR, OR MODIFY PRODUCT. DO NOT USE IF DAMAGED (INSPECT UNIT PERIODICALLY).
- Página 12 AVERTISSEMENT POUR UNE UTILISATION À L’INTÉRIEUR SEULEMENT. NE PAS UTILISER DANS DES CONDITIONS D’HUMIDITÉ, D’HILE OU DE HAUTESTEMPÉRATURES. CET ARTICLE NE PEUT PAS ÊTRE UTILISÉ POUR LES AQUARIUMS, LES RÉFRIGÉRATEURS OU LES DÉSHUMIDIFICATEURS. ASSUREZ-VOUS DE BIEN BRANCHER LE CORDON D’ALIMENTATION DANS UNE PRISE DE 120V. NE PAS ALTÉRER OU MODIFIER CET ARTICLE.
- Página 13 THREE YEAR LIMITED WARRANTY: IF WITHIN THE FIRST YEAR FROM DATE OF PURCHASE, THIS UNIT FAILS DUE TO A DEFECT, EXCHANGE WHERE PURCHASED, OR SHIP IT PREPAID WITH PROOF OF PURCHASE TO THE NCC, 1840 MCDONALD AVENUE BROOKLYN, NY 11223. UNITS THAT FAIL TO OPERATE DURING THE SECOND OR THIRD YEAR FROM DATE OF PURCHASE MUST BE SHIPPED PREPAID WITH PROOF OF PURCHASE TO THE NCC.
- Página 14 Item/Artículo/Article# 31259/W31259 STANLEY® and the STANLEY® logo are registered trademarks of Stanley Black & Decker, Inc., or one of its affiliates, and are used under license. STANLEY® y el STANLEY® logo son marcas registradas de Stanley Black & Decker, Inc., o uno de sus afiliados, y se usan con licencia.