
Resumen de contenidos para WLabs ZERA
- Página 1 Use and Care Guide and Installation Instructions Manual de uso y cuidado e instrucciones de instalación W10870868B...
-
Página 2: Tabla De Contenido
Table of Contents / Índice FOOD RECYCLER SAFETY ............2 SEGURIDAD DEL RECICLADOR DE ALIMENTOS ....26 CONNECTED APPLIANCE REGULATORY NOTICES ....4 AVISOS NORMATIVOS PARA ELECTRODOMÉSTICOS CONECTADOS ................28 FOOD RECYCLER FEATURES ............5 CARACTERÍSTICAS DEL RECICLADOR DE ALIMENTOS ..29 HOW YOUR FOOD RECYCLER WORKS ........5 FUNCIONAMIENTO DE SU RECICLADOR DE ALIMENTOS ...29 INSTALLATION REQUIREMENTS ..........6 REQUISITOS DE INSTALACIÓN ..........30... - Página 3 When using electric food recyclers, basic precautions are always to be followed, including the following: Read all the instructions before using the food recycler. Only add food waste materials and Zera™ additive packs to the food recycler. Do not add the following types of...
-
Página 4: Connected Appliance Regulatory Notices
Connected Appliance Regulatory Notices Federal Communications Commission (FCC) OEM Responsibilities to comply with FCC Regulations Compliance Notice The XPWG3 Module has been certified for integration into This equipment has been tested and found to comply with the limits products only by OEM integrators under the following for a Class B digital device, pursuant to Part 15 of the FCC Rules. -
Página 5: Food Recycler Features
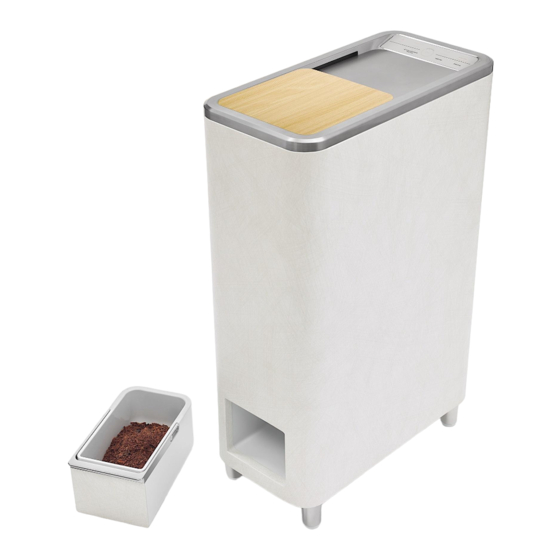
Add one unopened Zera™ additive pack, slide lid closed, and press START to begin a recycling cycle. The food recycler will transform food scraps into a homemade fertilizer. When the cycle is complete, the homemade fertilizer will be deposited in the output bin for removal and use. -
Página 6: Installation Requirements
Installation Requirements Electrical Requirements Tools Needed Gather the required tools and parts before starting installation. Level ■ Tape measure ■ Location Requirements WARNING Excessive Weight Hazard Use two or more people to move and install food recycler. Failure to do so can result in back or other injury. Use two or more people to move and install the food recycler. -
Página 7: Installation Instructions
Lift the carton off the food recycler. Remove all exterior packing material. Remove the output bin. Remove the Zera™ air filter and additive Remove carton bottom and foam base packs from the food recycler output bin. Set the additive packs aside for future use. - Página 8 Level food recycler Install new filter Alignment tab Check that the food recycler is level from front to back and side-to-side. Adjust the leveling legs as necessary to level the food recycler. Place the provided filter into the filter holder, ensure that the tab on the filter is properly aligned with the filter holder.
-
Página 9: Control Panel Description
Control Panel Description Control Keypad Description Press to connect to Wi-Fi. See the “Connectivity” section. Press and hold for 15 seconds to disable connectivity to WiFi. Press to lock and unlock the food recycler lid and control panel. Press once to lock the lid. Press and hold for 3 seconds to lock/unlock the control panel. -
Página 10: Indicator Lights
Indicator Lights Indicator Light Description Error The Error indicator light will come on if any problems occur with the food recycler. Before calling for assistance or service, please check the “Wi-Fi Signal” indicator light description below for possible problems or the “Troubleshooting” sections, as it may save you the cost of a service call. If you still need help, please refer to the contact information in the “Troubleshooting”... -
Página 11: Using Your Food Recycler
Using Your Food Recycler IMPORTANT: The food recycler is for food waste only, put only food waste and Zera™ additive packs in the mixing bin. Food Waste Fill to top of mixing blade For best results, the following food waste should... -
Página 12: Run The Food Recycling Cycle
Add one unopened Zera™ additive pack for every cycle run. fertilizer and is now ready to be used or stored for later use. Be sure to close the lid after adding the Zera™ additive pack. WARNING Press and hold START/PAUSE for 1 second. -
Página 13: Storing Homemade Fertilizer
Proper use of Homemade Fertilizer Caring for your Food Recycler It is recommended to use the homemade fertilizer similarly to NOTE: Please call for assistance for any services other than a traditional outdoor plant fertilizer for use on flowers, shrubs, those outlined in this section. -
Página 14: Emptying The Water Reservoir
Emptying the Water Reservoir Stir contents For best performance and to avoid buildup, drain the water reservoir once a year. NOTE: Turn off the food recycler and empty the water reservoir before moving the unit to avoid water spillage. The Drain Water indicator will light If the water reservoir is full, the Drain Water indicator light will Correct the jam by using a wooden spoon, tongs, or spatula to turn on. -
Página 15: Cleaning
Cleaning Drain water reservoir Open WARNING Allergic Reaction Hazard Homemade fertilizer may contain allergens or pathogens from food waste or other added materials. Wash hands after touching homemade fertilizer. Closed Failure to do so can result in allergic reaction or sickness. - Página 16 Cleaning the Dust Screen Dust screen Wash dust screen For proper performance, clean and re-install the dust screen after each cycle. The dust screen is designed to continuously remove fine particles. The dust screen is removable for cleaning. Follow steps 2 through 6 to remove, clean and re-install the dust screen.
-
Página 17: Replacing Air Filter
Replace filter indicator will light Remove and recycle or discard the old filter. For more information on recycling please visit www.zera.com. If the air filter needs to be replaced, the Replace Filter indicator light will turn on. -
Página 18: Extended Time Without Use
Extended Time Without Use Replace output bin If the food recycler will not be used for an extended period of time, follow these steps to ensure it is properly prepared for non-use. Run a complete cycle to process all food scraps. Empty output bin to remove all homemade fertilizer. -
Página 19: Connectivity
Connectivity Get connect instructions, terms of use, and privacy policy at www.whirlpool.com/connect. If you have any problems or questions, call the Whirlpool Connected Appliance Team at 1-866-333-4591. For future reference please make a note of your product Smart Appliance Identification (SAID), model, and serial numbers, which can be found on a sticker on the lower-back panel of your food recycler. -
Página 20: Troubleshooting - Connectivity
Troubleshooting – Connectivity First try the solutions suggested here. If you need further assistance or more recommendations that may help you avoid a service call, refer to the “Connectivity Setup” section in this manual or contact the Connected Appliance Team. In the U.S.A. -
Página 21: Troubleshooting
Troubleshooting First try the solutions suggested here. There are no serviceable parts in the food recycler, if you need further assistance call our Connected Appliance Team toll-free at 1-866-333-4591. Please include a daytime phone number in your correspondence. If You Experience Possible Cause Solution Power supply cord is unplugged... - Página 22 If You Experience Possible Cause Explanation and Solution Press and hold the Cancel button for 3 seconds to reset the unit. Wet load—the food load may Check the output bin and remove output if present. have been too large or too high Start a new cycle by pressing the Start button.
-
Página 23: Open Source License Usage
Open Source License Usage The following statements refer to the portions of this software THIS SOFTWARE IS PROVIDED BY THE AUTHOR “AS based in part on FreeRTOS v7.0.2, http://www.freertos.org. IS”, AND ANY EXPRESS OR IMPLIED WARRANTIES, The use of this software is governed by the terms of GNU INCLUDING, BUT NOT LIMITED TO, THE IMPLIED General Public License v. - Página 24 The following statements refer to those portions of the software The following statements refer to those portions of the software copyrighted by Adam Dunkels. copyrighted by The Regents of the University of California. Copyright (c) 2004, Adam Dunkels. Copyright (c) 1991, 1993 The Regents of the University of All rights reserved.
-
Página 25: Warranty
Zera™ Food Recycler Warranty This warranty extends to the purchaser and any succeeding owner for Zera™ Food Recyclers operated in the 50 United States and the District of Columbia. Length of Warranty: One Year Limited Warranty from date of purchase. -
Página 26: Seguridad Del Reciclador De Alimentos
Agregue únicamente materiales de residuo de alimentos y ■ ■ alimentos. paquetes de aditivo Zera™ al reciclador de alimentos. No agregue los siguientes tipos de materiales al reciclador de A n de reducir el riesgo de sufrir lesiones, es necesario ■... -
Página 27: Avisos Normativos Para Electrodomésticos Conectados
INSTRUCCIONES DE CONEXIÓN A TIERRA Para la conexión de un reciclador de alimentos mediante ADVERTENCIA: La conexión incorrecta del conductor cable conectado a tierra: de conexión a tierra del equipo puede provocar el riesgo de un choque eléctrico. El reciclador de alimentos debe estar conectado a tierra. En el caso de funcionamiento defectuoso o avería, la conexión a Si no está... -
Página 28: Características Del Reciclador De Alimentos
El proceso del reciclador de alimentos combina en forma equilibrada el agua, los paquetes de aditivo Zera™, el calor y el oxígeno para optimizar la velocidad de reciclaje de alimentos. El reciclador de alimentos está equipado con Wi-Fi y, si lo conecta, le notificará... -
Página 29: Requisitos De Instalación
Requisitos de instalación Requisitos eléctricos Herramientas necesarias Reúna las herramientas y las piezas necesarias antes de comenzar la instalación. ADVERTENCIA Nivel ■ Cinta métrica ■ Requisitos de ubicación ADVERTENCIA Peligro de Choque Eléctrico Peligro de peso excesivo Conecte a un contacto de pared de conexión a tierra de Para mover e instalar el reciclador de alimentos, hágalo 3 terminales. -
Página 30: Instrucciones De Instalación
Extraiga el contenedor de fertilizante. Extraiga el filtro de aire y Retire la parte inferior de la caja los paquetes de aditivo Zera™ del contenedor de fertilizante del y la base de espuma reciclador de alimentos. Deje a un lado los paquetes de aditivo para usarlos más adelante. -
Página 31: Instale Un Nuevo Filtro
Nivele el reciclador de alimentos Instale un nuevo filtro Pestaña de alineación Verifique que el reciclador de alimentos esté nivelado de adelante Coloque el filtro suministrado en el soporte del filtro, hacia atrás y de lado a lado. Según sea necesario, ajuste las asegurándose de que la pestaña en el filtro quede patas niveladoras para nivelar el reciclador de alimentos. -
Página 32: Descripción Del Panel De Control
Descripción del panel de control Teclas de control Descripción Presiónela para conectarse a Wi-Fi. Consulte la sección “Conectividad”. Mantenga presionada durante 15 segundos para desactivar la conectividad a Wi-Fi. Presione para bloquear y desbloquear la tapa del reciclador de alimentos y el panel de control. Presione una vez para bloquear la tapa. -
Página 33: Luces Indicadoras
Luces indicadoras Luz indicadora Descripción Error Si se produce algún problema con el reciclador de alimentos, la luz indicadora de Error se encenderá. Antes de llamar para solicitar asistencia o servicio, revise la descripción de la luz indicadora de “Wi-Fi Signal” (Señal Wi-Fi) a continuación para determinar los posibles problemas, o las secciones de “Troubleshooting”... -
Página 34: Cómo Usar El Reciclador De Alimentos
Cómo usar el Reciclador de alimentos IMPORTANTE: El reciclador de alimentos está previsto para residuos de alimentos solamente; coloque solo residuos de alimentos y paquetes de aditivo Zera™ en el contenedor para mezclar. Residuos de alimentos Agregue una variedad de residuos de alimentos en el contenedor para mezclar. -
Página 35: Ejecución Del Ciclo De Reciclaje De Alimentos
El Reciclador de alimentos tiene como resultado final un fertilizante casero listo para usar o almacenar para su uso Agregue un paquete del aditivo Zera™ sin abrir para cada ciclo posterior. de funcionamiento. Procure cerrar la tapa después de agregar el paquete de aditivo Zera™. -
Página 36: Almacenamiento Del Fertilizante Casero
Uso adecuado del fertilizante casero Cuidado de su Reciclador de alimentos Le recomendamos usar el fertilizante casero de manera similar que los fertilizantes de plantas de exterior tradicionales, en flores, arbustos, césped y jardines. NOTA: Para obtener cualquier otro servicio no señalado en esta sección, solicite asistencia por teléfono. -
Página 37: Revuelva El Contenido
Vaciado del depósito de agua Revuelva el contenido Para obtener un rendimiento óptimo y evitar acumulaciones, vacíe el depósito de agua una vez al año. NOTA: Apague el reciclador de alimentos y vacíe el depósito de agua antes de mover la unidad para evitar derrames de agua. La luz indicadora de Drain Water (Drenar el agua) se encenderá... -
Página 38: Limpieza
Limpieza Vacíe el depósito de agua ADVERTENCIA Abierto Peligro de reacciones alérgicas El fertilizante casero puede contener alérgenos o patógenos de los residuos de alimentos u otros materiales agregados. Cerrado Lávese las manos después de tocar el fertilizante casero. De lo contrario, se puede producir una reacción alérgica o enfermedad. -
Página 39: Identifique El Filtro De Pelusa
Limpieza del filtro de pelusa filtro de pelusa Lave el filtro de pelusa Para un rendimiento apropiado, limpiar y volver a colocar el filtro de pelusa luego de cada ciclo. El filtro de pelusa se designa para eliminar de manera continua las partículas finas. -
Página 40: Cambio Del Filtro De Aire
(Cambiar filtro) se encenderá Extraiga y recicle o descarte el filtro antiguo. Para obtener más información sobre reciclaje, visite www.zera.com. Instale un nuevo filtro Si es necesario cambiar el filtro de aire, se encenderá la luz indicadora de Replace Filter (Cambiar filtro). -
Página 41: Período Prolongado Sin Uso
Período prolongado sin uso Vuelva a colocar el contenedor de fertilizante Si no utilizará el reciclador de alimentos por un período prolongado, siga estos pasos para asegurarse de prepararlo correctamente para ese período. Ejecute un ciclo completo para procesar todos los residuos de alimentos. -
Página 42: Conectividad
Conectividad Obtenga las instrucciones de conexión, los términos de uso y la política de privacidad en www.whirlpool.com/connect. Si tiene problemas o preguntas, llame a Whirlpool Connected Appliances Team al 1-866-333-4591. Para referencia futura, tome nota de la identificación de los números de electrodoméstico inteligente (SAID), de modelo y de serie del producto, que puede encontrar en un adhesivo en el panel inferior posterior del reciclador de alimentos. -
Página 43: Solución De Problemas - Conectividad
Solución de problemas — Conectividad Pruebe primero las soluciones sugeridas aquí. Si necesita más ayuda o recomendaciones para evitar una llamada al servicio técnico, consulte la sección “Configuración de conectividad” de este manual o comuníquese con el equipo de Connected Appliance. En los EE.UU. -
Página 44: Solución De Problemas
Solución de problemas Pruebe primero las soluciones sugeridas aquí. El reciclador de alimentos no contiene piezas que el usuario pueda reparar; si necesita asistencia adicional, llame de forma gratuita al equipo de Connected Appliance al 1-866-333-4591. Incluya en su correspondencia un número de teléfono en el que se le pueda localizar durante el día. ADVERTENCIA Peligro de Choque Eléctrico Conecte a un contacto de pared de conexión a tierra de... - Página 45 Si experimenta lo siguiente Causa posible Explicación y solución Mantenga presionado el botón Cancel (Cancelar) durante 3 segundos para reiniciar la unidad. La carga húmeda—la carga de Verificar el contenedor de fertilizante y quite el fertilizante si alimentos tal vez es demasiado se encuentra presente.
-
Página 46: Uso De Licencia De Origen Abierto
Uso de licencia de origen abierto Los siguientes enunciados se refieren a las partes de este software ESTE SOFTWARE ES PROPORCIONADO POR EL AUTOR “TAL con base en parte de FreeRTOS v7.0.2, http://www.freertos.org. COMO ESTÁ” Y SE NIEGA TODA RESPONSABILIDAD POR CUAL- El uso de este software se rige por los términos de GNU General QUIER GARANTÍA EXPLÍCITA O IMPLÍCITA, INCLUIDAS, ENTRE Public License v. - Página 47 Los siguientes enunciados se refieren a las partes de este Los siguientes enunciados se refieren a esas partes del software software con derechos de autor registrados por Adam Dunkels. con derechos de autor registrados por The Regents of the Copyright (c) 2004, Adam Dunkels. University of California.
-
Página 48: Garantía
Garantía del Reciclador de alimentos Zera™ Esta garantía se extiende al comprador y a cualquier propietario subsiguiente para los Recicladores de alimentos Zera™ en los 50 estados de los Estados Unidos y el Distrito de Columbia. Duración de la garantía: Un año de garantía limitada a partir de la fecha de compra.