Tabla de contenido
Publicidad
Idiomas disponibles
Idiomas disponibles
Enlaces rápidos
For German/Dutch/Poland/Denmark/Estonia/Lithuania/Latvia/Norway/Sweden/Portugees
languages, please visit the website: www.beijerref-carrier.com
Thank you very much for purchasing our air conditioner. Please read this
owner's manual carefully before using your air conditioner. Make sure to
save this manual for future reference.
Publicidad
Capítulos
Tabla de contenido

Manuales relacionados para Carrier KJR-120X-4L


Resumen de contenidos para Carrier KJR-120X-4L
- Página 1 For German/Dutch/Poland/Denmark/Estonia/Lithuania/Latvia/Norway/Sweden/Portugees languages, please visit the website: www.beijerref-carrier.com Thank you very much for purchasing our air conditioner. Please read this owner’s manual carefully before using your air conditioner. Make sure to save this manual for future reference.
- Página 2 This manual gives detailed description of the precautions that should be brought to your attention during operation. In order to ensure correct service of the wired controller please read this manual carefully before using the unit. For convenience of future reference, keep this manual after reading it.
-
Página 3: Tabla De Contenido
Table of Contents 1. Safety precaution............1 2. Installation accessory .............2 3. Installation method ............4 4. Specification ..............12 5. Feature and function of the wired controller ....13 6. Name on the LCD of the wired controller .....14 7. Name of button on the wired controller......15 8. -
Página 4: Safety Precaution
1. Safety precaution WARNING • Please entrust the distributor or professionals to install the unit. • Installation by other persons may lead to imperfect installation, electric shock or fire. • Adhere to this installation manual. • Imporper installation may lead to electric shock or fire. •... -
Página 5: Installation Accessory
1. Safety precaution NOTE • The specified cables shall be applied in the wiring. No external force may be applied to the terminal. Otherwise, wire cut and heating may occur and result in fire. 2. Installation accessory Select the installation location Don’t install at the place where cover with heavy oil, vapor or sulfureted gas, otherwise, this product would be deformed that would lead to system malfunction. - Página 6 2. Installation accessory 2. Prepare the following assemblies on the site. Qty.(embeded Specification Name Remarks into wall) (only for reference) 1 Switch box 2 Wiring Tube (Insulating Sleeve and Tightening Screw) Precaution of installingthe wire controller 1. This manual provides the installation method of wired controller.
-
Página 7: Installation Method
3. Installation method 1. Wired remote controller structural dimensions 20mm 20mm 120mm 120mm 46mm 46mm Fig 3-1 60mm 60mm 2. Remove the upper part of wired controller • Insert a slot screwdriver Buckling position Back cover into the slots in the lower part of the wired controller (2 places), and remove Front cover... - Página 8 3. Installation method NOTE: The PCB is mounted in the upper part of the wired controller. Be careful not to damage the board with the slot screwdriver. 3. Fasten the back plate of the wired controller • For exposed mounting, fasten the back plate on the wall with the 3 screws (M4×20) and plugs.
- Página 9 3. Installation method NOTE: Put on a flat surface. Be careful not to distort the back plate of the wire controller by overtightening the mounting screws. 4. Battery installation Fig 3-5 • Put the battery into the installationsite and make sure the positive side of the battery is in accordance with the positive side of installationsite.(See Fig.3-5) •...
- Página 10 3. Installation method 5. Wire with the indoor unit 60mm Wiring hole Wiring hole HA HB Fig 3-6 Fig 3-6 1. indoor unit 2. notch the part for the wiring to pass through with nippers, etc. Connect the terminals on the remote controller (HA ,HB), and the terminals of the indoor unit (HA ,HB).
- Página 11 3. Installation method For some units, the wired controller connects to the unit HA and HB ports through the HA and HB ports. There is no polarity between HA and HB. SeeFig. 3-7 Indoor Unit Transfer Adapter CN44/CN8 HA HB Wired Controller Fig.3-7 8-GB...
- Página 12 3. Installation method The main/secondary wired controller can be used to enable two wired controllers to control one unit, and the wired controllers connect to the unit HA and HB ports through the HA and HB port on the controller. There is no polarity between HA and HB.
- Página 13 3. Installation method For some units, one wired controller can support multiple units (a maximum of 16 units). In this case, the wired controller and unit need to be connected to the HA and HB ports at the same time. In group control, there will be no error displayed on the wired controller.
- Página 14 3. Installation method Putty Trap Putty Putty Trap Trap Fig 3-10 6. Reattach the upper part of the wired controller • After adjusting the upper case and then buckle the upper case; avoid clamping the wiring during installation. (Fig 3-11) All the pictures in this manual are for explanation purpose only.
-
Página 15: Specification
4. Specification Input voltage DC 12V Ambient temperature -5~43ºC (23~110ºF) Ambient humidity RH40%~RH90% Wiring specifications Wiring type Size Total length 0.5mm ≤20m (66’) shielded vinyl cord or cable 0.75-1.25mm ≤50m (164’) 12-GB... -
Página 16: Feature And Function Of The Wired Controller
5. Feature and function of the wired controller Feature: • LCD display. • Malfunction code display: it can display the error code, helpful for service. • 4-way wire layout design, no raised part at backside, more convenient to place the wires and install the device. -
Página 17: Name On The Lcd Of The Wired Controller
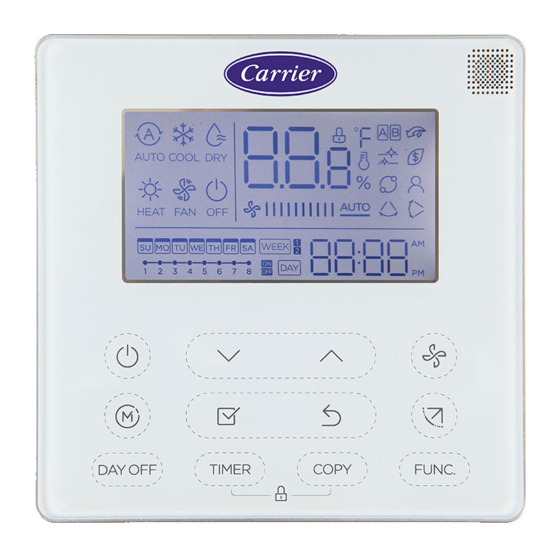
6. Name on the LCD of the wired controller 1 Operation mode indication 8 Room temperature indication 2 Fan speed indication 9 Rotating indication 3 Temperature display 10 Follow Me function indication 4 Lock indication 11 Left-right swing indication 5 °C/°F indication (some models) 6 Main unit and secondary 12 Clock display... -
Página 18: Name Of Button On The Wired Controller
7. Name of button on the wired controller 1 POWER button 6 TIMER button 2 MODE button 7 FAN SPEED button 3 DAY OFF/DEL button 8 BACK bottom 4 ADJUST button 9 SWING bottom 5 CONFIRM button 10 FUNC. button 11 COPY button 15-GB... -
Página 19: Preparatory Operation
8. Preparatory operation Set the current day and time Press the Timer button for 2 seconds or more. The timer display will flash. Press the button “ ” or “ ” to set the date. The selected date will flash. The date setting is finished and the time setting is prepared after pressing Timer button or CONFIRM button or there is no pressing button in 10 seconds. -
Página 20: Operation
9. Operation Time scale selection Press the buttons “ ” and “ ” for 2 seconds will alternatethe clock tieme display between the 12h&24h scale. To start/stop operation Press the Power button. To set the operation mode Operation mode setting Press the Mode button to set the operation mode.(Heat function is invalid for cool only type unit) -
Página 21: Fan Speed Setting
9. Operation Room temperature setting Press the button“ ” or “ ” to set the room temperature. Indoor Setting Temperature Range: 17~30°C(62~86°F ). °C & °F scale selection(on some models) Press the buttons“ ” and “ ” for 3 seconds Lower Raise will alternate the temperature display between... -
Página 22: Child Lock Function
9. Operation Child lock function Press the buttons “ ” and “ ” for 3 seconds to activate the child lock function and lock all buttons on the wire controller. Press the buttons again for 3 seconds to deactivate the child lock function. When the child lock function is activated, the mark appears. - Página 23 9. Operation Swing function(For the unit without left & right auto swing function models) Up-Down airflow direction and swing • Use Swing button to adjust the Up-down airflow direction. 1. Press the button every time, the louver swings 6 degrees. 2.
- Página 24 9. Operation 3. And then use Swing button to adjust the Up-Down airflow direction of the selected louver. Press the FUNC. button to set the turbo or rotating or Ifeel function. The select function icon will flash then press the Confirm button to confirm the setting. Turbo function (on some models) Under COOL/HEAT mode ,press the FUNC.
- Página 25 9. Operation When the follow me function indication Indoor Unit appears,the room temperature is detected at the wire controller. Press the button again to cancel the follow me function. Rotation&Back-up indication When there are two units, press the button to select the rotating function, and press “Confirm”to turn on or off the rotating function.
-
Página 26: Timer Functions
4. Step 4: set which machine will run first. Select A or B. 5. After this function is turned on, as long as the air conditioner is running at the setting hour, it will automatically turn on another air conditioner and turn off the current air conditioner. - Página 27 10. Timer functions To set the On or Off TIMER Press the Timer button to select the No display Press the Confirm button and the Timer display is flashing. ex.Off timer set at 18:00 Press the button “ ” or “ ”...
- Página 28 10. Timer functions To set the On and Off TIMER Press the Timer button to select the Press the Confirm button and the Clock display is flashing. Press the button “ ” or “ ” to set the time of On timer,and then press the Confirm button to confirm the setting.
-
Página 29: Weekly Timer 1
11. Weekly Timer 1 1. Weekly timer setting Press the Timer button to select the then press the Confirm button to confirm. 2. Day of the week setting Press the button “ ” or “ ” to select the day of the week and then press the Confirm button to confirm the setting. - Página 30 11. Weekly Timer 1 ex.Tuesday time scale 1 Up to 4 timer settings can be saved for each day of the week.It is conventent if the WEEKLY TIMER is set according to the user’s life style. 4. Off timer setting of timer setting 1 Press the button “...
- Página 31 11. Weekly Timer 1 WEEKLY timer operation To activate WEEKLY TIMER operation Press the Timer button while is displayed on the LCD. To deactivate WEEKLY TIMER operation Press the Timer button while is disappear from the LCD. To turn off the air conditioner during the weekly timer 1.
- Página 32 11. Weekly Timer 1 To set the DAY OFF (for a holiday) During the weekly timer, press the Confirm button. Press the button “ ” or “ ” to select the day in this week . Press the Day off button to set the DAY OFF.
-
Página 33: Delay Function
11. Weekly Timer 1 DELAY function During the weekly timer, pressing the Del button once, display “ ”. Press this button twice, display “ ” and wait 3 seconds to confirm. It means the unit will override 1 hours; Press this button three times,display “... - Página 34 11. Weekly Timer 1 Press the Copy button,the letter “CY” will be shown on the LCD. Press the button “ ” or “ ” to select the day to copy to. Press the Copy button to confirm . mark flashes quickly ex.
- Página 35 12. Weekly Timer 2 1. Weekly timer setting Press Timer to select the press Confirm. 2. Day of the week setting Press “ ” or “ ” to select the day of the week and then press CONFIRM. 3. ON timer setting of timer setting 1 Press “...
-
Página 36: Time Setting
12. Weekly Timer 2 IMPORTANT: Up to 8 scheduled events can be set on one day. Various events can be scheduled in either MODE, TEMPERATURE ex.Tuesday time scale 1 and FAN speeds. 4. Time setting Press “ ” or “ ”... - Página 37 12. Weekly Timer 2 7. Fan speed setting Press “ ” or “ ” to set the fan speed then press CONFIRM. NOTE: This setting is unavailable in the AUTO, DRY or OFF modes. 8. Different scheduled events can be set by repeating steps 3 through 7.
- Página 38 12. Weekly Timer 2 WEEKLY timer operation To start Press Timer to select the , and then the timer starts automatically. To cancel Press the Power buttons for 2 seconds to cancel the timer mode. The timer mode can also be canceled by changing the timer mode using Timer.
- Página 39 12. Weekly Timer 2 Press DAY OFF to create an off day. mark is hidden ex.The DAY OFF is set for Wednesday Set the DAY OFF for other days by repeating the steps 2 and 3. Press BACK to revert to the weekly timer. To cancel, follow the same procedures used for setup.
- Página 40 12. Weekly Timer 2 Press “ ” or “ ” to select the day to copy from. Press COPY, the letters CY appear on the LCD. Press “ ” or “ ” to select the day to copy to. Press COPY to confirm. mark flashes quickly ex.
- Página 41 12. Weekly Timer 2 Delete the time scale in one day. During the weekly timer setting, press CONFIRM. ” or “ ” to select the day of the Press “ week and then press CONFIRM. Press “ ” or “ ”...
-
Página 42: Fault Alarm Handing
13. Fault alarm handing If the system does not properly operate except the above mentioned cases or the above mentioned malfunctions is evident, investigate the system according to the following procedures. DISPLAY No. MALFUNCTION & PROTECTION DEFINE DIGITAL TUBE Error of communication between wire controler and indoor unit The error displayed on the wire controller are different from those on the unit. -
Página 43: Queries And Settings
15. Queries and settings When the air conditioning unit is switch machine, Long press “COPY” for 3 seconds , first display P:00, if connected to an indoor unit, display P:00, if connected to multiple indoor units, press “ ” or “ ”... - Página 44 15. Queries and settings Follow me function temperature compensation When the air conditioning unit is off, into the query function of temperature, press “ ” or “ ” to select tF. The compensation temperature Range : -5°C~5°C. Press “Confirm” into setting state, press “ ”...
- Página 45 15. Queries and settings Set the highest and lowest temperature values When the air conditioning unit is off, into the query function of temperature, press “ ” or “ ” to select tHI or tLo. Press “Confirm” into setting state, press “ ”...
-
Página 46: Restore Factory Settings
15. Queries and settings Two - line controller address selection When the air conditioning unit is off, into the query function of temperature, press “ ” or “ ” to select Adr, the temperature zone will display -- or A, B. Where -- refers to the code setting of the wire controller. - Página 47 15. Queries and settings After the wire controller resumes the factory parameter setting, the rotating parameter setting is restored to 10 hours (the highest and lowest temperature are not set); The compensation of body temperature is uncompensated; COOL and HEAT/single COOL mode is restored to COOL and HEAT model;...
- Página 48 Este manual provee descripciones detalladas de las precauciones que deberían llamar su atención durante la utilización. A fin de asegurar un funcionamiento correcto del controlador alámbrico por favor leer este manual cuidadosamente antes de usar la unidad. Para el caso de consultas futuras, guárdelo después de leerlo.
- Página 49 Tabla de Contenidos 1. Precauciones de Seguridad ...........1 2. Accesorios para instalación ..........2 3. Método de instalación.............4 4. Especificaciones ............12 5. Características y funciones del controlador alámbrico . 13 6. Elementos en el LCD del controlador alámbrico ..14 7. Nombres de botones del controlador alámbrico ... 15 8.
-
Página 50: Precauciones De Seguridad
1. Precauciones de Seguridad ADVERTENCIA • Por favor, encargue la instalación de unidad al distribuidor o en los profesionales. • Si se realiza la instalación por otras personas, puede resultar en una instalación imperfecta, descarga eléctrica o incendio. • Siga a este manual de instalación. •... -
Página 51: Accesorios Para La Instalación
1. Precauciones de Seguridad NOTA • Los cables especificados deben ser usados en el cableado. No se puede aplicar fuerza externa al terminal. De otra forma, puede ocurrir la ruptura y calentamiento del cable y originar un incendio. 2. Accesorios para la instalación Seleccionar la ubicación de la instalación No instale en el lugar cubierto con aceite pesado, vapor o gas sulfurado, de lo contrario, este producto podría deformarse y funcionar de forma inapropiada. -
Página 52: Precaución Al Instalar El Controlador Alámbrico
2. Accesorios para la instalación 2. Prepare los siguientes ensamblajes en el lugar. Cant. (empotrado Especificación Número Nombre Observaciones en la pared) (Sólo para referencia) Caja de interruptores Tubos para Cableado (Manga Aislante y Tornillo Tensor) Precaución al instalar el controlador alámbrico 1. -
Página 53: Método De Instalación
3. Método de instalación 1. Dimensiones estructurales del controlador remoto alámbrico 20mm 20mm 120mm 120mm 46mm 46mm Imagen 3-1 60mm 60mm 2. Retire la pieza superior del controlador alámbrico • Inserte un destornillador en la Posición de pandeo Cubierta posterior ranura en la parte más baja del controlador alámbrico (2 lugares) y retire la parte... - Página 54 3. Método de instalación AVISO: La TCI es sujetada en la parte superior del controlador alámbrico. Tenga cuidado de no dañar la tarjeta con el destornillador de ranura. 3. Asegure la placa posterior del controlador alámbrico • Para un montaje expuesto, fije la placa posterior a la pared con 3 tornillos (M4x20) y tapones.
- Página 55 3. Método de instalación AVISO: Coloque sobre una superficie plana. Tenga cuidado de no deformar la placa posterior del controlador alámbrico al ajustar en forma excesiva los tornillos de sujeción. 4. Instalación de la batería Imagen 3-5 • Coloque la batería en el lugar de la instalación y asegure que el lado positivo de la batería esté...
- Página 56 3. Método de instalación 5. Cableado con la unidad interior 60mm Orificio para Wiring hole cableado HA HB Fig 3-6 Imagen 3-6 1 unidad interior 2 haga una muesca en la pieza para pasar el cable a través usando pinzas, etc. Conecte los terminales del controlador remoto (HA, HB) y los terminales de la unidad interior (HA, HB).
- Página 57 3. Método de instalación Para algunas unidades, el controlador alámbrico se conecta a los puertos HA y HB de la unidad a través de los puertos HA y HB. No hay polaridad entre los puertos HA y HB. Vea Imagen 3-7 Unidad Interior Adaptador de transferencia CN44/CN8...
- Página 58 3. Método de instalación El controlador alámbrico principal/secundario puede ser usado para activar dos controladores alámbricos para controlar una unidad, y los controladores alámbricos se conectan a los puertos HA y HB de la unidad a través de los puertos HA y HB en el controlador.
- Página 59 3. Método de instalación En algunas unidades, un controlador alámbrico puede soportar varias unidades (un máximo de 16 unidades). En ese caso, el controlador alámbrico y la unidad necesitan estar conectados a los puertos HA y HB al mismo tiempo. Al controlar un grupo, no se mostrarán errores en el controlador alámbrico.
- Página 60 3. Método de instalación Masilla Separador Masilla Masilla Separador Separador Imagen 3-10 6. Vuelva a colocar la parte superior del controlador alámbrico. • Después de ajustar y luego abrochar la caja superior; evite fijar el cableado durante la instalación. (Imagen 3-11) Todas las figuras en este manual sólo sirven para fines explicativos.
-
Página 61: Especificaciones De Cableado
4. Especificación Voltaje de entrada DC 12V Temperatura -5~43ºC (23~110ºF) ambiente Humedad ambiente RH40%~RH90% Especificaciones de cableado Tipo de cableado Tamaño Longitud total 0,5mm ≤20m (66’) cordón o cable de vinilo blindado 0,75-1,25mm ≤50m (164’) 12-ES... -
Página 62: Características Y Funciones Del Controlador Alámbrico
5. Características y funciones del controlador alámbrico Características: • Pantalla LCD • Visualización del código de mal funcionamiento: puede mostrar el código de error, útil para el mantenimiento. • Diseño de esquema de cableado a 4 pasos, sin partes en relieve por el lado posterior, más conveniente para colocar los cables e instalar el dispositivo. -
Página 63: Elementos En El Lcd Del Controlador Alámbrico
6. Elementos en el LCD del controlador alámbrico Indicador de modo de operación Indicador de temperatura en Indicación de la velocidad del habitación ventilador Indicador de rotación Temperatura 10 Indicador de función Seguirme Indicador de bloqueo 11 Indicador de oscilación izquierda- Indicador °C / °F derecha (algunos modelos) Indicador de unidad principal y... -
Página 64: Nombres De Botones Del Controlador Alámbrico
7. Nombres de botones del controlador alámbrico Botón POWER (ENCENDIDO) Botón TIMER (TEMPORIZADOR) Botón MODE (MODO) Botón FAN SPEED (VELOCIDAD Botón DAY OFF/DEL (DÍA LIBRE/ DE VENTILADOR) BORRAR) Botón BACK (REGRESAR) Botón ADJUST (AJUSTE) Botón SWING (OSCILACIÓN) Botón CONFIRM (CONFIRMAR) 10 Botón FUNC. -
Página 65: Operación Preparatoria
8. Operación preparatoria Configure la fecha y hora actuales Pulse el botón del Timer (Temporizador) por 2 segundos o más El temporizador destellará Pulse el botón “ ” o “ ” para configurar la fecha. La fecha seleccionada destellará El ajuste de fecha concluye y el ajuste de hora se prepara después de pulsar el botón del Timer (Temporizador) o el botón CONFIRM (CONFIRMAR) o si no se presiona ningún botón por 10 segundos. -
Página 66: Funcionamiento
9. Funcionamiento Selección de escala de tiempo Pulse los botones “ ” y “ ” por 2 segundos para alternar la visualización de hora entre la escala de 12h y 24h. Para iniciar/ detener el funcionamiento Pulse el botón de Power (Encendido). Para seleccionar el modo de operación Ajuste del modo de operación Pulse el botón Mode (Modo) para seleccionar el modo... - Página 67 9. Funcionamiento Ajuste de temperatura de habitación Pulse el botón “ ”o “ ” para ajustar la temperatura de la habitación. Rango de Ajuste de Temperatura Interior: 17~30°C(62~86°F ). Selección de escala °C y °F (en algunos modelos) Pulse los botones “ ” y “ ” por 3 segundos para alternar la visualización de la escala de temperatura entre °C y °F Bajar Subir...
- Página 68 9. Funcionamiento Función Child lock (Bloqueo para niños) Pulse los botones “ ” y “ ” por 3 segundos para activar la función de bloqueo para niños y bloquear todos los botones del controlador alámbrico. Pulse nuevamente los botones por 3 segundos para desactivar la función de bloqueo de niños.
- Página 69 9. Funcionamiento Función de oscilación (Para los modelos sin función de oscilación automática left & right ( izquierda/derecha)) Dirección de flujo de aire Arriba-Abajo y oscilación • Use el botón Swing (Oscilación) para ajustar la dirección del flujo de aire Arriba-Abajo. 1.
- Página 70 9. Funcionamiento 3. Y luego use el botón Swing (Oscilación) para ajustar la dirección del flujo de aire Arriba-Abajo de la lámina seleccionada. Pulse el botón FUNC. (FUNCIÓN) para seleccionar la función turbo (turbo) o rotating (rotación) o Ifeel (Mi sentido). El ícono de la función seleccionada destellará...
- Página 71 9. Funcionamiento Unidad Cuando aparece el indicador de la función “Seguirme”, Interior la temperatura de la habitación es detectada en el controlador alámbrico. Pulse nuevamente el botón para cancelar la función “Seguirme”. Indicador de Rotación y Respaldo Cuando hay dos unidades, pulse el botón para seleccionar la función rotación, y pulse “Confirm (Confirmar)”...
-
Página 72: Funciones Del Temporizador
5. Después de que esta función es activada, en cuanto el aire acondicionado está funcionando en la hora configurada, automáticamente encenderá el otro aire acondicionado y apagará el aire acondicionado actual. Pulse el botón POWER (ENCENDIDO) para cambiar inmediatamente al otro. Los íconos A o B parpadean para indicar que hay una falla en el aire acondicionado correspondiente. - Página 73 10. Funciones de temporizador Para configurar el Encendido o Apagado del TEMPORIZADOR Pulse el botón Timer (Temporizador) para seleccionar No mostrar Pulse el botón Confirm (Confirmar) y el Temporizador empezará a destellar. ej. Apagado de temporizador fijado a las 18:00 Pulse el botón “...
- Página 74 10. Funciones de temporizador Para configurar el Encendido y Apagado del TEMPORIZADOR Pulse el botón Timer (Temporizador) para seleccionar Pulse el botón Confirm (Confirmar) y el Reloj empezará a destellar. Pulse el botón “ ” o “ ” para configurar el tiempo de encendido del temporizador, y luego pulse el botón Confirm (Confirmar) para confirmar los ajustes.
-
Página 75: Ajuste Del Temporizador Semanal
11. Temporizador Semanal 1 1. Ajuste del temporizador semanal Pulse el botón Timer (Temporizador) para seleccionar el luego presione el botón Confirm (Confirmar) para la confirmación. 2. Ajuste del día de la semana Pulse el botón “ ” o “ ” para seleccionar el día de la semana y luego pulse el botón Confirm (Confirmar) para confirmar el ajuste. - Página 76 11. Temporizador Semanal 1 ej. Escala de tiempo 1 del Martes Se puede guardar hasta 4 ajustes del temporizador para cada día de la semana. Es conveniente ajustar el TEMPORIZADOR SEMANAL de acuerdo al estilo de vida del usuario. 4. Ajuste de Apagado del temporizador 1 Pulse el botón “...
- Página 77 11. Temporizador Semanal 1 Funcionamiento del temporizador SEMANAL Para activar el TEMPORIZADOR SEMANAL Pulse el botón Timer (Temporizador) mientras se muestra Para desactivar el TEMPORIZADOR SEMANAL Pulse el botón Timer (Temporizador) mientras desaparece Para apagar el aire acondicionado estando en el temporizador semanal 1.
- Página 78 11. Temporizador Semanal 1 Para definir el DÍA LIBRE (para un feriado) Estando en el temporizador semanal, pulse el botón Confirm (Confirmar) Pulse el botón “ ” o “ ” para seleccionar el día en esta semana. Pulse el botón Day off (Día libre) para fijar el DÍA LIBRE. La señal es ocultada ej.
- Página 79 11. Temporizador Semanal 1 Función RETRASO Durante el temporizador semanal, pulse el botón de Del (Borrar) una vez, se mostrará " ". Pulse dos veces este botón, se muestra " " y espere 3 segundos para confirmar. Significa que la unidad ignorará por 1 hora; pulse tres veces este botón, se mostrará...
- Página 80 11. Temporizador Semanal 1 Pulse el botón Copy (Copiar), la letra “CY” se mostrará en el LCD. Pulse el botón “ ” o “ ” para seleccionar el día hasta que copiar. Pulse el botón Copy (Copiar) para confirmar. La señal parpadeará...
- Página 81 12. Temporizador Semanal 2 1. Ajuste del temporizador semanal Pulse Timer (Temporizador) para seleccionar el presione Confirm (Confirmar). 2. Ajuste del día de la semana Pulse “ ” o “ ” para seleccionar el día de la semana y luego pulsa Confirm (CONFIRMAR). 3.
- Página 82 12. Temporizador Semanal 2 IMPORTANTE: Se pueden definir hasta 8 eventos programados en un día. Se pueden programar eventos en MODO, TEMPERATURA y VELOCIDAD DE ej. Escala de tiempo 1 VENTILADOR. del Martes 4. Ajuste de tiempo Pulse “ ” o “ ” para ajustar el tiempo y luego pulse CONFIRM (CONFIRMAR).
- Página 83 12. Temporizador Semanal 2 7. Ajuste de velocidad de ventilador Pulse “ ” o “ ” para fijar la velocidad del ventilador y luego pulse CONFIRM (CONFIRMAR). AVISO: Este ajuste no está disponible en los modos AUTO, SECO o APAGADO. 8.
- Página 84 12. Temporizador Semanal 2 Funcionamiento del temporizador SEMANAL Para empezar Pulse el Timer (Temporizador) para seleccionar el luego inícielo automáticamente. Para cancelar Pulse el botón Power (Encendido) por 2 segundos para cancelar el modo temporizador. El modo temporizador también puede ser cancelado cambiando el modo temporizador usando Temporizador.
- Página 85 12. Temporizador Semanal 2 Pulse DAY OFF (DÍA LIBRE) para crear un día libre. La señal es ocultada ej. El DÍA LIBRE es fijado en Miércoles Defina otros días como DÍA LIBRE repitiendo los pasos 2 y 3. Pulse BACK (REGRESAR) para revertir al temporizador semanal.
- Página 86 12. Temporizador Semanal 2 Pulse “ ” o “ ” para seleccionar el día desde que copiar. Pulse COPY (COPIAR), las letras “CY” se mostrarán en el LCD. Pulse “ ” o “ ” para seleccionar el día hasta que copiar. Pulse COPY (COPIAR) para confirmar.
- Página 87 12. Temporizador Semanal 2 Borrar la escala de tiempo de un día. Estando en el ajuste del temporizador semanal, pulse CONFIRM (CONFIRMAR). Pulse “ ” o “ ” para seleccionar el día de la semana y luego pulsa Confirm (CONFIRMAR). Pulse “...
-
Página 88: Manejo De Alarma De Fallas
13. Manejo de Alarma de Fallas Si el sistema no funciona adecuadamente y si ninguno de los casos mencionados anteriormente o los errores mencionados antes es evidente, investigue en el sistema de acuerdo con los siguientes procedimientos. TUBO Número DEFINICIÓN DE ERROR & PROTECCIÓN DE PANTALLA DIGITAL Error de comunicación entre controlador... -
Página 89: Consultas Y Configuraciones
15. Consultas y configuraciones Cuando la unidad de aire acondicionado es una máquina de cambio, pulse “COPY (COPIAR)” por 3 segundos, primero se muestra P:00, si se conecta a una unidad interior, se muestra P:00, si se conecta a múltiples unidades interiores, pulse “... - Página 90 15. Consultas y configuraciones Compensación de temperatura en la función Seguirme Cuando la unidad de aire acondicionado está apagada, estando en la función de consulta de temperatura, pulse “ ” o “ ” para seleccionar Rango de compensación de temperatura: -5°C~5°C. Pulse “Confirm (Confirmar)”...
- Página 91 15. Consultas y configuraciones Fije los valores de temperatura más alta y más baja Cuando la unidad de aire acondicionado está apagada, en la función de consulta de temperatura, presione“ ” o “ ” para seleccionar tHI o tLo. Pulse “Confirm (Confirmar)” en el estado de configuración, presione“...
- Página 92 15. Consultas y configuraciones Selección de dirección del controlador de doble – línea Cuando la unidad de aire acondicionado está apagada, en la función de consulta de temperatura, presione “ ” o “ ” para seleccionar Adr, se muestra la zona de temperatura --.el área de temperatura mostrará – o A, B.
- Página 93 15. Consultas y configuraciones Después de que el controlador alámbrico reanuda la configuración de los parámetros de fábrica, la compensación de la temperatura corporal se descompensa. Los modos COOL (FRÍO) y HEAT (CALOR) / COOL (FRÍO) simple se restauran al modelo COOL (FRÍO) y HEAT (CALOR).
- Página 94 Ce manuel décrit en détail les précautions à prendre pendant le fonctionnement. Afin d'assurer le service correct de la télécommande par fil, veuillez lire attentivement ce manuel avant d'utiliser l'unité. Pour faciliter une consultation ultérieure, conservez ce manuel après l'avoir lu. Toutes les images dans le manuel sont uniquement à...
- Página 95 Sommaire 1. Consignes de sécurité ................... 1 2. Accessoires d’installation................2 3. Méthode d’installation ..................4 4. Spécifications ....................12 5. Caractéristiques et fonction de la télécommande par fil ......13 6. Nom sur l'écran LCD de la télécommande par fil ........14 7.
-
Página 96: Consignes De Sécurité
1. Consignes de sécurité AVERTISSEMENT • Veuillez confier au distributeur ou aux professionnels à installer l'unité. • L'installation par d'autres personnes peut conduire à une installation imparfaite, un choc électrique ou un incendie. • Suivez ce manuel d'installation. • L'installation incorrecte peut conduire à un choc électrique ou un incendie. •... - Página 97 1. Consignes de sécurité NOTE • Les câbles spécifiés doivent être appliqués dans le câblage. Aucune force externe ne peut être appliquée au terminal. Dans le cas contraire, la coupure de fil et le chauffage peuvent se produire et entraîner un incendie. 2.
-
Página 98: Accessoires D'installation
2. Accessoires d’installation 2. Préparez les composants suivants sur site. Spécification Qté.(encastré N° (Seulement pour la Remarques dans le mur) référence) 1 Boîte à bornes 2 Tube de câblage (gaine d’isolement et vis de serrage) Précaution d'installation de la télécommande par fil 1. -
Página 99: Méthode D'installation
3. Méthode d'installation 1. Dimensions structurelles de la télécommande par fil 20mm 20mm 120mm 120mm 46mm 46mm Fig 3-1 60mm 60mm 2. Retirez la partie supérieure de la télécommande par fil • Insérez un tournevis plat dans Position de flexion Couverture arrière les fentes de la partie inférieure... - Página 100 3. Méthode d'installation NOTE : Le PCB est monté dans la partie supérieure de la télécommande par fil. Veillez à ne pas endommager le panneau avec le tournevis à fente. 3. Fixez la plaque arrière de la télécommande par fil •...
- Página 101 3. Méthode d'installation NOTE : Mettez sur une surface plane. Veillez à ne pas déformer la plaque arrière de la télécommande par fil en resserrant plus les vis de montage. 4. Installation de batterie Fig 3-5 • Mettez la batterie dans le site d'installation et assurez-vous que le côté positif de la batterie est en accord avec le pôle positif du site d'installation.
- Página 102 3. Méthode d'installation 5. Fil avec l'unité intérieure 60mm Wiring hole Trou de câblage HA HB Fig 3-6 Fig 3-6 1. Unité intérieure 2. Encochez la pièce pour passer le câblage à l’aide de pince, etc. Connectez les terminaux sur la télécommande (HA ,HB), et les terminaux de l'unité...
- Página 103 3. Méthode d'installation Pour certaines unités, la télécommande par fil se connecte aux ports de HA et HB de l’unité par les ports HA et HB. Il n'y a pas de polarité entre HA et HB. Voie la Fig.3-7 Unité intérieure Adaptateur de transfert CN44/CN8 HA HB...
- Página 104 3. Méthode d'installation La télécommande par fil principale/secondaire peut être utilisé à activer deux télécommandes par fil pour contrôler une unité, et les télécommandes par fil se connectent aux ports de HA et HB de l’unité à travers le port HA et HB sur la télécommande.
- Página 105 3. Méthode d'installation Pour certaines unités, une télécommande par fil peut supporter plusieurs unités (maximum de 16 unités). Dans ce cas, la télécommande par fil et l'unité doivent être connectées aux ports HA et HB en même temps. En contrôle de groupe, il n'y aura pas d'erreur affichée sur la télécommande par fil.
- Página 106 3. Méthode d'installation Mastic Trappe Mastic Mastic Trappe Trappe Fig 3-10 6. Remontez la partie supérieure de la télécommande par fil • Après avoir réglé l’étui supérieur, bouclez ce dernier ; évitez de serrer le câblage pendant l'installation. (Fig 3-11) Toutes les images dans le manuel sont uniquement à...
-
Página 107: Spécifications
4. Spécification Tension d’entrée DC 12V Température -5 à 43ºC (23 à 110ºF) ambiante Humidité ambiante RH40% à RH90% Spécifications de câblage Type de câblage Dimension Longueur totale 0,5mm ≤20m (66’) Cordon ou câble en vinyle blindé 0,75 à 1,25mm ≤50m (164’) 12-FR... -
Página 108: Caractéristiques Et Fonction De La Télécommande Par Fil
5. Caractéristiques et fonction de la télécommande par fil Caractéristiques : • Affichage LCD. • Affichage du code de dysfonctionnement : il peut afficher le code d'erreur, ce qui est utile pour le service. • Conception de disposition de fil à 4 voies, aucune partie surélevée à... -
Página 109: Nom Sur L'écran Lcd De La Télécommande Par Fil
6. Nom sur l'écran LCD de la télécommande par fil Indication du mode de Indication de température fonctionnement ambiante Indication de la vitesse du Indication de rotation Ventilateur 10 Indication de fonction Suivez-moi Affichage de température 11 Indication de balayage gauche- Indication de verrouillage droite (certains modèles) Indication de °C / °F... -
Página 110: Nom Du Bouton Sur La Télécommande Par Fil
7. Nom du bouton sur la télécommande par fil Bouton Alimentation Bouton Minuterie Bouton Vitesse du ventilateur Bouton MODE Jour de Repos/ bouton DEL Bouton Retour Bouton Ajuster Bouton Balayage Bouton Confirmer 10 Bouton Fonction 11 Bouton Copier 15-FR... -
Página 111: Opération Préparatoire
8. Opération préparatoire Définir le jour et l’heure actuels Appuyez sur le bouton Minuterie pendant 2 secondes ou plus. L'affichage de minuterie clignotera. Appuyez sur le bouton « » ou « » pour définir la date. La date sélectionnée clignotera. Le réglage de la date est terminé... -
Página 112: Opération
9. Opération Sélection de l'échelle de temps Appuyer sur les boutons « » et « » pendant 2 secondes alternera l'affichage du temps de l’horloge entre l'échelle de 12h et 24h. Pour démarrer/arrêter le fonctionnement Appuyez sur le bouton Alimentation. Pour définir le mode de fonctionnement Réglage du mode de fonctionnement Appuyez sur le bouton Mode pour définir le mode... - Página 113 9. Opération Réglage de température ambiante Appuyez sur le bouton « » or « » pour définir la température ambiante. Plage de température de réglage intérieur : 17 à 30°C (62 à 86°F). Sélection de l'échelle de °C &°F (sur certains modèles) Appuyer sur les boutons «...
- Página 114 9. Opération Fonction de verrouillage de sécurité d’enfant Appuyez sur les boutons « » et « » pendant 3 secondes pour activer la fonction de verrouillage de sécurité d'enfant et verrouiller tous les boutons sur la télécommande par fil. Appuyez à nouveau sur les boutons pendant 3 secondes pour désactiver la fonction de verrouillage de sécurité...
- Página 115 9. Opération Fonction Balayage (pour l'unité de modèle sans balayage automatique à gauche et à droite) Direction du flux d’air et balayage Haut-Bas • Utilisez le bouton Balayage pour ajuster la direction du flux d’air Haut-Bas. 1. En appuyant sur le bouton à chaque fois, le volet balaye 6 degrés. 2.
- Página 116 9. Opération 3. Et puis utilisez le bouton Balayage pour ajuster la direction du flux d’air Haut-Bas du volet sélectionné. Appuyez sur le bouton FONCTION pour définir la fonction turbo ou rotation ou Ifeel. L'icône de fonction de sélection clignotera, puis appuyez sur le bouton Confirmer pour confirmer le réglage.
- Página 117 9. Opération Unité Lorsque l'indication de fonction Suivez-moi intérieure apparaît, la température ambiante est détectée à la télécommande par fil. Appuyez à nouveau sur le bouton pour annuler la fonction Suivez-moi. Indication de rotation et de réserve Lorsqu'il y a deux unités, appuyez sur le bouton pour sélectionner la fonction de rotation et appuyez sur «...
-
Página 118: Fonction De Minuterie
4. Étape 4 : définir quelle machine fonctionnera en premier. Sélectionnez A ou B. 5. Une fois que cette fonction est activée, tant que le climatiseur fonctionne pendant l'heure définie, elle allume automatiquement un autre climatiseur et éteint le climatiseur actuel. Appuyez sur le bouton Alimentation pour passer à... - Página 119 10. Fonctions de minuterie Pour définir Activer ou Désactiver la Minuterie Appuyez sur le bouton Minuterie pour sélectionner Aucun affichage Appuyez sur le bouton Confirmer et l’affichage de la minuterie clignote. Ex. Désactiver la minuterie est défini à 18h00 Appuyez sur le bouton « »...
- Página 120 10. Fonctions de minuterie Pour définir Activer et Désactiver la Minuterie Appuyez sur le bouton Minuterie pour sélectionner le Appuyez sur le bouton Confirmer et l'affichage d’horloge clignote. Appuyez sur le bouton « » ou « » pour définir l’heure d’Activer la minuterie, puis appuyez sur le bouton Confirmer pour confirmer le réglage.
-
Página 121: Minuterie Hebdomadaire 2
11. Minuterie hebdomadaire 1 1. Réglage de minuterie hebdomadaire Appuyez sur le bouton Minuterie pour sélectionner puis appuyez sur le bouton Confirmer pour confirmer. 2. Réglage de jour de la semaine Appuyez sur le bouton « » ou « » pour régler le jour de la semaine, puis appuyez sur le bouton Confirmer pour confirmer le réglage. - Página 122 11. Minuterie hebdomadaire 1 Ex. Échelle de temps du Mardi 1 4 réglages maximaux de minuterie peuvent être enregistrés pour chaque jour de la semaine. Il est commode si la minuterie hebdomadaire est définie selon le style de vie de l'utilisateur. 4.
- Página 123 11. Minuterie hebdomadaire 1 Fonctionnement de minuterie hebdomadaire Pour activer le fonctionnement de minuterie hebdomadaire Appuyez sur le bouton Minuterie lorsque est affiché sur l'écran LCD. Pour désactiver le fonctionnement de minuterie hebdomadaire Appuyez sur le bouton Minuterie lorsque disparaît de l'écran LCD.
- Página 124 11. Minuterie hebdomadaire 1 Pour définir le Jour de repos (pour des vacances) Pendant la minuterie hebdomadaire, appuyez sur le bouton Confirmer. Appuyez sur le bouton « » ou « » pour sélectionner le jour de la semaine courante. Appuyez sur le bouton Jour de repos pour définir le Jour de repos.
- Página 125 11. Minuterie hebdomadaire 1 Fonction de Retard Pendant la minuterie hebdomadaire, en appuyant sur le bouton DEL une fois, il affiche « ». Appuyez sur ce bouton deux fois, il affiche « » et attendez 3 secondes pour confirmer. Cela signifie que l'unité...
- Página 126 11. Minuterie hebdomadaire 1 Appuyez sur le bouton Copier, la lettre « CY » sera affichée sur l'écran LCD. Appuyez sur le bouton « » ou « » pour sélectionner le jour où la copie sera réalisée. Appuyez sur le bouton Copier pour confirmer . La marque clignote rapidement...
- Página 127 12. Minuterie hebdomadaire 2 1. Réglage de minuterie hebdomadaire Appuyez sur Minuterie pour sélectionner le appuyez sur Confirmer. 2. Réglage de jour de la semaine Appuyez sur « » ou « » pour sélectionner le jour de la semaine, puis appuyez sur Confirmer. 3.
-
Página 128: Important
12. Minuterie hebdomadaire 2 IMPORTANT: 8 événements programmés au maximum peuvent être définis dans un jour. Divers événements peuvent être programmés en MODE, TEMPERATURE et Ex. Échelle de temps du Mardi 1 Vitesse de Ventilateur. 4. Réglage de temps Appuyez sur « »... - Página 129 12. Minuterie hebdomadaire 2 7. Réglage de vitesse du ventilateur Appuyez sur « » ou « » pour définir la vitesse du ventilateur, puis appuyez sur Confirmer. NOTE : Ce réglage n'est pas disponible en modes AUTO, Déshumidification d’air ou Arrêt. 8.
- Página 130 12. Minuterie hebdomadaire 2 Fonctionnement de minuterie hebdomadaire Pour démarrer Appuyez sur Minuterie pour sélectionner le , puis la minuterie démarre automatiquement. Pour annuler Appuyez sur le bouton Alimentation pendant 2 secondes pour annuler le mode minuterie. Le mode minuterie peut également être annulé en changeant le mode minuterie à...
- Página 131 12. Minuterie hebdomadaire 2 Appuyez sur le Jour de repos pour créer un jour de repos. La marque est cachée Ex. Le Jour de repos est défini à mercredi Définissez le Jour de repos pour les autres jours en répétant les étapes 2 et 3. Appuyez sur Retour pour revenir à...
- Página 132 12. Minuterie hebdomadaire 2 Appuyez sur « » ou « » pour sélectionner le jour à copier. Appuyez sur Copier, les lettres CY apparaissent sur l'écran LCD. Appuyez sur « » ou « » pour sélectionner le jour où la copie sera réalisée. Appuyez sur Copier pour confirmer.
- Página 133 12. Minuterie hebdomadaire 2 Supprimer l'échelle de temps dans un jour. Pendant le réglage de minuterie hebdomadaire, appuyez sur Confirmer. Appuyez sur « » ou « » pour sélectionner le jour de la semaine, puis appuyez sur Confirmer. Appuyez sur « »...
-
Página 134: Traitement De L'alarme De Défaut
13. Traitement d'alarme de défaut Si le système ne fonctionne pas correctement, sauf les cas mentionnés ci- dessus ou les dysfonctionnements mentionnés ci-dessus, examinez le système selon les procédures suivantes. AFFICHAGE DE DYSFONCTIONNEMENT & PROTECTION N° CATASTRON DÉFINIE Erreur de communication entre la télécommande par fil et l'unité... -
Página 135: Consultation Et Paramètres
15. Consultation et paramètres Lorsque l'unité de climatisation est la machine de commutation, Appuyez sur « Copier » pendant 3 secondes, il affiche d'abord P:00, si connecté à une unité intérieure, il affiche P:00, si connecté à plusieurs unités intérieures, appuyez sur « »... - Página 136 15. Consultation et paramètres Compensation de température de la fonction Suivez-moi Lorsque l'unité de climatisation s’éteint, passez à la fonction de consultation de température, appuyez sur « » ou « » pour sélectionner tF. Plage de température de compensation : -5°C à 5°C. Appuyez sur «...
- Página 137 15. Consultation et paramètres Définir les valeurs de température les plus élevées et les plus basses Lorsque l'unité de climatisation s’éteint, passez à la fonction de consultation de température, appuyez sur « » ou « » pour sélectionner tHI ou tLo. Appuyez sur « Confirmer » pour accéder à...
- Página 138 15. Consultation et paramètres Sélection de deux adresses de la télécommande par fil Lorsque l'unité de climatisation s’éteint, passez à la fonction de consultation de température, appuyez sur « » ou « » pour sélectionner Adr, la zone de température affichera --ou A, B. Où...
- Página 139 15. Consultation et paramètres Une fois que la télécommande par fil reprend le réglage des paramètres de l'usine, le réglage des paramètres de rotation est restauré à 10 heures (la température la plus élevée et la plus basse ne sont pas définies) ; la compensation de la température corporelle n'est pas compensée ;...
- Página 140 Questo manuale fornisce una descrizione dettagliata delle precauzioni a cui prestare attenzione durante il funzionamento. Si prega di leggere attentamente questo manuale prima di utilizzare l'unità per garantire la corretta manutenzione della porta intelligente. Conservare il presente manuale dopo averlo letto in modo da poterlo consultare in futuro.
- Página 141 Sommario 1. Precauzioni di sicurezza ..........1 2. Accessorio per l’Installazione .........2 3. Metodo di Installazione ...........4 4. Specificazione ............. 12 5. Caratteristica e funzione del controller cablato..... 13 6. Nome sul display LCD del controller cablato ....14 7. Nome del pulsante sul controller cablato......15 8.
-
Página 142: Precauzioni Di Sicurezza
1. Precauzioni di sicurezza ATTENZIONE: • Si prega di incaricare il distributore o i professionisti di installare l'unità. • L'installazione da parte di altre persone può causare installazioni imperfette, scosse elettriche o incendi. • Aderire a questo manuale di installazione. •... -
Página 143: Accessorio Per L'installazione
1. Precauzioni di sicurezza NOTA: • Per il collegamento devono essere utilizzati i cavi specificati. Nessuna forza esterna può essere applicata al terminale. Altrimenti, potrebbero verificarsi lacerazioni dei cavi o surriscaldamento con conseguente incendio. 2. Accessorio per l’Installazione Seleziona la posizione di installazione Non installare nel luogo coperto da olio pesante, vapore o gas solforato, altrimenti questo prodotto si deformerebbe, causando un malfunzionamento del sistema. - Página 144 2. Accessorio per l’Installazione 2. Preparare i seguenti assiemi sul sito. Qt. (Incorporato Specificazione Nome Osservazioni nel muro) (solo per referenza) Interruttore Tubo di cablaggio (guaina isolante e vite di serraggio) Precauzioni per l'installazione del telecomando via cavo 1. Questo manuale fornisce il metodo di installazione del controller cablato.
-
Página 145: Metodo Di Installazione
3. Metodo di Installazione 1. Dimensioni strutturali del telecomando cablato 20mm 20mm 120mm 120mm 46mm 46mm Fig. 3-1 60mm 60mm 2. Rimuovere la parte superiore del controller cablato • Inserire un cacciavite Posizione di instabilità Copertura posteriore nello slot nella parte inferiore della porta smart (2 punti) e rimuovere la Copertura... -
Página 146: Fissare La Piastra Posteriore Del Controller Cablato
3. Metodo di Installazione NOTA: Il PCB è montato nella parte superiore del controller cablato. Fare attenzione a non danneggiare la scheda con il cacciavite a taglio. 3. Fissare la piastra posteriore del controller cablato • Per il montaggio a vista, fissare la piastra posteriore sulla parete con le 3 viti (M4 ×... - Página 147 3. Metodo di Installazione NOTA: Metti su una superficie grassa. Fare attenzione a non deformare la piastra posteriore del controllore filo serrando eccessivamente le viti di montaggio. 4. Installazione della batteria Fig. 3-5 • Inserire la batteria nel sito di installazione e assicurarsi che il lato positivo della batteria sia conforme al lato positivo del sito di installazione (vedere Fig.3-5) •...
- Página 148 3. Metodo di Installazione 5. Collegare con l'unità interna 60mm Foro di cablaggio HA HB Fig. 3-6 1. Unità interna 2. incidere la parte per il passaggio del cablaggio con tronchesi, ecc. Connettere i terminali al telecomando remoto (HA, HB) e i terminali all'unità...
- Página 149 3. Metodo di Installazione Per alcune unità, il telecomando via cavo si connette alle porte HA e HB dell'unità attraverso le porte HA e HB. Non c'è polarità tra HA e HB. Vedi Fig. 3-7 Unità interna Adattatore di trasferimento CN44/CN8 HA HB Telecomando via cavo...
- Página 150 3. Metodo di Installazione Il telecomando via cavo principale/secondario può essere utilizzato per attivare due telecomandi via cavo di una unità di controllo, e due telecomandi via cavo si connettono alle porte HA e HB dell'unità tramite le porte HA e HB sul telecomando. Non c'è polarità tra HA e HB.
- Página 151 3. Metodo di Installazione Per alcune unità, un telecomando via cavo può supportare più unità (fino a un massimo di 16 unità). In questo caso, il telecomando via cavo e l'unità devono essere collegati alle porte HA e HB contemporaneamente. In modalità di controllo di gruppo, non verrà...
- Página 152 3. Metodo di Installazione Stucco Trappola Stucco Stucco Trappola Trappola Fig. 3-10 6. Riattaccare la parte superiore del telecomando via cavo • Dopo aver regolato il maiuscolo e poi fibbia il maiuscolo; evitare di bloccare il cablaggio durante l’installazione. (Fig 3-11) Tutte le immagini di questo manuale sono solo a scopo esplicativo.
-
Página 153: Specificazione
4. Specificazione Tensione di ingresso DC 12V Temperatura -5~43ºC (23~110ºF) ambiente Umidità ambientale RH40%~RH90% Specifiche di cablaggio Tipo di cablaggio Taglia Lunghezza totale 0,5mm ≤20m (66’) cavo o cavetto in vinile schermato 0,75-1,25mm ≤50m (164’) 12-IT... -
Página 154: Caratteristica E Funzione Del Controller Cablato
5. Caratteristica e funzione del controller cablato Caratteristica: • Schermo LCD. • Visualizzazione del codice di errore: può visualizzare il codice di errore, utile per l'assistenza. • Design del layout a 4 vie, nessuna parte rialzata sul retro, più comodo per posizionare i cavi e installare il dispositivo. -
Página 155: Nome Sul Display Lcd Del Controller Cablato
6. Nome sul display LCD del controller cablato Indicazione della modalità Indicazione della temperatura ambiente operativa Indicazione della velocità della Indicazione rotazione ventola 10 Seguimi indicazione funzione Display della temperatura 11 Indicazione dell'oscillazione Indicazione di blocco sinistra-destra (alcuni modelli) Indicazione ° C / ° F 12 Visualizzazione dell'orologio Indicazione dell'unità... -
Página 156: Nome Del Pulsante Sul Controller Cablato
7. Nome del pulsante sul controller cablato Tasto POWER (ACCENSIONE) Tasto TIMER (TEMPORIZZATORE) Tasto MODE (MODALITÀ) Tasto FAN SPEED (VENTOLA Tasto DEL OFF / DEL VELOCE) (SPEGNIMENTO / Tasto BACK (INDIETRO) CANCELLAZIONE) Tasto SWING (angolazione FLAP) Tasto ADJUST (REGOLARE) 10 Tasto FUNC. (FUNZ.) Tasto CONFIRM (CONFERMARE) 11 Tasto COPY (COPIA) 15-IT... -
Página 157: Operazioni Preparatorie
8. Operazioni preparatorie Impostare il giorno e l'ora attuali Premere il pulsante Timer (Temporizzatore) per 2 secondi o più. Il display del timer accelera. Premere il pulsante “ ” o “ ” per impostare la data. La data selezionata accelererà. L'impostazione della data è... -
Página 158: Funzionamento
9. Funzionamento Selezione scala orario Premere i pulsanti “ ” e “ ” per 2 secondi per passare da 12H a 24H. Per avviare / interrompere l'operazione Premere il tasto Power. Premi il pulsante Power (accensione). Impostazione della modalità operativa Premere il pulsante Mode (modalità) per impostare la modalità... - Página 159 9. Funzionamento Impostazione della temperatura ambiente Premere il pulsante “ ” o “ ” per impostare la temperatura della stanza. Intervallo di temperatura di impostazione interna: 17~30°C(62~86°F ). Selezione scala ° C e ° F (su alcuni modelli) Più Più alta Premere i pulsanti“...
- Página 160 9. Funzionamento Funzione blocco bambini Premere i pulsanti “ ” e “ ” per 3 secondi per attivare la funzione di blocco bambini e bloccare tutti i pulsanti sul controller filo. Premere nuovamente i pulsanti per 3 secondi per disattivare la funzione di blocco bambini. Quando la funzione blocco bambini è...
- Página 161 9. Funzionamento Funzione di oscillazione (per unità senza oscillazione sinistra e destra). Direzione e rotazione del flusso d'aria su-giù • Utilizzare il pulsante Swing per regolare la direzione del flusso d'aria su-giù. 1. Premere il pulsante ogni volta, la feritoia oscilla di 6 gradi. 2.
- Página 162 9. Funzionamento 3. Quindi utilizzare il pulsante Swing per regolare la direzione del flusso d'aria Su-Giù della feritoia selezionata. Premere il pulsante FUNC. (FUNZ.) per impostare funzione turbo, rotazione o Ifeel. L'icona della funzione selezionata lampeggerà, successivamente premere il pulsante Confirm (conferma) per confermare l'impostazione.
- Página 163 9. Funzionamento Unità Quando appare l'indicazione della funzione interna follow me, la temperatura ambiente viene rilevata dal controller del filo. Premere di nuovo il pulsante per annullare la funzione follow me. Indicazione rotazione e back-up Quando sono presenti due unità, premere il pulsante per selezionare la funzione rotazione e premere Confirm (conferma) per attivare o disattivare la funzione rotazione.
-
Página 164: Funzionalità Timer
4. Step 4: impostare quale unità funziona prima. Selezionare A o B. 5. Dopo aver attivato questa funzione, fino a quando il condizionatore è in funzione nell'orario impostato, accenderà in automatico un altro condizionatore e spegnerà il condizionatore corrente. Premere il pulsante di ACCENSIONE per accendere un altro condizionatore immediatamente. - Página 165 10. Funzionalità timer Per impostare il TIMER di accensione o spegnimento Premere il pulsante Timer (Temporizzatore) per selezionare Nessuna visualizzazione Premere il pulsante Confirm (conferma) e il timer lampeggerà ex.Off timer impostato alle 18:00 Premere il pulsante “ ” o “ ”...
- Página 166 10. Funzionalità timer Per impostare il TIMER di accensione o spegnimento Premere il pulsante Timer (Temporizzatore) Premere il pulsante Confirm (conferma) e l'orario lampeggerà. Premere il pulsante “ ” o “ ” per impostare timer ON, premere Confirm (conferma) per completare l'impostazione. Premere il pulsante “...
- Página 167 11. Timer settimanale 1 1. Impostazione del timer settimanale Premere il pulsante timer e premere il pulsante conferma per completare l'impostazione. 2. Impostazione del giorno della settimana Premere il pulsante “ ” o “ ” per selezionare il giorno della settimana e premere Confirm (conferma) per completare l'impostazione.
-
Página 168: Timer Settimanale
11. Timer settimanale 1 ex. Scala temporale martedì 1 È possibile salvare fino a 4 impostazioni del timer per ogni giorno della settimana, se il Timer settimanale è impostato in base allo stile di vita dell'utente. 4. Impostazione del timer disattivato dell'impostazione del timer Premere il pulsante “... - Página 169 11. Timer settimanale 1 Funzionamento con timer SETTIMANALE Per attivare il TIMER SETTIMANALE Premere il pulsante Timer (Temporizzatore) appare sullo schermo LCD. Per disattivare il TIMER SETTIMANALE Premere il pulsante Timer (Temporizzatore) scompare dallo schermo LCD. Per spegnere il condizionatore d'aria durante il timer settimanale 1.
- Página 170 11. Timer settimanale 1 Per impostare il GIORNO SPENTO (per una vacanza) Durante il timer settimanale, premere il pulsante Confirm (Conferma). Premere il pulsante “ ” or “ ” per selezionare il giorno della settimana. Premere il pulsante giorno off per impostare DAY OFF (GIORNO OFF) marchio è...
- Página 171 11. Timer settimanale 1 Funzione DELAY Durante timer settimanale, premere il pulsante Del (ritardo), viene mostrato “ ”. Premere due volte questo pulsante, visualizzare “ ” e attendere 3 secondi per confermare. Significa che l'unità sostituirà 1 ora; Premere questo pulsante tre volte, visualizzare “...
- Página 172 11. Timer settimanale 1 Premere il pulsante Copy (Copia), sul display LCD verrà visualizzata la lettera "CY". Premere il pulsante “ ” o “ ” per selezionare il giorno su cui copiare. Premere il pulsante Copy (Copia) per confermare. simbolo lampeggia velocemente.
- Página 173 12. Timer settimanale 2 1. Impostazione del timer settimanale Premere il timer (temporizzatore) per selezionare e premere conferma. 2. Impostazione del giorno della settimana Premere “ ” o “ ” per selezionare il giorno della settimana e poi premere CONFIRM (CONFERMA). 3.
-
Página 174: Importante
12. Timer settimanale 2 IMPORTANTE: È possibile programmare fino a 8 eventi al giorno. Possono essere programmati diversi eventi in MODALITÀ, TEMPERATURA ex. Scala temporale e velocità VENTOLA. martedì 1 4. Impostazioni orario Premere “ ” o “ ” per impostare l'orario e premere CONFERMA. - Página 175 12. Timer settimanale 2 7. Indicazione della velocità della ventola Premere “ ” o “ ” per impostare la velocità della ventola e premere CONFIRM (CONFERMA). NOTA: Questa impostazione non è disponibile in modalità AUTOMATICO, DEUMIDIFICAZIONE e OFF. 8. È possibile impostare diversi eventi programmati ripetendo i passaggi da 3 a 7.
- Página 176 12. Timer settimanale 2 Funzionamento con timer SETTIMANALE Iniziare Premere timer per selezionare successivamente il timer si avvierà in automatico. Per cancellare Premere i pulsanti di accensione per 2 secondi per annullare la modalità timer. La modalità timer può anche essere annullata modificando la modalità...
- Página 177 12. Timer settimanale 2 Premere DAY OFF (GIORNO SPENTO) per creare un giorno libero. marchio è nascosto Premere GIORNO OFF per creare un giorno off. 4 Impostare il GIORNO SPENTOF per altri giorni ripetendo i passi 2 e 3. Premere BACK (INDIETRO) per tornare al timer settimanale.
- Página 178 12. Timer settimanale 2 Premere “ ” o “ ” per selezionre il giorno da copiare. Premere il pulsante Copy (copia), le lettere “CY” verranno mostrato sullo schermo LCD. Premere “ ” o “ ” per selezionare il giorno su cui copiare. Premere COPY (COPIA) per confermare.
- Página 179 12. Timer settimanale 2 Elimina la scala temporale in un giorno. Durante l'impostazione del timer settimanale, premere CONFIRM (CONFERMA). Premere “ ” o “ ” per selezionare il giorno della settimana e poi premere CONFIRM (CONFERMA). Premere “ ” o “ ”...
-
Página 180: Gestione Falso Allarme
13. Gestione falso allarme Se il sistema non funziona correttamente ad eccezione dei casi sopra menzionati o dei malfunzionamenti sopra menzionati è evidente, investigare il sistema secondo le seguenti procedure. DEFINIZIONE MALFUNZIONAMENTO E Display PROTEZIONE tubo digitale Errore di comunicazione tra il controllore a filo e l'unità... -
Página 181: Richieste E Impostazioni
15. Richieste e impostazioni Quando l'unità del condizionatore è il quadro, tenere premuto COPIA per 3 secondi, viene mostrato P:00, se è connessa a un'unità interna, viene mostrato P:00, se connessa a più unità interne, premere “ ” o “ ”... - Página 182 15. Richieste e impostazioni Compensazione della temperatura di funzione Follow me Quando il condizionatore è spento, nella funzione di richiesta temperatura, premere “ ” o “ ” per selezionare tF. La temperatura di compensazione Campo : -5°C~5°C. Premere conferma nello stato di impostazione, premere “...
- Página 183 15. Richieste e impostazioni Impostare i valori di temperatura massima e minima est Quando il condizionatore è spento, nella funzione di richiesta temperatura, premere “ ” o “ ” per selezionare tHI o tLO. Premere conferma nello stato di impostazione, premere “ ”...
- Página 184 15. Richieste e impostazioni Selezione indirizzo telecomando due linee Quando il condizionatore è spento, nella funzione di richiesta temperatura, premere “ ” o “ ” per selezionare INlt, viene mostrato la zona di temperatura --. Dove -- si riferisce all'impostazione del codice del controllore a filo.
- Página 185 15. Richieste e impostazioni Dopo che il telecomando via cavo ha ripristinato i parametri di fabbrica, la compensazione della temperatura non è compensata. COOL (RAFFREDDAMENTO) e HEAT (RISCALDAMENTO) / modalità COOL (RAFFREDDAMENTO) singolo sono ripristinate sui modelli RAFFREDDAMENTO e RISCALDAMENTO. La temperatura è...
- Página 186 Carrier is committed for continuous improvement of Carrier products according standards to ensure the highest quality and to national and international reliability standards, and to meet market regulations and requirements. specifications subject to change without prior notice according to Carrier policy of continuous development BEIJER REF AB Stortorget 8 Malmö...