Tabla de contenido
Publicidad
Idiomas disponibles
Idiomas disponibles
Enlaces rápidos
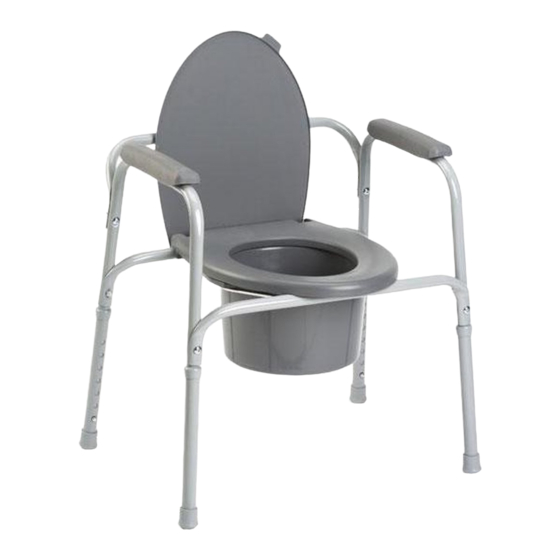
Model No. 9630E
SAFETY SUMMARY
The following recommendations are made for the safe
installation of the Commodes:
WARNING
DO NOT install this equipment without
first reading and understanding this in-
struction sheet. If you are unable to un-
derstand these instructions, contact a
healthcare professional, dealer or tech-
nical personnel if applicable before at-
tempting to install this equipment - oth-
erwise, injury or damage may occur.
Check all parts for shipping damage.
In case of shipping damage, DO NOT
use. Contact Dealer/Carrier for further
instruction.
Snap buttons MUST be fully engaged and
aligned in the proper height adjustment
hole of each leg before use. This ensures
that the legs are securely locked and an
even height adjustment is achieved.
Make certain ALL screws, nuts and/or
bolts are tight at all times.
Inspect rubber tips on the leg exten-
sions for rips, wear or if they are miss-
ing. Replace them immediately if any
of these conditions exist.
Leg extensions with rubber tips MUST
be in contact with the floor at all times.
Users with limited physical capabilities
should be supervised or assisted when
using the commode.
The Commode Model No. 9630E has a
weight limitation of 135 kg.
LEG HEIGHT ADJUSTMENT
(FIGURE 1)
1. Select the desired height for the commode by align-
ing the snap button of each leg extension with the
appropriate adjustment hole in the leg frame.
2. Make certain that the snap buttons are fully en-
gaged into the adjustment hole of each leg frame
and are at the same height before using.
INSTALLING AND REMOVING
THE COMMODE SEAT AND LID
(FIGURE 2)
Before removing/installingseat and lid, al-
low seat/ring to reach room temperature if
exposed to cold. This will help prevent the
seat clamps from breaking when being re-
moved/installed onto commode back
frame rail.
1. Align the seat clamps of the toilet seat onto the
back frame rail. (Each clamp should sit out-
side the pail holders). Push down on seat until
it clamps firmly into place.
2. Repeat the same process for the lid.
3. When removing the seat or lid, remove the lid
first and then the seat. To remove, grasp the back
corner of the lid and/or seat and lift up firmly.
CARE: Use a damp cloth and soap to
clean.
NOTE: To make raising or lowering the seat/lid
easier, you may lubricate the commode back
frame rail with a very small amount of petroleum
jelly or furniture polish.
Toilet seat MUST be DOWN before sitting
on the commode. Pail holders are NOT
constructed to support the weight of an
individual, ONLY the pail and its contents.
Back Tube Models -9630E; wing nuts must
be inspected regularly for proper tight-
ness. (Refer to Item No. 6 in Parts List).
1
Snap Button
CAUTION
WARNING
CAUTION
Publicidad
Tabla de contenido

Resumen de contenidos para Invacare 9630E
- Página 1 The Commode Model No. 9630E has a WARNING weight limitation of 135 kg. Toilet seat MUST be DOWN before sitting LEG HEIGHT ADJUSTMENT on the commode.
-
Página 2: Parts List
Commode Seat Seat Clamp Pail Holder Pail Back Frame Rail REPLACING THE COMMODE ARMRESTS (FIGURE 3) 1. Remove the Phillips Tap Screws, two (2) each from the underside of the arm tube(s). 2. Lift armrest(s) from the arm tube(s). 3. Install/reinstall the armrest(s). PARTS LIST ITEM DESCRIPTION... -
Página 3: Sicherheitsvorschriften
9630E Sicherheitsvorschriften EINSTELLEN DER VERSTELL- BAREN FUSSELEMENTE Hinsichtlich einer korrekten Benutzung des (ABBILDUNG 1) Toilettenstuhls empfehlen wir die Beachtung nachstehender Vorgaben: 1. Gewünschte Stuhlhöhe einstellen: Hierzu die ACHTUNG: Druckknöpfe jeden Fußteils auf die geeignete Vor dem Aufstellen dieses Produktes Höhenbohrung der Rahmenfüße ausrichten. - Página 4 ANMERKUNG: Die Sitzfläche und der Klappdeckel lassen sich leichter hochnehmen und absenken, wenn die hinteren Rahmenelemente z.B. mit Silikonfett oder einem Gleitmittel geschmiert werden. ACHTUNG: Sitzfläche vor jeder Benutzung des Toilettenstuhls absenken. Eimerhalteführungen sind nicht dazu bestimmt das Gewicht des Benutzers aufzunehmen, sondern dienen lediglich dem Halten des Eimers u.
-
Página 5: Pautas De Seguridad
9630E PAUTAS DE SEGURIDAD INSTALACIÓN Y USO DEL ASIENTO Y LA TAPA (FIGURA 2) Para una correcta utilización de la silla W.C. siga las instrucciones que se detallan a continuación. ADVERTENCIA Antes de utilizar la silla procure que la ADVERTENCIAS misma haya alcanzado la temperatura No instale la silla sin haber leído y... -
Página 6: Sustitución De Las Gomas De Reposa Brazo
SUSTITUCIÓN DE LAS GOMAS DE REPOSA BRAZO 1. Desmonte los tornillos, 2 debajo de cada tubo de reposa brazos. 2. Desmonte las gomas de reposa brazo 3. Coloque las gomas nuevas y atorníllelas a los tubos. Reposa Brazo Tornillo LISTA DE PIEZAS REF DESCRIPCIÓN CANT: Contera caucho... -
Página 7: Consignes De Sécurité
9630E CONSIGNES DE SÉCURITÉ 2. S’assurer que les boutons pressions soient complétement engagés dans les trous prévus à Les recommandations ci-dessous vous permettront cet effet et que chaque pied possède le même d’installer et d’utiliser la chaise-toilette en toute sécurité: réglage en hauteur avant utilisation. -
Página 8: Liste Des Pieces
Seau et couvercle Système anti-projection Accoudoir Vis cruciforme Ressort, bouton www.invacare.com One Invacare Way Les Roches Invacare and "Yes, you can" are trademarks of Invacare Elyria, Ohio USA 37230 Fondettes Corporation. 44036-2125 France 37930 © 2000 Invacare Corporation 800-333-6900 47-62-64-66 Form No.


