
Manuales relacionados para HoMedics BPW-050


Resumen de contenidos para HoMedics BPW-050
- Página 1 Automatic Wrist Blood Pressure Monitor El manual en BPW-050 español empieza en la lifetime página 38 limited warranty...
-
Página 2: Tabla De Contenido
TABLE OF CONTENTS INTRODUCTORY INFORMATION: Important Notes Regarding Your Blood Pressure Measurement ..27 Important Product Notices and Safety Instructions ....3 Recalibration Service ... .28 About Blood Pressure . -
Página 3: Important Product Notices And Safety Instructions
medications without the advice of your physician or healthcare professional. • This product is not suitable for people IMPORTANT PRODUCT NOTICES AND with arrythmias. This device may have difficulty determining the proper blood SAFETY INSTRUCTIONS pressure for individuals with diabetes, When using your blood pressure monitor, poor circulation of blood, kidney prob- basic precautions should always be... -
Página 4: About Blood Pressure
ovens). These may lead to temporary ABOUT BLOOD PRESSURE impairment of measurement accuracy. What is Blood Pressure? • Use blood pressure monitor only for its Blood pressure is the pressure exerted on intended use. the artery walls while blood flows through •... -
Página 5: Blood Pressure Standard
BLOOD PRESSURE STANDARD This monitor comes equipped with a Risk Category Indicator to visually indicate the The US Department of Health & Human assumed risk level of each reading based Services and the National Institutes of upon these standards. See page 24 for Health have developed a blood more information on this feature. -
Página 6: Name/Function Of Each Part
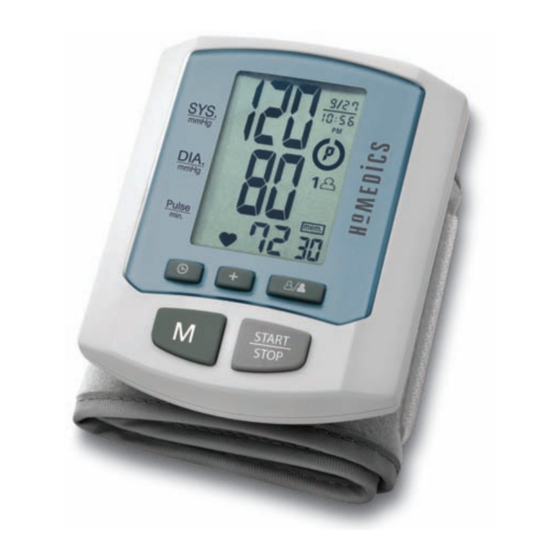
Please note that any muscle movement dur- NAME/FUNCTION OF EACH PART ing inflation or deflation will cause measure- LCD Display ment error. When measurement is complete, Battery the monitor will display your systolic pressure, Cover diastolic pressure, and pulse readings. Based upon your measurement results, the monitor's Risk Category Indicator will alert you if your reading falls into the pre-hypertension,... -
Página 7: Display Explanations
DISPLAY EXPLANATIONS Display Symbols: User 1: Appears when the monitor is operated by User 1. User 2: Appears when the monitor is Date/Time operated by User 2. Indicator Systolic Weak Battery Symbol: Appears when batteries Pressure should be replaced. Pulse Symbol: Shows the pulse rate per minute. Memory Symbol: Shows the memory reading number Memory Average: Displays average of last 3 readings... -
Página 8: Installing Batteries
INSTALLING BATTERIES 5. Replace the cover 1. The battery cover is locat- by snapping it back ed along the right side of into place. the monitor. 2. Remove battery cover Replace the batteries if: by pressing and 1. The weak battery pulling cover away symbol appears in from the monitor. -
Página 9: Date & Time Set Procedure
DATE & TIME SET PROCEDURE APPLYING THE CUFF 1. To adjust the date/time, press the Set 1. Remove all watches, button . The display will show a wrist jewelry, etc. prior blinking number showing the month. to attaching the wrist 2. -
Página 10: Correct Measurement Posture
4. In order to insure accu- CORRECT MEASURE- rate measurements, fas- MENT POSTURE ten the hook and loop 1. Place your elbow on a Fig. A strap securely around table so that the cuff is your wrist so there is no at the same level as extra space between the your heart as shown in... -
Página 11: Measurement Procedure
3. Turn you palm upwards. MEASUREMENT PROCEDURE 4. Sit upright in a chair, Important Notes: Fig. C and take 5-6 deep • Position the monitor at the same level as breaths. your heart during measurement to ensure accurate readings. Avoid leaning back •... - Página 12 1. Press the User Select Button to 3. After all symbols disappear, the display choose User 1 or User 2. will show a blinking “0”. The monitor is “Ready to Measure” and will automati- cally inflate the cuff to begin measure- ment.
-
Página 13: Risk Category Health Indicator
4. When the measurement is completed, the RISK CATEGORY INDICATOR cuff wil deflate entirely and systolic pres- The U.S. Department of Health and sure, diastolic pressure and pulse will be Human Services and The National shown simultaneously on the LCD screen. Institutes of Health have developed a The measurement is then automatically blood pressure standard, classifying blood... -
Página 14: Recalling Values From Memory
RECALLING VALUES FROM MEMORY CLEARING VALUES FROM MEMORY This monitor can be used by two individuals. 1. Press the User-Select button to select Each user can store up to 30 measurements. User 1 or User 2. 1. Press the User-Select button. -
Página 15: Important Notes Regarding Your Blood Pressure Measurement
IMPORTANT NOTES REGARDING YOUR • Once inflation reaches 300 mmHg, BLOOD PRESSURE MEASUREMENT the unit will deflate automatically for • Take your reading in a comfortable safety reasons. environment as measurements can be • This product is not suitable for people affected by hot or cold temperatures. -
Página 16: Care, Maintenance & Cleaning
$10 payable attempt to adjust anything inside the to HoMedics, Inc. for recalibration service device. If you have any problems with and shipping & handling: this device, please contact HoMedics... -
Página 17: Potential For Radio/Television Interference
10. Do not inflate the cuff unless wrapped frequency energy and, if not used in accordance with the instructions, may cause harmful interference to radio around wrist. communications. However, there is no guarantee that 11. Do not wrap the cuff around body parts interference will not occur in a particular installation. -
Página 18: Troubleshooting
Device and cuff are designed to display more information. provide special protection against Note: If the unit still does not work, contact HoMedics Consumer electrical shocks. Relations. Under no circumstance should you disassemble or Note: These specifications are subject to change attempt to repair the unit by yourself. -
Página 19: Lifetime Limited Warranty
RANTIES EXPRESS OR IMPLIED INCLUDING ANY IMPLIED WAR- RANTY OF MERCHANTABILITY OR FITNESS OR ANY OTHER HoMedics sells its products with the intent that they are free of OBLIGATION ON THE PART OF THE COMPANY WITH RESPECT TO defects in manufacture and workmanship for the life of the original PRODUCTS COVERED BY THIS WARRANTY. -
Página 20: Monitor Automático De Presión Sanguínea Para La Muñeca
Monitor automático de presión sanguínea para la muñeca BPW-050 garantía limitada garantía limitada de por vida de por vida... - Página 21 ÍNDICE INFORMACIÓN INICIAL: Cómo recuperar los valores de la memoria 63 Avisos importantes del producto e Cómo borrar los valores de la memoria . . .64 instrucciones de seguridad ... . .41 Notas importantes con respecto a las Sobre la presión sanguínea .
-
Página 22: Avisos Importantes Del Productoe Instrucciones De Seguridad
• Este producto no es adecuado para personas con arritmia. Este dispositivo puede tener dificultad para determinar la correcta presión sanguínea para las personas con diabetes, mala circulación, AVISOS IMPORTANTES DEL PRODUCTO trastornos renales o usuarios que han sufrido una E INSTRUCCIONES DE SEGURIDAD apoplejía. -
Página 23: Sobre La Presión Sanguínea
• Utilice el monitor de presión sanguínea SOBRE LA PRESIÓN SANGUÍNEA únicamente para el uso para el cual fue diseñado. ¿Qué es la presión sanguínea? • No coloque el brazalete en otra parte de su La presión sanguínea es la presión que se ejerce en cuerpo que no sea la muñeca. -
Página 24: Estándar De Presión Sanguínea
ESTÁNDAR DE PRESIÓN SANGUÍNEA Este monitor viene equipado con un Indicador de Categoría de Riesgo para indicar de manera visual el El U.S. Department of Health and Human Services nivel asumido de riesgo de cada lectura en base a y el National Institute of Health han desarrollado estos estándares. -
Página 25: Nombre/Función De Cada Pieza
En base a los resultados de la medición, el Indicador NOMBRE/FUNCIÓN DE CADA PIEZA de Categoría de Riesgo del monitor lo alertará si su lectura se encuentra en las categorías de Pantalla LCD prehipertensión, etapa 1 de hipertensión, o etapa Tapa de las pilas 2 de hipertensión. -
Página 26: Explicaciones De La Pantalla
EXPLICACIONES DE LA PANTALLA Símbolos de la pantalla: Usuario 1: aparece cuando el Usuario 1 opera el monitor. Usuario 2: aparece cuando el Usuario 2 opera el monitor. Indicador de fecha/hora Presión Símbolo de pilas bajas: aparece cuando tiene que sistólica cambiar las pilas. -
Página 27: Instalación De Las Pilas
INSTALACIÓN 5. Vuelva a colocar la tapa, deslizándola hasta que quede DE LAS PILAS en su lugar. 1. La tapa del compartimiento de las pilas está ubicada Reemplace las pilas si: sobre el lado derecho del 1. El símbolo de pilas bajas monitor. -
Página 28: Procedimiento De Configuración De Fecha Y Hora
PROCEDIMIENTO DE CONFIGURACIÓN APLICACIÓN DEL BRAZALETE DE FECHA Y HORA 1. Quítese el reloj, las alhajas que Para ajustar la fecha/hora, presione el botón Set tenga en la muñeca, etc., antes La pantalla mostrará un número intermitente de colocar el monitor para la mostrando el mes. -
Página 29: Postura Correcta Para La Medición
4. A fin de asegurar mediciones POSTURA CORRECTA precisas, ajuste la tira con PARA LA MEDICIÓN velcro en forma segura 1. Coloque el codo sobre una Fig. A alrededor de su muñeca para mesa de modo que el que no haya espacio entre el brazalete quede al mismo brazalete y la muñeca, como nivel que su corazón, como se... -
Página 30: Procedimiento De Medición
3. Coloque la palma de la mano PROCEDIMIENTO DE MEDICIÓN hacia arriba. Notas importantes: Fig. C • Coloque el monitor al mismo nivel que su corazón 4. Siéntese derecho en una silla durante la medición para asegurar lecturas y respire profundamente precisas. - Página 31 1. Presione el botón de Selección de usuario para 3. Una vez que el símbolo desaparezca, la pantalla elegir Usuario 1 o Usuario 2. mostrará un “0” en forma intermitente. El monitor está “Listo para medir” e inflará el brazalete automáticamente para comenzar a medir.
-
Página 32: Indicador De Categoría De Riesgo
4. Cuando la medición esté completa, el brazalete INDICADOR DE CATEGORÍA DE RIESGO se desinflará. Se mostrarán simultáneamente las El U.S. Department of Health and Human Services lecturas de presión sistólica, presión diastólica y el National Institutes of Health han desarrollado y pulso en la pantalla LCD. -
Página 33: Cómo Recuperar Los Valores De La Memoria
CÓMO RECUPERAR LOS VALORES DE LA MEMORIA CÓMO BORRAR LOS VALORES DE LA MEMORIA Este monitor puede ser utilizado por dos individuos. 1. Presione el botón de Selección de usuario Cada usuario puede almacenar hasta 30 mediciones. para elegir Usuario 1 o Usuario 2. 1. -
Página 34: Notas Importantes Con Respectoa Las Mediciones De Presión Sanguínea
NOTAS IMPORTANTES CON RESPECTO • Una vez que esté inflada a 300 mmHg, la unidad se desinflará automáticamente A LAS MEDICIONES DE PRESIÓN por motivos de seguridad. SANGUÍNEA • Este producto no es adecuado para personas • Tome su lectura en un entorno cómodo ya que las con arritmia. -
Página 35: Cuidado, Mantenimiento Y Limpieza
1. Limpie el cuerpo del monitor de presión un cheque u orden de pago por la suma de sanguínea y el brazalete con cuidado con un $10 pagadero a HoMedics, Inc. para el servicio paño suave, apenas húmedo. No lo apriete. de recalibración, porte y manejo: No lave el brazalete ni utilice un limpiador químico para limpiarlo. -
Página 36: Potencial De Interferencia Con Radio/Televisión
7. No doble el brazalete ni el tubo demasiado POTENCIAL DE INTERFERENCIA CON apretados. RADIO/TELEVISIÓN Para EE.UU. únicamente: 8. No desarme el monitor ni el brazalete. Si alguno Este producto ha sido probado y se ha observado que cumple de los componentes necesita reparación, con los límites para un dispositivo digital de Clase B, conforme consulte la sección de la garantía de este a la parte 15 de las reglas FCC. -
Página 37: Diagnóstico Y Resolución De Problemas
Tanto el dispositivo como el brazalete están Nota: si la unidad aún sigue sin funcionar, póngase en contacto con diseñados para proporcionar protección Relaciones con el Consumidor de HoMedics. Bajo ningún especial contra choques eléctricos. concepto deberá desarmar ni intentar reparar la unidad por su cuenta. -
Página 38: Garantía Limitada De Por Vida
(Válida únicamente en los EE.UU.) bajo esta garantía. HoMedics vende sus productos con la intención de que no tengan LA GARANTÍA AQUÍ ESTABLECIDA SERÁ LA ÚNICA Y EXCLUSIVA defectos de fabricación ni de mano de obra durante la vida del GARANTÍA.