Publicidad
sauder.com
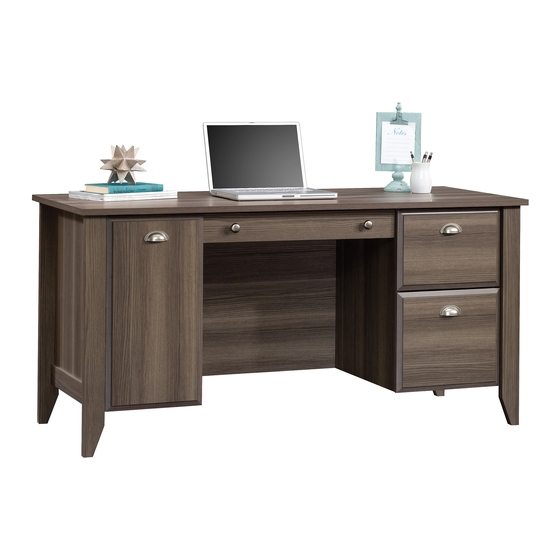
Computer Desk
Shoal Creek Collection | Model 420166
Need help? Visit Sauder.com to view video assembly tips or chat with a live rep.
Prefer the phone? Call 1-800-523-3987.
Share your journey!
Sit and surf.
NOTE: THIS INSTRUCTION
BOOKLET CONTAINS IMPORTANT
SAFETY INFORMATION.
PLEASE READ AND KEEP FOR
FUTURE REFERENCE.
English pg 1-32
Français pg 33-36
Español pg 37-40
Lot # 516039
03/29/18
Purchased: __________________
Be sure to give us a ring before
making any returns. 1-800-523-3987
Publicidad
Tabla de contenido

Manuales relacionados para Sauder Shoal Creek 420166


Resumen de contenidos para Sauder Shoal Creek 420166
- Página 1 Shoal Creek Collection | Model 420166 NOTE: THIS INSTRUCTION BOOKLET CONTAINS IMPORTANT SAFETY INFORMATION. Need help? Visit Sauder.com to view video assembly tips or chat with a live rep. PLEASE READ AND KEEP FOR FUTURE REFERENCE. Prefer the phone? Call 1-800-523-3987.
- Página 2 DRAWER BOTTOM (1) PENCIL DRAWER BRACE (1) LEFT DRAWER SIDE (1) TOP (1) LARGE DRAWER FRONT (1) DRAWER BACK (1) RIGHT BOTTOM (1) PENCIL DRAWER FRONT (1) LARGE DRAWER BACK (1) LEFT BOTTOM (1) END MOLDING (2) Page 2 420166 www.sauder.com/services...
-
Página 3: Part Identifi Cation
Now you know Part Identifi cation our ABCs. D716 D707 D427 D502 D504 D503 D428 www.sauder.com/services 420166 Page 3... - Página 4 SHORT SUPPORT ROD - 1 FILE ROD - 2 FILE GLIDE - 2 CAM - 35 TWIST-LOCK ® WOOD CAM DOWEL - 23 CAM SCREW - 12 ANCHOR PLATE - 2 DOWEL - 8 FASTENER - 8 Page 4 420166 www.sauder.com/services...
- Página 5 BLACK 7/8" LARGE HEAD SCREW - 2 SILVER 3/4" MACHINE SCREW - 6 30S BLACK 1-9/16" FLAT HEAD SCREW - 13 SILVER 5/8" FLAT HEAD SCREW - 4 BLACK 9/16" FLAT HEAD SCREW - 6 SILVER 1-1/2" MACHINE SCREW - 2 www.sauder.com/services 420166 Page 5...
- Página 6 Look for this icon. It means a Step 1 video assembly tip is available at www.sauder.com/services/tips NOTE: You may need someone's help while assembling this unit. å Assemble your unit on a carpeted fl oor or on the empty carton to å...
- Página 7 Turn twelve CAM SCREWS (8F) into the LEGS (K and L). å NOTE: Use the exact holes shown. å Arrow The arrow in the HIDDEN CAM must point toward the hole in the edge of the board. Arrow Arrow (12 used) Hole (12 used) www.sauder.com/services 420166 Page 7...
- Página 8 These surfaces These large should be even. holes must be here. S u r f a c i t h H I D D E N These surfaces should be even. Angled edge Page 8 420166 www.sauder.com/services...
- Página 9 Apply pressure with your hands as you guide the MOLDINGS over the SCREWS and onto the ENDS. Apply pressure with your hands as you guide the MOLDINGS over the SCREWS and onto the ENDS. Shoulder These edges should be even. www.sauder.com/services 420166 Page 9...
- Página 10 D E N These surfaces These large should be even. holes must be here. Angled edge These large holes must S u r be here. f a c i t h H I D D E N Page 10 420166 www.sauder.com/services...
- Página 11 Push the black lever in and pull the SLIDE from the RAIL. Open end These large holes must be here. GOLD 5/16" FLAT HEAD SCREW (4 used in this step) This large hole must be here. Open end www.sauder.com/services 420166 Page 11...
- Página 12 UPRIGHT (C). Use four GOLD 5/16" FLAT HEAD SCREWS (3S) through holes #1 and #3. GOLD 5/16" FLAT HEAD SCREW Roller end (4 used in this step) These large holes must be here. This large hole must be here. Roller end Page 12 420166 www.sauder.com/services...
- Página 13 Push the black lever in and pull the SLIDE from the RAIL. Open end GOLD 5/16" FLAT HEAD SCREW This large (4 used in this step) hole must be here. Open end This large hole must be here. www.sauder.com/services 420166 Page 13...
- Página 14 Fasten the ANCHOR PLATES (66G) to the TOP (E) å exactly as shown. Use eight BLACK 9/16" LARGE HEAD SCREWS (1S). BLACK 9/16" LARGE HEAD SCREW (8 used in this step) This large hole must be here. Page 14 420166 www.sauder.com/services...
- Página 15 Tighten Risk of damage or Arrow injury. HIDDEN CAMS must be completely Arrow Maximum tightened. HIDDEN 210 degrees CAMS that are not completely tightened may loosen, and parts may separate. To Minimum completely tighten: 190 degrees www.sauder.com/services 420166 Page 15...
- Página 16 Step 11 NOTE: You may need someone's help in this step. å Maximum Arrow Insert the dowel ends of four SAUDER TWIST-LOCK® å 210 degrees FASTENERS (7F) into the TOP (E). Push the MODESTY PANEL (H) onto the four TWIST-LOCK®...
- Página 17 Step 12 Fasten the BOTTOMS (F and G) to the UPRIGHTS (C å and D). Tighten four HIDDEN CAMS. Maximum Arrow 210 degrees Minimum 190 degrees Finished edge Finished edge www.sauder.com/services 420166 Page 17...
- Página 18 Step 13 Insert the dowel ends of four SAUDER TWIST-LOCK® å FASTENERS (7F) into the TOP (E). Maximum Arrow 210 degrees Push the ENDS (A and B) onto the four TWIST-LOCK® å FASTENERS in the TOP (E). Minimum Fasten the ENDS (A and B) to the TOP (E). Tighten four å...
- Página 19 Insert the larger end of the LONG SUPPORT ROD (23A) through å the LEFT UPRIGHT (D) and into the ANCHOR PLATE (66G). Slide the TURNBUCKLE (9A) over the other end of the LONG å SUPPORT ROD (23A) exactly as shown. Larger end www.sauder.com/services 420166 Page 19...
- Página 20 SUPPORT RODS and the TOP. Now, insert your screwdriver through the large hole in the middle of the TURNBUCKLE and turn the TURNBUCKLE another half turn. NOTE: Tighten the TURNBUCKLE if the TOP ever begins to sag. å Threaded end Page 20 420166 www.sauder.com/services...
- Página 21 Step 16 Fasten two HINGES (14H) and two HINGE SPACERS (22H) to the å DOOR (I). Use four SILVER 5/8" FLAT HEAD SCREWS (23S). SILVER 5/8" FLAT HEAD SCREW (4 used in this step) www.sauder.com/services 420166 Page 21...
- Página 22 MACHINE SCREWS (20S). Stop Insert the DOOR STOP (4I) into the hole in the LEFT UPRIGHT (D). å See the next step for DOOR adjustments. å Mounting screw Hinge SILVER 3/4" MACHINE SCREW (2 used for the PULL) Page 22 420166 www.sauder.com/services...
- Página 23 To adjust the DOORS in or out (depth), loosen the mounting å screw one turn and move the DOORS in or out, as needed. Mounting screw (depth) Tighten the mounting screw after making adjustments. Adjusting screw (horizontal) (vertical adjustment) www.sauder.com/services 420166 Page 23...
- Página 24 Fasten the PENCIL DRAWER BRACE (M65) to the PENCIL DRAWER SIDES (D427 and D428) and PENCIL PENCIL DRAWER BOX FRONT (D503). Tighten one DRAWER BRACE (M65). Use three BLACK 1-9/16" FLAT HIDDEN CAM. HEAD SCREWS (30S). Page 24 420166 www.sauder.com/services...
- Página 25 (2 used for the KNOBS) BLACK 7/8" LARGE HEAD SCREW (2 used in this step) D503 S u r f a c f e w e r h i t h o l e These edges should be almost even. www.sauder.com/services 420166 Page 25...
- Página 26 Fasten the EXTENSION SLIDES (40NC) to the PENCIL å DRAWER SIDES (D427 and D428). Use four GOLD 5/16" FLAT HEAD SCREWS (3S) through holes #1 and #3. Open end D428 Open end D427 GOLD 5/16" FLAT HEAD SCREW (4 used in this step) Page 26 420166 www.sauder.com/services...
- Página 27 HEAD SCREWS (30S). NOTE: Be sure the LARGE DRAWER BOTTOM (D707) inserts into the groove of the LARGE DRAWER BACK (D78). å Repeat this step for the remaining drawer using parts M, D30, D31, D77, and D716. å www.sauder.com/services 420166 Page 27...
- Página 28 Screw head - turn CAM to line up holes in Open end the SLIDES with holes in DRAWER SIDES Open end SILVER 3/4" MACHINE SCREW (2 used for the PULL) (4 screws per drawer) GOLD 5/16" FLAT HEAD SCREW (4 used in this step) Page 28 420166 www.sauder.com/services...
- Página 29 Screw head - turn CAM to line up holes in the SLIDES with holes in DRAWER SIDES Roller end SILVER 3/4" MACHINE SCREW (2 used for the PULL) (4 screws per drawer) GOLD 5/16" FLAT HEAD SCREW (4 used in this step) www.sauder.com/services 420166 Page 29...
- Página 30 Slide another FILE GLIDE (15B) onto the other end of å the FILE RODS (8B), then press this FILE GLIDE over the LARGE LEFT DRAWER SIDE (D29). Insert the FILE RODS into the holes in the FILE GLIDES depending on your fi le sizes. Page 30 420166 www.sauder.com/services...
- Página 31 Inner cartridge Black tab (4 used) 15 lbs. 60 lbs. 5 lbs. Place the roller on the SLIDE behind the roller on the RAIL. 30 lbs. 20 lbs. 30 lbs. (3 used) To cover HIDDEN CAMS www.sauder.com/services 420166 Page 31...
- Página 32 #4. The higher the screw in the oblong hole, the higher your drawer front will be. The lower the screw, the lower the drawer front. Page 32 420166 www.sauder.com/services...
-
Página 33: Liste De Pièces
40CA ÉLÉMENT DROITE..............1 EXTRÉMITÉ DROITE ..........1 pour future référence. 40CB ÉLÉMENT GAUCHE .............. 1 EXTRÉMITÉ GAUCHE ..........1 Pour contacter Sauder 40CC TIROIR DROIT ................1 MONTANT DROIT ............1 40CD TIROIR GAUCHE ..............1 en ce qui concerne cet MONTANT GAUCHE ..........1 (ENSEMBLE DE GLISSIÈRE ILLUSTRÉ... - Página 34 Pour serrer à bloc, faire tourner l'excentrique escamotable de 210 degrés. REMARQUE : S'assurer de bien insérer les CHEVILLES EN BOIS situées sur les PIEDS dans les trous dans les EXTRÉMITÉS. Page 34 420166 www.sauder.com/services...
- Página 35 ÉTAPE 13 Voir l'étape suivante pour réglages des PORTES. Insérer les extrémités fi letées des quatre FIXATIONS TWIST-LOCK® SAUDER (7F) dans le DESSUS (E). ÉTAPE 18 Enfoncer les EXTRÉMITÉS (A et B) sur les quatre FIXATIONS TWIST-LOCK® dans le DESSUS (E).
- Página 36 REMARQUE : La tête de vis dans l'EXCENTRIQUE doit être visible à travers le trou fendu dans la COULISSE. Fixer un BOUTON (7K) au DEVANT DE TIROIR (M). Utiliser deux VIS À MÉTAUX 19 mm ARGENTÉES (20S). Page 36 420166 www.sauder.com/services...
-
Página 37: Escritorio Para Computadora
PARAL DERECHO ..............1 22A DIVISOR ..................2 PARAL IZQUIERDO ..............1 Pour contacter Sauder 23A VARILLA DE SOPORTE LARGA ........1 D28 LADO DERECHO DE CAJÓN GRANDE ....1 28A VARILLA DE SOPORTE CORTA ........1 en ce qui concerne cet D29 LADO IZQUIERDO DE CAJÓN GRANDE ..... - Página 38 Escondidos que no se aprieten completamente se afl ojarán y las EXCÉNTRICOS ESCONDIDOS. partes pueden separarse. Para apretar completamente, atornille el NOTA: Asegúrese de insertar los PASADORES DE MADERA excéntrico escondido 210 grados. sujetados a las PATAS en los agujeros de los EXTREMOS. Page 38 420166 www.sauder.com/services...
- Página 39 PUERTA (I). Utilice cuatro TORNILLOS PLATEADOS DE CABEZA Inserte los extremos con cabilla de cuatro SUJETADORES PERDIDA de 16 mm (23S). TWIST-LOCK® SAUDER (7F) en el PANEL SUPERIOR (E). Empuje el VELO DE FONDO (H) sobre los cuatro SUJETADORES PASO 17 TWIST-LOCK®...
- Página 40 CORREDERA. muebles preferido o un paño húmedo. Seque con un paño. Fije un POMO (7K) a la CARA DE CAJÓN (M). Utilice dos TORNILLOS PLATEADOS PARA METAL de 19 mm (20S). Page 40 420166 www.sauder.com/services...
- Página 41 à Les téléviseurs peuvent être particulièrement un téléviseur. cet eff et. lourds. De plus, le poids et l’emplacement du tube image ont tendance à rendre les téléviseurs instables et enclins à tomber vers l’ a vant. www.sauder.com/services 420166 Page 41...
- Página 42 Además, el peso y la ubicación del tubo de imagen tienden a causar la inestabilidad de televisores y propensa a volcarse hacia adelante. Page 42 420166 www.sauder.com/services...
-
Página 43: Garantie Limitée De 5 Ans
à compter de la date d'achat la première fois et qui sont signalés à Sauder dans les limites de couverture de la contre tout défaut de matériaux ou de fabrication des composantes de mobilier Sauder. - Página 44 Dear Valued Customer: So, how did it go? Thanks so much for choosing Sauder® furniture. I hope the Set a world record for speed? purchase and assembly process was a positive experience Feeling good about yourself? and you feel good about the furniture you just built. If you Nice.