Tabla de contenido
Publicidad
Idiomas disponibles
Idiomas disponibles
Enlaces rápidos
Publicidad
Capítulos
Tabla de contenido

Manuales relacionados para Oster POGH21402


Resumen de contenidos para Oster POGH21402
- Página 1 MODELO/ POGH21402 POGH21402 MODEL Manual de instrucciones HORNO DE MICROONDAS PARA MOSTRADOR LEA TODAS LAS INSTRUCCIONES ANTES DE USAR ESTE APARATO Instruction Manual COUNTERTOP MICROWAVE OVEN PLEASE READ ALL INSTRUCTIONS BEFORE USING THIS APPLIANCE...
-
Página 2: Tabla De Contenido
ÍNDICE Precauciones importantes................ 2 Guía de instalación.................. 4 Instrucciones para la conexión a tierra............ 4 Diagrama del producto................5 Panel de control..................6 Instrucciones para el funcionamiento............7 Guía de utensilios..................10 Técnicas de cocción.................11 Mantenimiento y limpieza................. 12 Antes de llamar a un técnico..............13 -Especificaciones................... 13 es p año l-1... -
Página 3: Precauciones Importantes
P re c au ci on es i MPorta nte s Cuando se utilicen artefactos eléctricos deben seguirse las precauciones básicas de seguridad incluyendo las siguientes: ADVERTENCIA: Para disminuir el riesgo de quemaduras, descargas eléctricas, incendios y lesiones personales o exposición excesiva a la energía de las microondas: 1. -
Página 4: Precauciones Para Evitar La Posible Exposición Excesiva A La Energía De Las Microondas
18. No haga funcionar ningún artefacto que genere calor o sirva para cocinar debajo de este electrodoméstico. 19. Asegúrese que el plato de vidrio y el aro deslizante estén en su lugar al hacer funcionar el horno. 20. Este electrodoméstico sólo debe ser reparado por personal técnico calificado. Comuníquese con el centro de servicio autorizado más cercano para su inspección,reparación o ajuste. 21. Al limpiar las superficies de la puerta y del horno que entran en contacto al cerrar la puerta, utilice únicamente una esponja o un paño para aplicar jabones o detergentes suaves, no abrasivos. -
Página 5: Guía De Instalación
G u Ía De i n staLac iÓ n 1. Asegúrese de retirar todos los materiales de empaque de la parte interior de la puerta. 2. Compruebe que el horno no tenga daños, como por ejemplo, que la puerta esté desalineada o doblada, que los sellos de la puerta o la superficie de contacto esté dañada, bisagras y cerrojos rotos o sueltos, y abolladuras en la cavidad del horno o en la puerta. Si se observan daños, no haga funcionar el horno y comuníquese con un personal de servicio calificado. 3. Este horno de microondas debe colocarse sobre una superficie plana y estable, capaz de sostener su peso y los alimentos más pesados que pueda llegar a cocinar en el horno. 4. No coloque el horno en áreas donde se genere calor o humedad, ni cerca de materiales combustibles. -
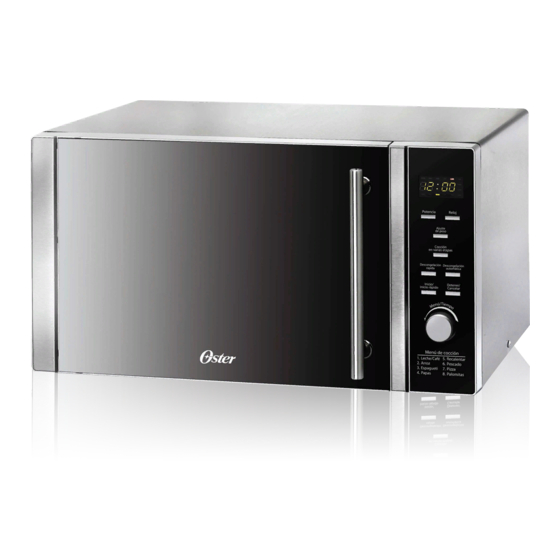
Página 6: Diagrama Del Producto
Di aG r a M a D eL P ro D uc to 1. Sistema de cierre de seguridad de la puerta 2. Ventana del horno 3. Aro deslizante 4. Eje 5. Plato de vidrio 6. Guía de ondas (no retire la placa de mica que cubre la guía para ondas) 7. -
Página 7: Panel De Control
Pa ne L D e c o n t ro L • PANTALLA DEL MENÚ DE ACCIÓN Muestra el tiempo de cocción, la potencia, los indicadores de acción y la hora del reloj. • POTENCIA Presione este botón varias veces para fijar la potencia de cocción del microondas. -
Página 8: Instrucciones Para El Funcionamiento
INSTRUCCIONES PARA EL FUNCIONAMIENTO SONIDOS DE LOS AJUSTES DEL HORNO UN PITIDO: El horno acepta el ajuste. DOS PITIDOS: El horno no acepta el ajuste, compruebe y vuelva a intentarlo. CÓMO CONFIGURAR LA HORA DEL RELOJ El microondas viene equipado con un reloj digital; puede elegir configurarlo como un reloj de 12 o de 24 horas con solo presionar el botón RELOJ mientras esté... -
Página 9: Descongelación Rápida
DESCONGELACIÓN RÁPIDA Puede configurar un programa de descongelación según el tiempo fijado. El tiempo máximo de descongelación es 45 minutos. Supongamos que desea descongelar camarones durante 20 minutos. 1. Coloque los camarones congelados en el microondas y cierre la puerta. 2. -
Página 10: Cocción Automática
COCCIÓN AUTOMÁTICA Para los siguientes alimentos o modos de cocción no es necesario programar la duración ni la potencia. Basta con indicar el tipo de alimentos que desea cocinar y el peso. Tal vez deba voltear los alimentos durante el ciclo de cocción para que se cocinen uniformemente. 1. Estando en el modo en espera, gire el control MENÚ/TIEMPO hacia la izquierda para seleccionar el código del alimento. 2. Presione el botón AJUSTE DE PESO varias veces para configurar el peso o la cantidad de porciones. -
Página 11: Guía De Utensilios
G u Ía D e u t en siL io s En esta sección se indican qué utensilios pueden utilizarse en el microondas, cuáles pueden usarse de forma limitada por breves períodos y cuáles no deben usarse en ningún momento en el microondas. RECoMENDADoS Bandeja para dorar en el microondas: Utilícela para dorar el exterior de alimentos pequeños, tales como bistecs, chuletas o panqueques. Siga las indicaciones que vienen con la bandeja para dorar. -
Página 12: Técnicas De Cocción
t Écn i ca s D e cocc iÓ n El horno de microondas permite cocinar más fácilmente que en una cocina convencional, siempre que se tengan en cuenta las siguientes consideraciones: REVoLVER • Revuelva alimentos tales como guisos y vegetales durante el proceso de cocción, para distribuir el calor uniformemente. • Los alimentos en el borde exterior del recipiente absorben más energía y se calientan más rápidamente, de modo que se debe revolver de afuera hacia adentro. -
Página 13: Mantenimiento Y Limpieza
M a n te n iM i e nto Y L iM Pie Za 1. Al limpiar las superficies de la puerta y del horno que entran en contacto al cerrar la puerta, utilice únicamente una esponja o un paño para aplicar jabones o detergentes suaves, no abrasivos. 2. Apague el horno y desenchufe del tomacorriente antes de limpiarlo. 3. Mantenga limpio el interior del horno. Si las salpicaduras de comida o los líquidos derramados se adhieren a las paredes del horno, límpielo con un paño húmedo. Si el horno está... -
Página 14: Antes De Llamar A Un Técnico
ante s De L a Ma r a un tÉc nico Si el horno no funciona: • Compruebe que el horno esté bien enchufado. De lo contrario, desenchúfelo del tomacorriente, espere 10 segundos y vuelva a enchufarlo bien. • Compruebe que ningún fusible se haya quemado ni que se haya disparado ningún disyuntor. Si todo parece estar funcionando adecuadamente, pruebe el tomacorriente con otro electrodoméstico. • Verifique que el panel de control esté debidamente programado y que el temporizador esté ajustado. • Verifique que la puerta esté bien cerrada. Para hacerlo, active el sistema de bloqueo de seguridad de la puerta. Si no está bien cerrada, la energía de las microondas no fluirá en el horno. - Página 15 TABLE oF CoNTENTS Important safeguards................2 Installation guide..................4 Grounding instructions................4 Product diagram..................5 Control panel ................... 6 Operation instructions................7 Utensils guide...................10 Cooking techniques.................. 11 Cleaning and care..................12 Before you call for service................ 1 3 -Specifications.................. 1 3 en g lish -1...
-
Página 16: Important Safeguards
i MP o rta n t s aF e Gu a r Ds When using electrical appliances, basic safety precautions should be followed, including the following: WARNING -To reduce the risk of burns, electric shock, fire, and injury to persons or exposure to excessive microwave energy: 1. Read all instructions before using the appliance. 2. Read and follow the specific “PRECAUTIONS TO AVOID POSSIBLE EXPOSURE TO EXCESSIVE MICROWAVE ENERGY” on page 3. 3. This appliance must be grounded. Connect only to a properly grounded outlet. See “GROUNDING INSTRUCTIONS” on page 4. 4. Install or locate this appliance only in accordance with the installation instructions provided. 5. Some products such as whole eggs and sealed containers (for example, closed glass jars) may explode and should not be heated in this oven. 6. Use this appliance only for its intended use as described in this manual. Do NoT use corrosive chemicals or vapors in this appliance.This type of oven is specifically designed to heat, cook, or dry food. -
Página 17: Precautions To Avoid Possible Exposure To Excessive Microwave Energy
21. When cleaning door and oven surfaces that come together when closing the door, use only a sponge or soft cloth to apply mild, nonabrasive soaps, or detergents. 22. This appliance is not intended for use by mentally, physically or sensory challenged persons (including children), or those with lack of experience and knowledge, unless they have been given supervision or instruction concerning the use of the appliance by a person responsible for their safety. Children should be supervised to ensure that they do not play with the appliance. -
Página 18: Installation Guide
i ns ta L Lation Gu i De Make sure that all the packing materials are removed from the inside of the door. 2. Check the oven for any damage, such as a misaligned or bent door, damaged door seals and sealing surface, broken or loose door hinges and latches and dents inside the cavity or on the door. -
Página 19: Product Diagram
P r oD uc t D ia Gr a M 1. Door Safety Lock System 2. Oven Window 3. Roller Ring 4. Shaft 5. Glass Tray 6. Wave Guide 7. Control Panel en g lish-5... -
Página 20: Control Panel
con t roL Pa n e L • MENU ACTION SCREEN Cooking time, power, action indicators, and clock time are displayed. • POWER LEVEL Touch this button a number of times to set microwave cooking power level. • CLOCK Touch this button to start setting the oven clock and ending by touching it again. • WEIGHT ADJUST After choosing an auto-cook menu, use it to specify food weights or number of... -
Página 21: Operation Instructions
OP ER ATIN G I N STRU CTI ONS SIGNALS DURING OVEN SETTINGS ONE BEEP: Oven accepts the entry. TWO BEEPS: Oven does not accept the entry, check and try again. SETTING CLOCK TIME The oven is equipped with a digital clock; you can choose to set the clock time in 24 or 12-hour cycle by pressing the CLOCK button in waiting mode. -
Página 22: Speed Defrost
SPEED DEFRoST You can set a defrost program based on the time you entered. The longest defrosting time is 45 minutes. Suppose you want to defrost shrimp for 20 minutes. 1. Place the shrimp to be defrosted into the oven and close the door. 2. Press SPEED DEFROST button once. 3. Turn MENU/TIME to set defrosting time. 4. Press START/QUICK START. Note: During defrosting process, the system will pause to remind user to turn food over, after that, press START/QUICK START to resume. AUTo DEFRoST The oven could be used to defrost food based on the weight you entered. The defrosting time and power level are automatically set once the weight is programmed. The weight varies between 100g and 1800g. Suppose you want to defrost 600g of shrimp. 1. Place the shrimp to be defrosted into the oven and close the door. 2. Press AUTO DEFROST button once. -
Página 23: Quick Start
QUICK START Use this feature to program the oven to microwave food at 100% power conveniently. The longest cooking time is 10 minutes. In standby mode, press START/QUICK START in quick succession to set the cooking time, the oven will start automatically at full power. AUTO COOK For food or the following cooking mode, it is not necessary to program the duration and the cooking power. It is sufficient to indicate the type of food that you wish to cook as well as the weight of this food. You may need to turn food over during cooking time to obtain uniform cooking. 1. In standby mode, turn MENU/TIME dial counterclockwise to select food code. 2. Press WEIGHT ADJUST button repeatedly to indicate food weight or number of servings. 3. Press START/QUICK START to start. Cooking Menu FooD CoDE FooD NoTES Milk/Coffee F or milk/coffee and potato, (200ml/cup) parameters on display are not weight but number of servings. Rice (g) T here is only one weight choice for popcorn. Spaghetti (g) The result of Auto Cook depends on factors such as fluctuation of voltage, the shape and size of Potato (230g/unit) -
Página 24: Utensils Guide
u t en s iL s G u iD e This section lists which utensils can be used in the microwave, which ones have limited use for short periods, and which ones should not be used in the microwave at all. RECoMMENDED Microwave browning dish — Use to brown the exterior of small items such as steaks, chops, or pancakes. Follow the directions provided with your browning dish. Microwaveable plastic wrap — Use to retain steam. Leave a small opening for some steam to escape and avoid placing it directly on the food. Paper towels and napkins — Use for short-term heating and covering; they absorb excess moisture and prevent spattering. Do not use recycled paper towels, which may contain metal and could ignite. Glass and glass-ceramic bowls and dishes — Use for heating or cooking. Paper plates and cups — Use for short-term heating at low temperatures. Do not use recycled paper, which may contain metal and could ignite. -
Página 25: Cooking Techniques
cooK i n G t e cH ni Qu es Your microwave makes cooking easier than conventional cooking, provided you keep these considerations in mind: STIRRING • Stir foods such as casseroles and vegetables while cooking to distribute heat evenly. • Food on the outside of the dish absorbs more energy and heats more quickly, so stir from the outside to the center. • The oven will turn off when you open the door to stir your food. ARRANGEMENT • Arrange unevenly shaped foods, such as chicken pieces or chops, with the thicker, meatier parts toward the outside of the turntable where they receive more microwave energy. • To prevent overcooking, place delicate areas, such as asparagus tips, toward the center of the turntable. SHIELDING • Shield food with narrow strips of aluminum foil to prevent overcooking. • Areas that need shielding include poultry wing-tips, the ends of poultry legs, and corners of square baking dishes. • Use only small amounts of aluminum foil. Larger amounts can damage your oven. TURNING • Turn foods over midway through cooking to expose all parts to microwave energy. -
Página 26: Cleaning And Care
c L ea ni n G a nD car e 1. When cleaning door and oven surfaces that come together when the door is closed, use only a sponge or soft cloth to apply mild, nonabrasive soups, or detergents. 2. Turn off the oven and remove the power plug from the wall socket before cleaning. 3. Keep the inside of the oven clean. When food splatters or spilled liquids adhere to oven walls, wipe with a damp cloth. Mild detergent may be used if the oven gets very dirty. Avoid the use of spray and other harsh cleaners as they may stain, streak or dull the door surface. 4. The outside surfaces should be cleaned with a damp cloth. To prevent damage to the operating parts inside the oven, water should not be allowed to seep into the ventilation openings. -
Página 27: Before You Call For Service
Be Fo r e Yo u ca LL For ser v ic e If the oven fails to operate: • Check to ensure that the oven is plugged in securely. If not, remove the plug from the outlet, wait 10 seconds and plug it in again securely. • Check for a blown circuit fuse or a tripped main circuit breaker. If these seem to be operating properly, test the outlet with another appliance. • Check to ensure that the control panel is programmed correctly and the timer is set. • Check to ensure that the door is securely closed by engaging the door safety lock system. Otherwise, the microwave energy will not flow into the oven. IF NONE OF THE ABOVE RECTIFIES THE SITUATION, THEN CONTACT A QUALIFIED TECHNICIAN. DO NOT TRY TO ADJUST OR REPAIR THE OVEN YOURSELF. SPECIFICATIoNS Power Consumption 220V~ 60Hz, 1500 W output 1000 W operation Frequency 2450 MHz Oven Exterior Dimensions (H×W×D) 30.0 x 53.9 x 48.7cm (11.8 x 21.2 x 19.2 in.) -
Página 28: Hecho En China
™ © 2020 Sunbeam Products, Inc., Todos los derechosreservados. El logotipo Oster es una marca comercial de Sunbeam Products, Inc. utilizada bajo licencia. Fabricado, distribuido o vendido por Household Solutions. S.A., licenciatario oficial de este producto. Garantía limitada de un año.