Tabla de contenido
Publicidad
Idiomas disponibles
Idiomas disponibles
Enlaces rápidos
BVSTEM6701B, BVSTEM6701CF,
MODELOS
BVSTEM6701R, BVSTEM6701RF,
MODELS
BVSTEM6701SS
Manual de Instrucciones
CAFETERA AUTOMÁTICA ESPRESSO LATTE CAPPUCCINO
LEA TODAS LAS INSTRUCCIONES ANTES DE USAR ESTE APARATO
Instruction Manual
AUTOMATIC ESPRESSO LATTE CAPPUCCINO MAKER
PLEASE READ ALL INSTRUCTIONS BEFORE USING THIS APPLIANCE
Manual de Instruções
CAFETEIRA AUTOMÁTICA ESPRESSO LATTE CAPPUCCINO
LEIA TODAS AS INSTRUÇÕES ANTES DE USAR ESTE APARELHO
Publicidad
Tabla de contenido

Manuales relacionados para Oster BVSTEM6701B


Resumen de contenidos para Oster BVSTEM6701B
- Página 1 BVSTEM6701B, BVSTEM6701CF, MODELOS BVSTEM6701R, BVSTEM6701RF, MODELS BVSTEM6701SS Manual de Instrucciones CAFETERA AUTOMÁTICA ESPRESSO LATTE CAPPUCCINO LEA TODAS LAS INSTRUCCIONES ANTES DE USAR ESTE APARATO Instruction Manual AUTOMATIC ESPRESSO LATTE CAPPUCCINO MAKER PLEASE READ ALL INSTRUCTIONS BEFORE USING THIS APPLIANCE Manual de Instruções CAFETEIRA AUTOMÁTICA ESPRESSO LATTE CAPPUCCINO...
-
Página 2: Precauciones Importantes
NO utilice un electrodoméstico que tenga un cable o un enchufe dañado, ni después de que el artefacto haya presentado fallas, o haya sufrido cualquier otro daño. Lleve el artefacto al Centro de Servicio Autorizado Oster más cercano para ®... -
Página 3: Instrucciones Especiales Para El Cable
Con el fin de evitar posibles quemaduras corporales y otras lesiones asociadas con el vapor y el agua caliente, o daños a la unidad, nunca saque el tanque de agua ni el portafiltro mientras su Cafetera Automática para Espresso, Cappuccino y Latte Oster ®... -
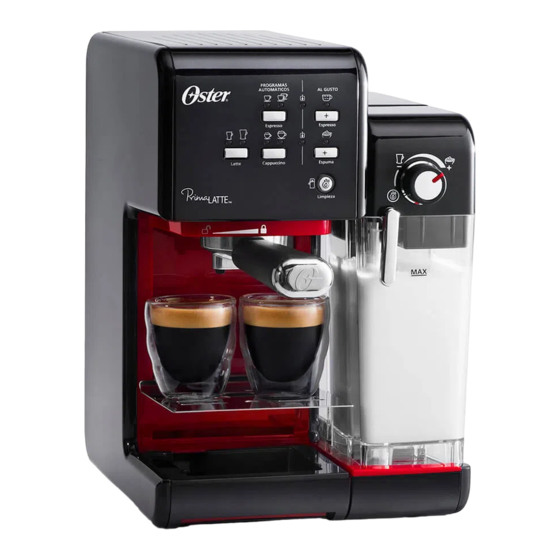
Página 4: Descripción Del Artefacto
DESCRIPCIÓN DEL ARTEFACTO 7a 7b Cabezal de Colado b. Botón Manual de Espresso con Luz Indicadora c. Botón de Cappuccino Pequeño y Grande con Portafiltros: Luces Indicadoras a. Porta-filtro para Café Molido y Sobre de café d. Botón de Latte Pequeño y Grande con Luces espresso E.S.E. -
Página 5: Introducción
Cuando se utiliza esta unidad, algunas piezas y accesorios se calientan y necesitan enfriarse. El cuidado y mantenimiento adecuado deben asegurar la larga vida de la Cafetera Automática para Espresso, Cappuccino, Latte de Oster y su ®... -
Página 6: Antes De Usar El A Rtefa Ctop Or Prim E Ra Ve Z
depósito de leche y colóquelo de nuevo en la unidad. Gire hacia la izquierda la perilla de control de espumar hasta la posición de limpieza “ ” y seguidamente pulse el botón de limpieza “ ” para activar esta función. Deje que la unidad dispense el agua a través del tubo durante 30 segundos aproximadamente y después pulse el botón de limpieza “... -
Página 7: Cómo Seleccionar La Medida De Taza Adecuada
Pulse el botón manual para espumar “ ”. Deje correr el agua durante un máximo de 90 segundos. Pulse el botón manual para espumar “ ” una vez más para detener el proceso. 10. Las luces de control del calentador de Espresso “ ”... -
Página 8: Cómo Llenar El Depósito De Agua
INSTRUCCIONE S PA R A E L F UN CIONAM IE NTO CÓMO LLENAR EL DEPÓSITO DE AGUA Figura 1 Llene el depósito con agua (ver figura 1). Puede utilizar una jarra para llenarlo o retirarlo de la unidad y luego llenarlo debajo del grifo. -
Página 9: Cómo Colocar El Filtro En El Porta-Filtro
CÓMO COLOCAR EL FILTRO EN EL PORTA-FILTRO Figura 3 Inserte el filtro en el porta-filtro, asegurándose de alinear la muesca del filtro con la ranura del porta-filtro (ver figura 3). Gire el filtro hacia la izquierda o hacia la derecha hasta que encaje en su lugar (ver figura 4). -
Página 10: Cómo Colocar El Portafiltro
CÓMO COLOCAR EL PORTAFILTRO Position porta-filter underneath the brew head. Position handle so that the handle lines up with the open lock icon “ ” on the unit and fits into the groove. A continuación, gírelo lentamente hacia la derecha hasta que el mango quede alineado con el símbolo de candado cerrado “... -
Página 11: Cómo Seleccionar La Función
Las luces de control del calentador de café espresso “ ” y del calentador de vapor “ ” comenzarán a parpadear durante el proceso de calentamiento y hasta que el agua y la leche lleguen a la temperatura perfecta (si se preparara cappuccino o latte). Una vez que estas luces se queden sólidas, la unidad está... - Página 12 MÁS ESPUMA MENOS ESPUMA NOTA: El nivel de espuma también puede regularse durante el ciclo de colado. Presione el Botón de Cappuccino “ ” una vez para colar una tacita de cappuccino. La luz indicadora para una taza pequeña de cappuccino se encenderá. Comenzará a parpadear;...
-
Página 13: Preparación De La Leche Espumada
¡Su delicioso latte está listo para ser disfrutado! PREPARACIÓN DE LA LECHE ESPUMADA La Cafetera Automática para Espresso, Cappuccino, Latte de Oster también le permite ®... - Página 14 LIMPIEZA DE SU CAFETERA AUTOMÁTICA PARA ESPRESSO, CAPPUCCINO, LATTE DE OSTER ® CÓMO LIMPIAR EL DEPÓSITO DE LECHE Y EL TUBO ESPUMADOR Aunque puede guardar el depósito de leche con la leche que haya sobrado en el refrigerador, es importante limpiar el depósito y el tubo espumador con regularidad para evitar la obstrucción y la acumulación de residuos.
- Página 15 CÓMO LIMPIAR LA UNIDAD Limpie la carcasa con un paño suave y húmedo. No utilice limpiadores abrasivos o estropajos, ya que pueden rayar el acabado. No guarde ninguno de los portafiltros en el cabezal de colado. Esto puede afectar negativamente el sellado del cabezal de colado y el porta-filtro al colar café espresso. PRECAUCIÓN: No sumerja el artefacto en agua ni ningún otro líquido.
-
Página 16: Pro Ble Mas Y C Ausa S
PRO BLE MAS Y C AUSA S PROBLEMA CAUSAS SOLUCIONES • • No sale café. No hay agua en el tanque. Añada agua. • • El café se ha molido Muela el café a un demasiado fino. grosor medio. • •... -
Página 17: Important Safeguards
Return this appliance only to the nearest Authorized Oster Service Center for examination, repair or adjustment. ® The use of accessory attachments not recommended for Oster products may result ® in fire, electric shock or injury to persons. -
Página 18: Special Cord Set Instructions
In order to avoid possible burns to body parts and/or other injury from hot steam and water or damages to the unit, never remove the water reservoir or the porta-filter while your Oster espresso, cappuccino and latte maker is brewing coffee or frothing. -
Página 19: Description Of The Appliance
DESCRIPTION OF THE APPLIANCE Brew Head c. Small and Large Cappuccino Button with Indicator Lights Porta-Filter: d. Small and Large Latte Button with a. Porta-Filter for Ground Coffee and Indicator Lights E.S.E. pods (45mm) e. Manual Milk Frothing Button with b. -
Página 20: Important Safety Instructions
I N T RO DU CTI O N Congratulations! You have selected the new and innovative Oster Automatic Espresso, ® Cappuccino, and Latte Maker. This unique appliance has been designed to help you prepare delicious espressos, cappuccinos and lattes quickly, conveniently, and automatically with the touch of a button. -
Página 21: Be Fore Using Your App Lian Ce F Or The F Ir St T Im E
BE FORE USING YOUR APP LIAN CE F OR THE F IR ST T IM E CLEANING AND PRIMING THE UNIT PRIOR TO FIRST USE Please refer to the “Description of the Appliance” section to familiarize yourself with the product and identify all parts. Please make sure the unit is off “O”... -
Página 22: Sel Ec Ti N G T H E Ri G Ht Co Ff E E
HOW TO SELECT THE RIGHT CUP Please make sure to select your cup according to the following chart: SUGGESTED BEVERAGE Single ( Espresso 40 ml Double ( 80 ml Single ( Cappuccino 180 ml Double ( 300 ml Single ( ) Latte 350 ml Double (... -
Página 23: Filling The Water Reservoir
OPERATING INS TR UC TIONS FILLING THE WATER RESERVOIR Fill the water reservoir with water (see figure 1). You Figure 1 may use either a jar to fill it up or remove it from the unit and then fill it up under the tap. Fill the reservoir with the desired amount of water below the “MAX”... - Página 24 PLACING THE FILTER ON THE PORTA-FILTER Figure 3 Insert the filter into the porta-filter, making sure to align the filter dimple to the porta-filter notch (see figure 3). Turn the filter to the left or right to lock it in place (see figure 4). NOTE: To remove the filter for cleaning, turn the filter to the left or right to align the filter dimple to the porta-filter notch and proceed to remove.
- Página 25 PLACING THE PORTA-FILTER Position porta-filter underneath the brew head. Position handle so that the handle lines up with the open lock icon “ ” on the unit and fits into the groove. Then, slowly turn it to the right until the handle is aligned with the closed lock symbol “...
-
Página 26: Preparing Espresso
SELECT THE FUNCTION PREPARING ESPRESSO Press the Espresso Button “ ” once to brew a single shot. The indicator light for a single shot of espresso will turn on. It will start blinking; indicating that a single shot of espresso is brewing. Press the Espresso Button “... - Página 27 The unit will start brewing cappuccino according to your selection. The unit will stop automatically after the brewing process and the light will become solid, indicating that the cycle has been completed. Your delicious cappuccino is now ready to be enjoyed! PREPARING LATTE Prior to preparing your latte, adjust the level of frothed milk according to your preference by turning the Froth Control Knob to the right for more foam (cappuccino) and to the left...
- Página 28 PREPARING FROTH MILK The Oster Automatic Espresso, Cappuccino, and Latte Maker also allows you to ® prepare frothed milk alone. Press the Manual Foam “Espuma” Button “ ” if you wish to add more foam to your beverage or to prepare frothed milk for any other beverage, e.g.
-
Página 29: Cleaning The Filters
CLEANING YOUR AUTOMATIC ESPRESSO, CAPPUCCINO, AND LATTE MAKER CLEANING THE MILK RESERVOIR AND FROTHING TUBE Although you can store the milk reservoir with leftover milk in the refrigerator, it is important to clean the reservoir and frothing tube regularly to avoid clogging and residue build-up. In order to clean the milk reservoir, please follow the instructions listed below: Remove the milk reservoir from the unit by lifting up on the milk reservoir release button and simultaneously sliding milk reservoir out, grabbing milk reservoir by lid. -
Página 30: Prob Lems, Cau Se S An D So Lut Ions
CLEANING THE WATER RESERVOIR Dispose of the remaining water by removing the reservoir and turning it upside down over the sink. It is recommended to empty the water reservoir between uses. Wash the water reservoir and its lid thoroughly with warm soapy water. Make sure to rinse and dry them well. - Página 31 Espresso “ ” Button twice. The vinegar will start flowing through the unit and it will stop automatically. Place a large empty cup (with at least 325 mL/ 11 fl. oz. capacity) under the frothed milk dispensing tube. Fill the milk reservoir with water and place it back on the unit. Turn the Froth Control Knob counter clockwise to the clean position “...
-
Página 32: Pr Ec Auç Õe S I M P Orta N Te S
PR EC AUÇ ÕE S I M P ORTA N TE S Ao utilizar um eletrodoméstico é necessário seguir algumas precauções básicas de segurança para evitar o risco de incêndio, descarga elétrica ou lesões, incluindo as que seguem: LEIA TODAS AS INSTRUÇÕES ANTES DE USAR O ELETRODOMÉSTICO. NÃO toque as superfícies quentes . -
Página 33: Cuidado: Pressão
Para evitar possíveis queimaduras ou outras lesões corporais que possam ser causadas pelo vapor ou a água quente, ou que o aparelho seja danificado, nunca retire o tanque de água nem o porta-filtro enquanto sua Cafeteira Automática para Espresso, Cappuccino e Latte Oster estiver preparando espresso, espumando ®... -
Página 34: Descrição Do Aparelho
D ESCRI ÇÃO D O A PAR EL H O Cabeçote de preparo do café c. Botão para fazer cappuccino pequeno ou grande com luzes indicadoras Porta-filtro: d. Botão para fazer latte pequeno ou grande a. Porta-filtro para café moído e sachês com luzes indicadoras E.S.E. - Página 35 Quando este aparelho é usado, algumas peças e acessórios esquentam e precisam esfriar. O cuidado e a manutenção adequada garantirá o uso sem problemas e a durabilidade da Cafeteira Automática para Espresso, Cappuccino e Latte Oster . Guarde ®...
-
Página 36: Antes De Usar Sua Antes De Usar Seu Eletrodoméstico Pela Primeira Vez
Encha o tanque para leite com água e coloque-o de volta no aparelho. Gire o botão de controle da espuma de leite no sentido anti-horário colocando-o na posição para limpeza “ ” e em seguida pressione o botão para limpeza “ ”... -
Página 37: Selecionando A Xícara
Pressione o botão para fazer espuma com controle manual “ ”. Deixe com que a água flua por até 90 segundos. Pressione o botão para fazer espuma com controle manual “ ” novamente para interromper o processo. 10. As luzes de controle dos aquecedores para o Espresso “ ” e para o Vapor “... -
Página 38: Como Encher O Tanque De Água
INS TRUÇÕE S D E USO COMO ENCHER O TANQUE DE ÁGUA Figura 1 Encha o tanque com a água (veja a figura 1). Use uma garrafa ou jarra para encher o tanque ou retire-o do aparelho e encha-o diretamente. Encha o tanque com a quantidade desejada de água, certificando-se de que não ultrapasse o nível máximo “Max”... -
Página 39: Como Encher Com Café
OBSERVAÇÃO: O filtro para sachês de café que vem com o aparelho, foi desenvolvido para ser usado apenas com sachês E.S.E. (sigla em inglês que significa espresso fácil de servir) (45 mm). COLOCANCO O FILTRO NO PORTA-FILTRO Encaixe o filtro no porta-filtro, certificando-se que a saliência do filtro esteja alinhada com a fenda do potra-filtro (veja a figura 3). -
Página 40: Usando O Porta-Filtro Para Cápsulas Nespresso
SACHÊ USANDO O PORTA-FILTRO PARA CÁPSULAS NESPRESSO Levante a tampa do filtro para cápsulas Nespresso. Coloque a cápsula Nespresso dentro do filtro e feche a tampa. Em seguida, coloque o filtro para cápsula Nespresso no porta-filtro para cápsula Nespresso. COMO COLOCAR O PORTA-FILTRO Coloque o porta-filtro encaixado-o em baixo do cabeçote para preparo de café. - Página 41 LIGUE O APARELHO Ligue o aparelho na tomada correspondente. Ligue o aparelho, pressionado o botão para ligar/desligar “I/O” colocando-o na posição de ligado “I”. As luzes de controle dos aquecedores para o Espresso “ ” e para o Vapor “ ” começarão a piscar durante o processo de aquecimento da cafeteira até...
- Página 42 Para ambas funções automáticas de espresso, o aparelho irá começar a preparar espresso conforme selecionado. O aparelho irá parar automaticamente após o preparo e a luz irá parar de piscar e ficará acessa, indicando que o processo terminou. Seu espresso delicioso estará pronto para ser saboreado! COMO PREPARAR UM NESPRESSO Pressione o botão para espresso curto “...
-
Página 43: Preparando Leite Espumado
Seu latte delicioso estará pronto para ser saboreado! PREPARANDO LEITE ESPUMADO A Cafeteira Automática para Espresso, Cappuccino e Latte Oster também possibilita o ®... -
Página 44: Limpando Os Filtros
LIMPEZA DE SUA CAFETEIRA AUTOMÁTICA PARA ESPRESSO, CAPPUCCINO E LATTE COMO LIMPAR O TANQUE PARA O LEITE E O TUBO DISPENSADOR DE LEITE ESPUMADO Embora pode-se guardar o tanque para o leite na geladeira com o que sobrou de leite sem usar, é... -
Página 45: Como Limpar O Aparelho
cabeça para baixo sobre a pia. Recomenda-se esvaziar o tanque de água ao termino de cada uso Lave o tanque de água com água morna e detergente. Enxágue e seque bem. OBSERVAÇÃO: Não lave o tanque de água na lava-louças. COMO LIMPAR O APARELHO Limpe o aparelho com um pano macio e úmido. - Página 46 Repita os passos de 1 a 6 conforme seja necessário usando apenas água da torneira para enxaguar o vinagre dentro do aparelho. PRO BLE MAS Y C AUSA S PROBLEMA POSSÍVEIS CAUSAS POSSÍVEIS SOLUÇÕES • • O café não sai O tanque de água Adicione água •...
-
Página 47: Contenido: 1 Pieza Características Eléctricas
Características eléctricas de los modelos de la serie: BVSTEM6701B -XXX, BVSTEM6701CF -XXX, Electric characteristics of series models: BVSTEM6701R -XXX, BVSTEM6701RF -XXX, Características elétricas dos modelos da série: BVSTEM6701SS-XXX Voltaje/Voltage/Voltagem Frecuencia/Frequency/Frequência Potencia/Power/Potência 120 V 60 Hz 1 040 W 127 V...