Tabla de contenido
Publicidad
Idiomas disponibles
Idiomas disponibles
Publicidad
Tabla de contenido

Manuales relacionados para Oster BVSTEM8100


Resumen de contenidos para Oster BVSTEM8100
- Página 1 MODELO BVSTEM8100 MODEL Manual de Instrucciones CAFETERA SUPER AUTOMÁTICA PARA ESPRESSO OSTER® LEA TODAS LAS INSTRUCCIONES ANTES DE USAR ESTE APARATO Instruction Manual OSTER® SUPER AUTOMATIC ESPRESSO MAKER PLEASE READ ALL INSTRUCTIONS BEFORE USING THIS APPLIANCE...
- Página 2 PRE C A UC ION ES Al usar aparatos eléctricos, siempre se deben seguir las precauciones e instrucciones básicas de seguridad para reducir el riesgo de incendio, descarga eléctrica y / o lesiones a personas, incluidas las siguientes: 1. Lee todas las instrucciones. 2.
-
Página 3: Avisos De Producto
Comuníquese con los centros de servicio autorizados de Oster® para obtener recomendaciones o preguntas sobre reparaciones, limpieza y mantenimiento de la unidad. -
Página 4: Introducción
IN TR O DUC CIÓ N ¡Felicidades! Ha seleccionado la nueva cafetera para espresso súper automática Oster ® Esta cafetera única ha sido diseñada para ayudarlo a preparar desde el grano de café hasta la taza de espresso, capuccino, Latte, lungo, agua caliente, y muchas otras bebidas calientes de manera rápida, conveniente y en la comodidad de su casa. -
Página 5: Des C Ri Pc Ió N Del Artefac To
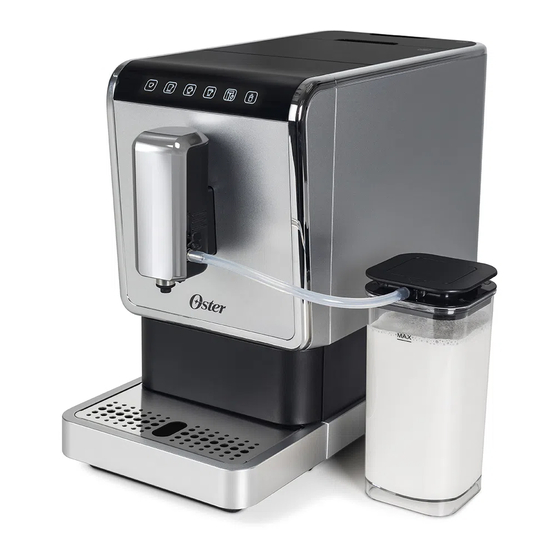
DES C RI PC IÓ N DEL ARTEFAC TO 1. Bandeja externa extraíble 12. Cepillo de limpieza 2. Bandeja interna extraíble 13. Tanque de leche 3. Contenedor de café usado 14. Tapa de tanque de leche 4. Manija adjustable 15. Conector de tanque de leche 5. -
Página 6: Panel De Control Táctil
PANEL DE CONTROL TÁCTIL IMPORTANTE: El panel táctil es sensible al tacto y se podría llegar a activar por accidente, si se activa por error se puede cancelar la operación volviendo a apretar el icono seleccionado. Espresso Falta de granos de café Cappuccino Luz parpadeando: Nivel de agua bajo/ Falta el tanque de agua... - Página 7 A NT E S DE US AR SU CAFETERA PO R PR IME RA VEZ 1. Consulte la sección “Descripción del artefacto” para familiarizarse con el producto e identificar todas las piezas. 2. Retire todo el embalaje y las etiquetas removibles de la unidad. 3.
- Página 8 8. Tome el cable de alimentación extraíble y conéctelo a la toma de corriente en la parte posterior de la cafetera. 9. Para garantizar la vida útil óptima dla cafetera, es necesario dejar que sus componentes internos se enjuaguen varias veces con agua caliente antes del primer uso.
- Página 9 3. Asegúrese de que el tanque de agua esté correctamente instalado en su lugar. IMPORTANTE: Nunca use agua tibia o caliente para llenar el depósito de agua. Para una mejor calidad de preparación, es necesario utilizar siempre agua agua fría. Para evitar el desbordamiento de agua del tanque de agua, no agregue agua directamente en la cafetera con otro recipiente.
- Página 10 2. Llene el compartimiento de granos con los granos de café de su preferencia, no llene demasiado o podría afectar el rendimiento. El compartimiento de granos tiene una capacidad máxima de 150 g. 3. Cierre la tapa. No deje abierta la tapa del compartimento de los granos de café, de lo contrario, los granos de café...
- Página 11 U SO D E L A C O N F IGURA CIÓN DE MO L IE ND A NOTA: Nunca realice el ajuste cuando El molinillo no esté funcionando. Puede dañar el molinillo. 1. Ubique los 5 niveles de molido ubicados dentro de la tolva de granos de café para establecer la preferencia de molido.
- Página 12 C EB E L A C A FE TER A D E E SPRE SSO AN T ES D E L P R IM E R US O IMPORTANTE: Para garantizar la vida útil óptima dla cafetera, es necesario dejar que sus componentes internos se enjuaguen varias veces con agua caliente antes del primer uso.
- Página 13 CO MO IN STA LA R E L S IST EM A DI S PE N S AD O R D E L EC H E A UTO MÁ T ICO 1. Coloque la goma de conexión en la ranura dentro de la tapa 2.
- Página 14 4. Inserte el tubo de conexión de leche a la goma fuera de la tapa del tanque. 5. Inserte el conector del tubo de leche en la entrada del sistema de dispensación de leche de la boquilla dispensadora (abra primero la tapa de la entrada) Cubierta protectora Esp año l-13...
-
Página 15: Recomendaciones
P RE PA RA R CA PP UC C INO O LAT T E Recomendaciones: • Limpiar el sistema de dispensación automática de leche antes del primer uso y en cada uso • Utilice leche fría (a una temperatura aproximada de 5 ° C / 41 ° F). Se recomienda utilizar leche entera para asegurar un resultado de espumado óptimo. - Página 16 Preparando capuccino o latte Realice el montaje del sistema dispensador de leche. Consulte la sección “Preparar Cappuccino o Latte” 1. Asegúrese de que el sistema dispensador de leche esté instalado correctamente. 2. Llene el tanque de leche con leche y cierre la tapa. 3.
- Página 17 1. Extraiga la bandeja de goteo externa de la cafetera. 2. Vacíe el agua dentro de la bandeja de goteo en el fregadero y lávela con agua limpia. Sécalo después. 3. Desliza para abrir la bandeja de goteo interna y el depósito de posos de café. 4.
- Página 18 2. Retire la puerta de servicio. 3. Presione el ajuste de liberación del extractor de café. 4. Retire el extractor de café y enjuáguelo bajo el grifo con agua fría. 5. Vuelva a colocar el extractor de café en su posición original y vuelva a instalar la puerta de servicio en su posición original.
- Página 19 Limpieza del sistema de dispensador automático de leche Nota: es importante realizar este paso a diario para asegurarse de que la función del espumador de leche automático funcione en buenas condiciones. 1. Coloque una taza debajo del la dispensador. 2. Llene el recipiente de la leche con agua fresca. 3.
-
Página 20: Apagado Automático
Limpieza del recipiente de la leche y del tubo de conexión de la leche Nota: Es importante realizar este paso a diario para asegurarse de que la función del espumador de leche automático funcione en buenas condiciones. 1. Vacíe la leche dentro del recipiente de leche y lávelo con agua fresca, saque la goma de conexión y el tubo de leche del recipiente para lavarlo también con agua fresca, luego vuelva a montarlos en la tapa (asegúrese de que la conexión esté... -
Página 21: Recomendación
7. Cuando se termine de programar el volumen de cafe y/o leche deseado; la cafetera preparará la misma cantidad configurada cada vez que presione el botón de Espresso / Lungo / Latte / Cappuccino o Agua Caliente. RECOMENDACIÓN: Al personalizar los volúmenes para las funciones de cappuccino y latte, asegúrese de guardar la configuración de volumen de leche espumada primero, seguido de la configuración del volumen del café... -
Página 22: Limpieza Y Mantenimiento
1. Llene el tanque de agua hasta el nivel MAX. 2. De ser posible agregue un paquete descalsificador de agua. Pregunte a los centros de servicio autorizados de Oster para recomendaciones o preguntas. IMPORTANTE: No use vinagre u otro agente de limpieza para hacer la autolimpieza de esta cafetera. -
Página 23: Limpieza Con Ciclo Manual
Cualquier servicio más allá de lo descrito en la sección de limpieza debe ser realizado únicamente por un representante de servicio autorizado. Consulte la tarjeta de garantía para comunicarse con un centro de servicio autorizado de Oster ® PRECAUCIÓN: Mantenga el paquete de limpieza fuera del alcance de los niños. - Página 24 Limpieza de residuos café molido El café en polvo puede adherirse a la pared de la salida de polvo dla cafetera después de un uso prolongado. Se sugiere limpiar la salida siguiendo el paso para asegurarse de que el café en polvo llegue a la cafetera. 1.
-
Página 25: P Ro Bl E Mas, C A Us As Y Sol Ucio Nes
P RO BL E MAS, C A US AS Y SOL UCIO NES PROBLEMA CAUSA SOLUCIÓN La cafetera no funciona. La cafetera no está conectado Enchufe la cafetera a la toma de a la toma de corriente o no esta corriente y presione el interruptor de encendido. - Página 26 PROBLEMA CAUSA SOLUCIÓN El café sale demasiado Polvo de café demasiado Ajuste la finura del café a un punto más lento o gota a gota. fino crea bloqueo en la grande, efectué el cambio durante el salida del agua. funcionamiento del molinillo. El icono indicador de La salida interna de café...
- Página 27 “Limpiar y La puerta de servicio está colocar el extractor de café” rota Póngase en contacto con un representante de servicio autorizado de Oster para el ® cambio de la puerta de servicio; considere que este electrodoméstico no tiene piezas que pueda reparar el usuario.
-
Página 28: Important Safeguards
IM P ORTANT SAF E GUA R D S When using electrical appliances, basic safety precautions should always be followed to reduce the risk of fire, electric shock, and/or injury to persons including the following: 1. Read all instructions. 2. Do not touch hot surfaces. Use handles or knobs. 3. -
Página 29: Product Notices
Read ALL of the instructions, precautions, notes and warnings included in this instruction manual carefully before you begin to use this appliance. • Proper care and maintenance will ensure the long life of the Oster Super Automatic ® Espresso Maker and its trouble-free operation. Save these instructions and refer to them often for cleaning and care tips. - Página 30 I NTR O DUC TIO N Congratulations! You have selected the new Oster Super Automatic Espresso Maker. ® This unique appliance has been designed to help you prepare espressos, cappuccinos, lattes, lungos, hot water and many other hot beverages quickly, conveniently, and at the comfort of your house.
-
Página 31: Description Of The Appliance
DESCRI PTIO N OF T HE A PPLIANC E 1. External Drip Tray 12. Clean brush 2. Internal Drip Tray 13. Milk Tank 3. Used Coffee Grounds Container 14. Milk tank lid 4. Adjustable coffee spout 15. Connection milk tube 5. -
Página 32: Control Panel
CONTROL PANEL IMPORTANT: The digital panel is sensitive to the touch and could be activated by accident. If it is activated by mistake, the operation can be canceled by pressing the selected icon again. Espresso Lack of coffee beans Cappuccino Flashing: Low water level/ Water Tank is missing Lungo... - Página 33 B EF O RE U S IN G YOU R A P PL IAN C E FO R THE F IRST T IM E 1. Please refer to the “Description of the Appliance” section to familiarize yourself with the product and identify all parts. 2.
- Página 34 8. Connect the removable power cord to the socket at the back of the appliance. 9. To ensure the optimal lifetime of the appliance, it is necessary to allow its internal components to be rinsed out several times with hot water prior to first use. Follow the instructions in section “PRIMING THE ESPRESSO MAKER BEFORE FIRST USE”.
- Página 35 3. Make sure that the water tank is properly installed in its place. IMPORTANT: Never use warm or hot water to fill the water reservoir. Always use fresh water for better brewing quality. To prevent overflow of water from the water tank, do not add water directly into the appliance with another container.
- Página 36 2. Fill the bean hopper with coffee beans of your preference. Do not overfill or it might affect performance. The bean hopper max capacity is 150g. 3. Close the lid. Do not leave the lid of the coffee bean compartment open, otherwise, the coffee beans will lose their freshness quicker.
-
Página 37: Helpful Tips
US E O F GR IN D IN G S ET T ING S NOTE: Never adjust the grinder when it is not operating, as it may damage it. 1. Locate the 5 levels of grinding inside the coffee bean hopper to set the grinding preference. - Página 38 P RI MIN G THE ES P R ES SO MA KE R B EF O RE FI R ST U SE To ensure the optimal lifetime of the appliance, it is necessary to allow its internal components to be rinsed out several times with hot water prior to first use. 1.
- Página 39 A S S E M B LIN G TH E A UTOM AT IC M ILK D IS PE N SIN G S YST EM 1. Place the connection rubber into the slot inside the lid. 2. Insert the container milk tube to the rubber inside the lid. 3.
- Página 40 4. Insert the connection milk tube to the rubber outside the milk tank lid. 5. Insert the milk tube connector to the dispensing spout milk dispensing system inlet (open the inlet cover first). Protective cover En g lis h- 13...
- Página 41 P R EPA R IN G C A P PU C CIN O O R LAT T E Recommendations: • Clean the automatic milk dispensing system before first and each use • Use cold milk (at a temperature of approximately 5°C/41°F), It is recommended to use whole milk to ensure an optimal frothing result.
-
Página 42: Preparing Cappuccino
Preparing Cappuccino Assemble the automatic milk froth system as described in Preparing Cappuccino or Latte section. 1. Fill the milk container with milk and close the lid. 2. Place a cup under the spout. 3. Switch on and press Cappuccino button. The indicator keeps on during preparation process. - Página 43 Attention: The espresso maker will perform auto rinsing once it switches on, this is to clean inside of the espresso maker before usages. During the auto-rinsing, around 30ml hot water will be poured out. The auto rinsing would not appear if the appliance is just switch off for a while.
- Página 44 2. Remove the service door. 3. Press the release knob. 4. Remove the brewer and rinse it with fresh water. 5. Place the brewer and the service door in their original position. Helpful Tips: When lights up stably, it indicates that the brewer is missing or is installed improperly.
- Página 45 Cleaning the automatic milk dispensing system Note: it is important to do this daily to make sure the automatic milk frother works properly. 1. Place a cup under the spout. 2. Fill the milk container with fresh water. 3. Connect the milk container to the espresso maker as described in “Preparing Latte” section 4.
-
Página 46: Auto-Shut Off
Cleaning the milk container and connection milk tube Note: it is important to do this daily to ensure the automatic milk dispensing system works properly. 1. Empty the milk container and wash it with clean water,remove the connection ruber and milk tube container and wash with clean water, then assemble them to the lid again. -
Página 47: Mode Selection
MODE SELECTION The espresso maker has three different settings: default setting, ECO mode and speed mode. In ECO mode, the appliance helps to save more energy. In speed mode, the user can make their coffee faster than in default setting. ECO Mode Speed Mode Default Setting... -
Página 48: Cleaning & Maintenance
1. Fill the water tank to “MAX” level. 2. If possible add a water descaling package. Ask Oster Authorized Service Centers for recommendations or questions. IMPORTANT: Do not use vinegar or another cleaning agent to clean this appliance. The cleaning agent might damage the appliance. - Página 49 CLEANING & MANTAINANCE OF THE APPLIANCE IMPORTANT: This appliance has no user serviceable parts. Any servicing beyond that described in the Cleaning Section should be performed by an Authorized Service Representative only. See warranty card for contacting an authorized Oster service ®...
- Página 50 Cleaning coffee powder outlet Coffee powder may stick on the wall of powder outlet after a long period or no use. Follow these steps to clean the coffee powder outlet. 1. Push the service door recess area. 2. Take out the service door. 3.
-
Página 51: P Ro B Le M S, C A U Se S A Nd S Olu T Ions
P RO B LE M S, C A U SE S A ND S OLU T IONS PROBLEM CAUSE SOLUTION The appliance does not work. The appliance is not plugged Plug in and press the switch. in to an outlet. Check the cable and the plug. - Página 52 PROBLEM CAUSE SOLUTION Lack of bean indicator flashes Internal coffee powder outlet Follow the steps of section E (V. but there is still a lot of coffee is blocked. Cleaning coffee powder outlet). beans in bean hopper. Run 2nd cycle without light There are not enough coffee flashing grounds in hopper...
- Página 53 XXX where X is any number between 0 and 9 or any letter between A and Z. La siguiente información es para México solamente. The following information is intended for Mexico only. CAFETERA SUPER AUTOMÁTICA PARA ESPRESSO OSTER® MODELOS: BVSTEM8100 LEA EL INSTRUCTIVO ANTES DE USAR La cafetera IMPORTADOR: NEWELL BRANDS DE MEXICO S.A.