Publicidad
Enlaces rápidos
during assembly, please call 1-800-241-7548
l'assemblage, S'il vous plaît appelez 1-800-241-7548
durante el Ensamblado, llámenos Al 1-800-241-7548
Tools needed for assembly:
Phillips Screwdriver
Flat Head Screwdriver
Adjustable wrenches
(Tools not supplied)
12/04/13 • 42805096
12301388
Outils requis pour l'assemblage :
Tournevis cruciforme
Tournevis à tête plate
Deux clés à molette
(Outils non prévus)
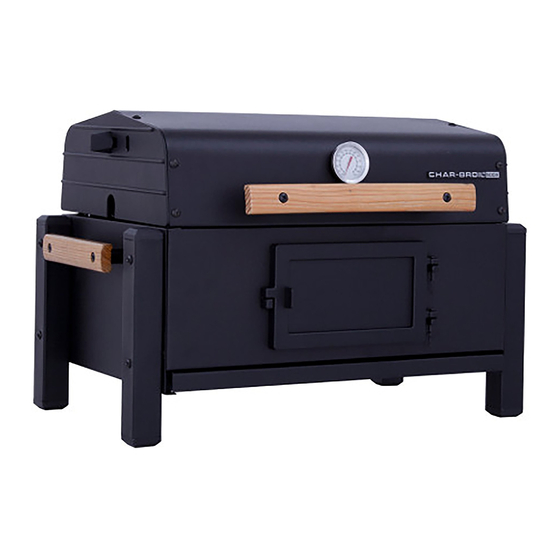
CB500X
CHARCOAL GRILL
Herramientas necesarias para el armado:
Destornillador Phillips
Destornillador de hoja plana
Llaves regulables
(Las herramientas no previstas)
Publicidad

Manuales relacionados para Char-Broil CB500X


Resumen de contenidos para Char-Broil CB500X
- Página 1 CB500X 12301388 CHARCOAL GRILL during assembly, please call 1-800-241-7548 l’assemblage, S’il vous plaît appelez 1-800-241-7548 durante el Ensamblado, llámenos Al 1-800-241-7548 Tools needed for assembly: Outils requis pour l'assemblage : Herramientas necesarias para el armado: Phillips Screwdriver Tournevis cruciforme Destornillador Phillips Flat Head Screwdriver Tournevis à...
- Página 2 TABLE OF CONTENTS TABLE DES MATIÈRES ÍNDICE Product Record Information ..... . .1 Renseignements relatifs à la garantie ....1 Información de inscripción de la garantía .
- Página 3 WARNING ADVERTENCIA AVERTISSEMENT FAILURE TO READ AND FOLLOW INSTRUCTIONS EL NO LEER Y SEGUIR LAS INSTRUCCIONES LE FAIT DE NE PAS LIRE ET RESPECTER LES FOR LIGHTING CHARCOAL MAY RESULT IN PARA ENCENDER EL CARBÓN, PUEDE INSTRUCTIONS POUR ALLUMER LE CHARBON SERIOUS PERSONAL INJURY AND OR PROPERTY OCASIONAR LESIONES GRAVES Y DAÑOS PEUT ENTRAÎNER DE GRAVES BLESSURES, DES...
- Página 4 COOKING TIPS PREPARING TO USE YOUR GRILL Direct and Indirect Grilling Before cooking with your grill, the following steps should Building Your Fire be closely followed to both cure the finish and season the Direct Grilling - For most grilling, the ignited coals are 1.
- Página 5 LIMITED WARRANTY This warranty only applies to units purchased from an authorized retailer. Manufacturer warrants to the original consumer-purchaser only that this product shall be free from defects in workmanship and materials after correct assembly and under normal and reasonable home use for the periods indicated below beginning on the date of purchase*.
- Página 6 Cuisson au gril directe et indirecte PRÉPARATION POUR UTILISER LE GRIL CONSEILS POUR LA CUISSON Avant de faire la cuisson avec votre gril, suivez les étapes Cuisson au gril directe La majeure partie du temps, les que voici pour traiter le fini du gril et apprêter l'acier à briquettes allumées sont étendues sur une seule couche sous Comment allumer votre feu l'intérieur.
- Página 7 GARANTIE LIMITÉE La présente garantie n'est valide que pour les appareils achetés auprès d'un détaillant autorisé. Le fabricant garantit à l'acheteur initial, et uniquement celui-ci, que le produit est exempt de tout défaut de matériel et de main-d'œuvre, dans la mesure où il a été assemblé correctement, qu'il est utilisé de façon normale et raisonnable à...
- Página 8 Utilizando precaución disponer pesados como cepillo de Char-Broil broca. Vuelva a Pruebe con maderas diferentes para decidir cuál prefiere, las brasas en su parrilla de carbón sobre la base de su aplicar manteca vegetal y el calor, como se indica arriba y use siempre madera bien seca.
- Página 9 GARANTÍA LIMITADA Esta garantía es válida únicamente para las unidades adquiridas de los distribuidores autorizados. El fabricante le garantiza únicamente al consumidor- comprador original, que este producto no presentará defectos de mano de obra ni de materiales por el período indicado a continuación, contado desde la fecha de compra*, si se arma correctamente y se usa en el hogar, en condiciones normales y razonables.
- Página 10 LID ASSEMBLY ASSEMBLY INSTRUCTIONS ASSEMBLY INSTRUCTIONS BOTTOM ASSEMBLY ENGLISH/FRENCH ENGLISH/FRENCH/SPANISH ASH PAN WIRE FIRE GRATE FRONT HANDLE KIT SIDE HANDLE KIT COOKING GRID LEG KIT FRAME, CLEAN OUT DOOR FIRE GRATE HANGER VENT PLATE KIT WIRE STOP, LID GRATE LIFTER TOOL LOGO PLATE KIT TEMPERATURE GAUGE DOOR, CLEAN OUT...
- Página 11 PARTS DIAGRAM SCHEMA DES PIÈCES DIAGRAMA DE PIEZAS...
- Página 12 ASSEMBLY ASSEMBLAGE ENSAMBLAR First, pick a suitable location to work. Open the carton and slit the corners. This will give a protective surface upon which to start the assembly. During assembly, refer to the attached Hardware List near the back of this manual. Tout d'abord, trouvez un endroit approprié...
- Página 13 Attach Ash Door to Frame using two Hinge Pins and Cotter Pins. Fixez la porte du cendrier au cadre au moyen des tiges de charnière et des goupilles. Fije la Puerta de las cenizas al bastidor usando dos pasadores de bisagra y pasadores de chaveta. Hinge Charnière Bisagra...
- Página 14 Attach two Spacers and Side Handles to Grill Bottom using two 1/4-20x2 ½”Machine Screws, Insulated Washers, and 1/4-20 Flange Nuts per side. Attachez les deux pièces d'espacement et les poignées au fond du gril en vous servant de deux vis 1/4-20×2 1/2 po, de deux rondelles isolées et de deux écrous d'accouplement 1/4-20.
- Página 15 Attach four Legs using two 1/4-20x2” Machine Screws and 1/4-20 Flange Nuts per leg. Fixez les quatre pieds au moyen de deux vis à métal 1/4-20×2 po et de deux écrous d'accouplement 1/4-20 par pied. Fije cuatro patas usando dos tornillos mecánicos de 1/4 20x2”, y tuercas de brida de 1/4 20 por pata. Pied Pata...
- Página 16 Slide Ash Pan into front of Grill Bottom. Glissez le cendrier dans la partie avant du fond du gril. Deslice la Bandeja para cenizas en el frente de la parte inferior de la Parrilla. Ash Pan Cendrier Bandeja para cenizas...
- Página 17 Open Lid and attach two Fire Grate Hangers to Fire Grate (hooks point inward toward Grate). Lower into Grill Bottom and hang from Tabs on each side. Ouvrez le couvercle et fixez les deux supports de grille à la grille du foyer (les crochets doivent pointer à l'intérieur vers la grille). Posez la grille de foyer sur le fond du gril en accrochant les crochets aux languettes de chaque côté.
- Página 18 Place Cooking Grids into Grill Bottom. Note: use the provided Grate Lifting Tool to lift hot Cooking Grates. Posez les grilles de cuisson sur le fond du gril. Utilisez l'outil de levage fourni pour soulever les grilles à cuisson chaudes. Coloque las parrillas de cocción en la parte inferior de la parrilla.
- Página 19 Attach two Spacers and Lid Handle to Grill Lid using two 1/4-20x2 ½”Machine Screws, Insulated Washers, and 1/4-20 Flange Nuts. Attachez deux pièces d'espacement et la poignée au couvercle du gril en vous servant de deux vis 1/4-20×2 1/2 po, de deux rondelles isolées et de deux écrous d'accouplement 1/4-20.
- Página 20 Insert Vent Knobs into side of Grid Lid from the outside. Inside the Grill Lid, slide a Vent Plate onto the Knob stud followed by a Vent Spring and a #10-24 Hex Nut. Tighten just enough to allow Vent to slide freely from side to side. Repeat for other side.
- Página 21 Install Temperature Gauge by placing the stem through the large hole in front of the Grill Lid. Attach the nut provided until snug against the Lid. Installez le thermomètre en passant la tige par le grand trou à l'avant du couvercle du gril. Serrez complètement l'écrou fourni contre le couvercle.
- Página 22 Attach the Logo Plate by inserting the two pins into the small holes on the front of the Grill Lid. From the inside of the Lid, press the Logo Plate Clips onto the pins until they are snug against the Lid. Fixez la plaque de logo en insérant les deux tiges dans les petits orifices sur la partie avant du couvercle du gril.
- Página 23 HARDWARE LIST Hardware is shown actual size. You may have spare hardware after assembly is complete. Insulated Washer 1/4-20 Flange Nut #10-24 Flange Nut #10-24 Hex Nut Vent Spring Qty: 6 Qty: 14 Qty: 4 Qty: 2 Qty: 2 Small Cotter Pin Logo Plate Clip Qty: 2 Qty: 2...
- Página 24 LISTE DE MATÉRIEL Les pièces de quincaillerie sont illustrées en grandeur réelle. Il se peut qu'il vous reste des ferrures non utilisées après l'assemblage. Écrou Ressort du bouton Rondelle isolée Écrou Écrou hexagonal d'accouplement nº de ventilation Qté : 6 d'accouplement n°...
- Página 25 LISTA DE ACCESORIOS Los accesorios se muestran en su tamaño real. Puede sobrarle accesorios de repuesto luego de haber completado el ensamblaje. Tuerca Resorte del Arandela aislada Tuerca de brida Tuerca de brida hexagonal ducto Cant: 6 de #10 24 de 1/4 20 #10 24 Cant:2...