Tabla de contenido
Publicidad
Enlaces rápidos
Publicidad
Tabla de contenido

Resumen de contenidos para DBDrums Multi Sample Pad
- Página 1 Multi Sample Pad Manual del Usuario...
- Página 2 Hola! Creá música y hacé historia.
-
Página 3: Tabla De Contenido
ÍNDICE Notas Importantes. Otras consideraciones. Panel frontal. Panel trasero. Panel inferior. Aplicaciones Avanzadas. Cómo acceder a las opciones del menú de la Memoria USB / Importar y Exportar archivos. > Cómo cargar sonidos, kits y configuraciones de usuario. >... -
Página 4: Notas Importantes
NOTAS IMPORTANTES! Fuente de alimentación No conectar el nPad a la misma toma de corriente que esté siendo usada por una aplicación eléctrica controlada por inversor (como una heladera, lavavajillas, horno microondas o aire acondicionado), o que contenga motor. Dependiendo de la forma en la cual la aplicación eléctrica es usada, el ruido de la fuente de alimentación puede causar funcionamiento deficiente del nPad o puede producir ruido audible. -
Página 5: Otras Consideraciones
es posible. De lo contrario, se deberán utilizar materiales de embalaje equivalentes. También pueden encontrar diferentes tipos de fundas y cases en el website de dbdrums. Algunos cables de conexión contienen resistencias. No utilizar cables que incorporan resistencias para ... -
Página 6: Panel Frontal
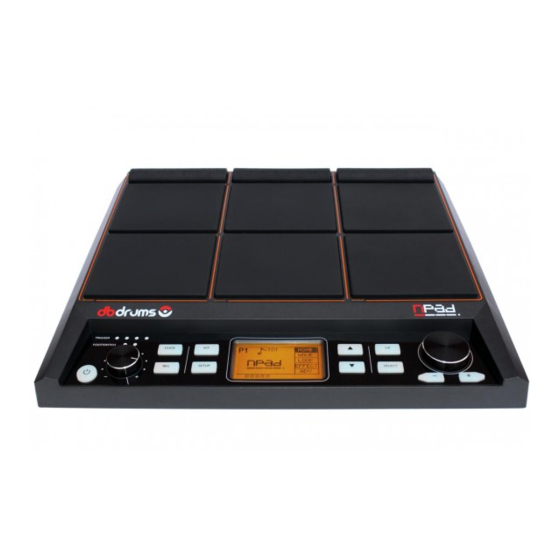
PANEL FRONTAL 1. DRUM PADS Pads sensitivos con velocity que disparan sonidos o notas MIDI cuando se golpean con un palillo. 8. BOTÓN KIT El LED correspondiente a cada pad golpeado se Usado para acceder al menú KIT, que permite iluminará. -
Página 7: Panel Trasero
Conecte aquí el adaptador de energía. Use la fuente para importar y exportar sus propios archivos de dbdrums PSU incluida. 9V DC 2A. sonido y kits. Esto se puede hacer utilizando el nPad Wave Manager. Para más información sobre el software de importación, consulte la guía del usuario... -
Página 8: Panel Inferior
DE MONTURA 70mm 100mm El nPad se puede tocar sobre una superficie plana o se puede colocar en los soportes de tambor más comunes. Clamp y soporte hechos específicamente para el nPad están disponibles para comprar en dbdrums. Manual del Usuario... -
Página 9: Aplicaciones Avanzadas
Estará disponible para sistemas operativos Windows® y MacOS®. La duracion maxima de los archivos es de 6 minutos. Hay más información disponible en el manual del usuario del software en los sitios web de dbdrums: dbdrums.com.ar/npad db-arg.com/npad MIDI Vista previa de los archivos MIDI en el nPad. - Página 10 INFO Muestra la información relacionada al Ajuste del paneo de la salida del metrónomo (click). almacenamiento total y restante de la memoria 0 = izquierda, 64 = centro, 127 derecha. USB y da la opción de formatear. Ajuste de volumen del metrónomo (click), 0 = apagado y 127 = volumen máximo.
- Página 11 WAVE LOOP Permite ajustar individualmente samples dentro Ajuste de loops internos de fabrica y loops grabados de un preset. Al golpear un PAD se selecciona y por el usuario. Más información sobre la grabación se puede editar. Presione el botón SELECT para de loops en la página 13.
-
Página 12: Adv (Edición Avanzada)
EFFECT Permite tener control sobre los efectos principales Acceso a funciones de edición avanzadas. del nPad. Use el botón SELECT para desplazarse entre EQ, Reverb y Limit. Es un ecualizador (EQ) de 3 bandas incorporado, que afecta al sonido general del nPad. Tuning (Afinación) Afinación del sample, hacia arriba o hacia abajo, el rango es +/- 12. -
Página 13: Pad Mode / Cómo Asignar Diferentes Funciones A Un Pad
ADV 2 KITCHAIN Brinda acceso a funciones de edición más avanzadas. Se utiliza para crear un orden personalizado de preset kits según sus preferencias. El nPad puede admitir 5 Kitchains, permitiendo tener 8 kits diferentes en cada Kitchain. Después de que se haya activado, se mostrará... -
Página 14: Conectando Pads Externos (Simple Y Doble Zona) Y Pedales
Conectando Pads Externos y pedales ExtPAD Para conectar correctamente los pads externos Menú que permite configurar los pads externos (simple y doble zona) y pedales, consulte la página 5. conectados al nPad (se venden por separado). Para controlar el pedal footswitch, enchúfelo y Sub menú... - Página 15 DISPLAY Sub menú del botón Permite configurar el contraste de la pantalla LCD y desactivar los LEDs indicadores. Permite grabar MIDI patterns dentro del nPad. Al presionar el botón REC una vez, se mostrará el siguiente menú. El metrónomo se encenderá automáticamente, pudiendo desactivarlo con el botón CLICK.
- Página 16 ®dbdrums 2020 | Un año muy peculiar. Gracias por tu apoyo! Buenos Aires - Argentina...
- Página 17 Multi Sample Pad User Manual...
- Página 18 Hi! Create music and make history.
- Página 19 INDEX Important Notes. Other considerations. Front Panel. Rear Panel. Bottom Panel. Advanced Applications. How to access the USB Memory Stick options menu / Import and Export files. > How to load user sounds, kits and settings. >...
- Página 20 IMPORTANT NOTES! Power supply Do not connect this nPad to the same electrical outlet that is being used by an electrical appliance that is controlled by an inverter (such as a refrigerator, washing machine, microwave oven or air conditioner), or that contains a motor. Depending on the way in which the electrical appliance is used, power supply noise may cause this nPad to malfunction or may produce audible noise. If it is not practical to use a separate electrical outlet, connect a power supply noise filter between this nPad and the electrical outlet. The AC adapter will begin to generate heat after long hours of consecutive use. This is normal, and is not a cause for concern. Before connecting this nPad to other devices, turn off the power to all of them. This will help prevent malfunctions and/or damage to speakers or other devices. Placement Using the nPad near power amplifiers (or other equipment containing large power transformers) may induce hum. To alleviate the problem, change the orientation of the nPad; or move it farther away from the source of interference. This device may interfere with radio and television reception. Do not use this device in the vicinity of such receivers. Noise may be produced if wireless communication devices, such as cell phones, are operated near the nPad. Such noise could occur when receiving or initiating a call, or while conversing. If you experience such problems, relocate such wireless devices farther away from the nPad, or switch them off. Do not expose the nPad to direct sunlight, place it near devices that radiate heat, leave it inside an enclosed vehicle, or expose it to extreme temperatures. Excessive heat can can damage, deform or discolor the nPad.
-
Página 21: Other Considerations
When connecting/disconnecting all cables, grasp the connector itself, never pull on the cable. This way you will avoid causing shorts, or damage to the cable’s internal elements. To avoid disturbing your neighbors, try to keep the nPad’s volume at reasonable levels. You may prefer to use headphones, so you do not need to be concerned about those around you. Since sound vibrations can be transmitted through floors and walls to a greater degree than expected, take care not to allow such sound to become a nuisance to neighbors, especially at night and when using headphones. When you need to transport the nPad, package it in the box (including padding) that it came in, if possible. Otherwise, you will need to use equivalent packaging materials. You can also find a different kind of soft and hard case to transport the nPad properly at dbdrums website. Some connection cables contain resistors. Do not use cables that incorporate resistors for connecting to this nPad. The use of such cables can cause the sound level to be extremely low, or impossible to hear. User Manual... - Página 22 FRONT PANEL 1. DRUM PADS 8. KIT BUTTON Velocity-sensitive pads which trigger sounds or MIDI Used to access the KIT menu, which allows you notes when hit with a drumstick. When struck, the to adjust and select different preset kits. You can pad’s corresponding LED will illuminate.
-
Página 23: Rear Panel
7. USB - A Port to connect main power. Use the included USB-A connection, used to connect memory stick dbdrums PSU. 9V DC 2A. for updates as well as importing and exporting your own sound files and kits. This can be done using nPad Wave Manager importing software. -
Página 24: Bottom Panel
BOTTOM PANEL MOUNTING CLAMP HOLES 70mm 100mm The nPad can be played flat on desktop or placed on most common snare drum stands. A mounting clamp and stand made specifically for the nPad is available to purchase at dbdrums. User Manual... - Página 25 More information is available in the software user manual on the dbdrums websites: dbdrums.com.ar/npad db-arg.com/npad You can download our Special Series of dbdrums MIDI A preview of MIDI file’s data loaded in the nPad. Sample Packs, which have been created together You can use the scroll wheel or +/- buttons to scroll with a diverse variety of renowned artists.
- Página 26 INFO Displays information relating to the total and Changes the pan of the metronome output. remaining storage on your USB stick as well as 0 = left, 64 = centre, 127 right. giving the option to format. Changes the volume of the metronome, 0 = off, 127 = maximum volume.
- Página 27 WAVE LOOP Gives you the ability to adjust individual samples Adjust built-in and user recorded loops within the within a preset. Hit a PAD to select it and begin nPad. More information about recording loops on editing. Press SELECT to scroll through the different page 13.
- Página 28 EFFECT Allows you to have control over the master effects on Gives you access to advanced editing features. the nPad. Use the SELECT button to scroll between EQ, Reverb and Limit. A built-in 3-band EQ, which can shape the overall sound of the nPad.
- Página 29 ADV2 KITCHAIN Gives you access to more advanced editing features. Used for creating a custom order of drum presets according to your preferences. The nPad can support 5 Kitchains, allowing you to have 8 different kits in each Kitchain. After it has been activated it will be shown in the home screen (Ex.
- Página 30 External Pads and Pedals To properly connect external pads (single and dual zone) and pedals, refer to page 5. Button Sub Menu MIDI Mode Displays a MIDI number for each pad. Hit a pad and Allows you to change the behaviour of a connected the corresponding MIDI number will be highlighted.
- Página 31 DISPLAY Button Sub Menu Allows you to set the LCD Contrast and disable the LEDs. Allows you to record MIDI patterns within the nPad. Pressing the REC button once will display the following menu. The metronome will automatically turn on, you can disengage it using the CLICK button. LCD Contrast Sets the contrast of the LCD screen, from 0-20.
- Página 32 ®dbdrums 2020 | A very peculiar year. Thanks for your support! Buenos Aires - Argentina...