
Manuales relacionados para BQS BNOFIX DS15


Resumen de contenidos para BQS BNOFIX DS15
- Página 1 BNOFIX 0 DS15 Apto para Suitable for Approprié à 0-36 MANUAL DE INSTRUCCIONES MANUAL DE INSTRUÇÕES INSTRUCTIONS MANUAL...
- Página 2 BNOFIX 0+123 no instalar la silla en el asiento delantero en sentido contrario a la marcha si los airbags delanteros están activos. — iF the car is eQUiPPed With active Front seat airbags, it is Prohibited to Place a child in a rear-Facing seat in the Front oF the car.
-
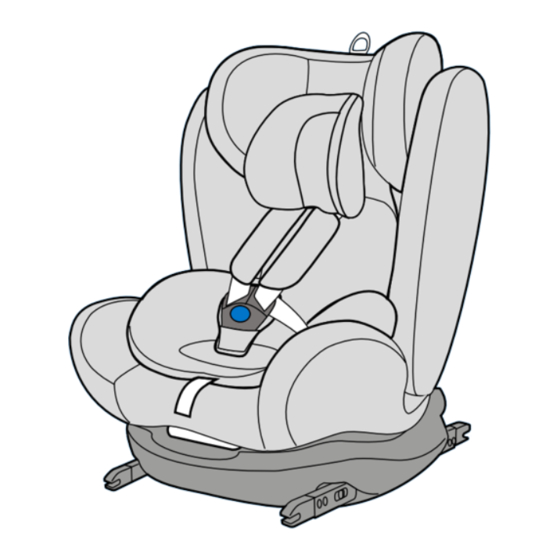
Página 3: Vista General
no está permitido utilizar la silla asegurada solamente 16. La silla de seguridad debe permanecer instalada al Lea detenidamente estas 1. VISTA GENERAL instrucciones. Guárdelas con cinturones de 2 puntos. vehículo mediante el cinturón de seguridad, aunque el AVISO siempre a mano en el bolsillo niño no esté... -
Página 4: Cómo Utilizar La Hebilla Del Arnés
Cinturón de La silla ofrece diferentes opciones de montaje. La 3. USO GENERAL DE LA SILLA 3 puntos. 2. PUESTOS DE INSTALACIÓN EN EL VEHÍCULO siguientes tabla indica los tipos de instalación para — cada grupo: 3.1. Cómo utilizar la hebilla del arnés Cinturón de DÓNDE: 2 puntos. -
Página 5: Limpieza De La Hebilla Del Arnés
Por mal funcionamiento se entiende: Botón de (13) fig. 4 fig. 2 ajuste del • Los cierres del broche salen sólo lentamente cuando se arnés. presiona el botón rojo. • Los cierres del broche ya no entran (se salen cuando los introduce en la hebilla). • Los cierres del broche encajan sin que se oiga un clic. • Resulta difícil insertar los cierres del broche en la hebilla (hay una resistencia). • La hebilla sólo se abre al ejercer una fuerza extrema. - Página 6 3.7. Regular en altura del arnés y del reposacabezas El reposacabezas debe ajustarse de forma que quede 3. Coloque la silla de seguridad en el asiento del coche. • Si desea instalar la silla solamente con el cinturón del en una instalación con arnés de 5 puntos. Grupos un espacio de dos dedos entre el reposacabezas y los vehículo comience desde el punto 4.2.
- Página 7 2. Coloque el reposacabezas del asiento del vehículo en la queden acoplados con un clic en ambos lados. El botón fig. 13 fig. 10 posición más alta. rojo cambiará a parcialmente verde en ambos lados (fig. 11). (19) 3. Localice los brazos Isoclick Fix ®...
-
Página 8: Anclar Los Brazos Isoclick Fix ® En Sentido A La Marcha (Opcional)
• La silla de seguridad esté firmemente instalada en el 6. INSTALACIÓN DE LA SILLA EN SENTIDO A LA 9. Siga los pasos del capítulo 5 asegurando al niño con fig. 18 fig. 19 vehículo. el arnés de 5 puntos. MARCHA. GRUPO 1 ( OPCIONAL ) • Las correas no estén retorcidas. 5. - Página 9 Para la seguridad del niño, antes de cada trayecto en 4. Coloque la silla de seguridad orientada en el sentido Guía para 3. Sujete la silla de seguridad con ambas manos e de la marcha sobre el asiento del vehículo. coche compruebe que: fig.
-
Página 10: Limpieza Y Mantenimiento
(11) para el grupo 1/2/3 a ambos lados del cojín de la 8 nunca utilize a cadeira de segurança sem a 10. GARANTÍA silla. Leia cuidadosamente antes cobertura e sem os protetores do arnês. AVISO de instalar o dispositivo de • La parte del cinturón diagonal (27) del lado de la... -
Página 11: Vista Geral
criança nunca deve estar sem vigilância enquanto 1. VISTA GERAL 2. POSTOS DE INSTALAÇAO NO VEÍCULO Cinto de 3 pontos. estiver sentada na cadeira de segurança, nem fora — do veículo. Cinto de 2 pontos. ONDE: Apoio para 17. mantenha a cadeira de segurança longe de a cabeça Regulador de produtos corrosivos. - Página 12 Entende-se por mau funcionamento: A cadeira oferece várias opções de montagem. A (13) Botâo de fig. 1 fig. 2 ajuste do • Os fechos do encaixe saem lentamente quando se tabela a seguir mostra os tipos de instalação para arnês. pressiona o botão vermelho. cada grupo: • Os fechos do encaixe já não entram (saem quando são OPÇAO 1 / COM O CINTO DO VEÍCULO...
- Página 13 e o apoio para a cabeça ao mesmo tempo. Isto 3.7. Ajustar o arnês e o apoio para a cabeça em altura em una instalaçao com arnês de 5 desbloqueia o apoio para a cabeça (fig. 6). fig. 4 pontos. Grupos 0+/1 2.
- Página 14 * As guias de inserção facilitam a instalação da cadeira de 4.1 Conectando os braços Isoclick Fix em uma ® 4. INSTALAÇÃO DA CADEIRA NO SENTIDO segurança com a ajuda dos pontos de fixação ISoFIX e evitam instalação no sentido contrario da marcha. fig.
- Página 15 4.2 Instalação com o cinto do veículo no sentido contrario da 1. Abra a fivela do arnês (fig. 15). fig. 13 fig. 15 fig. 16 marcha. Grupo 0+/1 2. Pressione o botão do regulador do arnês (13) 1. Certifique-se que ao arnês do 5 pontos da cadeira estão corretamente mesmo tempo que remove a parte peitoral das cintas instaldo (consulte o capitulo 3).
- Página 16 6. Certifique-se de que o cinto não fica dobrado ou 3. Fixe a cadeira de segurança com as duas mãos 6. INSTALAÇÃO DA CADEIRA NO SENTIDO DA fig. 18 fig. 19 torcido após a instalação. e introduza os dois braços de bloqueio (19) MARCHA.
-
Página 17: Limpeza E Manutenção
3. Se você deseja instalar a cadeira usando o sistema • A parte do cinto diagonal passa pela pinça vermelha 10. GARANTIA Guia do fig. 22 Isoclick Fix ® , siga as instruções no capítulo 6.1 do apoio para a cabeça. cinto 4. Coloque a cadeira de segurança virada para o • A parte do cinto diagonal se desloca na diagonal diagonal Este produto está... - Página 18 8. Please never use the safety seat without its cover or 17. Keep the safety seat away from corrosive products. Please read the following 1. OVERVIEW wARNING without the harness protectors. instructions carefully before 18. Do not use anchor points that are not listed in the installing the product.
-
Página 19: Uses In The Vehicle
fig. 1 The seat offers a number of assembly options. The 3 point belt. 2. USES IN THE VEHICLE following table shows the installation types for each — 2 point belt. group: WHERE: OPTION 1 / wITH THE VEHICLE’S BELT In the vehicle rear seats. -
Página 20: Removing The 5-Point Harness
Incorrect operation is understood as: the seat (fig. 3 and 4). fig. 4 • The buckle clasps are notably slow to release when 3. Free the shoulder protectors by unfastening them the red button is pressed. from the connector that joins them (located at the back • The buckle clasps cannot be inserted (they fall out of the seat) or, in the event they are joined without when they are inserted into the buckle). - Página 21 3.7. Adjusting the harness and headrest height in 4.1 Connecting the Isoclick Fix arms in a 1. Pull the headrest height adjuster and the headrest ® 4. CAR SEAT REARWARD-FACING INSTALLATION. at the same time. This will unlock the headrest (fig. 6). an installation with a 5-point harness.
- Página 22 4.2 Fastening the seat with the vehicle’s belt in a rearward- * The insertion guides facilitate the installation of the safety fig. 13 seat with the aid of the ISoFIX securing points and prevents facing installation. Group 0+/1. (Optional) fig. 10 damage to the upholstery.
- Página 23 6. CAR SEAT FORWARD-FACING INSTALLATION. 1. Release the harness buckle (fig. 15). fig. 15 fig. 16 GROUP 1 (OPTIONAL) fig. 18 fig. 19 2. Press the harness adjuster button (13) while pulling the part of the harness straps that cross the chest in GROUP 1 only.
- Página 24 3. Hold the safety seat with both hands and insert the • The safety seat straps are firmly fastened around the IMPORTANT! make sure the belt is not twisted. Diagonal belt two Isoclick Fix arms (19) firmly into the insertion guides child’s body, without squashing it. fig. 22 guide (group 2/3).
-
Página 25: Cleaning And Maintenance
• The diagonal section of the belt passes diagonally 10. GUARANTEE towards the back. This product is covered by a legal warranty under the • The straps are taut and not twisted. terms and conditions in Royal Legislative Decree 1/2007, from the 16th of november. For a period of 2 years after 9. - Página 27 Parque Empresarial Zuatzu Edificio Donosti, 2ª planta Oficina 3 20018 San Sebastián (Gipuzkoa) Spain t. (00 34) 943 833 013 f. (00 34) 943 833 004...