Tabla de contenido
Publicidad
Idiomas disponibles
Idiomas disponibles
Enlaces rápidos
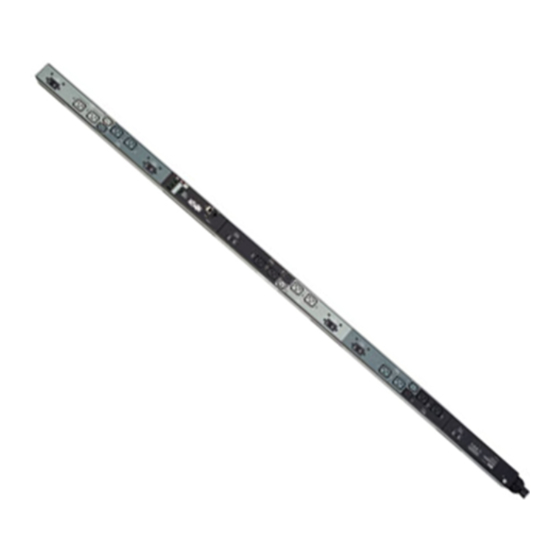
3-Phase Switched 0U Power
PDU3XVSRHWA • PDU3XVSRHWB PDU3XVSR6G32A • PDU3XVSR6G32B
PDU3XVSR6L2230 • PDU3XVSR6L2230B PDU3XVSR6G60A • PDU3XVSR6G60B
(Series Number: AG-0056)
PDU3XVSR6G30A • PDU3XVSR6G30B PDU3XVSR6G63A • PDU3XVSR6G63B
(Series Number: AG-0096)
1111 W. 35th Street, Chicago, IL 60609 USA • www.tripplite.com/support
13-09-017-9332B8.indb 1
Owner's Manual
Distribution Units
208V MODELS
PDU3VSR6H50A • PDU3VSR6G60A
(Series Number: AG-0065) • (Series Number: AG-0063)
400V MODELS
(Series Number: AG-0057)
Copyright © 2013 Tripp Lite. All rights reserved.
(Series Number: AG-0080)
(Series Number: AG-0093)
(Series Number: AG-0094)
1
2
3
8
10
16
18
18
19
20
39
58
9/5/2013 4:26:45 PM
Publicidad
Capítulos
Tabla de contenido

Manuales relacionados para Tripp-Lite PDU3VSR6H50A


Resumen de contenidos para Tripp-Lite PDU3VSR6H50A
-
Página 1: Tabla De Contenido
Owner’s Manual 3-Phase Switched 0U Power Distribution Units 208V MODELS PDU3VSR6H50A • PDU3VSR6G60A (Series Number: AG-0065) • (Series Number: AG-0063) 400V MODELS PDU3XVSRHWA • PDU3XVSRHWB PDU3XVSR6G32A • PDU3XVSR6G32B (Series Number: AG-0057) (Series Number: AG-0080) PDU3XVSR6L2230 • PDU3XVSR6L2230B PDU3XVSR6G60A • PDU3XVSR6G60B... -
Página 2: Important Safety Instructions
Important Safety Instructions SAVE THESE INSTRUCTIONS This manual contains instructions and warnings that should be followed during the installation, operation, and storage of this product. Failure to heed these instructions and warnings may affect the product warranty. • The PDU provides convenient multiple outlets, but it DOES NOT provide surge or line noise protection for connected equipment. -
Página 3: Installation
Installation Mounting the PDU Note: The illustrations may differ somewhat from your PDU model. Regardless of configuration, the user must determine the fitness of hardware and procedures before mounting. The PDU and included hardware are designed for common rack and rack enclosure types and may not be appropriate for all applications. Exact mounting configurations may vary. -
Página 4: Connecting The Pdu
Pole, 20A 309 3P+E (1.8 m) (2) C19 and (1) C13 Branch-Rated 6 x Double HUBBLE 6 ft. 18 Total; 6 Banks of PDU3VSR6H50A 208V 208V Pole, 20A CS8365C (1.8 m) (2) C19 and (1) C13 Branch-Rated 13-09-017-9332B8.indb 4 9/5/2013 4:26:47 PM... - Página 5 Installation Each 400V model is equipped with 1 of 3 different input plugs. L22-30P 32A Red IEC 309 63A Red IEC 309 3P+N+E 3P+N+E Max Input Amps (Limited by Input Cord Input Output Cord Outlets Model Name Input Plug and Plug) Voltage Voltage Breakers...
- Página 6 Installation Connect the input plug to your facility’s For Installation compatible AC power source. Purposes Only Connect your equipment’s input plugs to the appropriate outlets on the PDU. The LED near each outlet illuminates when the outlet is ready to distribute live AC power.
-
Página 7: Networking The Pdu
Installation To access the terminal block to make Remove Access Plate Screws input wire connections, remove the access plate located on the back side of the PDU. Ground Terminal Networking the PDU Your PDU can receive IP address assignments via DHCP server (dynamic) or static (manual) addressing methods. -
Página 8: Digital Display
Digital Display 3-Digit Display: Shows measured or calculated values such as Amperage, Kilowatts, Voltage, Power Unbalance Percentage, Temperature and Humidity. Arrow Buttons: Scroll through indicated Outlet, Input, Bank, Power, Load Balance, Sensor and Display Brightness options using these buttons. A long press of the up or down arrow buttons allows the user to skip to the next sequential measurement category. - Página 9 Digital Display Button Response Definitions: Configuration Switch Action Control Function Sequentially, moves up one selection in Depress ½ sec the menu. Up Pushbutton Advances up to the next measurement Depress 3 sec category. Sequentially, moves down one selection in Depress ½ sec the menu.
-
Página 10: Using The Digital Display
Using the Digital Display Scrolling Through Input Phases and Options (Measurement Category) Press Mode button to toggle between options and data within a menu. A momentary press of the arrow buttons switches between menus. A long press skips between measurement categories. The scrolling pattern of the display is outlined below. - Página 11 Using the Digital Display Press Mode button to toggle between options and data within a menu. A momentary press of the arrow buttons switches between menus. A long press skips between measurement categories. The scrolling pattern of the display is outlined below. Unbalanced Load Detect (Measurement Category) Phase Imbalance % Scrolling Through Load Banks and Options (Measurement Category)
- Página 12 i 0.5 2. i 8 2 0 8 Using the Digital Display Press Mode button to toggle between options and data within a menu. A momentary press of the arrow buttons switches between menus. A long press skips between measurement categories. The scrolling pattern of the display is outlined below.
- Página 13 Using the Digital Display These options are only available when a sensor such as Tripp Lite’s ENVIROSENSE is attached (sold separately). Press Mode button to toggle between options and data within a menu. A momentary press of the arrow buttons switches between menus. A long press skips between measurement categories.
- Página 14 Using the Digital Display LED Brightness and Color Scheme (Configuration Category) Hold the Mode button for 3 seconds to scroll through each option. The number in the 2-digit display is defined as: 1=25%; 2=50%; 3=75%; 4=100% Outlet Indicator LED Color Code Options (Configuration Category) Hold the Mode button for 3 seconds to switch between options.
-
Página 15: Display Options
Using the Digital Display OUTLET INDICATOR LED DEFINITIONS: LED Configuration LED Color Outlet Status Description Outlet power is absent Green Circuit breaker is on – Outlet power is present Outlet current has exceeded 80% of the outlet Yellow Standard current rating – Outlet power is present Outlet voltage is below the Low Voltage threshold –... -
Página 16: Rotating The Display
Using the Digital Display Rotating the Display At any point, pressing both of the arrow buttons simultaneously and holding 0 3.0 for 3 seconds rotates the 2-digit and 3-digit displays. Features Outlets: During normal operation, the outlets distribute AC power to connected equipment. Outlet Status LED: Once the unit is powered on, each outlet individually ramps up and each Outlet Status LED will illuminate when the associated outlet is ready to distribute live AC power. - Página 17 Features PDUMVROTATEBRKT Mounting Accessory: Use these V-shaped brackets to mount the PDU with its outlets facing the rear of the rack. C14 Plug-lock Insert: (Optional) Use the included C14 inserts to secure plugs to receptacles. Attach the insert to the plug making sure that the pull tabs remain outside the plug and that the fit is secure.
-
Página 18: Configuration And Operation
Configuration and Operation Remote Monitoring and Control The PDU provides remote monitoring outlet control and more via Web browser, telnet and SNMP-based Network Management Systems. For more information about configuration and operation of the PDU via thePowerAlert Web browser interface, refer to the SNMPWEBCARD User’s Guide, included on the CD-ROM bundled with the PDU. -
Página 19: Warranty And Warranty Registration
Warranty and Warranty Registration 2- YEAR LIMITED WARRANTY Seller warrants this product, if used in accordance with all applicable instructions, to be free from original defects in material and workmanship for a period of 2 years from the date of initial purchase. If the product should prove defective in material or workmanship within that period, Seller will repair or replace the product, in its sole discretion. -
Página 20: Unidades De Distribución De Energía Trifásicas Controlables De 0U
Manual del propietario Unidades de Distribución de Energía Trifásicas Controlables de 0U MODELOS DE 208V PDU3VSR6H50A • PDU3VSR6G60A (Número de Serie: AG-0065) • (Número de Serie: AG-0080) MODELOS DE 400V PDU3XVSRHWA • PDU3XVSRHWB PDU3XVSR6G32A • PDU3XVSR6G32B (Número de Serie: AG-0057) (Número de Serie: AG-0080) -
Página 21: Instrucciones Importantes De Seguridad
Instrucciones Importantes de Seguridad CONSERVE ESTAS INSTRUCCIONES Este manual contiene instrucciones y advertencias que deben seguirse durante la instalación, operación y almacenamiento de este producto. La omisión en la observancia de estas instrucciones y advertencias puede afectar la garantía del producto. •... -
Página 22: Instalación
Instalación Instalación del PDU Nota: Las ilustraciones pueden diferir un poco de su modelo de PDU. Sin importar la configuración, el usuario debe determinar la adecuación de los accesorios y procedimientos antes de la instalación. El PDU y accesorios incluidos están diseñados para tipos comunes de racks y gabinetes y pueden no ser apropiados para todas las aplicaciones. -
Página 23: Conexión Del Pdu
Bancos de (2) 20A por [6 pies] 3P+E C19 y (1) C13 Derivación 18 en Total; 6 HUBBLE Bipolares, 1.83 m PDU3VSR6H50A 208V 208V Bancos de (2) CS8365C 20A por [6 pies] C19 y (1) C13 Derivación 13-09-017-9332B8.indb 23 9/5/2013 4:27:04 PM... - Página 24 Instalación Cada modelo de 400V está equipado con 1 de 3 clavijas de alimentación diferentes. L22-30P 32A Red IEC 309 63A Red IEC 309 3P+N+E 3P+N+E Amperes Máximos de Entrada (Limitado por el Cable Voltaje Voltaje Clavija de y Clavija de Longitud Nombre del Modelo Entrada...
-
Página 25: Instalaciones Eléctricas Permanentes (Sólo Modelos Pdu3Xvsrhwa Y Pdu3Xvsrhwb)
Instalación Conecte la clavija de entrada a la Sólo para Fines fuente de alimentación de CA de su de Instalación instalación. Conecte las clavijas de entrada de sus equipos a los tomacorrientes apropiados en el PDU. El LED próximo a cada tomacorriente se ilumina cuando el tomacorriente está... -
Página 26: Conectando El Pdu En Red
Instalación Para acceder al bloque de terminales Remueva Los Tornillos de La Placa de Acceso para hacer las conexiones de cableado del bloque de terminales, retire la placa de acceso localizada en la parte posterior del PDU. Terminal de Conexión a Tierra Conectando el PDU en Red Su PDU puede recibir asignaciones de dirección IP mediante métodos de direccionamiento de servidor DHCP (dinámico) o estático (manual). -
Página 27: Pantalla Digital
Pantalla Digital Pantalla de 3 Dígitos: Muestra los valores medidos o calculados como Amperaje, Kilowatts, Voltaje, Porcentaje de Desbalanceo de Potencia, Temperatura y Humedad. Botones de Flecha: Usando estos botones, se desplaza a través de las opciones indicadas de Salida, Entrada, Banco, Potencia, Balance de Carga, Sensor Brillo de Pantalla. Una presión prolongada de los botones de flecha arriba o abajo permite al usuario saltar a la siguiente categoría de medición secuencial. -
Página 28: Ubicación Del Receptáculo Del Banco De Carga
Pantalla Digital Definiciones de Respuesta de Botón: Configuración Interruptor Acción Función de Control Oprimir ½ Mueve secuencialmente hacia arriba una segundo selección en el menú. Botón de Presión Hacia Arriba Oprimir 3 Avanza hacia arriba a la siguiente categoría de segundos medición. -
Página 29: Usando La Pantalla Digital
Usando la Pantalla Digital Desplazándose a Través de Fases y Opciones de Entrada (Categoría de Medición) Oprima el botón de modo para cambiar entre opciones y datos dentro de un menú. Una presión momentánea de los botones de flecha cambia entre menús. Una presión prolongada salta entre categorías de mediciones. - Página 30 Usando la Pantalla Digital Oprima el botón de modo para cambiar entre opciones y datos dentro de un menú. Una presión momentánea de los botones de flecha cambia entre menús. Una presión prolongada salta entre categorías de mediciones. El patrón de desplazamiento en la pantalla se detalla a continuación. Detección de Carga Desbalanceada (Categoría de Medición) % de Desbalanceo de Fase Desplazándose a Través de Bancos de Carga y Opciones (Categoría de Medición)
- Página 31 i 0.5 2. i 8 2 0 8 Usando la Pantalla Digital Oprima el botón de modo para cambiar entre opciones y datos dentro de un menú. Una presión momentánea de los botones de flecha cambia entre menús. Una presión prolongada salta entre categorías de mediciones.
-
Página 32: Cambio Secuencial De Opciones De Función (Categoría De Configuración)
Usando la Pantalla Digital Estas opciones están disponibles solamente cuando está acoplado un sensor como ENVIROSENSE de Tripp Lite (Vendido por separado). Oprima el botón de modo para cambiar entre opciones y datos dentro de un menú. Una presión momentánea de los botones de flecha cambia entre menús. Una presión prolongada salta entre categorías de mediciones. - Página 33 Usando la Pantalla Digital Esquema de Brillo y Color del LED (Categoría de Configuración) Sostenga por 3 segundos el botón de Modo para desplazarse a través de cada opción. El número en la pantalla de 2 dígitos está definido como: 1=25%; 2=50%; 3=75%; 4=100% Opciones de Código de Color de Led Indicador de Tomacorriente (Categoría de Configuración) Sostenga el botón de Modo por 3 segundos para cambiar...
-
Página 34: Opciones De Pantalla
Usando la Pantalla Digital DEFINICIONES DE LED INDICATOR DE TOMACORRIENTE: Configuración Estado de Color de LED Descripción de LED Salida Apagado Apagado La energía salida está ausente Verde Encendido El breaker está encendido – La energía de salida está presente La corriente de salida ha excedido el 80% de la especificación Amarillo Encendido... -
Página 35: Características
Usando la Pantalla Digital Girado de la Pantalla En cualquier punto, oprimir y sostener por 3 segundos simultáneamente 0 3.0 ambos botones de flecha gira las pantallas de 2 dígitos y 3 dígitos. Características Tomacorrientes: Durante la operación normal, los tomacorrientes distribuyen energía de CA al equipo conectado. - Página 36 Características Accesorio de Instalación PDUMVROTATEBRKT: Use estos soportes con perfil en V para instalar el PDU con sus tomacorrientes viendo a la parte posterior del rack. Manguito de Clavija C14: (Opcional) Use los insertos C14 incluidos para asegurar las clavijas a los tomacorrientes. Coloque el inserto a la clavija asegurándose que las lengüetas permanezcan fuera de la clavija y que la conexión sea segura.
-
Página 37: Configuración Y Operación
Configuración y Operación Monitoreo y Control Remoto El PDU proporciona monitoreo remoto control de tomacorrientes y más mediante un navegador de red, telnet y Sistemas de Administración de Red basados en SNMP . Para más información sobre la configuración y operación del PDU mediante la interfaz de navegador de red PowerAlert, refiérase a la Guía del Usuario de SNMPWEBCARD, incluida en el CD-ROM empacado con el PDU. -
Página 38: Garantía
Garantía GARANTÍA LIMITADA DE 2 AÑOS El vendedor garantiza que este producto no tiene defectos originales de materiales ni de mano de obra por un período de dos años a partir de la fecha original de compra, si se utiliza de acuerdo con todas las instrucciones correspondientes. -
Página 39: Français
Manuel de l’utilisateur Unités de distribution de l’énergie 0U commutables triphasées MODÉLES DE 208V PDU3VSR6H50A • PDU3VSR6G60A (Numéro de série: AG-0065) • (Numéro de série: AG-0063) MODÉLES DE 400V PDU3XVSRHWA • PDU3XVSRHWB PDU3XVSR6G32A • PDU3XVSR6G32B (Numéro de série: AG-0057) (Numéro de série: AG-0080) PDU3XVSR6L2230 •... -
Página 40: Consignes De Sécurité Importantes
Consignes de sécurité importantes CONSERVEZ CES INSTRUCTIONS Ce manuel contient des instructions et des avertissements qui devraient être respectés pendant l’installation, l’utilisation et l’entreposage de ce produit. Le non-respect de ces instructions et de ces avertissements pourrait affecter la garantie du produit. •... -
Página 41: Installation
Installation Montage de l’unité de distribution d’énergie (PDU) Remarque : Les illustrations peuvent différer quelque peu de votre modèle d’unité de distribution d’énergie (PDU). Quelle que soit la configuration, l’utilisateur doit déterminer l’aptitude du matériel et des procédures avant de procéder au montage. -
Página 42: Branchement De La Pdu
1,8 m (6 pi) groupes de (2) C19 3P+E de 20 A et (1) C13 6 x bipolaire, 18 au total; 6 HUBBLE PDU3VSR6H50A 208V 208V section nominale 1,8 m (6 pi) groupes de (2) C19 CS8365C de 20 A et (1) C13 13-09-017-9332B8.indb 42... - Página 43 Installation Chaque modèles de 400 V est équipé de 1 à 3 prises d’entrée différentes. L22-30P 32A Red IEC 309 63A Red IEC 309 3P+N+E 3P+N+E Ampérage d’entrée maximum (limité par le Tension Longueur Fiche cordon et la Tension Nom du modèle d’entrée fiche d’entrée) d’entrée...
- Página 44 Installation Brancher la fiche d’entrée dans la À des fins source d’alimentation CA compatible de d’installation l’installation. uniquement Brancher les fiches d’entrée de l’équipement dans les sorties appropriées sur la PDU. Le voyant DEL près de chaque sortie s’allume lorsque la sortie est prête à...
-
Página 45: Fonctionnement En Réseau De La Pdu
Installation Ces modèles ne sont pas dotés d’un câble d’entrée. Le conduit et les adaptateurs sont installés sur la plaque d’extrémité , les fils sont acheminés à travers le conduit et les adaptateurs vers le bloc de jonction situé derrière la plaque d’accès Pour accéder au bloc de jonction Enlever les vis de la plaque d’accès... -
Página 46: Affichage Numérique
Affichage numérique Affichage à 3 chiffres : affiche les valeurs mesurées telles que l’intensité de courant, kilowatt, tension, pourcentage de déséquilibre de puissance, température et humidité. Flèches de défilement : Parcourir les options indiquées Outlet (sortie), Input (entrée), Bank (rangée), Power (alimentation), Load Balance (équilibre de la charge), Sensor (capteur) et Display Brightness (affichage de la luminosité) au moyen de ces flèches. - Página 47 Affichage numérique Définitions des réponses des boutons : Configuration Commutateur Action Fonction de commande Dans l’ordre, se déplace d’une sélection vers le Appuyer ½ sec. haut dans le menu Bouton-poussoir vers le haut Se déplace vers le haut vers la catégorie de Appuyer 3 sec.
-
Página 48: Utiliser L'affichage Numérique
Utiliser l’affichage numérique Parcourir les phases d’entrée et les options (catégorie de mesures) Appuyer sur le bouton Mode pour basculer entre les options et les données sur un menu. Une brève pression des flèches de défilement permet de permuter entre les menus. Une longue pression permet de sauter entre les catégories de mesures. -
Página 49: Détection De Charges Déséquilibrées (Catégorie De Mesures)
Utiliser l’affichage numérique Appuyer sur le bouton Mode pour basculer entre les options et les données sur un menu. Une brève pression des flèches de défilement permet de permuter entre les menus. Une longue pression permet de sauter entre les catégories de mesures. Le type de défilement de l’affichage est décrit ci-dessous. - Página 50 i 0.5 2. i 8 2 0 8 Utiliser l’affichage numérique Appuyer sur le bouton Mode pour basculer entre les options et les données sur un menu. Une brève pression des flèches de défilement permet de permuter entre les menus. Une longue pression permet de sauter entre les catégories de mesures.
-
Página 51: Parcourir Les Lectures De Température (Catégorie De Mesure)
Utiliser l’affichage numérique Ces options sont uniquement disponibles lorsqu’un capteur tel que ENVIROSENSE de Tripp Lite est attaché (vendu séparément). Appuyer sur le bouton Mode pour basculer entre les options et les données sur un menu. Une brève pression des flèches de défilement permet de permuter entre les menus. Une longue pression permet de sauter entre les catégories de mesures. - Página 52 Utiliser l’affichage numérique Intensité du voyant DEL et schéma de couleurs (catégorie de configuration) Maintenir le bouton Mode enfoncé pendant 3 secondes pour parcourir chaque option. Le nombre dans l’affichage à 2 chiffres est défini de la façon suivante : 1=25 %; 2=50 %; 3=75 %;...
-
Página 53: Options D'affichage
Utiliser l’affichage numérique DÉFINITIONS DU VOYANT DEL DE SORTIE : Configuration du Couleur du États de Description voyant DEL voyant DEL la sortie Off (arrêt) Off (arrêt) Le courant de sortie est absent. Le disjoncteur est sous tension – Le courant de sortie est Vert (marche) présent. -
Página 54: Caractéristiques
Utiliser l’affichage numérique Rotation de l’affichage À tout moment, le fait d’appuyer sur les deux flèches de défilement de 0 3.0 façon simultanée et de les maintenir pendant 3 secondes permet la rotation des affichages à 2 et 3 chiffres. Caractéristiques Sorties : Lors du fonctionnement normal, les sorites distribuent une alimentation CA à... - Página 55 Caractéristiques Accessoire de montage du PDUMVROTATEBRKT : utiliser ces supports en forme de V pour monter la PDU avec ses sorties faisant face à l’arrière du bâti. Manchons de fiche C14 : (facultatif) Utiliser les inserts C14 inclus pour retenir les fiches aux prises de courant. Attacher l’insert à la fiche en s’assurant que les tirettes demeurent à...
-
Página 56: Configuration Et Fonctionnement
Configuration et fonctionnement Surveillance et contrôle à distance La PDU fournit une surveillance à distance une commande de sortie et beaucoup plus via un navigateur Web, telnet et des systèmes de gestion de réseau basés sur SNMP . Pour plus d’information au sujet de la configuration et du fonctionnement de la PDU via l’interface de du navigateur Web PowerAlert, se reporter au guide d’utilisateur de la SNMPWEBCARD... -
Página 57: Garantie
Garantie GARANTIE LIMITÉE DE 2 ANS Le vendeur garantit que ce produit, s’il est utilisé selon toutes les directives applicables, est exempt de défauts d’origine de matériel et de main-d’oeuvre pour une période de 2 ans à partir de la date initiale d’achat. Si le produit s’avère défectueux en matériel ou en main-d’oeuvre durant cette période, le vendeur réparera ou remplacera le produit à... -
Página 58: Русский
Руководство пользователя 3-фазные управляемые блоки распределения питания высотой 0U Модели для номинального напряжения 208 В PDU3VSR6H50A • PDU3VSR6G60A (Серийный номер: AG-0065) • (Серийный номер: AG-0063) Модели для номинального напряжения 400 В PDU3XVSRHWA • PDU3XVSRHWB PDU3XVSR6G32A • PDU3XVSR6G32B (Серийный номер: AG-0057) (Серийный... -
Página 59: Важные Указания По Технике Безопасности
Важные указания по технике безопасности СОХРАНИТЕ НАСТОЯЩИЕ УКАЗАНИЯ В настоящем руководстве содержатся указания и предупреждения, которые необходимо соблюдать в процессе установки, эксплуатации и хранения данного изделия. Игнорирование этих указаний и предупреждений может привести к потере гарантии на изделие. • Блок распределения питания (PDU) оснащен несколькими удобными розетками, но НЕ обеспечивает защиту подключенного... -
Página 60: Монтаж Pdu
Установка Монтаж PDU Примечание. Устройство, изображенное на иллюстрациях, может несколько отличаться от вашей модели PDU. Независимо от конфигурации, пользователь должен установить пригодность оснастки и предполагаемых процедур до начала монтажа. Блок распределения питания (PDU) и входящая в его комплект оснастка предназначены для обычных типов шкафов и могут не подходить для всех целей применения. Установочные конфигурации могут... -
Página 61: Подключение Pdu
типа C19 и 1 шт. типа C13 3P+E питания) 6 двухполюсных на HUBBLE 20 А (в соответствии Всего 18 шт.: 6 групп по 2 шт. PDU3VSR6H50A 208V 208V 1,8 м CS8365C с параметрами цепи типа C19 и 1 шт. типа C13 питания) - Página 62 Установка Каждая модель на 400 В имеет от 1 до 3 входных разъемов различного типа. L22-30P 32A Red IEC 309 3P+N+E 63A Red IEC 309 3P+N+E Макс. входной ток в амперах (ограничивается сечениями Наименование входного шнура Входное Выходное Прерыватели Длина модели...
- Página 63 Установка Подключите входной разъем к совместимому Только в целях источнику питания переменного тока на вашем установки объекте. Подключите входные разъемы вашего оборудования к соответствующим выходным розеткам PDU. Свечение находящегося рядом с каждой розеткой светодиодного индикатора указывает на ее готовность к распределению электропитания переменного тока, поступающего...
- Página 64 Установка Для получения доступа к клеммной колодке с Вывернуте винты, фиксирующие монтажную крышку целью подключения входной проводки следует демонтировать съемную панель, расположенную на задней стороне PDU. Клемма заземления Подключение PDU к сети Ваш PDU может получать присваиваемые ему IP-адреса через DHCP-сервер (динамические) или ручным способом (статические).
-
Página 65: Цифровой Дисплей
Цифровой дисплей 3-разрядный дисплей: отображает измеренные и расчетные значения, такие как ток в амперах, мощность в киловаттах, напряжение в вольтах, дисбаланс мощности в процентах, температура и относительная влажность. Кнопки со стрелками: эти кнопки используются для переключения между следующими опциями: Outlet (Розетка), Input (Вход), Bank (Группа), Power (Питание), Load Balance (Баланс... - Página 66 Цифровой дисплей Описания откликов на нажатие кнопок: Конфигурация Переключатель Действие Функция управления Нажатие с Последовательный переход к следующей выше опции меню. удержанием 1/2 с Кнопка “вверх” Нажатие с Переход к следующей выше измерительной категории. удержанием 3 с Нажатие с Последовательный переход к следующей ниже опции меню. удержанием...
- Página 67 Порядок использования цифрового дисплея Прокрутка входных фаз и опций (измерительная категория) Для переключения между опциями и данными внутри какого-либо меню нажмите кнопку выбора режима. При кратковременном нажатии кнопок со стрелками производится переключение между меню. При длительном нажатии производится переключение между измерительными категориями. Порядок прокрутки дисплея приведен ниже. Примечание.
- Página 68 Порядок использования цифрового дисплея Для переключения между опциями и данными внутри какого-либо меню нажмите кнопку выбора режима. При кратковременном нажатии кнопок со стрелками производится переключение между меню. При длительном нажатии производится переключение между измерительными категориями. Порядок прокрутки дисплея приведен ниже. Определение...
- Página 69 i 0.5 2. i 8 2 0 8 Порядок использования цифрового дисплея Для переключения между опциями и данными внутри какого-либо меню нажмите кнопку выбора режима. При кратковременном нажатии кнопок со стрелками производится переключение между меню. При длительном нажатии производится переключение между измерительными категориями. Порядок прокрутки дисплея приведен ниже. Суммарная...
- Página 70 Порядок использования цифрового дисплея Эти опции доступны только в случае подключения датчика типа Tripp Lite ENVIROSENSE (продается отдельно). Для переключения между опциями и данными внутри какого-либо меню нажмите кнопку выбора режима. При кратковременном нажатии кнопок со стрелками производится переключение между меню. При длительном нажатии производится...
- Página 71 Порядок использования цифрового дисплея Яркость и цветовая маркировка светодиодных индикаторов (конфигурационная категория) Для прокрутки каждой опции удерживайте кнопку выбора режима нажатой в течение 3 секунд. Цифра, отображаемая на 2-разрядном дисплее, означает следующее: 1=25%; 2=50%; 3=75%; 4=100% “Опции цветовой маркировки светодиодных индикаторов розеток” (конфигурационная категория) Для...
- Página 72 Порядок использования цифрового дисплея ПОКАЗАНИЯ СВЕТОДИОДНЫХ ИНДИКАТОРОВ РОЗЕТОК: Конфигурация Цвет индикатора Статус розетки Описание светодиодных индикаторов Отключен Отключен Отсутствует питание розетки Зеленый Включен Автоматический выключатель в положении “вкл. ” – розетка запитана Ток через розетку превысил 80% от номинального значения – розетка Желтый...
- Página 73 Порядок использования цифрового дисплея Поворот изображения на дисплее В любой момент времени при одновременном нажатии кнопок со стрелками и их удержании 0 3.0 в течение 3 секунд производится поворот изображений на 2- разрядном и 3-разрядном дисплеях. Возможности Розетки: в штатном режиме работы розетки распределяют мощность...
- Página 74 Возможности Вспомогательное монтажное приспособление PDUMVROTATEBRKT: эти V-образные кронштейны следует использовать для установки PDU таким образом, чтобы его розетки были обращены к задней стороне шкафа. Муфта разъема С14: (опция) Для фиксации вилок в розетках используйте поставляемые в комплекте вставки C14. Наденьте вставку на вилочный разъем и убедитесь в том, что язычки остались...
-
Página 75: Техническое Обслуживание
Порядок настройки конфигурации и работы Дистанционный контроль и управление PDU обеспечивает дистанционный контроль , управление розетками и другие возможности через веб-браузер, протокол telnet и системы управления сетью по протоколу SNMP. Дополнительные сведения о конфигурации и режимах работы PDU через браузерный интерфейс PowerAlert см. в руководстве... -
Página 76: Гарантийные Обязательства
Гарантийные обязательства Условия 2-летней ограниченной гарантии Продавец гарантирует отсутствие изначальных дефектов материала или изготовления в течение 2 лет с момента первой покупки данного изделия при условии его использования в соответствии со всеми применимыми к нему указаниями. В случае проявления каких-либо дефектов материала...