Tabla de contenido
Publicidad
Idiomas disponibles
Idiomas disponibles
Enlaces rápidos
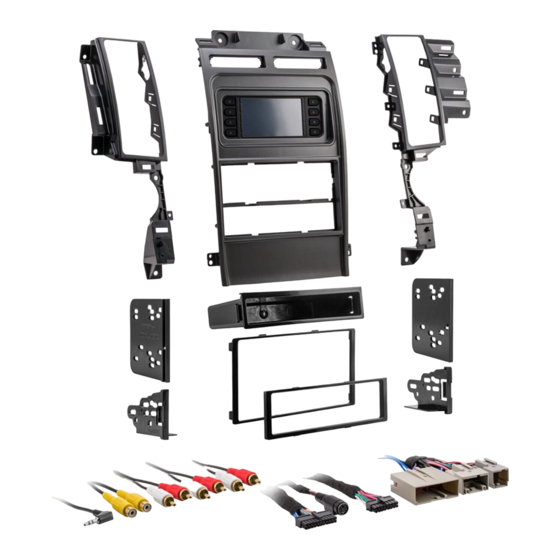
KIT COMPONENTS
• A) Radio trim panel with touchscreen display • B) A/C vent trim panels • C) ISO DDIN brackets • D) ISO DDIN trim plate • E) ISO DIN brackets
• F) ISO DIN trim plate • G) Pocket • H) (10) #8 x 3/8" Phillips screws
A
B
The World's best kits.
®
Ford Taurus*
* Only for models with a key start
Visit
MetraOnline.com
specific applications
KIT FEATURES
• DIN radio provision with pocket
• ISO DIN radio provision with pocket
• ISO DDIN radio provision
• Painted silver
• Touchscreen display for climate and personalization features
C
D
G
MetraOnline.com
2010-2012
for more detailed information about the product and up-to-date vehicle
E
F
H
© COPYRIGHT 2020 METRA ELECTRONICS CORPORATION
99-5722
I N S TA L L AT I O N I N S T R U C T I O N S
TABLE OF CONTENTS
Dash Disassembly ...............................................2-3
Kit Preparation .......................................................4
-DIN radio provision with pocket ........................5
-ISO DIN radio provision with pocket ..................6
-ISO DDIN radio provision .....................................7
Axxess Interface Installation ............................ 8-17
WIRING & ANTENNA CONNECTIONS
Wiring Harness: Axxess interface
and harness included
Antenna Adapter: Included with kit
TOOLS REQUIRED
• Panel removal tool • Phillips screwdriver
• 9/32" socket wrench • Cutting tool
Attention!
Let the vehicle sit with the key
out of the ignition for a few minutes before
removing the factory radio. When testing the
aftermarket equipment, ensure that all factory
equipment is connected before cycling the
key to ignition.
REV. 10/27/20 INST99-5722
Publicidad
Capítulos
Tabla de contenido
Solución de problemas

Manuales relacionados para Metra 99-5722


Resumen de contenidos para Metra 99-5722
-
Página 1: Tabla De Contenido
When testing the aftermarket equipment, ensure that all factory equipment is connected before cycling the key to ignition. The World’s best kits. MetraOnline.com ® © COPYRIGHT 2020 METRA ELECTRONICS CORPORATION REV. 10/27/20 INST99-5722... -
Página 2: Dash Disassembly
DASH DISASSEMBLY 1. Unclip and remove the (2) trim panels 5. Unclip and remove the trim panel on the left and right side of the center between the steering column and the console. (Figure A) key cylinder, and then remove the (1) 9/32”... - Página 3 DASH DISASSEMBLY (CONT.) 9. Remove the (4) 9/32” screws securing 11. Remove the (10) 9/32” screws securing the shifter trim panel, and then slide it the radio/climate control panel, and backwards. (Figure F) then unclip and remove. (Figure H) Note: There is no need to remove this 12.
-
Página 4: Kit Preparation
KIT PREPARATION From the factory radio/climate control To the 99-5722 radio/display trim panel: panel: 1. Secure the A/C vent trim panels to the 1. Unclip and remove the a/c vents and radio trim panel with touchscreen display using the (10) #8 x 3/8” Phillips chrome vent trim. -
Página 5: Kit Assembly
KIT ASSEMBLY DIN radio provision with pocket 1. Snap the pocket into the lower opening of the radio/display trim panel. (Figure A) 2. Remove the metal DIN sleeve from the aftermarket radio. 3. Slide the sleeve into the upper opening of the radio/display trim panel and secure by bending the metal locking tabs down. -
Página 6: Iso Din Radio Provision With Pocket
KIT ASSEMBLY ISO DIN radio provision with pocket 1. Snap the pocket into the lower opening of the radio/display trim panel. (Figure A) 2. Remove the metal DIN sleeve and trim ring from the aftermarket radio. 3. Secure the ISO DIN brackets to the radio using the screws supplied with the radio. -
Página 7: Iso Ddin Radio Provision
KIT ASSEMBLY ISO DDIN radio provision 1. Cut and remove the center bar from the radio/display trim panel. (Figure A) 2. Attach the radio brackets to the inside edge of the radio/display trim panel. (Figure B) 3. Slide the radio into the bracket/panel assembly and secure it using the screws supplied with the radio. -
Página 8: Axxess Interface Installation
AXXESS INTERFACE INSTALLATION INTERFACE FEATURES TABLE OF CONTENTS • Provides accessory power (12-volt 10-amp) Connections to be made ......................9-12 • Retains R.A.P. (retained accessory power) Installing the interface ....................... 12 • Provides NAV outputs (parking brake, reverse, speed sense) Initializing the interface ......................13 •... -
Página 9: For Models Without An Amplifier
CONNECTIONS TO BE MADE Attention! This interface will work with models that are either amplified or non-amplified. From the 5722 harness to the aftermarket radio: Please follow the instructions carefully for your model vehicle. Failure to do so will result in •... - Página 10 Refer to the manual provided • Metra OE: Connect the steering wheel control Key 1 wire (Gray) to the Brown with the radio if in doubt as to where the 3.5mm jack goes to.
- Página 11 CONNECTIONS TO BE MADE (CONT.) The following (3) wires are only for multimedia/navigation radios that require these wires. Attention! This interface will work with models that are either amplified or non-amplified. Please follow the instructions carefully for your model vehicle. Failure to do so will result in • Connect the Blue/Pink wire to the VSS/speed sense wire. either no sound, or low sound.
-
Página 12: Installing The Interface
CONNECTIONS TO BE MADE INSTALLING THE INTERFACE (CONT.) 4-pin harness with yellow RCA jacks: With the key in the off position: This harness is to be used to add an aftermarket backup camera to the touchscreen display, if 1. Connect the 5722 harness into the touchscreen display, ports “A” and “B”, so desired. -
Página 13: Initializing The Interface
Settings screen. being the coldest, and “HI” being the SYNC: hottest: LO / 1-9 / HI If the vehicle is equipped with SYNC, the 99-5722 can retain this feature. Note: The “Info” button will only be 1. Change the source of the radio to AUX-IN. shown if SYNC is to be retained. -
Página 14: System Configuration
TOUCHSCREEN DISPLAY OPERATION (CONT.) Configuration Settings screen • Steering Wheel Controls • Remap Buttons – For remapping the steering wheel control buttons • Dual Assign – For dual assigning the steering wheel control buttons (long button press) • Select Radio – For auto detecting the radio, or changing the radio type •... -
Página 15: Steering Wheel Control Settings
Others may be added at a later date. Universal “2 or 3 wire” radios can show up as any of these radio manufacturers. Eclipse (Type 1) † Clarion (Type 2) † Parrot ** Kenwood ‡ Pioneer/Jensen Metra OE XITE Clarion (Type 1) † Alpine * Eclipse (Type 2) † Philips Sony / Dual... - Página 16 STEERING WHEEL CONTROL SETTINGS (CONT.) Remap Button screen Dual Assign screen • The interface has the ability to change the button assignment for the steering wheel • The interface has the capability to assign two functions to a single button, except Volume- control audio buttons, except Volume-Up and Volume-Down.
-
Página 17: Troubleshooting
TROUBLESHOOTING Resetting the interface Option # 1 1. With everything connected and the car running. 2. Hold the bottom (2) buttons for 3 seconds, then release. (Figure A) (The screen will turn black and then put you in the vehicle selection screen) 3. - Página 18 386.257.1187 MetraOnline.com...
- Página 19 REV. 10/27/2020 INST99-5722...
- Página 20 Log onto www.installerinstitute.com or call 800-354-6782 for more information and take steps toward a better tomorrow. Metra recommends MECP certified technicians The World’s best kits. MetraOnline.com ® © COPYRIGHT 2020 METRA ELECTRONICS CORPORATION REV. 10/27/20 INST99-5722...
- Página 21 Además, no quite el radio de fábrica con la llave en la posición o de encendido ni con el vehículo funcionando. The World’s best kits. MetraOnline.com ® © COPYRIGHT 2020 METRA ELECTRONICS CORPORATION REV. 10/27/20 INST99-5722...
-
Página 22: Desmontaje Del Tablero
DESMONTAJE DEL TABLERO 1. Desenganche y quite los (2) paneles de 5. Desenganche y quite el panel de la la moldura del lado izquierdo y derecho moldura entre la columna de dirección de la consola central. (Figura A) y el cilindro de la llave, y luego quite (1) tornillo de 9/32”... - Página 23 DESMONTAJE DEL TABLERO (CONT.) 9. Quite los (4) tornillos de 9/32” que 11. Quite los (10) tornillos de 9/32” que sujetan el panel de la moldura de sujetan el panel del radio/control del la palanca de velocidades, y luego clima, y luego desenganche y quite. deslícela hacia atrás.
-
Página 24: Preparación Del Kit
PREPARACIÓN DEL KIT Del panel del radio/control del clima Para el panel de la moldura del radio/ de fábrica: pantalla 99-5722: 1. Desenganche y quite las rejillas del aire 1. Sujete los paneles de la moldura de la acondicionado y la moldura cromada de rejilla del aire acondicionado con la la rejilla. -
Página 25: Ensamble Del Kit
ENSAMBLE DEL KIT Provisión de radio DIN con cavidad 1. Coloque a presión la cavidad en la abertura inferior del panel de la moldura del radio/pantalla. (Figura A) 2. Quite la manga de metal DIN del radio de mercado secundario. 3. Deslice la manga en la abertura superior del panel de la moldura del radio/ pantalla y sujétela doblando hacia abajo las pestañas de metal. -
Página 26: Provisión De Radio Iso Din Con Cavidad
ENSAMBLE DEL KIT Provisión de radio ISO DIN con cavidad 1. Coloque a presión la cavidad en la abertura inferior del panel de la moldura del radio/pantalla. (Figura A) 2. Quite la manga de metal DIN del radio de mercado secundario. 3. Sujete los soportes ISO DIN al radio usando los tornillos suministrados con el radio. -
Página 27: Provisión De Radio Iso Ddin
ENSAMBLE DEL KIT Provisión de radio ISO DDIN 1. Corte y quite la barra central del panel de la moldura del radio/pantalla. (Figura A) 2. Coloque los soportes del radio al borde interior del panel de la moldura del radio/pantalla. (Figura B) 3. -
Página 28: Instalación De La Interfase Axxess
INSTALACIÓN DE LA INTERFASE AXXESS CARACTERÍSTICAS DE LA INTERFAZ INDICE • Provee corriente de accesorio (12 voltios 10 amperes) Conexiones que se deben hacer .....................9-12 • Retiene R.A.P. (corriente de accesorio retenida) Instalación de la interfaz ......................12 • Proporciona salidas de NAV (freno de mano, reversa, sensor de velocidad) Inicializar la interfaz ........................13 •... -
Página 29: Para Los Modelos Sin Un Amplificador Sony
CONEXIONES QUE SE DEBEN HACER ¡Atención! Esta interfaz funcionará con modelos que cuenten con amplificador Sony o que no Desde el arnés 5722 al radio de mercado secundario: estén amplificados. Siga las instrucciones cuidadosamente para su modelo de vehículo. Ignorar las •... - Página 30 • Para todos los demás radios: Conecte el conector de 3.5 mm dentro del puerto en el radio • Equipo original Metra: Conecte el cable Key 1 (gris) del control en el volante al designado para una interfaz externa de control en el volante. Haga referencia al manual cable marrón.
-
Página 31: Para Los Modelos Con Un Amplificador Sony
CONEXIONES QUE SE DEBEN HACER (CONT.) ¡Atención! Esta interfaz funcionará con modelos que cuenten con amplificador Sony o que no • Conecte el cable verde/púrpura al cable de reversa. estén amplificados. Siga las instrucciones cuidadosamente para su modelo de vehículo. Ignorar las •... -
Página 32: Instalación De La Interfaz
• Ignore el conector RCA amarillo rotulado “AUX video”; no se utilizará en esta aplicación. 5. Localice el conector de la antena de fábrica en el tablero y realice todas las conexiones necesarias al radio. Metra recomienda el uso de un adaptador adecuado de acoplamiento de Metra. -
Página 33: Inicializar La Interfaz
Configuraciones. frío y “HI” el más caliente: LO / 1-9 / HI SYNC: Nota: El botón “Info” solo se mostrará si Si el vehículo está equipado con SYNC, el 99-5722 puede conservar esta función. debe retenerse SYNC. 1. Cambie la fuente del radio a AUX-IN. Continua en la siguiente pagina 2. Oprima el botón “Info” en la pantalla táctil para ingresar al menú SYNC. Oprima el botón “HVAC”... -
Página 34: Iluminación Ambiental
OPERACIÓN DE LA PANTALLA TÁCTIL (CONT.) Pantalla de Configuraciones: • Controles en el volante • Botones de reubicación: para reubicar los botones del control en el volante • Doble asignación: para doble asignación de los botones de control en el volante (oprimir el botón por largo tiempo) •... -
Página 35: Configuración Del Control Del Volante
Otros pueden agregarse en una fecha posterior. Los radios universales de “2 o 3 cables” pueden mostrarse como cualquiera de estos fabricantes de radio. Eclipse (Type 1) † Clarion (Type 2) † Parrot ** Kenwood ‡ Pioneer/Jensen Metra OE XITE Clarion (Type 1) † Alpine * Eclipse (Type 2) † Philips Sony / Dual... -
Página 36: Configuración De Control En Volante
CONFIGURACIÓN DE CONTROL EN VOLANTE (CONT.) Pantalla para reubicar el botón Pantalla de doble asignación • La interfaz tiene la capacidad de cambiar la asignación de botón para los botones de audio del • La interfaz tiene la capacidad de asignar dos funciones a un solo botón, excepto Subir control en el volante, excepto para Subir volumen y Bajar volumen. -
Página 37: Resolución De Problemas
RESOLUCIÓN DE PROBLEMAS Restablecimiento de la interfaz Opción 1 1. Con todo conectado y el coche en marcha. 2. Mantenga presionados los botones inferiores (2) durante 3 segundos y luego suéltelos. (Figura A) (La pantalla se volverá negra y luego lo pondrá en la pantalla de selección de vehículo) 3. - Página 38 18 18 386.257.1187 MetraOnline.com...
- Página 39 REV. 10/27/2020 INST99-5722...
- Página 40 Tenga el vehículo separado y listo para realizar los pasos de solución de problemas antes de ponerse en contacto con el soporte técnico de Metra / Axxess. EL CONOCIMIENTO ES PODER Mejore sus habilidades de instalación y ®...