Tabla de contenido
Publicidad
Enlaces rápidos
IMPORTANTES CONSIGNES DE SÉCURITÉ
Toujours faire preuve de prudence en utilisant un appareil électromécanique.
Lire toutes les instructions avant d'utiliser cette machine à coudre.
DANGER -
Pour réduire le risque de décharge électrique, suivre ce qui suit:
Cette machine à coudre ne devrait jamais être laissée sans surveillance lorsque branchée. Toujours la débrancher
immédiatement après l'avoir utilisée ou avant de la nettoyer.
Débranchez toujours avant de remplacer l'ampoule. Remplacez l'ampoule par une ampoule similaire de 15 watts.
AVERTISSEMENT-
Pour réduire le risque de brûlures, de feu, de choc électrique
ou de blessures, suivre ce qui suit:
1.
Ne pas utiliser comme jouet. Une surveillance attentive est nécessaire lorsque cette machine est utilisée par ou près des enfan ts.
2.
Cet appareil n'est pas adapté pour les enfants de moins de 8 ans ainsi que les personnes ayant un handicap physique, sensoriel ou
mental, ou les personnes inexpérimentées ou manquant des connaissances nécessaires, à moins qu'elles soient supervisées
ou formées adéquatement afin de comprendre et d'appliquer les mesures nécessaires à leur sécurité. Les enfants ne doivent pas
jouer avec l'appareil. Les opérations de nettoyage et d'entretien ne doivent pas
un enfant sans surveillance.
3. N'utiliser cet appareil qu'aux fins mentionnées dans ce manuel et n'utiliser que des accessoires recommandés
par le fabricant.
4. Ne jamais faire fonctionner l'appareil si le cordon ou la fiche est endommagé, s'il ne fonctionne pas adéquatement,
s'il est tombé par terre, endommagé ou s'il est tombé dans l'eau. Retourner la machine à un détaillant autorisé ou
un centre de service le plus près pour inspection, réparation, ajustement électrique ou mécanique.
5. Si le cordon est endommagé, il doit être remplacé par le fabricant, un représentant autorisé ou toute autre personne qualifiée
pour éviter tout danger.
6. Ne jamais utiliser la machine à coudre si les ouvertures d'aération sont obstruées. Garder toutes les ouvertures et le
rhéostat exempts d'accumulation de peluches, de poussières ou de pièces de tissu.
7. Ne jamais laisser tomber ni insérer d'objet quelconque dans les ouvertures.
8. Utiliser à l'intérieur seulement.
9. Ne pas faire fonctionner là où des produits en aérosol sont vaporisés ou de l'oxygène est administré.
10. Pour débrancher, mettre l'interrupteur sur arrêt (position 0), puis retirer la fiche de la prise.
11. Mettre l'interrupteur sur arrêt ou débrancher l'appareil, lorsqu'il est laissé sans surveillance. Débranchez l'appareil avant d'effectuer
des travaux d'entretien ou de remplacer des ampoules.
12.
Ne pas débrancher en tirant sur le cordon. Débranchez en tirant sur la fiche, non pas sur le cordon.
13. Garder les doigts éloignés de toute pièce mobile. L'aiguille doit faire l'objet d'une attention particulière.
14. Ne jamais coudre si la plaque d'aiguille est endommagée, car elle pourrait briser l'aiguille.
15. Ne pas utiliser d'aiguilles gauchies.
16.
Ne pas tirer ni pousser le tissu en cousant. Il pourrait faire dévier l'aiguille et la briser.
17. Mettre l'interrupteur sur arrêt (position 0) avant de faire un quelconque ajustement autour de l'aiguille, comme enfiler l'aiguille,
la changer, embobiner du fil ou changer de pied presseur, etc.
18. Toujours débrancher la machine à coudre de la prise pour retirer des couverts, lubrifier la machine ou pour faire tout
autre ajustement mentionné dans ce manuel.
19. Pour éviter toute décharge électrique, ne jamais mettre la machine, ni les câbles principaux, ni les fiches dans
l'eau ou tout autre liquide.
20.
Attention: pour éviter toute blessure, débrancher le rhéostat :
- lorsque l'appareil est laissé sans surveillance.
- avant de le transporter pour effectuer un entretien.
être effectuées par
ATTENTION -
Pièces mobiles
Pour réduire le risque de blessures, mettre
l'interrupteur sur arrêt avant d'effectuer un entretien. Fermer
le couvercle avant de faire fonctionner la machine.
CONSERVER
CES INSTRUCTIONS
Ce produit est conçu pour une utilisation
domestique seulement (ou l'équivalent).
Cet appareil est conforme à la
directive CEE 2004/108/EC
concernant
les normes
électromagnétiques.
"DISPOSITION PARTICULIERE:
Cet appareil est marqué d'un symbol de
recyclage. Ne déposez pas ce matériel en
décharge municipale. Il fait l'objet d'un
traitement spécifique pour sa collecte.
Publicidad
Tabla de contenido

Manuales relacionados para Baby Lock Proline 097


Resumen de contenidos para Baby Lock Proline 097
- Página 1 IMPORTANTES CONSIGNES DE SÉCURITÉ Toujours faire preuve de prudence en utilisant un appareil électromécanique. Lire toutes les instructions avant d’utiliser cette machine à coudre. DANGER - Pour réduire le risque de décharge électrique, suivre ce qui suit: Cette machine à coudre ne devrait jamais être laissée sans surveillance lorsque branchée. Toujours la débrancher immédiatement après l’avoir utilisée ou avant de la nettoyer.
-
Página 2: Importantes Instrucciones De Seguridad
IMPORTANTES INSTRUCCIONES DE SEGURIDAD Cuando se usa un aparato eléctrico, debe seguirse unas precauciones básicas y que vienen incluidas a continuación. “Leer las instrucciones antes de usar la máquina de coser.” PELIGRO - Para reducir el riesgo de una descarga eléctrica. La máquina no debe dejarse nunca desatendida mientras esté... -
Página 3: Belangrijke Veiligheidsinstructies
BELANGRIJKE VEILIGHEIDSINSTRUCTIES Als u een elektrisch apparaat gebruikt, moet u altijd de basis veiligheidseisen in het oog houden, inclusief deze: Lees alle instructies voordat u deze naaimachine gaat gebruiken. GEVAAR! - Voorkom een elektrische schok: 1. Laat het apparaat nooit alleen met de stekker in het stopcontact. Haal de stekker van het apparaat altijd uit het stopcontact na gebruik en voor reiniging. -
Página 4: Specifications De La Machine
FRANÇAIS ESPAÑOL ENGLISH TABLE OF CONTENTS TABLE DES MATIERES INDICE DE CONTENIDOS 1. KNOWING YOUR MACHINE 1. VOTRE MACHINE A COUDRE 1. PRINCIPALES PARTES DE LA MAQUINA Identification chart・ ・ ・ ・ ・ ・ ・ ・ ・ ・ ・ ・ ・ ・ ・ ・ ・ ・ ・ ・ ・ ・ ・ ・ ・ ・ ・ ・ ・ ・ ・ ・ ・ ・ ・ ・ ・ ・ ・ ・ ・ ・ ・ ・ ・ ・ ・ ・ 4 - 5 Description de la machine・... -
Página 5: Tabla De Contenido
NEDERLANDS NEDERLANDS INHOUD / TABLE MATIERES 1. Ken uw machine Ken uw machine ・ ・ ・ ・ ・ ・ ・ ・ ・ ・ ・ ・ ・ ・ ・ ・ ・ ・ ・ ・ ・ ・ ・ ・ ・ ・ ・ ・ ・ ・ ・ ・ ・ ・ ・ ・ ・ ・ ・ ・ ・ ・ ・ ・ ・ ・ ・ ・ ・ ・ ・ 4 - 5 Accessoires ・... -
Página 6: Knowing Your Machine
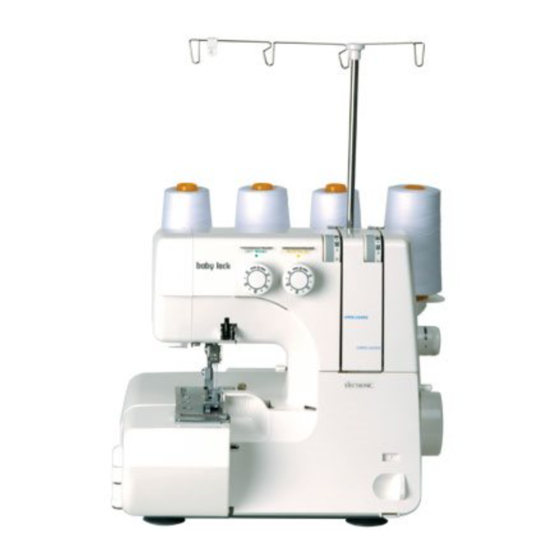
FRANÇAIS ENGLISH 1. KNOWING YOUR 1. VOTRE MACHINE A MACHINE COUDRE IDENTIFICATION CHART DESCRIPTION DE LA MACHINE 1. Foot pressure regulator 1. Réglage de la pression du pied 2. Sewing light 2. Ampoule d'éclairage 3. Presser foot lever 3. Levier pied presseur 4. -
Página 7: Ken Uw Machine
ESPAÑOL NEDERLANDS NEDERLANDS 1. PRINCIPALES 1. KEN UW PARTES DE LA MACHINE MAQUINA BESCHRIJVING NOMENCLATURA DE IDENTIFICACION 1. Persvoetstangdruk 2. Verlichting 1. Regulador de presión de pie 3. Persvoethevel 2. Luz 4. Draadafsnijmesje 3. Palanca elevadora del 5. Naaldplaat prensatelas 6. - Página 8 FRANÇAIS ENGLISH ACCESSORIES ACCESSOIRES All parts listed may be obtained from your Toutes les pièces décrites ci-dessous peuvent nearest dealer. être obtenues auprès de votre revendeur le plus proche. 1. Two-thread convertor 2. Stitch finger (B) (See page 48) 1. Convertisseur à 2 fils 3.
-
Página 9: Accesorios
ESPAÑOL NEDERLANDS NEDERLANDS ACCESORIOS ACCESSOIRES Todas las piezas listadas se puede obtener en Al deze onderdelen zijn verkrijgbaar bij uw su distribuidor más próximo. handelaar. 1. Convertidor de dos-hilos 1. 2-Draads converter 2. Dedo de puntada (B) 2. Steekdoorn (B) (Zie blz. 49) (Ver página 49) 3. -
Página 10: Setting Up Your Machine
FRANÇAIS ENGLISH SETTING UP YOUR MACHINE BRANCHEMENT DE LA MACHINE 1. Wipe off excess oil in the needle plate and bed areas. 1. Nettoyer l'excès d'huile sur la plaque-aiguille et ses alentours. 2. FOOT CONTROL *Ⅰ 2. RHEOSTAT Push foot control plug into connector socket, and connect the power line plug into power supply outlet. -
Página 11: Aansluiten Van De Machine
ESPAÑOL NEDERLANDS NEDERLANDS MONTAJE DE SU MAQUINA AANSLUITEN VAN DE MACHINE 1. Asegúrese de limpiar la zona de la placa de la aguja y la 1. Verwijder de eventuele olie van naaldplaat enz. placa base antes de coser un vestido. 2. -
Página 12: Preparation For Threading
FRANÇAIS ENGLISH PREPARATION FOR THREADING PREPARATION A L'ENFILAGE *Ⅰ THREAD GUIDE POLE SUPPORT GUIDE-FILS TELESCOPIQUE *Ⅱ Pull up thread guide pole to the highest point until you hear it Tirer vers le haut le support jusqu'à son point maximum signalé click. -
Página 13: Alvorens In Te Rijgen
ESPAÑOL NEDERLANDS NEDERLANDS PREPARACION PARA EL ENHEBRADO ALVORENS IN TE RIJGEN BARRA DEL PORTA CARRETES ANTENNE-DRAADGELEIDER Extender la barra guía del hilo a su punto más alto hasta que Trek de antenne geheel naar boven, tot hij stuit. escuche un click. Colocar los hilos sobre los pasadores de las Plaats de plastic onderschijven en het garen, op de guías desde atrás al frente. - Página 14 FRANÇAIS ENGLISH SPOOL CAPS FOR DOMESTIC TYPE CHAPEAUX POUR MISE EN PLACE DES *Ⅰ SPOOLS BOBINES DE TYPE DOMESTIQUES *Ⅱ SPOOL DISC AND SPOOL HOLDERS FOR PLAQUETTES D'EXTENSION POUR * Ⅲ CONE SPOOLS CONES ET SUPPORTS POUR CONES For large cone spools use the spool holders with the wide end Pour les cônes de fil les plus hauts, utiliser les supports pour at the top, and for small ones, use the same spool holders but cône avec la partie large vers le haut.
-
Página 15: Tapas Para Carretes De Hilo Domestico
ESPAÑOL NEDERLANDS NEDERLANDS TAPAS PARA CARRETES DE HILO GARENSCHOTEL VOOR HUISHOUD DOMESTICO GARENKLOSSEN PLACAS DE PROLONGACION Y PORTA CONE-HOUDERS VOOR INDUSTRIE CARRETES PARA CONO DE HILO KLOSSEN (CONEN) MET GAREN Para carretes cónicos grandes, usa los porta-carretes con el Bij conen met een groot gat, plaatst u de cone-houder met het borde ancho en la parte superior y para los pequeños, usa los dikke deel naar boven, op de garenpen. - Página 16 FRANÇAIS ENGLISH LINT TRAY BAC A DECHETS With the lint tray located in this position, it will collect all your Avec le bac à déchets plaçé dans cette position, il contiendra waste material. tous les déchets de fil et tissu causés par la coupe. Après avoir After completion of work if you then turn tray upwards in fini votre travail et si vous voulez le remettre comme montré, direction shown, finger Ref C will locate in slot D and left hand...
-
Página 17: Het Stofopvangbakje
ESPAÑOL NEDERLANDS NEDERLANDS BATEA DE HILOS HET STOFOPVANGBAKJE Con la batea de hilos en esta posición, cogerá todos materiales Met dit accessoire in deze positie worden de stof en gastados. draadresten opgevangen. Na het werk kunt u het bakje Después de completar su trabajo si entonces gire la batea omhoog zetten zoals staat afgebeeld, vinger C past in de hasta arriba en dirección indicada, dedo Ref. -
Página 18: Changing Needle
FRANÇAIS ENGLISH CHANGING NEEDLE CHANGEMENT D'AIGUILLE *Ⅰ Raise needle bar to its highest point by turning hand wheel Remonter la barre-aiguille au maximum en tournant le volant towards you, but leave presser foot down. Loosen needle vers soi, mais en laissant le pied presseur en position abaissée. clamp screw to remove the needle, and place new needle with Flat Side Away From You, into the needle bar as far as it will go, Dévisser la vis du serre-aiguille, et plaçer la nouvelle aiguille... -
Página 19: Verwisselen Van De Naalden - Naald
ESPAÑOL NEDERLANDS NEDERLANDS MONTAR LA(S) AGUJA(S) VERWISSELEN VAN DE NAALDEN Levantar la barra de las agujas hasta su punto más alto girando Plaats de naald in zijn hoogste stand door het handwiel naar u el volante manual hacia usted, pero deje el pie prensatelas toe te draaien. -
Página 20: Needle, Thread And Fabric Chart
FRANÇAIS ESPAÑOL ENGLISH NEEDLE, THREAD AND FABRIC CHART TABLEAU DES FILS ET MATIERES MATERIALS, HILOS Y AGUJAS Use HA × 1SP, HA × 1(130 / 705H) Needles. Utiliser des aiguilles système 130-705 H. Usar agujas HA × 1SP (punta bola) o 130 / 705H S. Grosseur FABRIC THREAD... -
Página 21: Naald, Garen En Stoffen-Tabel
NEDERLANDS NEDERLANDS NAALD, GAREN EN STOFFEN-TABEL Gebruik HA × ISP, of 130 / 705H naalden. STOFFEN GAREN NAALDEN Dunne stoffen : Katoen No. 100 Organdie, Batist, Katoen KATOEN LINNEN Dikke zware stoffen : Polyester Denim, Katoen, No. 60 - 50 Garbadine Katoen No. -
Página 22: Enfilage Du Boucleur Inferieur
FRANÇAIS ENGLISH 2. STARTING TO SEW 2. COMMENCER A COUDRE THREADING YOUR MACHINE ENFILAGE DE LA MACHINE Wrong threading may cause skipped stitches, breaking threads, or other problems. Un mauvais enfilage causera des points de manque, des casses de fil ou autres Try to master the correct threading before problèmes. -
Página 23: Beginnen Met Naaien
ESPAÑOL NEDERLANDS NEDERLANDS 2. EMPEZAR A COSER 2. BEGINNEN MET NAAIEN ENHEBRAR SU MAQUINA INRIJGEN VAN DE MACHINE Un mal enhebrado puede originar puntos sueltos, rotura del hilo y otros problemas. Verkeerd inrijgen veroorzaakt draadbreuk, Trate de dominar el enhebrado correcto antes overslaan van steken en andere problemen. - Página 24 FRANÇAIS ENGLISH THREADING UPPER LOOPER ENFILAGE DU BOUCLEUR SUPERIEUR 1. Feed the thread through the thread guide as illustrated. 1. Passer le fil dans le guide-fil comme illustré. 2. Pull the upper thread through the slot. Holding the thread with your left hand, pull 2.
- Página 25 ESPAÑOL NEDERLANDS NEDERLANDS ENHEBRAR EL ANCORA INRIJGEN VAN DE SUPERIOR BOVENGRIJPER 1. Avanzar el hilo a través de la guía del hilo 1. Rijg de draad door de diverse draad- como se ilustra. geleiders, zoals afgebeeld. 2. Conducir el hilo a través de la ranura, 2.
-
Página 26: Needle Threader
FRANÇAIS ENGLISH THREADING NEEDLES ENFILAGE DES AIGUILLES *Ⅰ *Ⅰ 1. Feed the thread through the thread guide 1. Passer le fil dans le guide-fil comme as illustrated. illustré. 2. Draw the needle threads through left-hand 2. Tirer les fils d'aiguille à travers la tension tension. -
Página 27: Enhebrador De Aguja
ESPAÑOL NEDERLANDS NEDERLANDS ENHEBRAR AGUJAS INRIJGEN VAN DE NAALDEN 1. Avanzar el hilo a través de la guía del hilo 1. Rijg de draad door de diverse draad- como se ilustra. geleiders zoals afgebeeld. 2. Conducir los hilos asegurándose de que 2. -
Página 28: Helpful Hints
FRANÇAIS ENGLISH HELPFUL HINTS CONSEILS D'UTILISATION REPLACING THREAD SPOOLS REMPLACER LES BOBINES DE FIL When replacing thread spools, the following steps may be Les conseils suivants seront utiles pour changer rapidement et helpful for quick changeover. facilement les fils de bobine. 1. -
Página 29: Bruikbare Tips
ESPAÑOL NEDERLANDS NEDERLANDS SUGERENCIAS DE AYUDA BRUIKBARE TIPS REEMPLAZAR LOS CARRETES DE HILO VERWISSELEN VAN HET GAREN Cuando se reemplacen los carretes de hilo, para un cambio Als u het garen gaat wisselen, ga dan als onderstaand rápido, los siguientes pasos pueden ser utiles. omschreven te werk. -
Página 30: Testing Stitch Overlock Stitches
FRANÇAIS ENGLISH TESTING STITCH OVERLOCK STITCHES TESTER LA FORMATION DU POINT After threading is completed, use a scrap of fabric that you plan Après avoir terminé l'enfilage, utiliser une chute du tissu à to sew and test to sew in the following order. utiliser pour tester la couture dans l'ordre suivant : 1. -
Página 31: Testen Van De Overlocksteken
ESPAÑOL NEDERLANDS NEDERLANDS COMPROBAR LOS SOBREHILADOS TESTEN VAN DE OVERLOCKSTEEK Después de que el enhebrado se complete, usar un material Nadat de machine is ingeregen, naait u de locksteek op een similar que piense coser y verifique las puntadas en el proeflapje. -
Página 32: Setting Chart
ENGLISH SETTING CHART Number of threads Overedge cutting width dial - 6 - - 5 - 4 - 6 - 6 - 4 - 6 Needle to use Left Right Left Right Right Left Right Stitch finger Two thread convertor - 4 - - 4 - - 4 -... - Página 33 FRANÇAIS TABLEAU DE REGLAGE DE LA MACHINE Nombre de fils Bouton de réglage de largeur - 6 - - 5 - 4 - 6 - 6 - 4 - 6 de coupe Aiguille à utiliser Gauche Droit Gauche Droit Droit Gauche Droit Doigt mailleur...
-
Página 34: Tabla De Fijacion
ESPAÑOL TABLA DE FIJACION Número de hilo - 6 - - 5 - 4 - 6 - 6 - 4 - 6 Dial de anchura de costura Aguja que se usa Izquierda Derecha Izquierda Derecha Derecha Izquierda Derecha Dedo de puntada Convertidor de dos-hilos - 4 - - 4 -... -
Página 35: Garenspanningen
NEDERLANDS GARENSPANNINGEN Aantal draden Snijbreedteknop - 6 - - 5 - 4 - 6 - 6 - 4 - 6 Links en Links en Gebruik de naald Links Rechts Links Rechts Rechts Links Rechts Rechts Rechts Steekdoorn 2-Draads converter - 4 - - 4 - - 4 - - 4 -... -
Página 38: Three-Thread Overlock With One Needle
FRANÇAIS ENGLISH THREE-THREAD OVERLOCK OVERLOCK A 3 FILS AVEC WITH ONE NEEDLE UNE AIGUILLE By threading the LEFT needle only a width of En conservant pour seule aiguille l'aiguille 6 mm will be produced and by threading the gauche, on obtient une largeur de surjet de 6 RIGHT needle only a width of 3.8 mm will be mm, en ne conservant que l'aiguille droite, on produced. -
Página 39: 3-Draads Overlocksteek Met L-Naald
ESPAÑOL NEDERLANDS NEDERLANDS SOBREHILADOS DE TRES 3-DRAADS OVERLOCKSTEEK HILOS CON UNA AGUJA MET 1-NAALD Enhebrando sólo la aguja IZQUIERDA se Als u alleen de linkernaald inrijgt, krijgt u een producirá anchura 6mm brede steek. Als u de rechternaald enhebrando la aguja DERECHA sólo se gebruikt, krijgt u een 3.8mm brede steek. -
Página 40: Narrow And Rolled Hem, Picot Stitch
ENGLISH NARROW AND ROLLED HEM, PICOT STITCH *Ⅰ Narrow and rolled edge is ideal for use on thin materials such as georgette crepe, crepe de chine, silk etc. Also, picot stitch can be produced particularly when sewing on fine 'scarflike' materials. In view of the nature of these hems, they are unsuitable for use on 'hard' or 'heavy' materials. -
Página 41: Dobladillados Enrollados, Estrechos Y De Forro
FRANÇAIS ESPAÑOL OURLETS ETROITS ET OURLETS ROULES, POINT PICOT DOBLADILLADOS ENROLLADOS, ESTRECHOS Y DE FORRO Les ourlets étroits ou roulés conviennent particulièrement bien pour finir les tissus fins tels que la Son ideales para usarlos en materiales delgados tales como: crespón georgette, crespón de soie, le voile, le crêpe de chine, etc ... -
Página 42: Smalle / Rolzoom, Picot-Steek
NEDERLANDS SMALLE / ROLZOOM, PICOT-STEEK *Ⅰ De smalle / rolzoomsteek is ideaal voor het afwerken van dunne stoffen zoals georgette, zijde en schuingesneden stoffen. Ook de Picotsteek is zeer geschikt voor schuingesneden stoffen en andere dunne materialen. Deze steken zijn niet geschikt voor harde of zware stoffen. 1. -
Página 44: Adjusting Thread Tensions
ENGLISH ADJUSTING THREAD TENSIONS TWO-THREAD USE Just right. Lower looper thread pulled to under side. Needle thread pulled to top side. Turning tension dial to a higher number gives a tighter thread tension. Turning tension dial to a lower number gives a looser Under side Under side Under side... -
Página 45: Reglage Des Tension
FRANÇAIS REGLAGE DES TENSION UTILISATION A DEUX FILS Tension correcte Fil du boucleur inférieur tiré vers Fil d'aiguille tiré sur le dessus Tourner le bouton de tension sur un chiffre supérieur (vers le l'envers bas) augmente la tension. Tourner le bouton de tension sur un Envers du tissu Envers du tissu Envers du tissu... -
Página 46: Ajustar Las Tensiones De Los Hilos
ESPAÑOL AJUSTAR LAS TENSIONES DE LOS EMPLEO DE DOS HILOS HILOS Cosido correcto. El hilo del ancora inferior tirado al lado de El hilo de la aguja tirado al lado de arriba. abajo. Girando el dial de tensión hacia arriba da una tensión del hilo Lado de abajo Lado de abajo Lado de abajo... -
Página 47: Instellen Van De Draadspanningen・ ・ ・ ・ ・ ・ ・ ・ ・ ・ ・ ・ ・ ・ ・ ・ ・ ・ ・ ・ ・ ・ ・ ・ ・42
NEDERLANDS INSTELLEN VAN DE DRAADSPANNINGEN 2-DRAADS - STEEK Correcte spanning Ondergrijperdraad teveel naar onder. Naalddraad komt teveel naar boven. Als u de spanningknop op een hoger cijfer zet, verhoogt u de spanning. Als u de knop op een lager cijfer zet, verlaagt u de Onderkant Onderkant Onderkant... -
Página 48: Adjusting Stitch Length
FRANÇAIS ENGLISH ADJUSTING STITCH LENGTH REGLAGE DE LA LONGUEUR DU POINT Turn the stitch length dial until the required length is reguired. Tourner le bouton de longueur de point jusqu'à la position requise. The higher the number, the longer the stitch. This dial can adjust the stitch length from 1 to Plus le chiffre est élevé, plus le point est long. -
Página 49: Instellen Van De Steeklengte
ESPAÑOL NEDERLANDS NEDERLANDS AJUSTAR LA LONGITUD DE INSTELLEN VAN DE PUNTADA STEEKLENGTE Girar el dial de longitud de puntada hasta Verdraai de steeklengteknop, tot u de juiste obtener la puntada deseada. Mayor el steeklengte heeft ingesteld. número, mayor longitud de puntada. Este dial Hoe hoger het cijfer des te groter de steek. -
Página 50: Differential Feed
FRANÇAIS ENGLISH DIFFERENTIAL FEED ENTRAINEMENT DIFFERENTIEL The differential feed has two independent feed dogs, one front L'entraînement différentiel est constitué de deux griffes (A) and one rear (B). indépendantes, une frontale (A) et une arrière (B). Each feed dog has an individual feed mechanism which Chacune griffes animée... -
Página 51: Differentieel-Transport
ESPAÑOL NEDERLANDS NEDERLANDS TRANSPORTE DIFERENCIAL DIFFERENTIEEL-TRANSPORT El transporte diferencial tiene 2 transportadores de avance Het differentieeltransport werkt met twee transporteurs één aan independientes, frontal (A) y posterior (B). Cada transportador de voorzijde (A) en één aan de achterzijde (B). tiene un mecanismo de avance individual que facilita el Elke transporteur heeft zijn eigen transportbeweging die transporte del material a longitudes de puntada diferentes. -
Página 52: Foot Pressure Regulator
FRANÇAIS ENGLISH SETTING DIFFERENTIAL FEED REGLAGE DE L'ENTRAINEMENT DIFFERENTIEL Set by simply moving the differential feed control lever in the direction desired referring to the chart below. Ajustez simplement en déplaçant le levier de contrôle d'entraînement différentiel dans la direction désirée en faisant *Ⅰ... -
Página 53: Persvoetstangdruk ・ ・ ・ ・ ・ ・ ・ ・ ・ ・ ・ ・ ・ ・ ・ ・ ・ ・ ・ ・ ・ ・ ・ ・ ・ ・ ・ ・ ・ ・ ・ ・ ・ ・ ・ ・ ・ ・ ・ ・ ・ ・ ・ ・ ・52
ESPAÑOL NEDERLANDS NEDERLANDS FIJAR EL TRANSPORTE DIFERENCIAL INSTELLEN VAN HET DIFFERENTIEEL-TRANSPORT Fijar el control del avance diferencial simplemente moviendo la palanca a la dirección deseada. Referirse a la grafíca de abajo. Door de differentieel-regelaar te draaien kunt u het transport El control se puede hacer entre 0.7 (efecto negativo) y 2 (efecto instellen volgens onderstaande tabel. -
Página 54: Basic Techniques
FRANÇAIS ENGLISH BASIC TECHNIQUES TECHNIQUES DE BASE TURNING OUTSIDE CORNERS WITHOUT PIQUER UN ANGLE SANS COUPER LES CUTTING THREADS FILS 1. When you reach the fabric edge, stop stitching with the 1. Lorsque vous arrivez au bord de l'angle, stoppez la couture needle above the fabric. -
Página 55: Basis Technieken
ESPAÑOL NEDERLANDS NEDERLANDS TECNICAS BASICAS BASIS TECHNIEKEN Girar el material sin cortar los hilos BUITENWAARTSE HOEKEN NAAIEN ZONDER DE DRAAD TE KNIPPEN 1. Cuando alcance el borde de material, pare el pespunte con la aguja sobre el material. 1. Stop aan het eind van de stofrand, met de naald in zijn hoogste stand. -
Página 56: Corded Overlock
FRANÇAIS ENGLISH CORDED OVERLOCK SURJET RENFORCE Corded overlock can be used to strengthen shoulder, sleeve or Le surjet renforçé sert a renforçer l'assemblage des épaules, side seams when joining or making up knitted garments. As a manches ou le montage des matières tricotées. Comme point decorative feature you can use knitting yarn of contrasting décoratif, il est utilisable avec un fil de laine de couleur colours to further enhance your garment. -
Página 57: Overlocksteek Met Vulkoord Of Band
ESPAÑOL NEDERLANDS NEDERLANDS PESPUNTE ENCORDONADO OVERLOCKSTEEK MET VULKOORD OF BAND El pespunte encordonado se puede usar para fortalecer las hombreras, mangas o costuras laterales cuando se cosen De locksteek met vulkoord of naadband, gebruikt u om de rek vestidos de punto. Como un elemento decorativo Vd. puede uit de naad te halen, zoals bij schoudernaden, zij-naden en gebreide stoffen. -
Página 58: Decorative Effects
FRANÇAIS ENGLISH DECORATIVE EFFECTS EFFETS DECORATIFS In addition to normal overlocking which is fully described in this plus leur efficacité pour l'assemblage, instruction book, your machine can also be used for a number surjeteuses-raseuses peuvent aussi s'employer pour de of decorative applications such as decorative top-stitching, nombreux travaux décoratifs comme les coutures à... -
Página 59: Efectos Decorativos
ESPAÑOL NEDERLANDS NEDERLANDS EFECTOS DECORATIVOS DECORATIEVE SIERSTEKEN Además del sobrehilado normal que está totalmente descrito Uw machine is ook geschikt om er enkele sier of decoratieve en este libro de instrucciones, su máquina también puede ser steken mee te naaien. De imitatie Flatlocksteek, welke u boven utilizada para aplicaciones decorativas tales como costuras de op de stof kunt naaien. -
Página 60: Differential Feed Applications
FRANÇAIS ENGLISH DIFFERENTIAL FEED APPLICATIONS UTILISATIONS DU DIFFERENTIEL Please refer to pages 50 - 53 DIFFERENTIAL FEED. Veuillez consulter page 50 - 53 ENTRAINEMENT DIFFERENTIEL. Differential feed is designed to minimize puckering and wavering. Le différentiel est conçu pour minimiser les effets de vague ou It is also very effective for gathering. -
Página 61: Differentieel-Transport
ESPAÑOL NEDERLANDS NEDERLANDS APLICACIONES DEL TRANSPORTE DIFFERENTIEEL-TRANSPORT DIFERENCIAL Zie ook de bladzijden 50 - 53 Differcntieel-transport. Referir la página 50 - 53 TRANSPORTE DIFERENCIAL. Het differentieel-transport is ontwikkelt om het uitlubberen of rimpelen van stoffen, tegen te gaan. El avance diferencial está diseñado para minimizar los pliegues y las ondulaciones. - Página 62 FRANÇAIS ENGLISH 3. CARING FOR YOUR MACHINE 3. ENTRETIEN DE LA MACHINE REPLACING MOVING CUTTER REMPLACEMENT DU COUTEAU MOBILE *Ⅰ *Ⅱ Replace a moving cutter if it becomes blunt as follows. A spare Si le tranchant du couteau mobile est émoussé, il faut le cutter will be found in your accessories.
-
Página 63: Onderhoud Van De Machine
ESPAÑOL NEDERLANDS NEDERLANDS 3. CUIDADOS PARA SU MAQUINA 3. ONDERHOUD VAN DE MACHINE CAMBIAR LA CUCHILLA MÓVIL VERVANGEN VAN HET BEWEGENDE MES Reemplazar la cuchilla móvil cuando llega a estar gastada o despuntada. Encontrará una de repuesto en sus accesorios. Vervang het bewegende mes wanneer het bot is geworden. -
Página 64: Cleaning And Oiling
FRANÇAIS ENGLISH CLEANING AND OILING NETTOYAGE ET LUBRIFICATION To keep the machine running smoothly, keep it clean and lubricated at all times. Pour conserver votre machine en bon état de *Ⅰ fonctionnement, il est nécessaire de la FIRST DISCONNECT MACHINE FROM nettoyer et la huiler régulièrement. -
Página 65: Schoonmaken En Olieën
ESPAÑOL NEDERLANDS NEDERLANDS LIMPIEZA Y ENGRASE SCHOONMAKEN EN OLIEËN Para conservar la máquina funcionando Om uw machine in goede conditie te houden. suavemente, mantenerla limpia y lubricada. is het nodig om deze regelmatig te olieën. PRIMERO DESCONECTAR LA MAQUINA DEL HAAL EERST STEKKER... -
Página 66: Checking Performance Problems
FRANÇAIS ENGLISH 4. CHECKING PERFORMANCE PROBLEMS 4. REMEDES A D'EVENTUELS PROBLEMES PROBLEM PROBABLE CAUSE CORRECTION PROBLEME CAUSE PROBABLE CORRECTION Tensions mauvaises Corriger les tensions Incorrect Thread Tension(s). Reset Thread Tension(s). Taille d'aiguille mauvaise Choisir une aiguille adaptée Incorrect size Needle. Choose correct size Needle for au tissu et au fil Irregular... -
Página 67: Verificando Los Problemas De Ejecucion
ESPAÑOL NEDERLANDS 4. VERIFICANDO LOS PROBLEMAS DE EJECUCION 4. OPSPOREN EN VERHELPEN VAN KLEINE STORINGEN Problema Causa probable Corrección PROBLEEM MOGELIJKE OORZAAK OPLOSSING Tension(es) de hilo incorrecta. Volver a fijar la(s) tension(es) del hilo. Verkeerde spanning Stel spanning af Tamaño de la aguja incorrecta. Elegir el tamaño correcto de la aguja Verkeerde naald Kies juiste naald, t.o.v. -
Página 68: Optional Accessories
FRANÇAIS ENGLISH 5. OPTIONAL ACCESSORIES 5. ACCESSOIRES OPTIONNELS BLIND HEM FOOT PIED OURLET INVISIBLE Blind hem feet are obtainable as an optional extra and are Les pieds pour ourlet invisible peuvent être obtenus en option available in two sizes. 0.5 for fine-medium fabrics and 1.0 for et sont disponibles en deux tailles. -
Página 69: Extra Optionele Accessoires
ESPAÑOL NEDERLANDS NEDERLANDS 5. ACCESORIOS OPCIONALES 5. EXTRA OPTIONELE ACCESSOIRES PIE DE PLEGADO O PUNTADA INVISIBLE BLINDZOOMVOET Los pliegues o doblados de puntada invisible dan un acabado duradero e invisible y ahorra horas de tedioso cosido a mano. De blindzoomvoet is geen standaard accessoire. U kunt deze bij uw dealer bestellen. - Página 70 FRANÇAIS ENGLISH ELASTICATOR POSE D'ELASTIQUES An elastic foot is available as an optional extra. This foot will Un pied pose élastique est disponible en option. Ce pied guide your elastic and at the same time apply pressure to the spécial guide la bande élastique et même temps la presse elastic with our specially designed tension controlled roller, selon la tension choisie sur le rouleau du pied, vous permettant allowing you to control the elasticity while sewing.
- Página 71 ESPAÑOL NEDERLANDS NEDERLANDS PIE ELASTICO ELASTIEKVOET El pie elástico es disponible como un suplemento opcional. De elastiekvoet is als extra accessoire bij uw dealer Este pie guiará su elástico y también aplicará la presión al verkrijgbaar. Met deze voet naait u het elastiek op uw stof en elástico con el control de la tensión del rodillo especialmente werkt u gelijk af.
-
Página 72: Piping Foot
FRANÇAIS ENGLISH PIED POUR CORDONNET ENROBE PIPING FOOT Permet de confectionner un bord avec un cordonnet enrobé. Prepare a piece of ready-made piping (corded bias fold tape). Plaçer le bord de façon à ce que le bord enroulé soit plaçé hors de la Place folded piping between seam edges with fold extending couture. -
Página 73: Pie Prensatelas Para Trenzas Decorativas
ESPAÑOL NEDERLANDS NEDERLANDS PASPELVOET PIE PRENSATELAS PARA TRENZAS DECORATIVAS Voor het maken van een koordbies, (paspel) plaatst u de het Preparar una pieza de trencilla (cinta plegada sesgada con o bandje zodanig dat het verdikte deel van het bandje, precies in de uitsparing van de voetzool loopt. - Página 74 FRANÇAIS ENGLISH GATHERING/SHIRRING FOOT PIED FRONCEUR-ETENDEUR 1. Tension settings for gathering : 1. Le règlage des tensions pour le fronçage doit être : ① Left needle Differential feed 2.0 Aiguille gauche : 4 Entraînement différentiel : 2.0 Right needle Stitch length Aiguille droite : 4 Longueur de point : 4 Upper looper...
-
Página 75: Pie De Fruncido
ESPAÑOL NEDERLANDS NEDERLANDS PIE DE FRUNCIDO RIMPEL / PLOOI-VOET 1. Fijación de tensión para fruncir: 1. Instellen van de garenspanningen : Aguja izquierda 4 Transporte diferencial 2.0 Linkernaald Differentieel-transport 2.0 Aguja derecha Longitud de puntada Rechternaald 4 Steeklengte Ancora superior Bovengrijper 4 Ancora inferior Ondergrijper 4... -
Página 76: Enfileur D'aiguille
FRANÇAIS ENGLISH NEEDLE THREADER ENFILEUR D'AIGUILLE PER L'AGO DESTRO 1. Feed the thread through the thread 1. Passer le fil par le passe-fil du guide of needle clamp as illustrated. serre-aiguille comme montré. Raise the presser foot. Raise the Lever le pied presseur. Lever la needle bar to highest position, and barre-aiguille dans sa position la plus pull the thread leaving about 4 ... -
Página 77: Enhebrador De La Aguja
ESPAÑOL NEDERLANDS NEDERLANDS ENHEBRADOR DE LA AGUJA DRAADINRIJGER 1. Avanzar el hilo a través de la guía del hilo 1. Rijg de draad achter de naaldstang- de grapa de aguja dejando unos 10 cms draadgeleider zoals afgebeeld. Zet het extra. Levantar el pie prensatelas. Levantar voetje omhoog. - Página 78 FRANÇAIS ENGLISH ESPAÑOL NEDERLANDS NEDERLANDS This appliance complies Cet appareil est Este instrumento se Deze machine with EEC Directive conforme à la directive conforma con directivo beantwoordt aan de 89 / 336 / EEC covering the CEE 89 / 336 EEC de CEE 89 / 336 / EEC eisen van de CE electromagnetic...
- Página 81 表 1 ENGLISH FRANÇAIS ESPAÑOL NEDERLANDS ITALIANO 表 1...
- Página 82 表 2 “IMPORTANT SAFETY INSTRUCTIONS” “ When using an electrical appliance, basic safety precautions should always be followed, including the following.” “ Read all instructions before using this sewing machine.” “DANGER - To reduce the risk of electric shock:” 1. “This sewing machine should never be left unattended when plugged in. Always unplug this sewing machine from the electric outlet immediately after using and before cleaning.”...
- Página 83 表 3 表 3...
- Página 84 表 4 Part No. 69894 3 / 96 1 0 / 15 (6) 69894-D04-8916 表 4...