Tabla de contenido
Publicidad
Idiomas disponibles
Idiomas disponibles
Enlaces rápidos
Harbor Breeze ® is a registered trademark of LF,
LLC. All Rights Reserved.
ATTACH YOUR RECEIPT HERE
Serial Number
Purchase Date
Questions, problems, missing parts? Before returning to your retailer, call our customer
service department at 1-800-643-0067, 8 a.m. - 6 p.m., EST, Monday - Thursday,
8 a.m. - 5 p.m., EST, Friday.
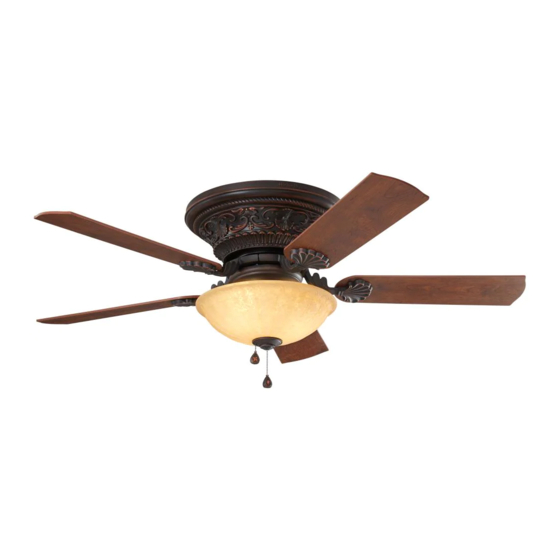
EB16372
ITEM #0807420
LYNSTEAD
CEILING FAN
MODEL #00723
UL #LSD52
Español p. 14
1
Publicidad
Capítulos
Tabla de contenido
Solución de problemas

Manuales relacionados para Harbor Breeze 00723


Resumen de contenidos para Harbor Breeze 00723
- Página 1 ITEM #0807420 LYNSTEAD CEILING FAN MODEL #00723 UL #LSD52 Harbor Breeze ® is a registered trademark of LF, LLC. All Rights Reserved. Español p. 14 ATTACH YOUR RECEIPT HERE Serial Number Purchase Date Questions, problems, missing parts? Before returning to your retailer, call our customer service department at 1-800-643-0067, 8 a.m.
-
Página 2: Tabla De Contenido
TABLE OF CONTENTS SAFETY INFORMATION READ AND SAVE THESE INSTRUCTIONS Safety Information....................... 3 Please read and understand this entire manual before attempting to assemble, operate or install the Package Contents....................... 4 product. • When using an existing outlet box, be sure the box is securely attached to the building structure Hardware Contents.......................5 and can support the full weight of the fan, so as to avoid potential serious injury or death. -
Página 3: Package Contents
PACKAGE CONTENTS HARDWARE CONTENTS (shown actual size) Lock Nut Qty. 3 Wire Connector Qty. 3 + 1 extra Light Pull Chain Fan Pull Chain Extension Extension Qty. 1 Qty. 1 Blade Screw Blade Bracket Screw Qty. 15 + 1 extra with Washer Qty. - Página 4 ASSEMBLY INSTRUCTIONS ASSEMBLY INSTRUCTIONS 1. Securely attach the mounting plate (A) to the 4. Tape the wire connectors (AA) and wires together. outlet box (not included) using two screws The wires should be spread apart with the (supplied with outlet box). Pull the black, white grounded conductor and the equipment-grounding and grounded wires out of the outlet box conductor on one side of the outlet box and the...
- Página 5 ASSEMBLY INSTRUCTIONS ASSEMBLY INSTRUCTIONS 10. Insert the wires from the motor (B) through the 7. Attach a blade (F) to a blade bracket (E) using middle hole in the switch housing (G). Attach the blade screws (EE). Tighten each blade the switch housing (G) to the switch housing screw (EE) securely.
-
Página 6: Assembly Instructions
ASSEMBLY INSTRUCTIONS ASSEMBLY INSTRUCTIONS 16. Place glass bowl (I) on the preassembled pipe 13. Attach light kit (H) to switch housing (G). Align on light kit (H) until it is flush against the metal the holes between the switch housing (G) and disk. -
Página 7: Operating Instructions
WARRANTY OPERATING INSTRUCTIONS PULL CHAIN: The manufacturer warrants this fan to be free from defects in workmanship and material present at (1). The fan pull chain is for motor speed control: High, Medium, Low and Off. Pull the chain once for time of shipment from the factory for lifetime limited from the date of purchase. -
Página 8: Adjunte Su Recibo Aquí
ARTÍCULO #0807420 VENTILADOR DE TECHO LYNSTEAD MODELO #00723 UL #LSD52 Harbor Breeze® es una marca registrada de LF, LLC. Todos los derechos reservados. ADJUNTE SU RECIBO AQUÍ Fecha de compra Número de serie ¿Preguntas, problemas, piezas faltantes? Antes de volver a la tienda, llame a nuestro Departamento de Servicio al Cliente al 1-800-643-0067, de lunes a jueves de 8 a.m. -
Página 9: Información De Seguridad
ÍNDICE INFORMACIÓN DE SEGURIDAD LEA Y GUARDE ESTAS INSTRUCCIONES Información de seguridad ......................16 Lea y comprenda completamente este manual antes de intentar ensamblar, usar o instalar el Contenido del paquete ......................... 17 producto. • Si utiliza una caja de salida existente, asegúrese de que esté bien sujeta a la estructura del Aditamentos .......................... -
Página 10: Contenido Del Paquete
CONTENIDO DEL PAQUETE ADITAMENTOS (se muestran en tamaño real) Contratuerca Cant.: 3 Conector de cables Cant. 3 + 1 adicional Extensión para la cadena Extensión para la de tiro del ventilador cadena de tiro del kit de iluminación Cant.: 1 Cant.: 1 Tornillo para aspas Tornillo para la abrazadera... -
Página 11: Instrucciones De Ensamblaje
INSTRUCCIONES DE ENSAMBLAJE INSTRUCCIONES DE ENSAMBLAJE 1. Fije bien la placa de montaje (A) a la caja de 4. Una los conectores de cables (AA) y los conductores salida (no se incluye) usando dos tornillos con cinta adhesiva. Los conductores deben separarse; (incluidos con la caja de salida). - Página 12 INSTRUCCIONES DE ENSAMBLAJE INSTRUCCIONES DE ENSAMBLAJE 10. Inserte los conductores desde el motor (B) 7. Fije un aspa (F) a una abrazadera del aspa (E) a través del orificio central en la carcasa del utilizando los tornillos para aspa (EE). Apriete interruptor (G).
- Página 13 INSTRUCCIONES DE ENSAMBLAJE INSTRUCCIONES DE ENSAMBLAJE 16. Coloque la pantalla de vidrio (I) en el tubo 13. Fije el kit de iluminación (H) a la carcasa preensamblado del kit de iluminación (H) hasta del interruptor (G). Alinee los orificios entre que quede al ras con el disco de metal.
-
Página 14: Instrucciones De Funcionamiento
GARANTÍA INSTRUCCIONES DE FUNCIONAMIENTO CADENA DE TIRO: El fabricante garantiza que este ventilador no presenta defectos de fabricación ni en los materiales (1). La cadena de tiro del ventilador es para controlar la velocidad del motor: alta, media, baja y presentes en el momento del transporte desde la fábrica, durante un período limitado de por vida a partir de la fecha de compra.