Tabla de contenido
Publicidad
Idiomas disponibles
Idiomas disponibles
Enlaces rápidos
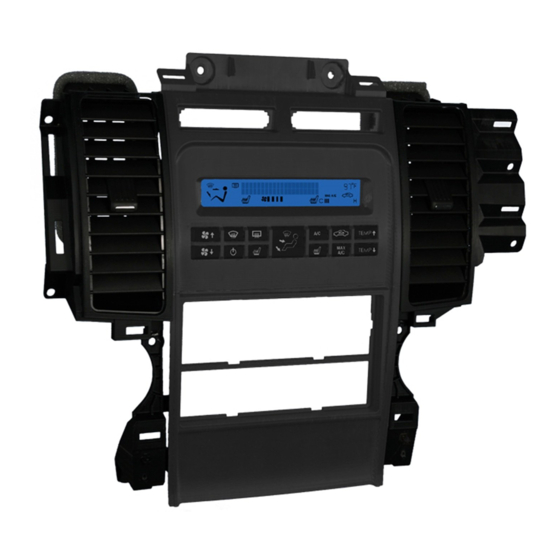
Installation instructions for part 99-5721
2010-2012 Ford Taurus
KIT FEATURES
• DIN radio provision with pocket
• ISO DIN radio provision with pocket
• Double DIN radio provision
• Painted silver to match factory dash
KIT COMPONENTS
• A) Radio/Climate housing panel • B) (2) A/C vent trim panels • C) ISO brackets • D) ISO trim plate
• E) Double DIN brackets • F) Double DIN trim plate • G) (10) #8x3/8" phillips screws • H) Pocket • I) Climate extension harness
A
C
B
WIRING & ANTENNA CONNECTIONS (sold separately)
Wiring Harness: • XSVI-5520 • XSVI-5521 • AX-ADBOX2 & AX-ADFD01
Antenna Adapter: • 40-EU10
TOOLS REQUIRED
• Panel removal tool • Phillips screwdriver • Socket wrench
METRA. The World's best kits.
®
(without navigation)
99-5721
D
E
H
metraonline.com
®
F
G
I
U.S. PATENT # D639,799
Table of Contents
Dash Disassembly ..............................................2-3
Kit Preparation ........................................................3
- DIN radio provision with pocket ............................ 4
-
ISO DIN radio provision with pocket ...................... 5
-
Double DIN radio provision ................................... 6
Customizing The Display ....................................7-8
CAUTION: Metra recommends disconnecting the
negative battery terminal before beginning any
installation. All accessories, switches, and especially
air bag indicator lights must be plugged in before
reconnecting the battery or cycling the ignition.
NOTE: Refer to the instructions included with the
aftermarket radio.
© COPYRIGHT 2017 METRA ELECTRONICS CORPORATION
Publicidad
Capítulos
Tabla de contenido

Manuales relacionados para Metra 99-5721


Resumen de contenidos para Metra 99-5721
-
Página 1: Tabla De Contenido
® Installation instructions for part 99-5721 U.S. PATENT # D639,799 Table of Contents 2010-2012 Ford Taurus (without navigation) 99-5721 Dash Disassembly ..........2-3 Kit Preparation ............3 Kit Assembly KIT FEATURES – DIN radio provision with pocket ......4 • DIN radio provision with pocket •... -
Página 2: Dash Disassembly
® 99-5721 Dash Disassembly 1. Unclip and remove the (2) trim 6. Unclip and remove the gauge panels on the left and right side cluster trim panel. (Figure D) of the cup holders and shifter. 7. Unclip and remove the trim... -
Página 3: Kit Preparation
® 99-5721 Kit Preparation Dash Disassembly 10. Remove (4) Phillips screws 1. Secure the left and right from the ash tray trim panel a/c vent trim panels to then unclip and remove the ash the radio/climate housing tray assembly. (Figure G) panel using the supplied (10) #8X3/8”... -
Página 4: Kit Assembly
DIN radio provision with pocket 6. Locate the factory wiring harness and antenna plug in the 1. Remove the metal “DIN” sleeve dash. Metra recommends using from the aftermarket radio. the proper mating adapters from Metra and/or AXXESS. 2. Slide the DIN cage into the Radio Housing and secure by 7. -
Página 5: Iso Din Radio Provision With Pocket
7. Locate the factory wiring harness 2. Mount the ISO Brackets to the and antenna plug in the dash. Metra radio with screws supplied with recommends using the proper mating radio. (Figure A) adapters from Metra and/or AXXESS. -
Página 6: Double Din Radio Provision
99-5721 Kit Assembly Double DIN radio provision 6. Locate the factory wiring harness in the dash. Metra recommends 1. Cut and remove the center bar using the proper mating adapter from the radio housing. (Figure A) from Metra or AXXESS. Re- connect the negative battery 2. -
Página 7: Customizing The Display
Dual Zone Temperature Controls 3. After 10 seconds of no buttons being pressed the chosen contrast will stay. (allows 99-5721 to operate in a dual-zone climate controlled car) Main Screen Text Customization 1. Press the Temp Down and Passenger Heated Seat button simultaneously to 1. - Página 8 ® Installation instructions for part 99-5721 Customizing The Display Dual Zone Temperature Controls (Cont’d) Air conditioned seats 3. Press no buttons for 5 seconds and the 1. Press and hold the seat button between one temperature bar graph will stop flashing to nine seconds.
-
Página 9: Componentes Del Kit
® Instrucciones de instalación para la pieza 99-5721 U.S. PATENT # D639,799 Indice 2010-2012 Ford Taurus (sin NAV) 99-5721 Desmontaje del tablero ........2-3 Preparación del kit ..........3 CARACTERÍSTICAS DEL KIT Ensamble del kit • Provisión de radio DIN con cavidad –... -
Página 10: Desmontaje Del Tablero
® 99-5721 Desmontaje del tablero 1. Desenganche y quite los (2) 6. Desenganche y quite el panel paneles de la moldura del de la moldura del conjunto de lado izquierdo y derecho de indicadores. (Figura D) los portavasos y la palanca de 7. -
Página 11: Preparación Del Kit
® 99-5721 Desmontaje del tablero Preparación del Kit 10. Quite los (4) tornillos Phillips del 1. Sujete los paneles de panel de la moldura del cenicero, la moldura de la rejilla luego desenganche y quite el del aire acondicionado ensamble del cenicero. (Figura G) -
Página 12: Ensamble Del Kit
1. Quite la manga de metal “DIN” en el tablero. Metra recomienda del radio de mercado secundario. que use adaptadores adecuados de acoplamiento de Metra y/o de 2. Deslice la reja DIN en la AXXESS. carcasa del radio y sujétela doblando hacia abajo las 7. -
Página 13: Provisión De Radio Iso Din Con Cavidad
7. Localice el arnés de cableado de fábrica y el conector de la antena en el tablero. Metra 2. Monte los soportes ISO en recomienda que use adaptadores adecuados el radio con los tornillos de acoplamiento de Metra y/o de AXXESS. -
Página 14: Provisión De Radio Doble Din
Ensamble del kit Provisión de radio doble DIN 6. Localice el arnés de cables de fábrica en el tablero. Metra recomienda el uso de un 1. Corte y quite la barra central de adaptador adecuado de acoplamiento de la carcasa del radio. (Figura A) Metra o de AXXESS. -
Página 15: Personalización De La Pantalla
Controles duales de temperatura por zonas 1. Presione el botón de asiento calefactado del conductor durante 10 segundos, la (permite que el 99-5721 opere en un vehículo con controles duales de clima por zonas unidad ingresará al modo “Ajuste del contraste de la pantalla”. - Página 16 ® Instrucciones de instalación para la pieza 99-5721 Personalización de la pantalla Asientos con aire acondicionado Controles duales de temperatura por zonas 3. No presione ningún botón durante 5 segundos y 1. Presione y mantenga presionado el botón la gráfica de barras de la temperatura dejará de de asiento entre uno y nueve segundos.