Tabla de contenido
Publicidad
Idiomas disponibles
Idiomas disponibles
Enlaces rápidos
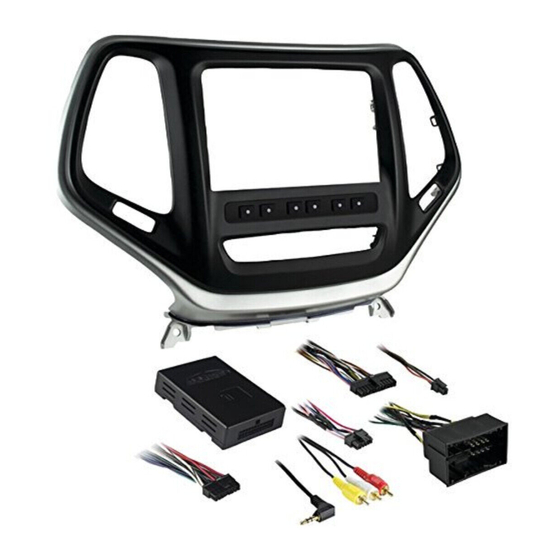
Installation instructions for part 99-6526
Jeep Cherokee Latitude/Limited 2014-up
KIT FEATURES
• ISO DDIN radio provision
• Included interface shows climate and menu info on the
aftermarket radio screen.
• Painted scratch-resistant matte black with either
silver (99-6526S) or bronze trim (99-6526BZ)
Note: The climate control sync function will no longer
be retained.
KIT COMPONENTS
• A) Radio trim panel • B) Radio brackets • C) (4) #8 x 3/8" Phillips screws • D) Axxess interface and wiring harness (not shown)
A
B
WIRING & ANTENNA CONNECTIONS
Wiring Harness: Axxess interface and harness included
Steering wheel control interface: ASWC-1 (sold separately)
METRA - The World's best kits
®
99-6526
C
Antenna Adapter: 40-EU55 (sold separately)
metraonline.com
®
Table of Contents
Dash Disassembly ..............................................2-3
Kit Preparation ....................................................... 4
- ISO DDIN radio provision ...................................... 5
Axxess Interface Installation .............................6-8
Screen Operation ................................................... 9
Climate Control Status ........................................ 10
steering wheel Activation.................................. 10
steering wheel Operation .................................. 11
TOOLS REQUIRED
• Panel removal tool • 10mm socket wrench
• Torx T-15 screwdriver • Phillips screwdriver
• Phillips screwdriver (short stubby version)
CAUTION!
All accessories, switches, climate controls panels, and
especially air bag indicator lights must be connected before cycling
the ignition. Also, do not remove the factory radio with the key in the
on position, or while the vehicle is running.
© COPYRIGHT 2018 METRA ELECTRONICS CORPORATION
Publicidad
Capítulos
Tabla de contenido

Manuales relacionados para Metra 99-6526


Resumen de contenidos para Metra 99-6526
-
Página 1: Tabla De Contenido
® Installation instructions for part 99-6526 Table of Contents Jeep Cherokee Latitude/Limited 2014-up 99-6526 Dash Disassembly ..........2-3 Kit Preparation ............4 KIT FEATURES Kit Assembly • ISO DDIN radio provision • Included interface shows climate and menu info on the –... -
Página 2: Dash Disassembly
99-6526 Dash Disassembly 1. Unclip, unplug, and remove the climate control panel. (Figure A) 2. Remove the (2) Phillips screws from the radio trim panel, then unplug and remove the panel. (Figure B) 3. Unclip and remove the A/C vents and save for kit assembly. - Página 3 99-6526 Dash Disassembly 3. Remove the (4) Phillips screws securing the radio, then unplug and remove the radio. (Figure C) 4. Open the pocket door at the top of the dash, remove the rubber liner, and then remove the (1) Phillips screw exposed.
-
Página 4: Kit Preparation
99-6526 Kit Preparation 1. Cut and remove the shaded area from the radio cavity. (Figure A) From the factory radio trim panel: 2. Remove the retaining clips, and Remove shaded area then attach them onto the radio trim panel. 3. Remove the (4) Torx T-15 screws securing the hazard switch panel, and then remove the panel. -
Página 5: Kit Assembly
99-6526 Kit Assembly ISO DDIN radio provision 1. Attach the radio brackets to the radio using the screws supplied with the radio. (Figure A) Continue to Axxess Interface Installation (Figure A) -
Página 6: Axxess Interface Installation
99-6526 Axxess Interface Installation Connections to be made From the 18-pin harness with stripped leads to the aftermarket radio: INTERFACE FEATURES • Provides accessory power (12-volt 10-amp) • Connect the (2) Red wires to the accessory wire. • Retains R.A.P. (retained accessory power) •... - Página 7 99-6526 Connections to be made • Connect the 4-pin female connector with the Green, Green/Black, Purple, and The following (3) wires are for multimedia/navigation radios that provide these wires. Purple/Black wires to the supplied 4-pin male connector with matching colors •...
-
Página 8: Installing The Interface
HVAC controls are now detected. 3. Test the radio and climate controls for proper operation. 4. Mount the completed assembly into the dash using the 99-6526 radio trim panel, and then reassemble the dash in reverse order of disassembly. -
Página 9: Screen Operation
99-6526 Screen Operation To change mode any time: • Anytime the HVAC controls are pressed, the aftermarket radio will revert to rearview camera input and display the climate info. 1. Press < or > arrow to move through the Mode options •... -
Página 10: Climate Control Status
99-6526 Climate Control Status Heated/Cooled Seats and Heated Steering Wheel Activation ATTENTION: The rear-view camera Input is used to display the climate control status and personalization menu. If the aftermarket radio does not have a screen The interface will auto-... -
Página 11: Steering Wheel Operation
99-6526 Heated/Cooled Seats and Heated Steering Wheel Activation If heated seats were Press the “Menu” button to detected the first line activate the HVAC screen should already be checked. Press the down arrow till the To select cooled seats button you wish to activate... -
Página 12: Important
® Installation instructions for part 99-6526 IMPORTANT If you are having difficulties with the installation of this product, please call our Tech Support line at 1-800-253-TECH. Before doing so, look over the instructions a second time, and make sure the installation was performed exactly as the instructions are stated. -
Página 13: Características Del Kit
® Instrucciones de instalación para la pieza 99-6526 Indice Jeep Cherokee Latitude/Limited 2014 y mas 99-6526 Desmontaje del tablero ........2-3 Preparación del kit ..........4 CARACTERÍSTICAS DEL KIT Ensamble del kit – Provisión de radio ISO DDIN ......... 5 • Provisión de radio ISO DDIN •... -
Página 14: Desmontaje Del Tablero
99-6526 Desmontaje del tablero 1. Desenganche, desconecte y quite el panel del control de clima. (Figura A) 2. Quite los (2) tornillos Phillips del panel de la moldura del radio y luego desconecte y retire el panel. (Figura B) 3. Soltar y retirar los / C respiraderos A y ahorrar para el montaje del kit. - Página 15 99-6526 Desmontaje del tablero 3. Quite los (4) tornillos Phillips que sujetan el radio y luego desconecte y quite el radio. (Figura C) 4. Abra la puerta de la cavidad en la parte superior del tablero, quite el revestimiento de caucho y luego quite el (1) tornillo Phillips expuesto.
-
Página 16: Preparación Del Kit
99-6526 Preparación del kit 1. Corte y retire el área sombreada de la cavidad del radio. (Figura A) Del panel de la moldura del radio de fábrica: Quite área sombreada 2. Quite los ganchos de retención y luego colóquelos en el panel de la moldura del radio. -
Página 17: Ensamble Del Kit
99-6526 Ensamble del kit Provisión de radio ISO DDIN 1. Una los soportes del radio al radio usando los tornillos que se (Figura A) Continúe con la instalación de la interfaz Axxess (Figura A) -
Página 18: Instalación De La Interfaz Axxess
99-6526 Instalación de la interfaz Axxess Conexiones que se deben hacer Del arnés de 18 pins con conectores pelados al radio CARACTERÍSTICAS de mercado secundario: • Provee corriente de accesorio (12 voltios 10 amperes) • Retiene R.A.P. (corriente de accesorio retenida) •... - Página 19 99-6526 Conexiones que se deben hacer • Conectar el conector hembra de 4 pins con el Verde, Verde/Negro, Púrpura, Los siguientes (3) cables son para radios con multimedios/navegación que incluyen y los cables Negro/Púrpura al conector macho de 4 pines suministrado con estos cables.
-
Página 20: Instalación De La Interfaz
3. Conecte el arnés negro de 4 pins en el teclado numérico del kit. Nota: Si va a utilizar el ASWC-1 (se vende por separado), conéctelo después de programar y probar el 99-6526 con la llave en la posición de apagado. 2. Antes de utilizar el kit debe ser inicializado. -
Página 21: Operación De La Pantalla
99-6526 Operación de la pantalla Para cambiar el modo en cualquier momento: • Cada vez que se presionen los controles de clima, el radio de mercado secundario se revertirá a la cámara retrovisora y mostrará la 1. Presione la flecha < o > para avanzar por las opciones de modo información del clima. -
Página 22: Estado De Control De Clima
99-6526 Estado de control de clima Asientos con calefacción/refrigeración y calefacciónActivación del volante ATENCIÓN: La entrada de la cámara retrovisora se utiliza para mostrar el estado de control de clima y el menú de personalización. Si el radio de mercado secundario La interfaz detectará... - Página 23 99-6526 Asientos con calefacción/refrigeración y calefacciónActivación del volante Si se detectaron asientos Presione el botón “Menú” para activar la pantalla HVAC con calefacción, la primera línea ya debería estar Presione la flecha hacia marcada. abajo hasta que se resalte el botón que desea activar y Para seleccionar los presione “Entrar”.
-
Página 24: Importante
® Instrucciones de instalación para la pieza 99-6526 IMPORTANTE Si tiene dificultades con la instalación de este producto, llame a nuestra línea de soporte técnico al 1-800-253-TECH. Antes de hacerlo, revise las instrucciones por segunda vez y asegúrese de que la instalación se haya realizado exactamente...