Tabla de contenido
Publicidad
Enlaces rápidos
CONTACT US FIRST
CONTACT US FIRST
sauder.com
sauder.com
sauder.com
BEFORE MAKING ANY RETURNS TO THE STORE.
BEFORE MAKING ANY RETURNS TO THE STORE.
sauder.com/service
Visit
Prefer the phone? Give us a ring at
Customer Service is available Monday-Friday - 9 a.m. to 5:30 p.m. EST (except holidays)
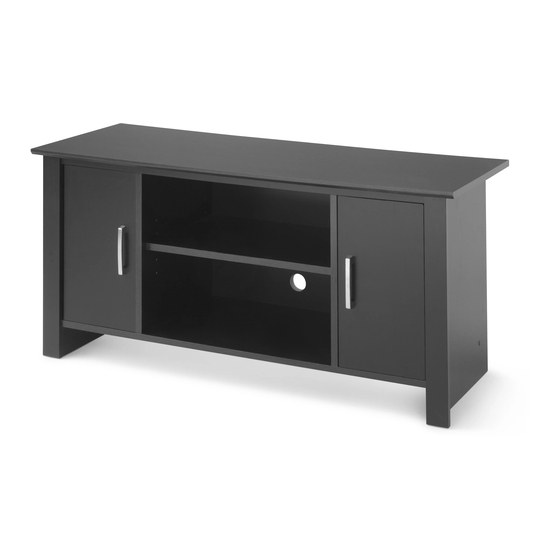
TV Stand
Model 411660
Share your journey!
to order replacement parts, view video assembly tips, or chat with a live rep.
1-800-523-3987
.
It stands. You sit.
A thing of beauty,
this one.
NOTE: THIS INSTRUCTION
BOOKLET CONTAINS IMPORTANT
SAFETY INFORMATION.
PLEASE READ AND KEEP FOR
FUTURE REFERENCE.
English pg 1-14
Français pg 15-17
Español pg 18-20
Lot # 530097
Purchased: __________________
05/28/19
Publicidad
Tabla de contenido

Manuales relacionados para Sauder 411660


Resumen de contenidos para Sauder 411660
- Página 1 It stands. You sit. A thing of beauty, this one. TV Stand NOTE: THIS INSTRUCTION BOOKLET CONTAINS IMPORTANT SAFETY INFORMATION. Model 411660 PLEASE READ AND KEEP FOR FUTURE REFERENCE. English pg 1-14 Français pg 15-17 Español pg 18-20 Share your journey!
- Página 2 • Check the size and weight of your TV. Compare it to the diagram below – before you begin assembly! • This Sauder unit is designed for use with televisions weighing less than 50 pounds. Never use with a TV that weighs more.
-
Página 3: Part Identifi Cation
Use this part identifi cation to help identify similar parts. RIGHT END (1) TOP (1) DOOR (2) LEFT END (1) BOTTOM (1) ADJUSTABLE SHELF (1) RIGHT UPRIGHT (1) CENTER BACK (1) VALANCE (1) LEFT UPRIGHT (1) BACK (2) END MOLDING (2) www.sauder.com/service 411660 Page 3... - Página 4 RUBBER SLEEVE - 4 BLACK 9/16" LARGE HEAD SCREW - 4 BLACK 1-7/8" FLAT HEAD SCREW - 12 BLACK 1-1/4" FLAT HEAD SCREW - 4 BLACK 1/2" FLAT HEAD SCREW - 2 SILVER 7/8" MACHINE SCREW - 4 Page 4 411660 www.sauder.com/service...
- Página 5 Then, insert the metal end of a CAM DOWEL (2F) into each HIDDEN CAM. Do not tighten the HIDDEN CAMS in this step. Arrow Arrow Insert the metal end of the CAM DOWEL into the HIDDEN CAM. (10 used) www.sauder.com/service 411660 Page 5...
- Página 6 BLACK 1-1/4" FLAT HEAD SCREWS (7S). Some assembly NOTE: Do not overtighten the SCREWS. å (and snacks) required. BLACK 1-1/4" FLAT HEAD SCREW (4 used in this step) The through holes will be closer to this edge. Angled edge Page 6 411660 www.sauder.com/service...
- Página 7 Tighten Risk of damage or Arrow injury. HIDDEN CAMS must be completely Arrow Maximum tightened. HIDDEN 210 degrees CAMS that are not completely tightened may loosen, and parts may separate. To Minimum completely tighten: 190 degrees www.sauder.com/service 411660 Page 7...
- Página 8 (8 used in this step) i t h o f a c S u r D E N H I D i t h f a c S u r D E N H I D Page 8 411660 www.sauder.com/service...
- Página 9 NOTE: The MOLDINGS should be even with the edges of å the ENDS. *U.S. Patent No. 5,499,886 å These edges must be even. Notched edge These edges must be even. The groove is closer to this edge. www.sauder.com/service 411660 Page 9...
- Página 10 (4 used in this step) i t h f a c S u r D E N H I D i t h o f a c S u r D E N H I D Page 10 411660 www.sauder.com/service...
- Página 11 With a hammer, tap four TACK GLIDES (13E) into the edges of the å ENDS (A2 and B2) and END MOLDINGS (L2). Edge of BACK with no holes. NAIL (26 used in this step) Edge of BACK with no holes. www.sauder.com/service 411660 Page 11...
- Página 12 BLACK 9/16" LARGE HEAD SCREW (2 used for the PIVOT HINGES) IMPORTANT: Only fasten one PIVOT HINGE to each DOOR in this step. Indented holes Indented holes BLACK 1/2" FLAT HEAD SCREW (2 used for the STRIKE PLATES) Page 12 411660 www.sauder.com/service...
- Página 13 SCREW in the HINGE, make needed adjustments, and tighten the SCREW. Repeat this step for the other DOOR (I2). å SILVER 7/8" MACHINE SCREW (4 used for the PULLS) (2 used) (2 used) BLACK 9/16" LARGE HEAD SCREW (2 used for the PIVOT HINGES) www.sauder.com/service 411660 Page 13...
- Página 14 Note: This is a permanent label. Do not try to remove. Surface will be damaged. 08/05 2 6 9 2 2 0 269220 50 lbs. 25 lbs. 40 lbs. total (4 used) (4 used) To cover screws Page 14 411660 www.sauder.com/service...
-
Página 15: Liste De Pièces
Modèle 411660 Meuble Télé Utilisez les instructions d’ a ssemblage en français avec les NOUS SOMMES LA POUR VOUS AIDER! schémas étape par étape du manuel d’instruction en anglais. Nous faisons de notre mieux pour nous assurer que votre meuble Chaque étape en français correspond à... - Página 16 ! Attention: Ne pas relever l'élément dans sa position verticale • Cette unité Sauder est conçue pour les téléviseurs pesant moins avant d'avoir fi xé l’ARRIÈRE. L'élément risque de s'eff ondrer. de 22,6 kg. Ne jamais utiliser avec des téléviseurs plus lourds.
- Página 17 Une fois apposée, ne pas essayer de la retirer. REMARQUE : Prière de lire attentivement les importantes informations concernant la sécurité qui fi gurent sur la couverture arrière du manuel d'instructions. Ceci complète l'assemblage. Nettoyer avec un tissu humide. Essuyer. www.sauder.com/service 411660 Page 17...
-
Página 18: Lista De Partes
EXTREMO IZQUIERDO ..........1 EXCÉNTRICO ESCONDIDO ......10 necesita ponerse en CCC PARAL DERECHO ............1 PASADOR DE EXCÉNTRICO ......10 contacto con Sauder en DDD PARAL IZQUIERDO .............1 15H BISAGRA DE PIVOTE ..........4 cuanto a esta unidad, refi érase al número EE3 PANEL SUPERIOR ............1 AGARRADOR MAGNÉTICO .......2... - Página 19 - antes de comenzar el ensamblaje! fi je el DORSO. La unidad podría caerse. • Esta unidad Sauder está diseñada para ser usada con Fije el DORSO CENTRAL (G2) al PANEL SUPERIOR (EE3). Apriete televisores cuyo peso sea inferior a 22,6 Kg. Nunca la use para un dos EXCÉNTRICOS ESCONDIDOS.
- Página 20 Una vez aplicada, no intente quitarla. NOTA: Por favor, lea la página de atrás del folleto de instrucciones en cuanto a importante información de seguridad. Esto completa el ensamblaje. Limpiar con un trapo húmedo. Seque con un paño. Page 20 411660 www.sauder.com/service...
- Página 21 TOUJOURS décharger les tablettes et les tiroirs, en commençant par les surface supérieures, avant de déplacer le meuble. NE JAMAIS pousser ou tirer un meuble sur de la moquette. Demander à une autre personne de le soulever correctement pour le déplacer et/ou le repositionner. www.sauder.com/service 411660 Page 21...
- Página 22 SIEMPRE descargue los estantes y cajones, empezando con las superfi cies superiores, antes de moverlo. NUNCA empuje ni tire de los muebles sobre una alfombra. Obtenga que un amigo le ayude a levantarlo correctamente para moverlo y/o reposicionarlo. Page 22 411660 www.sauder.com/service...
-
Página 23: Garantía Limitada De 1 Año
à compter de la date d'achat la première fois et qui sont signalés à Sauder dans les limites de couverture de la contre tout défaut de matériaux ou de fabrication des composantes de mobilier Sauder. -
Página 24: If You Need Assistance
Walmart.com in the product detail page. General Conformity Certifi cate 1. This certifi cate applies to the Sauder Woodworking Product identifi ed by this Instruction Book. 2. This certifi cate applies to compliance of this product with the CPSC Ban on Lead-Containing Paint (16 CFR 1303).