Tabla de contenido
Publicidad
Idiomas disponibles
Idiomas disponibles
Enlaces rápidos
Publicidad
Capítulos
Tabla de contenido

Manuales relacionados para Steren TEL-620


Resumen de contenidos para Steren TEL-620
-
Página 3: Teléfono Inalámbrico Con Contestadora
Teléfono inalámbrico con contestadora Steren. Por favor revise el manual completamente para estar seguro de instalar y poder operar apropiadamente este producto. Para apoyo, compras y todo lo nuevo que tiene Steren, visite nuestro sitio Web en: www.steren.com... -
Página 4: Instrucciones De Seguridad
La utilización de cualquier otro tipo de baterías no recargables puede resultar peligrosa. Puede provocar interferencias o daños al teléfono. Steren no será responsable de reparar o sustituir el producto en caso de que se utilicen otros tipos de baterías distintas a las suministradas originalmente. -
Página 5: Tabla De Contenido
ÍNDICE 5.10 Ver la lista de llamadas 5.11 Marcar un número en la lista de llamadas 5.12 Copiar un número en la agenda 5.12 Eliminar una entrada 5.13 Eliminar todas las entradas 1. CARACTERÍSTICAS 6. VOLUMEN DEL TIMBRE 2. PARA COMENZAR 6.1 Volumen del timbre 2.1 Aviso de batería baja 6.2 Timbre del teléfono... -
Página 7: Características
1. CARACTERÍSTICAS El teléfono inalámbrico con contestadora tiene un diseño moderno y fácil de usar, su pantalla luminosa nos permite visualizar la agenda, el identificador de llamadas y menús de configuración. Tiene altavoz tanto en la base como en el auricular, además en la base se encuentra un display que nos muestra el número de mensajes recibidos (grabados) y botones necesarios para operar la grabación y reproducción de los mensajes sin necesidad de usar el auricular. -
Página 8: Para Comenzar
2. PARA COMENZAR 2.1 Aviso de batería baja Si el icono parpadea en la pantalla y se escucha un sonido de aviso cada minuto durante una llamada, usted tendrá que recargar su teléfono antes de poder usarlo de nuevo. 2.2 Rendimiento de la batería Para mantener las baterías en las mejores condiciones, deberá... -
Página 9: Sólo Para Usuarios De Varios Auriculares
2.5 Sólo para usuarios de varios auriculares Coloque cada cargador al alcance de un enchufe de corriente de pared. Conecte el cargador (s) y cargue el teléfono (s) 1.- Conecte el adaptador de alimentación a la parte inferior del cargador y el otro extremo a la toma de corriente eléctrica. -
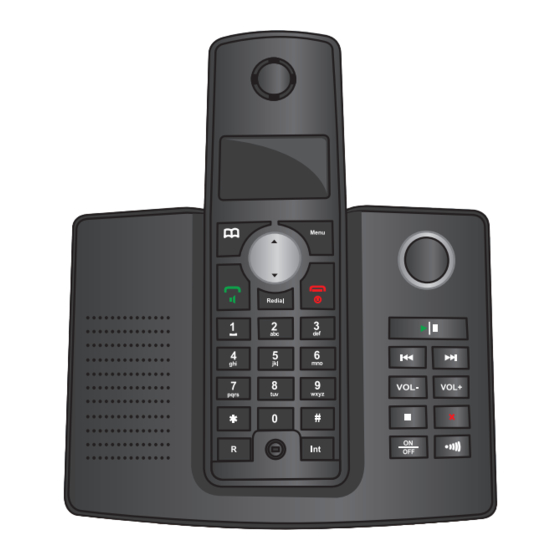
Página 10: Controles
3. CONTROLES 1.- Agenda / Borrar / Volver: pulse para abrir la agenda. En el modo de menú, pulse para volver al menú anterior o presione y mantenga presionado para salir y volver al modo de espera. En el modo de entrada/edición, pulse para borrar los caracteres y dígitos, en la lista de llamada/rellamada, pulse para eliminar la entrada que se muestra o presione y mantenga presionado para borrar todas las entradas. - Página 11 12.- Vol + / -: ajusta el volumen de reproducción de mensajes. 13.- Detener: detiene la reproducción del mensaje. Presione para anunciar la configuración del día y la hora. 14.- Encendido/apagado: use para encender/apagar la contestadora. Reproduce el mensaje actual. 15.- Indicador de mensaje nuevo: muestra el número de mensajes y notas recibidas.
- Página 12 Señal: Indica que el auricular está registrado y en la zona de cobertura de la base. Parpadea si el auricular está fuera de alcance,o buscando su base. Indica que ha accedido al menú principal. Nivel de carga de la batería. Indica que ha recibido alguna llamada.
-
Página 13: Usando El Teléfono
4. USANDO EL TELÉFONO 4.1 Encender/apagar el auricular 1.- Para apagarlo, mantenga pulsada la tecla hasta que la pantalla se apague. 2.- Para encender el teléfono, mantenga pulsada la tecla 4.2 Hacer una llamada 1.- Presione . Cuando escuche el tono, marque el número de teléfono. 4.3 Marcación previa 1.- Introduzca primero el número de teléfono. -
Página 14: Recepción De Llamadas
4.6 Recepción de llamadas 1.- Cuando el teléfono suene, pulse para responder la llamada*, o si el auricular está en la base o el cargador, basta con levantar para contestar. *Si prefiere presionar después de levantar el teléfono para contestar una llamada, tendrá... -
Página 15: Ajuste El Volumen Del Auricular
4.11 Ajuste el volumen del auricular 1.- Durante una llamada, oprima ▲ para subir o ▼ para bajar el volumen. 4.12 Volver a marcar Los últimos 10 números marcados se almacenan en la lista de llamadas. 1.- Oprima REDIAL para abrir la lista de rellamada. Se mostrará el último número marcado. -
Página 16: Copiar Un Número De La Lista De Rellamada En La Agenda
4.16 Copiar un número de la lista de rellamada 1.- Oprima REDIAL y desplácese con las teclas▲/▼ a la entrada que desee. 2.- Pulse MENU. Cuando la pantalla muestre el número GRABAR? Pulse MENU de nuevo. 3.- La pantalla mostrará NOMBRE? Use el teclado para introducir el nombre y pulse MENU. -
Página 17: Agenda
5. AGENDA 5.1 Uso de la agenda Puede almacenar hasta 50 nombres y números en cada teléfono registrado en la base. Cada nombre puede tener hasta 12 caracteres de largo y cada número de hasta 20 dígitos. Para abrir la agenda presione 5.2 Agregar una entrada a la agenda Para cada entrada que se almacena, se puede seleccionar uno de los 10 tonos de llamada diferentes. -
Página 18: Marcar Desde De La Lista Telefónica
Si la siguiente letra que desea introducir se encuentra en la misma tecla, espere un momento y luego presione el botón de nuevo. Pulse para borrar un carácter o un dígito incorrecto. Para introducir un espacio pulse [1]. Para introducir un guión, pulse dos veces [1]. 5.4 Marcar desde de la lista telefónica 1.- Pulse para abrir la agenda. -
Página 19: Eliminar Una Entrada
5.7 Eliminar una entrada 1.- Pulse MENU. Presione la tecla▼ para seleccionar la opción AGENDA, pulse MENU. 2.- Use las teclas▲/▼ para buscar la opción BORRAR y pulse MENU. 3.- Use las teclas▲/▼ para buscar la entrada que desea borrar. 4.- Pulse MENU. -
Página 20: Lista De Llamadas
En este caso, cierta información descriptiva aparecerá en la pantalla. RETENIDO: la persona que llama ha ocultado su número. NO DISPONIBLE: el número no está disponible. INT NACIONAL: llamadas internacionales. OPERADOR: llamada de operador. TELÉFONO PÚBLICO: llamada desde un teléfono público. 5.9 Lista de llamadas La lista guarda los detalles de las últimas 40 llamadas recibidas, incluyendo el número de teléfono, fecha y hora de la llamada. -
Página 21: Marcar Un Número En La Lista De Llamadas
Pulse MENU para ver el número del llamante. Si el número de teléfono es de más de 12 dígitos, se mostrará el icono ◄. Pulse MENU de nuevo para ver el número completo. Pulse MENU de nuevo para ver la fecha y hora de la llamada. Al pulsar de nuevo MENU le dará... -
Página 22: Volumen Del Timbre
6. VOLUMEN DEL TIMBRE 6.1 Volumen del timbre Usted puede ajustar el volumen del timbre y establecer diferentes niveles de llamadas internas y externas. Las opciones son 5 niveles y apagado. 1.- Pulse MENU, presione ▼ para seleccionar la opción TERMINAL y pulse MENU. 2.- Desplácese hasta VOL TIMB INT o VOL TIMB EXT y pulse MENU. -
Página 23: Idioma
6.4 Idioma 1.- Pulse MENU, presione ▼ para seleccionar la opción TERMINAL y pulse MENU. 2.- Desplácese con ▼ hasta la opción IDIOMA y pulse MENU. 3.- Desplácese con ▲/▼ para seleccionar su idioma preferido y pulse MENU para confirmar. Las opciones de idioma son: English/French/German/Italian/Spanish/Danish/Swedish/Slovak/Dutch/Portugese/ Norwegian/Russian/Greek/Hungarian/Polish/Czech/Finnish. -
Página 24: Tono De Advertencia (Fuera De Zona)
6.7 Tono de advertencia (Fuera de zona) 1.- Pulse MENU, presione ▼ para seleccionar la opción TERMINAL y pulse MENU. 2.- Seleccione con MENU la opción TONOS. 3.- Elija la opción SIN COBERT y pulse MENU. 4.- Pulse ▲/▼ para seleccionar ACTIVAR o DESACTIVAR y pulse MENU para confirmar. 6.8 Bloqueo del teclado a través del menú... -
Página 25: Establecer La Hora
6.11 Establecer la hora 1.- Pulse Menú, presione ▼ para seleccionar la opción FECHA - HORA y pulse MENU. 2.- Elija la opción CONF RELOJ y pulse MENU. 3.- Use el teclado para ajustar la hora en el formato de 24 horas, por ejemplo 11:01. 4.- Pulse MENU para confirmar. -
Página 26: Timbre De La Base
6.15 Timbre de la base Elige entre 5 diferentes melodías de timbre de base. 1.- Pulse MENU, presione ▼ para seleccionar la opción CONFIGURAR y pulse MENU. 2.- Elija la opción MELODÍA BASE y pulse MENU. 3.- Pulse ▲/▼ para seleccionar la melodía del timbre (1 - 5). 4.- Presione MENU para confirmar o para regresar al menú... -
Página 27: Restablecer Configuración Por Emergencia
6.17 Restablecer configuración por emergencia Si usted ha perdido su código PIN podrá restaurar el teléfono a su configuración predeterminada como se muestra a continuación. 1.- Quite las 2 baterías del teléfono. 2.- Mantenga presionada la tecla e insterte las baterías. La pantalla mostrará... -
Página 28: Configuraciones Adicionales
Se pueden registrar hasta 5 auriculares en cada base. Cada auricular se puede registrar con un máximo de cuatro bases. Si usted compra nuevos auriculares para su uso con el TEL-620 tendrán que registrarse en la base antes de poder usarlos. -
Página 29: Llamada De Tres Vías
7.2 Llamada de tres vías Puede mantener una conversación de tres vías entre una llamada externa y otro auricular. 1. Durante una llamada externa, presione INT. Su interlocutor se pondrá en espera. 2. Introduzca el número de auricular al que desea invitar. 3. -
Página 30: Eliminar El Registro De Un Auricular
7.4 Eliminar el registro de un auricular Puede utilizar un auricular para cancelar el registro de otro. No se puede anular el registro del teléfono que está utilizando. 1.- Pulse MENU, vaya a CONFIGURAR y pulse MENU. 2.- Desplácese con ▼ hasta AURICULAR DEL y pulse MENU. 3.- Introduzca el código PIN (por defecto: 0000) y pulse MENU. -
Página 31: Comprobar La Configuración Actual Del Día / Hora
Establecer el tiempo: 1.- Pulse MENU, vaya a FECHA - HORA y presione MENU. 2.- Busque con ▼ la opción CONF RELOJ, pulse MENU. 3.- Use el teclado para introducir la hora, por ejemplo, 18-30 para 6:30 pm. Pulse MENU para confirmar. 7.5 Comprobar la configuración actual del día / hora 1.- Presione . -
Página 32: Ajustar El Volumen Del Altavoz
Presione de nuevo para reanudar la reproducción. Pulse para reproducir el siguiente mensaje. Pulse una vez para repetir el mensaje actual. Pulse dos veces para reproducir el mensaje anterior. Pulse [x] para borrar el mensaje actual. Se escuchará “Mensaje borrado”. Presione y mantenga presionado para reproducir los mensajes en 1,5 veces la velocidad normal. - Página 33 Durante la reproducción: Pulse ▲/▼ para ajustar el volumen de reproducción. Pulse [1] o [4] una vez para repetir el mensaje actual. Pulse [1] o [4] dos veces para reproducir el mensaje anterior. Pulse [3] o [8] para reproducir el siguiente mensaje. Pulse para borrar el mensaje actual.
- Página 34 Usando el auricular: 1.- Pulse MENU, vaya a CONTESTADOR y pulse MENU. 2.- Desplácese hasta AJUS MEN SAL y pulse MENU. 3.- Vaya a GRAB MEN SAL y pulse MENU. 4.- Pulse ▲/▼ para seleccionar RESP/GRABAR o RESP SOLO y pulse MENU. 5.- Coloque el auricular a la oreja.
- Página 35 Seleccionar el mensaje de la contestadora Usando el auricular: 1.- Pulse MENU, vaya a CONTESTADOR y pulse MENU. 2.- Desplácese hasta MODO RESP y pulse MENU. 3.- Pulse ▲/▼ para seleccionar RESP/GRABAR o RESP SOLO y pulse MENU para confirmar. Restablecer los mensajes de salida pregrabados Usted puede borrar el mensaje saliente personalizado y volver al pregrabado.
-
Página 36: Ahorro De Tiempo
7.8 Ahorro de tiempo Cuando usted desea acceder a sus mensajes de forma remota, si la contestadora está en ahorro de tiempo y tiene mensajes nuevos, contestará después de dos tonos, si no hay mensajes nuevos, responderá a los 6 tonos. Esto significa que podrá... -
Página 37: Memoria Llena
7.11 Memoria llena Si hay menos de 35 segundos de tiempo de grabación en la memoria, la persona que llama escuchará, “Por favor, termine la llamada en 35 segundos”, después del mensaje de salida y antes de que el tono de grabación. Si la memoria se llena durante la grabación de la máquina anunciará: “Lo sentimos, la memoria llena”... -
Página 38: Establecer El Código Pin De Seguridad
3.- Si usted no tiene mensajes nuevos, escuchará, “Usted no tiene mensajes nuevos, para escuchar el menú principal pulse 1”. Si no presiona nada en un plazo de 8 segundos, el teléfono colgará. Cuando presione 1, se escuchará el menú principal. Simplemente siga las instrucciones tal como se escuche: “Para reproducir todos los mensajes presione 2”. -
Página 39: Consultar Código De Seguridad
7.15 Consultar código de seguridad 1. Presione la tecla [x] en la base. El código se indicará por el altavoz. 8. PROBLEMAS Y SOLUCIONES PROBLEMAS SOLUCIONES El auricular no se carga Los contactos no están colocados correctamente. al colocarlo sobre Vuelva a colocar el teléfono cuidadosamente sobre la base la base hasta escuchar un tono. -
Página 40: Especificaciones
• El auricular no está registrado en la base. Regístrelo. El icono parpadea • Acerque el teléfono a la base. • No hay alimentación eléctrica. No hay tono de llamada • Compruebe las conexiones. • Reinicie el teléfono. • Está demasiado lejos de la base. Acérquese. No se ve nada en •... -
Página 41: Póliza De Garantía
1.- Para hacer efectiva la garantía, presente ésta póliza y el producto, en donde fue adquirido o en Electrónica Steren S.A. de C.V. 2.- Electrónica Steren S.A de C.V. se compromete a reparar el producto en caso de estar defectuoso sin ningún cargo al consumidor. Los gastos de transportación serán cubiertos por el proveedor. - Página 45 TEL-620 Thank You on purchasing your new Steren product. This manual includes all the feature operations and troubleshooting necessary to install and operate your new Steren´s Cordless phone with answering machine. Please review this manual thoroughly to ensure proper installation and operation of this product. For support, shopping, and everything new at Steren, visit our website: www.steren.com...
-
Página 46: Important
The illustrations and icons shown in this manual are for reference about the product. There may be differences due to updates. Please check our web site (www.steren.com) to obtain the latest version of the instruction manual. - Página 47 INDEX 5.12 Copy a number to the phonebook 5.12 Delete an entry 5.13 Delete the entire Calls list 1. HIGHLIGHTS 6. HANDSET RINGER VOLUME 6.1 Handset ringer volume 2. GETTING STARTED 6.2 Handset ringer melody 2.1 Battery low warning 6.3 Handset name 2.2 Battery performance 6.4 Language 2.3 Handset range...
-
Página 49: Highlights
1. HIGHLIGHTS The cordless phone with answering machine has a modern design. Their luminous screen shows phonebook, configuration menus and calls. It features speaker in the base and the headset. The base includes a display to show the incoming messages and buttons to record and play messages without the headset. -
Página 50: Getting Started
2. GETTING STARTED 2.1 Battery low warning If the icon is flashing in the display and you hear a warning beep every minute during a call, you will need to recharge your handset before you can use it again. 2.2 Battery performance To keep the batteries in the best condition, leave the handset off the base for a few hours at a time. -
Página 51: Multipack Users Only
2.5 Multipack users only Place each headset charger within reach of a mains power wall socket. Connect the charger and charge the handset. 1.- Plug the mains power adaptor into the power socket on the underside of the charger and plug the other end to the mains power wall socket. -
Página 52: Controls
3. CONTROLS 1.- Phonebook / Clear / Back: Press to open the phonebook. In menu mode, press to return to the previous menu or press and hold to exit and return to standby. In enter/edit mode, press to delete characters and digits, when viewing the calls/redial list, press to delete the displayed entry or press and hold to delete all entries. - Página 53 12.- Vol +/–: Adjust playback volume. 13.- Stop: Stops message playback. Press to announce the current day and time setting. 14.-Answer On/Off: Switches the answering machine on/off. Announces the current OGM. 15.- New message indicator: Displays the number of new messages and memos received. 16.- Play/Pause: Play or pause recorded messages.
- Página 54 Signal: Steady when the handset is registered and within range of the base. Flashes when the handset is out of range or searching for the base. Menu is opened Handset Battery Level. Flashes to indicate new calls list entries received. Displayed when you are viewing the phonebook list.
-
Página 55: Using Your Phone
4. USING YOUR PHONE 4.1 Switch the handset power on/off 1.- To switch off, press and hold until the display goes off. 2.- To switch the handset on, press and hold 4.2 Make a call 1.- Press . When you hear the dial tone, dial the phone number. 4.3 Preparatory dialling 1.- Enter the phone number first. -
Página 56: Receiving Calls
4.6 Receiving calls 1.- When the phone rings, press to answer the call, or if the handset is on the base or charger, simply lift it to answer the call. If you would rather press after lifting the handset to receive a call, you will need to switch Auto-answer off. -
Página 57: Adjusting The Earpiece Volume
4.11 Adjusting the earpiece volume 1.- During a call, press ▲ to increase or ▼ to decrease the volume. 4.12 Redial The last 10 numbers dialed are stored in the redial list. 1.- Press REDIAL to open the redial list. The most recently dialed number is displayed. If the number matches an entry stored in the handset phonebook, the name is displayed. -
Página 58: Copy A Redial Number To The Phonebook
4.16 Copy a redial number to the phonebook 1.- Press REDIAL then scroll ▲/▼ through the list to the entry you want. 2.- Press MENU. The displays shows ADD?. Press MENU again. 3.- The display shows NAME? Use the keypad to enter the name, then press MENU. 4.- The number is displayed, edit the number if necessary, then press MENU. -
Página 59: Phonebook
5. PHONEBOOK 5.1 Using the phonebook You can store up to 50 name and number entries on each handset registered to your base. Each name can be up to 12 characters long and each number up to 20 digits long. You open the phonebook with the button. -
Página 60: Dial From The Phonebook
If the next letter you want to enter is on the same button, wait a moment then press the button again. Press to delete an incorrect character or digit. To enter a space press [1]. To enter a dash, press [1] twice. 5.4 Dial from the phonebook 1.- Press to open the phonebook. -
Página 61: Delete An Entry
5.7 Delete an entry 1. Press MENU. The display shows PHONE BOOK, press MENU. 2. Scroll ▼ to DELETE ENTRY and press MENU. 3. Scroll ▲/▼ to the entry you want delete, or search alphabetically. 4. Press MENU. Display shows CONFIRM? 5. -
Página 62: Calls List
In this case some explanatory information will be displayed. WITHHELD: The caller has withheld their number. UNAVAILABLE: The number is unavailable. RINGBACK: Ringback call. INT NATIONAL: International call. OPERATOR: Call from operator. PAYPHONE: Call from a payphone. 5.9 Calls list The calls list stores details of your last 40 calls received, including the phone number and date and time of the call. -
Página 63: Dial A Number In The Calls List
Press MENU to see the caller’s number. If the telephone number is longer than 12 digits, the ◄ icon is displayed. Press MENU again to see the complete number. Press MENU again to see the time and date of the call. Pressing MENU again will give you the option to add this entry in the phonebook if it’s not already stored. -
Página 64: Handset Ringer Volume
6. HANDSET RINGER VOLUME 6.1 Handset ringer volume You can adjust the ring volume and set different levels for internal and external calls. Choose from 5 levels and Off. 1. Press MENU, scroll ▼ to HANDSET and press MENU. 2. Scroll ▼ to INT RING VOL or EXT RING VOL and press MENU. 3. -
Página 65: Language
The handset name will only be displayed for approximately 20 seconds when no button is pressed. If you make a mistake press to delete an incorrect character or digit. 6.4 Language 1. Press MENU, scroll ▼ to HANDSET and press MENU. 2. -
Página 66: Out Of Range Warning Beep On/Off
6.7 Out of range warning beep on/off 1. Press MENU, scroll ▼ to HANDSET and press MENU. 2. BEEP is displayed, press MENU. 3. Scroll ▼ to OUT RANGE and press MENU. 4. Press ▲/▼ to select ON or OFF and press MENU to confirm. 6.8 Keypad lock via menu You can use the menu to lock the keypad. -
Página 67: Set The Time
6.11 Set the time 1. Press MENU, scroll ▼ to DATE-TIME and press MENU. 2. Scroll ▼ to CLOCK SET and press MENU. 3. Use the keypad to set the time in the 24 hour format, e.g. 18--30 for 6.30 pm. 4. -
Página 68: Base Ringer Melody
6.15 Base ringer melody Choose from 5 different base ringer melodies. 1. Press MENU, scroll ▼ to SETUP and press MENU. 2. Scroll ▼ to BASE MELODY and press MENU. 3. Press ▲/▼ to select the ringer melody (1 to 5). 4. -
Página 69: Emergency Default
6.17 Emergency default If you have lost your PIN code you can still restore your phone to its default settings. 1. Remove and replace the batteries from the handset. 2. Press and hold while inserting the batteries back in. The display shows DEFAULT Press MENU. -
Página 70: Additional Handsets And Bases
Up to 5 handsets can be registered and operated from the base. Each handset can be registered with up to four bases. If you buy new handsets to use with your TEL-620 they will have to be registered to the base before you can use them. -
Página 71: 3-Way Call
7.2 3-Way call You can hold a three-way conversation between an external caller and another handset user. 1. During an external call, press INT. Your caller is put on hold. 2. Enter the handset number you want to invite. 3. When the handset answers, press to connect all three callers. -
Página 72: De-Register A Handset
7.4 De-register a handset You can use one handset to de-register another handset. You cannot de-register the handset you are using. 1. Press MENU, scroll ▼ to SETUP and press MENU. 2. Scroll ▼ to DEL HANDSET and press MENU. 3. -
Página 73: Check The Current Day And Time Setting
Set the time: 1. Press MENU, scroll ▼ to DATE-TIME and press MENU. 2. Scroll ▼ to CLOCK SET and press MENU. The current time is displayed. 3. Use the keypad to set the required time in 24 hour format, eg: 18-30 for 6.30pm. Press MENU to confirm. -
Página 74: Adjust The Speaker Volume
Press again to resume playback. Press to play the next message. Press once to repeat the current message. Press twice to play the previous message. Press [x] to delete the current message. You will hear, ‘Message deleted’. Press and hold to play messages at 1.5 times normal speed. - Página 75 During playback: Press ▲/▼ to adjust the playback volume. Press [1] or [4] once to repeat the current message. Press [1] or [4] twice to play the previous message. Press [3] or [8] to play the next message. Press to delete the current message. You will hear, ‘Message deleted’. At the end of playback: You will hear, “End of messages.
- Página 76 Using the handset: 1. Press MENU, scroll ▼ to TAM SETTINGS and press MENU. 2. Scroll ▼ to OGM SETTING and press MENU. 3. Scroll ▼ to RECORD OGM and press MENU. 4. Press ▲/▼ to select either ANS AND REC or ANS ONLY and press MENU. 5.
- Página 77 Select the OGM Using the base: 1. Press MENU, scroll ▼ to TAM SETTINGS and press MENU. 2. Scroll ▼ to ANS MODE and press MENU. 3. Press ▲/▼ to select either ANS AND REC or ANS ONLY and press MENU to confirm. Re-instate the pre-recorded OGM You can delete your own outgoing message and return to the pre-recorded outgoing message.
-
Página 78: Time Saver
7.8 Time saver When you call from another phone to access your messages remotely, if your answering machine is set to time saver and you have new messages it will answer after 2 rings, if you do not have any new messages, it will answer after 6 rings. This means you can hang up after 3 rings knowing you have no new messages, saving you time and the cost of the call. -
Página 79: Memory Full
7.11 Memory full If there is less than 35 seconds recording time left in the memory, the caller will hear, “Please complete your call within 35 seconds”, after the outgoing message and before recording tone. If the memory becomes full during recording the machine announces, “Sorry, the memory full”, and ends the call. -
Página 80: Set The Security Pin Code
3. If you have no new messages, you will hear, “You have no new messages, to hear main menu press 1”. If you do not press 1 within 8 seconds, the machine hangs up. When you press 1, you will hear the main menu. Simply follow the instructions as announced: To play all messages press 2’. -
Página 81: Check Security Code
7.15 Check security code 1. Press [x] at the base. The security code is announced. 8. TROUBLESHOOTING TROUBLE SOLUTIONS The handset is not •The handset has been placed the wrong way around, make charging when the sure that the charging contacts on the handset line up with handset is placed the charging contacts on the base. -
Página 82: Specifications
• Handset is not registered to the base – register the handset The icon to the base. is blinking • You are too far from the base - move closer to the base. • No power - check the connections. Reset the phone: unplug No dialing tone and plug it back in the mains. - Página 83 Product: Cordless phone with answering machine Part number: TEL-620 Brand: Steren WARRANTY This Steren product is warranted under normal usage against defects in workmanship and materials to the original purchaser for one year from the date of purchase. CONDITIONS 1.- This warranty card with all the required information, invoice, product box or package, and product, must be presented when warranty service is required.